
Summary of Contents for capello CR220
- Page 1 Stand & Charge USB Charging Station with Dual Alarm Clock Charge 3 mobile phones, tablets & digital cameras including iPhone, iPod, iPad and Android devices Keeps cables organized CR220 user guide...
- Page 2 CAUTION RISK OF ELECTRIC SHOCK DO NOT OPEN CAUTION: TO REDUCE THE RISK OF ELECTRIC SHOCK, DO NOT REMOVE COVER (OR BACK). NO USER-SERVICEABLE PARTS INSIDE. REFER SERVICING TO QUALIFIED SERVICE PERSONNEL. DANGEROUS VOLTAGE: The lightning ash with arrowhead symbol, within an equilateral triangle is intended to alert the user to the presence of uninsulated dangerous voltage within the product’s enclosure that may be of suf cient magnitude to constitute a risk of electric shock to persons.
- Page 3 NOTE: This equipment has been tested and found to comply with the limits for a Class B digital device, pursuant to part 15 of the FCC Rules. These limits are designed to provide reasonable protection against harmful interference in a residential installation.
-
Page 4: Safety Precautions
SAFETY PRECAUTIONS a. Do not expose this unit or the AC/DC adaptor to dripping or splashing water. Keep liquid-filled objects such as vases, away from this unit and AC/DC adaptor. b. To ensure that this unit is completely disconnected, unplug it from the wall. c. -
Page 5: Inside The Box
CR220 Digital FM clock radio, AC power adapter, user guide, a set of cable spool and cable clip. power source AC outlet ac connection Insert the small end of the AC adaptor into the DC In Jack (located on the rear of the unit). -
Page 6: Inserting Batteries
inserting batteries Two (2) ‘AAA’ size batteries are used to back-up the clock, alarm time and Size ‘AAA’ 1.5V preset memories if the AC/DC adapter is disconnected or there is a power failure. Open the battery door by pushing in on the tabs, then removing the door. Size ‘AAA’... -
Page 7: Controls Overview
location of controls Power Button Alarm 1 Button Alarm 2 Button Preset Button LCD Display Snooze Button Volume / Brightness Down Button Volume / Brightness Up Button Tuning Down / Min Button Tuning Up / Hour Button Triple USB Charging Ports 3.5mm Line in Jack DST Button Time Zone Button... -
Page 8: Lcd Display
location of controls (con’t) Battery Compartment DC Power In Jack Wire Antenna Low Battery Preset LCD display Snooze Alarm 1 Alarm 2 AUX In PRESET Buzzer FM radio DST (Daylight Savings Time) -
Page 9: Playing The Radio
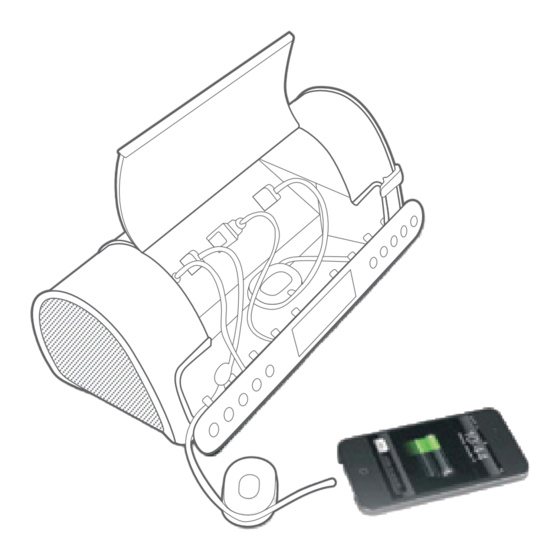
playing the radio Press the POWER BUTTON to switch the unit ON. There are multiple methods to select the station of your choice. Preset tuning mode: Press the PRESET BUTTON repeatedly to select the desired preset (P01 to P10). Scanning mode: Press and hold < or > to scan through the frequency bands; scanning starts from the currently-tuned station and stops when a station is received. - Page 10 triple USB charging ports This unit includes three USB ports placed inside the Cover (see"location of controls"). The USB ports support powering and charging most devices including iPhones, iPads, iPods, Android devices, E-readers, digital cameras and more. (USB cables sold separately). One of USB port supply 5V/1A quick charging (see "...
-
Page 11: Setting Alarm
setting the alarm Press & hold the ALARM 1 or ALARM 2 BUTTON, the alarm time will ash. Press > to set the hour and press < to set the minute. Press the ALARM 1 or ALARM 2 BUTTON to con rm the alarm time setting. Press <... -
Page 12: Setting The Clock
setting the clock Plug in the unit. Press and hold the CLOCK SET BUTTON until the clock ashes in the display. Press the TUNNING UP / HOUR BUTTON repeatedly to set the hour and press the TUNNING DOWN / MIN BUTTON repeatedly to set the minute. -
Page 13: Select Time Zone
select your time zone Press the TIME ZONE BUTTON. By default, area number “02” is displayed. If you live in the Eastern Standard Time zone, you do not need to adjust the setting. Area number Time zone Area number Time zone Atlantic Standard/Daylight Time Paci c Standard/Daylight Time 02 (default) -
Page 14: Aux In Connection
aux-in connection Insert one end of the 3.5mm audio cable (not included) into the LINE OUT jack on your external audio device (e.g. iPad, iPod shuf e, mobile phone, MP3 player, digital media player, etc.) and the other end into the LINE IN jack on the unit. -
Page 15: Troubleshooting
troubleshooting symptom cause solutions No Sound Volume is set to minimum. Increase volume. Power is not on. Press the power button to turn the power on. Radio, no sound. Volume is set to minimum. Increase volume. Station is not tuned properly. Retune the FM broadcast station. - Page 16 For further assistance, please visit our website: hellocapello.com or contact customer service at support@capelloproducts.com or 1-855-896-1795 Life Lab International Ltd.
Need help?
Do you have a question about the CR220 and is the answer not in the manual?
Questions and answers
How do I adjust the snooze time on c-11?
To adjust the snooze time on the Capello CR220:
1. Press the SNOOZE BUTTON. The current snooze time will appear on the display for about 3 seconds.
2. Press the SNOOZE BUTTON repeatedly to cycle through the available snooze times: 10, 20, 30, 40, 50, and 60 minutes.
3. Stop pressing when your desired snooze time appears. The snooze time is now set.
The maximum snooze time is 60 minutes.
This answer is automatically generated