Table of Contents
Advertisement
Quick Links
Advertisement
Table of Contents

Subscribe to Our Youtube Channel
Related Manuals for Kyocera Mita FS-1900


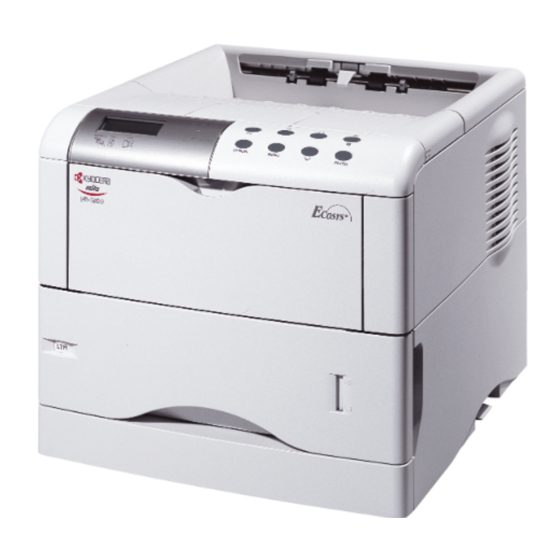
Summary of Contents for Kyocera Mita FS-1900
- Page 1 Installation Guide...
-
Page 2: Table Of Contents
HP PCL 6. The emulation mode can be changed by following the procedures described in the Operation Guide contained as an electronic file in the Kyocera Mita Digital Library CD-ROM supplied with the printer. -
Page 3: Step 1 Unpacking
Carefully remove the printer and other items from the box. Check that nothing is miss- ing against the list of shipped components below. List of Shipped Components (for U.S.A. only) Printer Printer Kyocera Mita Digital Library CD-ROM (B) Waste Toner Box (E) Installation Guide [this booklet] and other printed matter Toner... -
Page 4: Step 2 Positioning The Printer
STEP Positioning the Printer Make sure that the place of installation meets the following requirements: Clearance 30 cm (11-13/16 inches) 20 cm (7-7/8 inches) [40 cm (15-3/4 inches) when the option 30 cm face-up output tray is installed] (11-13/16 inches) Be sure to secure enough space around the printer. -
Page 5: Step 3 Installing The Toner Container
STEP Installing the Toner Container Before you can use the printer for the first time, you must prepare it by installing the toner container, waste toner box, and set up the interfacing with the computer. Open the printer top cover all the way. Top Cover Take the toner container from the bag. - Page 6 Push firmly on the top of the toner con- tainer at the positions marked PUSH HERE. When the toner container fits into place, it will lock with a clicking sound. Close the top cover. To remove the toner container Pull the lock lever (green colored) to the right and gently lift the toner con- tainer.
-
Page 7: Step 4 Installing The Waste Toner Box
STEP Installing the Waste Toner Box The waste toner box is supplied with the printer. The waste toner box must be installed in the printer. Open the cap of the waste toner box. Waste Toner Open the left cover on the left side of the Left Cover printer. - Page 8 Ensuring that it is correctly inserted, close the left cover. To remove the Waste Toner Box While holding the waste toner box, press the lock lever and then gently remove the waste toner box. Lock Lever...
-
Page 9: Step 5 Connecting The Printer To The Computer
Connecting the Printer to the Computer STEP There are various ways of connecting the printer to the computer, such as through the parallel interface connector, through the USB (Universal Serial Bus) interface connec- tor, through the option serial interface board kit (IB-10E) or through the option network interface card. -
Page 10: Parallel Interface Connection
Parallel Interface Connection Plug one end of the printer cable (not included) into the parallel interface con- nector on the rear of the printer. • Use a parallel printer cable Clip that complies with the Clip IEEE1284 standards. • The printer will work best if it is installed near the computer. -
Page 11: Step 6 Connecting The Power Cord
STEP STEP Connecting the Power Cord This section describes the procedure for connecting the power cord and various cau- tions. Notes on Power Supply • Install the printer near an AC wall outlet, preferably one that can be used for the printer alone. -
Page 12: Step 7 Adding Paper To The Paper Cassette And Mp Tray
(Refer to the Operation Guide [PDF file] provided on the Kyocera Mita Digital Library CD- ROM). Standard size paper settings are indicated as fixed positions in the cas- sette. - Page 13 CUSTOM the paper size must be set into the printer on the operator panel. See the Opera- tion Guide (PDF file) provided on the Kyocera Mita Digital Library CD-ROM. Paper Size Dial Paper Size Window Adjust the position of the paper guides located on the left and right sides of the paper cassette.
- Page 14 Adjust the position of the paper stopper located at the rear of the paper cassette. Pull the release lever and slide the Release Lever paper stopper to the desired paper size. When shipped from the factory, the paper cassette is set to A4 size. When using custom size paper, move the paper guides and paper stopper all the way out, insert the paper, then...
- Page 15 Set the stack of paper so that it is under the clips as shown. Clip Clip Insert the paper cassette into the slot in the printer. Push it straight in as far as it will go. There is a paper gauge on the right side of the front of the paper cassette to indicate the remaining paper supply.
-
Page 16: Multi Purpose Tray
MP (Multi Purpose) tray Pull the MP tray towards you until it stops. MP Tray Pull out the subtray. Adjust the position of the paper guides on the MP tray. Standard paper sizes are attached to the MP tray. For stan- dard paper sizes, slide the guides to the position marked correspondingly. -
Page 17: Envelopes
If the paper is considerably curled in one direction, for example, if the paper is already printed on one side, try to roll the paper in the opposite direction to counteract the curl. Printed sheets will then come out flat. Correct Correct Correct... -
Page 18: Installing Option Face-Up Output Tray
Installing the Option Face-up Output Tray Use the face-up output tray when you wish paper to be stacked with the printed side facing up (reverse order), or when you are printing on envelopes, postcards, transparencies, or thick paper. This face-up output tray is a separate option. Legal Size A4 Size Letter Size... -
Page 19: Step 8 Turning The Power Switch On
STEP STEP Turning the Power Switch On This section describes the procedure for turning on the printer’s power. During start-up, the language for the message display and status page of this printer can be selected from English, French, German, Italian, and Spanish. The default message language is English. -
Page 20: Step 9 Printing A Status Page
The message display indication changes to that shown on the left and ? MSG language flashes. ? English Press the key repeatedly until the message display shows the desired language and then press the ENTER key. If you do not wish to change the setting, press the CANCEL key. -
Page 21: Correcting A Paper Jam
Correcting a Paper Jam If a paper jam occurs while you are printing, remove the jammed paper as described below. After you have removed the jammed paper, open and close the top cover or the paper transfer unit. When pulling the paper, pull it gently so as not to tear it. Torn pieces of paper are difficult to remove and may be easily overlooked, deterring the jam recovery. - Page 22 Jam Inside the Printer While pulling the paper transfer unit release lever, pull out the paper transfer unit. If paper is jammed before the registration roller, remove it as shown in A. If paper is jammed under the registration roller, remove it as shown in B. Paper Transfer Unit Release Lever Registration Roller Paper Transfer...
- Page 23 FCC statement for users in the United States This device complies with Part 15 of the FCC Rules. Operation is subject to the following two conditions: (1) This device may not cause harmful interference, and (2) this device must accept any interference received, including interference that may cause undesired operation.
-
Page 24: Caution Labels
Caution labels The labels shown are affixed to the printer. Label inside the printer (Laser radiation warning) (U.S.A./Canada) (European/Pacific countries) Label on the printer’s rear panel Label inside the rear Ozone concentration The printers generate ozone gas (O ) which may concentrate in the place of installation and cause an unpleasant smell. - Page 25 Manufacturer’s address: 704-19 Nojino, Tamaki-Cho, Watarai-Gun, Mie-Ken 519-0497, Japan declares that the product Product name: Page Printer Model number: FS-1900 (as tested with the enhancement optional unit: PF-60, DU-60, and SO-60) Conforms to the following product specifications. EN 55 022:1998 Class B...
- Page 26 Model number: FS-1900 (as tested with the enhancement optional units: PF-60, DU-60, and SO-60) Description of device: This Page Printer Model FS-1900 is the 18 ppm; A4 size and utilized plane paper; laser; dry toner etc. The printer can be equipped with several enhancement optional units as a paper feeder as PF-60, a duplexer as DU-60, a sorter as SO-60 etc.
-
Page 27: Moving The Printer
Prolonged Non-Use and Moving the Printer Prolonged Non-use If you ever leave the printer unused for a long period of time, remove the power cord from the wall outlet. We recommend you consult with your dealer about the additional actions you should take to avoid possible dam- ages that may occur when the printer is used next time. - Page 28 Push the center as shown in the figure to make space for the developer unit. Put the developer unit into that space. Developer Unit To reinstall the developer unit into the printer, use the reverse procedure of the above. ® NERGY As an E Partner, Kyocera Corporation has determined that this...
- Page 29 Options The following options are available for the printer. Sorter (SO-60) Sorter (SO-60) Equipped with five trays each with 200 sheets capacity. Performs sorting, collat- ing, and mailbox function. Attaches to the top of the printer. Face-up Output Tray Face-up Output Tray This is a face-up tray.
-
Page 30: Limited Warranty
Regarding Tradenames PRESCRIBE is a registered trademark of Kyocera Corporation. KPDL and KIR (Kyocera Image Refinement) are trademarks of Kyocera Corporation. Hewlett-Packard, PCL, and PJL are registered trademarks of Hewlett-Packard Company. Centronics is a trade name of Centronics Data Computer Corp. PostScript is a registered trademark of Adobe Systems Incorporated. Adobe and Acrobat are trademarks of Adobe Systems Incorporated. -
Page 31: Safety Information
also applies to any developer of Programs supplied to IBM. IBM’s and the developer’s limitations of remedies are not cumulative. Such developer is an intended beneficiary of this Section. Some jurisdictions do not allow these limitations or exclusions, so they may not apply to you. 4. -
Page 32: Operator Panel
Operator Panel For more details on operating procedures, see the Operation Guide contained as a PDF file in the CD-ROM supplied with the printer. READY DATA ATTENTION INTERFACE SIZE TYPE CANCEL MENU ENTER Operator Panel Indicator Name Description Flashing: Indicates when an error occurs that you can clear by yourself. Lit: Indicates that the printer is on-line.
Need help?
Do you have a question about the FS-1900 and is the answer not in the manual?
Questions and answers