WhisperKool Platinum Split Manual Manual
Hide thumbs
Also See for Platinum Split:
- Quick reference manual (42 pages) ,
- Owner's manual (28 pages) ,
- Troubleshooting manual (3 pages)

Related Manuals for WhisperKool Platinum Split


Summary of Contents for WhisperKool Platinum Split
- Page 1 Platinum Split TECH MANUAL The Coolest Thing In Wine Storage 112713...
- Page 2 WhisperKOOL. Every effort has been made to ensure that the information in this manual is accurate. WhisperKOOL is not responsible for printing or clerical errors.
-
Page 3: Table Of Contents
Platinum Split with Humidity Wiring Diagram ... . . Platinum Split Wiring Diagram ...... -
Page 4: Quick Reference Guide
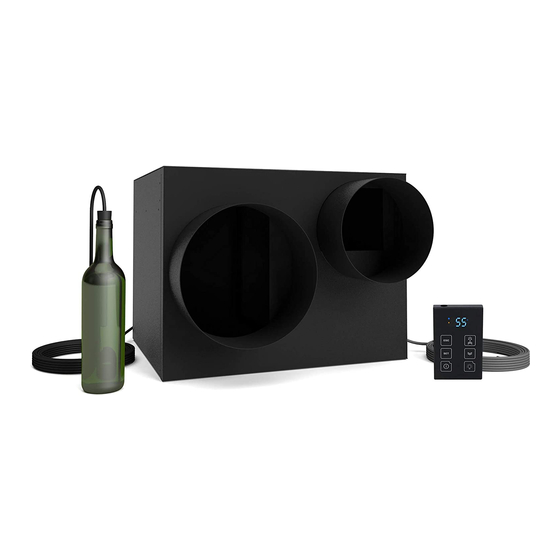
QUICK REFERENCE GUIDE Platinum Split Evaporator Unit (Fan Coil Unit) Front / Side View Evaporator Unit (Fan Coil Unit) ° Filter Grille Controller Platinum Split Evaporator Unit (Fan Coil Unit) Rear / Side View Mounting Key Hole (X4) THROUGH THE WALL... -
Page 5: Controller Layout & Specifications
(Press and hold 3-5 sec) Power On/Off Compressor On Unit is in Pre-Chill Mode Fans are On Alarm is Present Unit is in Anti-Frost Mode Wall Mounted PLATINUM SPLIT UNIT SPECIFICATIONS 4000 Condenser 8000 Condenser 4000 Evaporator 8000 Evaporator Model (Air Cooled... -
Page 6: Fully Ducted Unit & Specifications
QUICK REFERENCE GUIDE Platinum Split Evaporator Unit (Fan Coil Unit) Front / Side View Supply Air Return Air ° Keypad Duct Plenum DUCTED PLATINUM SPLIT UNIT SPECIFICATIONS 4000 Condenser 8000 Condenser 4000 Evaporator 8000 Evaporator Model (Air Cooled (Air Cooled... -
Page 7: Receiving & Inspecting The System
Allow the condensing unit to sit for 24 hours prior to start up. The condensing unit can be placed in the installation location, piped and evacuated during this time. Note: WhisperKOOL units are manufactured in the USA and tested prior to shipment. Review the Packing Slip to Verify Contents •... -
Page 8: Before You Start
4. The system is intended for use in properly designed and constructed wine cellars. Hire a professional wine storage consultant with a valid contractor’s license to build your wine cellar. 5. WhisperKOOL requires that all Split Systems are installed by a certified HVAC-R technician only, Nate or equivalent is recommended. -
Page 9: Preparing The Wine Cellar
Wine storage professionals work with licensed contractors, refrigeration technicians, and racking companies to build well-insulated, beautiful, and protective wine cellars. WhisperKOOL has put together some useful tips to assist in the installation process. Our recommendations are meant to act as a guide in the process of building a proper enclosure. - Page 10 In cases where glass doors are used and the room size is close to the recommended system size, the next larger size WhisperKOOL system should be used. This will compensate for the insulation loss due to the lower insulating rating of glass.
- Page 11 However, you must have a fresh air inlet as well. Note: If you are unsure about having adequate ventilation in your install location, please contact us to assess your specific installation at support@whisperkool.com or 1.800.343.9463. Evaporator Unit (Fan Coil Unit)
-
Page 12: Preparing The Evaporator Unit
PREPARING AND INSTALLING THE WALL MOUNT EVAPORATOR UNIT (FAN COIL UNIT) Required Tools: • Drill • 1/4” Wrench • Brazing Torch • Level • • • • 5/32” Drill Bit Phillips Head Screwdriver Drywall Saw Pliers • • • • 1/4”... -
Page 13: Installing The Evaporator Unit
7. Raise the evaporator to the installation location. Align the rear key holes with the mounting screws and mount the unit. 8. Using a ¼” wrench or socket, tighten the top mounting screws. www.whisperkool.com | Page 11... - Page 14 INSTALLING THE WALL MOUNTED EVAPORATOR (FAN COIL UNIT) 9. Using 1/4” and 1/2” copper tubing, route the liquid and suction lines through the knockouts in the wrapper. Be sure to extend the tubing far enough outside of the wrapper to extend through the wall if necessary. Note: ½” copper tubing will slip over the 3/8”...
-
Page 15: Drain Line
No tee To prevent mold from growing, is required if draining through the bottom allow the drain line to hang of the unit. above the water line. WRONG: Drain line is under water. www.whisperkool.com | Page 13... -
Page 16: Liquid Measuring Thermostat (Bottle Probe)
LIQUID MEASURING THERMOSTAT The WhisperKOOL Series cooling units come equipped with a liquid temperature measuring thermostat. This incorporates the following advantages: Liquid Measuring Thermostat To assure a consistent temperature, place bottle probe at least 3 feet away from the air output and not in the flow of the air. -
Page 17: Installing The Fully Ducted Evaporator Unit
4. Follow the directions on page 18 to mount the remote keypad and run the communication cable to the evaporator unit. Power 3/8” Suction 1/4” Liquid Drain CIRCULAR CONNECTOR/ BOTTLE PROBE INPUT RUBBER WASHER UNIT PANEL HOLE FOR CIRCULAR CONNECTOR (BOTTLE PROBE INPUT) www.whisperkool.com | Page 15... - Page 18 INSTALLING THE FULLY DUCTED EVAPORATOR (FAN COIL UNIT) 1. If mounting the unit to a wall see steps 1-8 of the instruction for installing the Wall Mounted Evaporator Unit. 2. Using 1/4” and 1/2” copper tubing, route the liquid and suction lines through the knockouts in the wrapper.
- Page 19 19. Connect the communication cable to the circular connector located in the lower left corner of the housing. 20. Secure all wiring neatly and close to the left wall to minimize obstructing the airflow. 21. See page 13 for drain line routing instructions. www.whisperkool.com | Page 17...
-
Page 20: Remote Keypad
REMOTE KEYPAD: INSTALLATION AND CONFIGURATION If you have a system with a remote keypad, please review this section for installation. Note: 50 feet of communication line is included, the keypad can be installed up to 300 line feet away. Longer lengths of communication line can be ordered by calling 1-800-343-9463 ext. -
Page 21: Platinum Split With Humidity Wiring Diagram
PLATINUM SPLIT WIRING DIAGRAM Copper Conductor Only Blue Black Green Green Green Black Blower White White www.whisperkool.com | Page 19... -
Page 22: Platinum Split Wiring Diagram
PLATINUM SPLIT WITH HUMIDITY WIRING DIAGRAM Black Black Black Copper Conductor Only Blue Black Green Green Green Black Blower White White Solenoid White Relay White Black White POWER INPUT Flasher Relay Black 112713 Page 20 | 1-800-343-9463... -
Page 23: 4000 Condenser Wiring Diagram
4000 CONDENSING UNIT WIRING DIAGRAM Platinum Split 4000 & 8000 Condenser Terminal Board www.whisperkool.com | Page 21... -
Page 24: 8000 Condenser Wiring Diagram
8000 CONDENSING UNIT WIRING DIAGRAM LEGEND: TERMINAL BOARD BD # SERVES COLOR GROUND GREEN UK GREEN/YELLOW STRIPE L1-115V-HOT BLACK WHITE (NEUTRAL) BLACK RED UK-CAN 115V-NEUTRAL WHITE BLUE UK CC HEATER BLACK COMP GND GREEN H-COMP BLACK N-COMP WHITE H-COND FAN BLACK START BLUE... -
Page 25: 8000 Condenser Wiring Schematic
8000 CONDENSING UNIT WIRING SCHEMATIC POWER 115v 60 HZ CC HEATER START CAPACITOR COMP CONTACTOR CURRENT RELAY COMPRESSOR COND. COMP CONTACTOR LOW AMBIENT HI PRESS SWITCH CONTROL LO PRESS SWITCH TIME DELAY www.whisperkool.com | Page 23... -
Page 26: Active Humidity Option
ACTIVE HUMIDITY OPTION OVERVIEW ACTIVE HUMIDITY SPECIFICATIONS Power Consumption 0.2 amps @ 120V/60 Hz Humidistat Range 30-90% RH Humidistat Accuracy ± 1% Humidistat Adjustment Increments Water Supply Feed Rate 0.63 gph @ 40 psi Accessory Included with Active Humidity Option: (1) 25 ft. -
Page 27: Humidistat Installation
Drill holes in the wall through the 2 mounting holes in the back of the humidistat cabinet as shown in Figure 4 and insert anchors into the holes. Fasten the humidistat to the wall with screws through the mounting holes. Screws Terminal Block Figure 4 www.whisperkool.com | Page 25... - Page 28 HUMIDISTAT INSTALLATION Wall anchors Mounting With a Wall Mount Plate Make sure the humidistat is unplugged before installing the unit. Position the wall mount plate on the wall or junction box and ensure the plate is level and covers the junction box completely. Pull the electrical wires through the hole in the wall mount plate.
-
Page 29: Preparing The Condensing Unit
Provide a weatherproof disconnect for Condensing Units located outside. As with all sensitive electrical equipment, damage may be caused in the event of power surges and spikes. WhisperKOOL recommends plugging the unit into a surge protector, or power conditioner, in order to protect your system. As outlined in our terms &... - Page 30 50-100ft Model <3ft 3-10ft >10ft <3ft 3-10ft >10ft <3ft 3-10ft >10ft Vertical Rice 1/2” 5/8” Horizontal Tubing Platinum Split 4000 3/8” 5/8” 5/8” 1/2” Vertical Rise 1/2” 5/8” Horizontal Tubing Platinum Split 8000 1/2” Vertical Rise The refrigerant drier and the sight glass shall be installed (in that order) in the direction of the refrigerant flow in the liquid line between the condensing unit and Evaporator Unit (Fan Coil Unit).
-
Page 31: Line Set Piping Diagrams
Option 2 is for when the system is installed with the condensing unit at a higher elevation than the coil. LEGEND Liquid Line Solenoid Thermal Expansion Valve COMP Compressor Receiver EVAP. Evaporator O.D. Outer Diameter Option 2 www.whisperkool.com | Page 29... -
Page 32: Installing The Condensing Unit
INSTALLING THE CONDENSING UNIT Refrigerant Piping Procedures When installing/routing the lines set, cap both ends of each tube to prevent material or debris from entering the tubing. Prior to connecting the piping, loosely connect the refrigerant gauges to the service ports of the suction and liquid line service valves. - Page 33 Fahrenheit). If superheat is not between 8 and 12 degrees make an adjustment to the expansion valve. Depending temperature, the “high side” should be approximately 175lbs, and the “low side” should be 28lbs or more to keep the Evaporator Unit (Fan Coil Unit) from icing. www.whisperkool.com | Page 31...
- Page 34 INSTALLING THE CONDENSING UNIT (continued) Measure Superheat If superheat is high and bubbles are present, add more refrigerant until it is clear. If superheat is low (around 4-6 degrees Fahrenheit) and bubbles are present in the sight glass, check for liquid refrigerant entering the compressor as evidenced by cool crankcase below 100- 110 degrees Fahrenheit and low discharge superheat.
-
Page 35: Installing The Wall Mount Kit
4. Align the front grill with the 4 ball studs on the housing. Push the front grill onto the balls studs until it snaps into place. 5. Using a Phillips head screwdriver, fasten the bottom two screws to fasten the grille to the unit DRAIN PAN ° www.whisperkool.com | Page 33... -
Page 36: Installing The Ducted Plenum
INSTALLING THE DUCT PLENUM 1. If removed, re-install the top onto the unit. 2. Align duct plenum with the 4 ball studs on the housing. Push the duct plenum onto the balls studs until it snaps into place. 3. Using a Phillips head screwdriver, fasten the bottom two screws to fasten the plenum to the unit 4. -
Page 37: System Operation
1°F), the compressor and the condenser fan will turn off, but the indoor fan will continue to run for about 5 minutes, which is a feature of the WhisperKOOL Humidity Management (WHM) system. The WHM is an adjustable feature which allows the customer the convenience of managing the humidity enhancement of their wine cellar. -
Page 38: Controller Functions
CONTROLLER FUNCTIONS If your unit has a remote keypad then you will have the Remote Controller. High Temp / Pre-Chill Low Temp Display ON / OFF Set Point TEMPERATURE Button Normal Functions • ON/OFF The ON/OFF button allows the customer the convenience of turning the refrigeration system ON or OFF, from the control panel. - Page 39 10° below the of the wine set point Defective Bottle probe Replace the Bottle probe “POF” The keypad is locked Hold “Up” and “Down” buttons for 3 to 5 seconds to disable, “PON” should appear www.whisperkool.com | Page 37...
- Page 40 CPSM Mode Press the “Set” and the “Down Arrow” buttons simultaneously, for 3-5 seconds, and you will access the “Customer Preference Selection Mode” (CPSM). The CPSM allows the customer to “Fine Tune” the Control Operating System to their applicable choice. The following CPSM options are available for adjustment: Fon –...
-
Page 41: Maintenance Schedule
Use a vacuum with brush attachment to clean coils. Be careful not to crush coil fins when cleaning. Annually 1. Inspect for corrosion. 2. Check wiring connections and integrity of cords. 3. Pour a 50/50 bleach solution into the drain line every spring. www.whisperkool.com | Page 39... -
Page 42: Troubleshooting Guide
TROUBLESHOOTING GUIDE Unit has ice forming on the Evaporator Unit (Fan Coil Unit) Solution Possible Cause Evaporator filter or coil is dirty. Remove the filter and wash, then clean the coil with a vacuum. If coil is very dirty, use a spray bottle with a small amount of liquid dish washing detergent or coil cleaner. - Page 43 Please contact the installing technician to troubleshoot. Compressor and /or starting components faulty Please contact the installing technician to troubleshoot. Humidity in cellar too low Possible Cause Solution Not enough moisture Raise the Fon setting to increase the humidity level www.whisperkool.com | Page 41...
-
Page 44: Bypass Test Procedure
BYPASS TEST PROCEDURE NOTE: If instructed by a WhisperKool representative, follow the directions below to test the cooling unit using the bypass plug provided in the accessory kit. 1. Disconnect power from the evaporator unit 2. Loosen the two screws on the front of the grille or duct plenum 3. - Page 45 NOTES www.whisperkool.com | Page 43...
-
Page 46: Technical Assistance & Accessories
TECHNICAL ASSISTANCE WhisperKOOL Customer Service is available Monday through Friday from 8:00 a.m. to 4:00 p.m. Pacific Time. The customer service representative will be able to assist you with your questions and warranty information more effectively if you provide them with the following: •... -
Page 47: Installation Terms And Conditions
WhisperKOOL warrants against defects in material and workmanship as follows: 1. LABOR - For a period of two (2) years commencing on the date of purchase, WhisperKOOL will, at its option and discretion, reimburse up to $250 to the End User for cost incurred for servicing, repairing, removing or installing warranty parts. - Page 48 9. Removing the rivets from the Product’s unit housing without prior authorization from WhisperKOOL voids this limited warranty. 10. The End User must first contact WhisperKOOL Customer Service by telephone (at 1-800-343-9463) prior to attempting service on any Product still under the limited warranty; else the limited warranty is voided.
- Page 49 E. End User is responsible for all costs incurred for the installation and/or removal of the Product, or any part thereof, unless such cost has been agreed by WhisperKOOL to be a warranty repair prior to the work being performed.
- Page 50 WhisperKOOL, Purchaser and End User, hereby irrevocably submit to the personal jurisdiction of such courts for that purpose. No waiver by WhisperKOOL of any breach or default of the contract of sale (including these Terms and Conditions of Sale) concerning a Product will be deemed to be a waiver of any preceding or subsequent breach or default.
- Page 51 Web: www.whisperkool.com B. Technical Assistance. WhisperKOOL Customer Service is available Monday through Friday from 6:30 a.m. to 4:00 p.m. PST. The Customer Service representative will be able to assist you with your questions and warranty information more effectively if you provide them with the following: 1.
- Page 52 WhisperKOOL 1738 E. Alpine Ave Stockton, CA 95205 1(800) 343-9463 www.whisperkool.com 112713...
Need help?
Do you have a question about the Platinum Split and is the answer not in the manual?
Questions and answers