Jura ENA 5 Instructions For Use Manual
Coffee maker
Hide thumbs
Also See for ENA 5:
- User manual ,
- Instructions for use manual (19 pages) ,
- Disassembling manual (15 pages)
Table of Contents
Advertisement
Advertisement
Table of Contents

Related Manuals for Jura ENA 5


Summary of Contents for Jura ENA 5
-
Page 1: Instructions For Use
Instructions for Use The ‘ENA 5 Instructions for Use’ has been awarded the seal of approval by the independent German Technical Inspection Agency, TÜV SÜD, due to its easy-to-understand style, its thoroughness and coverage of safety aspects. - Page 2 ENA 5 IMPORTANT SAFEGUARDS These safeguards apply for machines with UL safety test (see rating plate and chapter 9, ‘Technical data’). Follow the basic safety Follow the basic safety When using electrical appliances, basic safety precautions should precautions precautions always be followed, to reduce the risk of fire, electric shock, and/or injury to persons, including the following: Read all instructions.
- Page 3 ENA 5 Special cord set instructions Special cord set instructions a. A short power supply cord is provided to reduce the risk resulting from becoming entangled in or tripping over a long cord. Your ENA has a 3-pin grounded plug.
- Page 4 ENA 5 NEVER DO NEVER DO Never fill instant coffee, chocolate mix etc. into the grinder or (or you will void your (or you will void your ground coffee funnel (grunder by-pass). It will damage the warranty protection): warranty protection): functioning of the brewing chamber.
-
Page 5: Ena
ENA 5... -
Page 6: Table Of Contents
ENA 5 Your ENA 5 IMPORTANT SAFEGUARDS Control elements Proper use For your safety Welcome to the world of JURA JURA on the Internet .............................11 Knowledge Builder ..............................11 © Connector System ..............................11 3-colour plain text display ...........................12 Preparing and using for the first time Supplied as standard............................12... - Page 7 CAUTION The CAUTION symbol is used to draw References to the JURA website where attention to circumstances which could you can find interesting additional infor- result in damage to the machine.
-
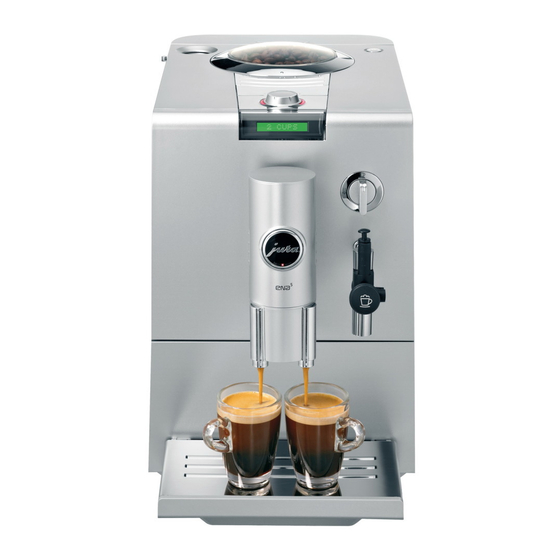
Page 8: Control Elements
ENA 5 Control elements Figure: ENA 5 Blossom White Water tank Switch for hot water and steam Powder chute for pre-ground coffee preparation Coffee grounds container Connector System © for removable Drip tray nozzles Cup platform Easy Cappuccino Frother Bean container cover... - Page 9 ENA 5 Figure: Open cover On/off button Display Grinding wheel Professional Cappuccino Frother Cover Easy Cappuccino Frother P button 2-stage frothing nozzle Maintenance button Hot water nozzle Rotary Switch The following nozzles are available from stockists and can be fitted to the ©...
-
Page 10: Proper Use
Only connect the machine to a power supply by JURA or by a JURA approved service centre. in accordance with the information on the Make sure that the ENA and the power cable rating plate. -
Page 11: Welcome To The World Of Jura
You can also get to know your ENA in a fun way on the PC. We thank you for the confidence that you have placed in us by purchasing a JURA ENA coffee The Knowledge Builder awaits you at machine. You have chosen www.jura.com. -
Page 12: 3-Colour Plain Text Display
Measuring spoon for pre-ground coffee CLARIS plus filter cartridge JURA cleaning tablets Aquadur® test strip Grinder key Your JURA ENA is equipped with the Connector System © for interchangeable nozzles. The nozzles supplied with the machine may vary depending on the Hot water nozzle model. -
Page 13: Filling The Bean Container
ENA 5 Remove the water tank and rinse with cold Turn the Rotary Switch until LANGUAGE water. is displayed. ENGLISH Fill the water tank with cold, fresh water and replace the tank. Filling the bean container CAUTION Coffee beans which have been treated with additives (e.g. -
Page 14: Using And Activating Filter
ENA 5 Using and activating filter Turn the switch to position Your ENA no longer requires descaling if you use , water is FILTER RINSING CLARIS plus filter cartridges. discharged from the nozzle. Perform the ‘Insert filter’ operation without interruptions. This will ensure optimum Rinsing of the filter can be interrupted at function of your ENA. -
Page 15: Adjusting Grinder
ENA 5 Example: Changing the water hardness from If the fineness of grind setting is too fine, the coffee only drips from the coffee spout. 16°dH 25°dH Precondition: appears on the display. READY Open the cover behind the Rotary Switch. -
Page 16: Switching On The Machine
ENA on. every coffee speciality and is a master at preparing perfect beverages. In conjunction with HEATING your JURA ENA, you too can achieve perfect PRESS ROTARY Place a receptacle under the coffee spout. results. Press the Rotary Switch to start rinsing. -
Page 17: Coffee At The Touch Of A Button
ENA 5 2 coffees at the touch of a button In addition remember the following barista tips: Store your coffee in a dry place. Oxygen, light, Precondition: appears on the display. READY heat and moisture will spoil the coffee. Turn the coffee spout to the 2 cup position. -
Page 18: One-Off Setting Before And During Preparation
ENA 5 One-off setting before and during Example: Preparing a cup of coffee using preparation pre-ground coffee. Precondition: appears on the display The coffee strength can be changed before READY and the coffee spout is set at the 1 cup position. -
Page 19: Entering A Default Setting For The Amount Of Water For A Cup Size
ENA 5 Entering a default setting for the amount of Set the selector lever of the nozzle to the water for a cup size milk foam position. A default setting can be entered for the amount of water for 1 coffee. When preparing 2 coffees this amount is dispensed per cup. -
Page 20: Cappuccino With The Easy Cappuccino Frother
ENA 5 Cappuccino with the To ensure that the Easy Cappuccino Frother Easy Cappuccino Frother works perfectly, it should be rinsed and Precondition: appears on the display cleaned regularly (refer to Chapter 4 READY and the coffee spout is set at the 1 cup position. -
Page 21: Heating Milk With The Professional Cappuccino Frother
ENA 5 Place the cup under the coffee spout. You can prepare more hot milk within Press the Rotary Switch to start coffee about 40 seconds. preparation. , the pre-set amount of water To ensure that the Professional Cappuccino 1 CUP flows into the cup. -
Page 22: Hot Water
ENA 5 To ensure that the 2-stage frothing 2 coffees are prepared at the same tempera- nozzle works perfectly, it should be ture which is set for 1 coffee. rinsed regularly (refer to Chapter 4 ‘Maintenance – Dismantling and rinsing Default settings in programming mode always the 2-stage frothing nozzle’). -
Page 23: Energy-Saving Mode
ENA 5 Energy-saving mode Automatic switch-off © A default energy-saving mode (E.S.M. ) setting You can save energy with the automatic switch- can be selected on the ENA. off function on the ENA. Programme item The automatic switch-off time can be ENERGY - adjusted between 0.5 and 9 hours or... -
Page 24: Language
ENA 5 Press the Rotary Switch to enter the Press the Rotary Switch to confirm the programme item. setting. , the language is then adjusted. Turn the Rotary Switch until LANGUE displayed. Turn the Rotary Switch until EXIT Press the Rotary Switch to confirm the displayed. -
Page 25: Changing The Filter Following A Prompt
ENA 5 The ‘Rinse machine’ operation can be manually Precondition: is displayed. READY FILTER initiated. Open the cover behind the Rotary Switch. Press the maintenance button. Precondition: appears on the display. READY INSERT FILTER Turn the coffee spout to the cleaning Remove and empty the water tank. -
Page 26: Changing The Filter - Manually
ADD TABLET Cleaning the machine following a prompt Open the powder chute for for pre-ground After 180 coffee preparations or 80 switch-on coffee and drop in a JURA cleaning tablet. rinses, the ENA will prompt you to clean the machine. CAUTION... -
Page 27: Cleaning The Machine - Manually
Remove and empty the water tank. machine when necessary. The degree of build-up Completely dissolve the contents of one depends on the hardness of the water. blister (3 JURA descaling tablets) in a container holding 500 ml of water. This CAUTION may take several minutes. -
Page 28: Descaling The Machine - Manually
ENA 5 Turn the switch to position Turn the Rotary Switch until DE-SCALE , water flows out of the is displayed. DE-SCALING Connector System © several times. Press the Rotary Switch. CLOSE TAP EMPTY TRAY Turn the switch to position... -
Page 29: Cleaning The Professional Cappuccino Frother
Turn the Rotary Switch until STEAM Only use original JURA care products. displayed. Press the Rotary Switch. The ENA will not prompt you to clean the HEATING Professional Cappuccino Frother. -
Page 30: Rinsing The Easy Cappuccino Frother
Press the Rotary Switch. If the wrong cleaning agent is used, the machine HEATING could be damaged and/or detergent residues appears as soon as the ENA is READY could be left in the water. sufficiently heated. Only use original JURA care products. -
Page 31: Dismantling And Rinsing The Easy Cappuccino Frother
ENA 5 Turn the switch to position Unscrew the nozzle using the opening on , the nozzle and pipe are rinsed the measuring spoon for pre-ground coffee. STEAM with fresh water. Turn the switch clockwise to position as soon as the receptacle holding the water is empty. -
Page 32: Cleaning The Bean Container
Designed specially for JURA These residues may negatively affect the coffee coffee machines, it has a neutral pH value and is results. - Page 33 The cartridge must then be replaced. Your JURA coffee machine will prompt you to change the filter. This procedure is described in detail in Chapter 4 ‘Maintenance –...
-
Page 34: Display Messages
ENA 5 6 Display messages Message Cause/Result Action FILL WATER TANK The water tank is empty. Fill the water tank (refer to You cannot prepare any coffee Chapter 1 ‘Preparing and using specialities, hot water or steam. for the first time – Filling the water tank’). -
Page 35: Troubleshooting
Contact Customer Support in your country. Contact information is available on the company website at www.jura.com. If you have not been able to solve the problem, contact Customer Support in your country. Contact information is available on the company website at www.jura.com. -
Page 36: Transport And Environmentally Neutral Disposal
ENA 5 8 Transport and environmentally 9 Technical data neutral disposal The voltage and current vary according to Transport/Emptying the system the safety test. Please consult the rating Keep the packaging of your ENA. It should be plate before connecting the device. -
Page 37: 10 Contacts
Voltage 230 V AC, 50 Hz 120 V AC, 60 Hz Contact information is available on the 220 – 240 V AC, company website at www.jura.com. 50 Hz 220 V AC, 50 Hz Power 1450 W S F D G... -
Page 38: Index
8, 11 With the 2-stage frothing nozzle 21 Contacts 37 With the Professional Cappuccino Cover 9 Frother 21 Bean container 8 Hot water 22 Cup platform 8 Hot water nozzle 9 Internet JURA on the Internet 11 Knowledge Builder 11... - Page 39 ENA 5 Knowledge Builder 11 Safety For your safety 10 Settings Machine Default, in programming mode 22 Cleaning 26 One-off setting, before and during Descaling 27 preparation 18 Rinsing 24 Setting up 12 Switching off 16 Supplied as standard 12...
- Page 40 Technical changes We reserve the right to make technical changes. The illustrations used in the ENA 5 Instructions for Use show the ENA 5 Blossom White model. Your ENA could incorporate minor changes. Feedback Your opinion is important to us! Use the contact link at www.jura.com.
Need help?
Do you have a question about the ENA 5 and is the answer not in the manual?
Questions and answers