Table of Contents
Advertisement
Advertisement
Table of Contents

Related Manuals for Wincor Nixdorf BEETLE /M-II plus


Summary of Contents for Wincor Nixdorf BEETLE /M-II plus
- Page 1 BEETLE /M-II plus G1- Motherboard, H1- Motherboard Modular POS System User Guide...
- Page 2 Please send us a copy of this page if you have any constructive criticism. We would like to thank you in advance for your comments. With kind regards, Your opinion: Wincor Nixdorf International GmbH Documentation RD HWD01 Rohrdamm 7 D-13629 Berlin E-Mail: retail.documentation@wincor-nixdorf.com...
- Page 3 BEETLE /M-II plus G1- Motherboard, H1- Motherboard Modular POS System User Guide Edition September 2010...
- Page 4 All brand and pro duct na mes men tio ned in this do cu ment are tra de marks of their re spec ti ve owners. Co py right© Win cor Nix dorf In ter na tio nal GmbH, 2010 The re pro duc ti on, trans mis si on or use of this do cu ment or its con tents is not per mit ted wit hout ex press aut ho ri ty.
-
Page 5: Table Of Contents
Contents Ma nu fac tu rer´s Cer ti fi ca ti on..........1 Tes ted Sa fe ty....................1 FCC-Class A De cla ra ti on................1 Im por tant No tes ..................2 Note On the La ser ..................3 In tro duc ti on................4 About This Ma nu al ..................4 Care Of the BEET LE /M-II plus..............5 Re cy cling the BEET LE /M-II plus ..............5... - Page 6 D- Sub Plug (COM1) ................23 D- Sub- Jack Po wer Supp lied (COM2*) ..........24 RJ10/RMT Jack (op tio nal)..............24 USB (Uni ver sal Se ri al Bus)- A.............24 RJ45 (LAN) ..................24 CRT (op tio nal) ..................25 PLINK TFT (TFT- VGA Mo ni tor, op tio nal) ...........25 Dis con nec ting Ca bles ................26 DVD- ROM/ DVD- RW Dri ve (op ti nal)........28 Ge ne ral .....................28...
-
Page 7: Manufacturer´s Certification
TESTED SAFETY Manufacturer´s Certification The device complies with the requirements of the EEC directive 2004/108/EC with regard to ‘Electromagnetic compatibility" and 2006/95/EG “Low Voltage Directive”. Therefore, you will find the CE mark on the device or packaging. Tested Safety The POS sys tem has been pro vi ded with the sym bol for “Tes ted Sa fe ty”. -
Page 8: Important Notes
IMPORTANT NOTES Important Notes The mo du lar POS sys tem BEETLE /M-II plus con forms to the cur rent sa fe ty stan dards for data pro ces sing equip ment. If this device is taken from a cold environment into the operating room, moisture condensation may form. -
Page 9: Note On The Laser
IMPORTANT NOTES The de vi ce may only be re pai red by aut ho ri zed qua li fied per son nel. Un aut ho ri zed ope ning of the de vi ce and in ex pert ly car ried-out re pairs may not only se ri ous ly jeo par di ze the sa fe ty of the user, but also can cel all war ran ty and liability agreements. -
Page 10: Introduction
Powerful processors ensure a quick processing of all operations. You can connect a variety of different peripheral devices to your BEETLE /M-II plus and even the choice of the software is not limited to a certain product. This provides you with a considerable degree of flexibility when arranging the configuration of your POS system. -
Page 11: Care Of The Beetle /M-Ii Plus
Recycling Center, which is certified pursuant to ISO 9001 and ISO 14001. So don’t discard your BEETLE /M-II plus system on the garbage when it has served its time, but take advantage of the environmentally smart, up-to-date... - Page 12 RECYCLING Plea se con tact your com pe tent branch or the Re cy cling Cen ter Pa der born (for Eu ro pe an coun tries) for in for ma ti on on how to re turn and re-use de vi ces and dis po sa ble ma ter ials un der the following mail address.
-
Page 13: Warranty
WARRANTY Warranty Win cor Nix dorf gua ran tees ge ne ral ly a war ran ty en ga ge ment for 12 months be gin ning with the date of de li very. This war ran ty en ga ge ment co vers all da ma ges which oc cur de spi te a nor mal use of the pro duct. -
Page 14: Beetle /M-Ii Plus- The Modulare Pos System
BEETLE /M-II plus, since it can accommodate two PCI cards (1x PCI and 1x PCI-e or 2x PCI). This means that the BEETLE /M-II plus can meet your requirements at all times, without having to exchange the complete system for a new one, thus... -
Page 15: Before Switching On The System
Set ting Up the De vi ce Set up the BEETLE /M-II plus system where it will not be exposed to extreme environmental conditions. Protect the device from vibrations, dust, moisture, heat and strong magnetic fields. -
Page 16: Ho Ri Zon Tal In Stal La Ti On
BEFORE SWITCHING ON THE SYSTEM Ho ri zon tal In stal la ti on Mind the minimum distances indicated below! If the equipment is to be fitted, you also must ensure that the specified minimum distances are maintained and constant ventilation is provided. The immediate ambient temperature of the system must not exceed 40°... - Page 17 BEFORE SWITCHING ON THE SYSTEM Remove the foils. You see the keyholes for installing the BEETLE /M-II plus with four screws. Remove each of the feet. Turn each of them to the position needed for the wall mounting, for example:...
-
Page 18: Moun Ting The Ca Ble Co Ver
The BEETLE /M-II plus is designed for horizontal mounting (see dimensions on page 43). If you install the BEETLE /M-II plus in vertical position, you have attend to the following: Three breakable bore holes are located at the underside, which allow the BEETLE /M-II plus to be suspended by means of the screws. -
Page 19: Cab Ling Of The Beet Le /M-Ii Plus
Follow the steps below in the order given when installing devices: The cable cover must be removed, if present. Plug one end of the power cable into the socket of the BEETLE /M-II plus. Plug in and secure the data cable. -
Page 20: Ba Sic Set Tings
It automatically adjusts itself to the particular voltage. Ba sic Set tings Ex works, the BEETLE /M-II plus is configured to your order. Your configuration must be subsequently adapted to support supplementary devices such as scanners. For more information, contact the Wincor Nixdorf... -
Page 21: The System Beetle /M-Ii Plus
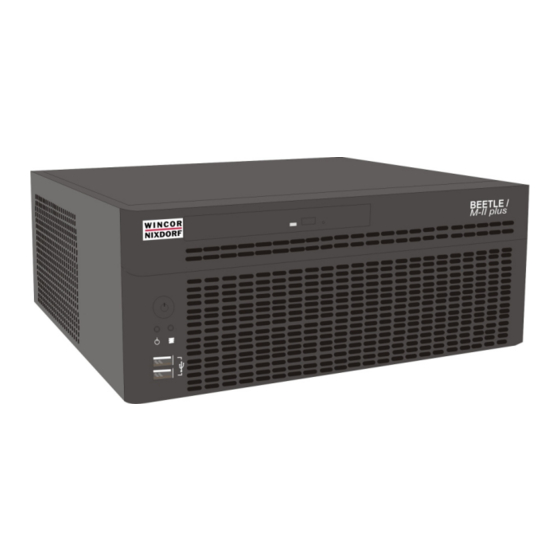
FRONT SIDE VIEW The System BEETLE /M-II plus Front Side View Ventilation Slots (Do not cover!) ON Button Power- LED 2 USB Intervaces HDD LED DVD (optional) -
Page 22: On But Ton
FRONT SIDE VIEW ON But ton With a power supplied power unit (power switch switched to 1) you switch on the system with the red power ON button on the rear side of the system unit. Light-emit ting Di ode (LED) The LEDs are labelled with: left LED flashs while the hard disk is beeing... -
Page 23: Interior View
INTERIOR VIEW Interior View Power Supply USB- Hub (optional) Ventilator of the power supply Motherboard Carrier for PCI cards DVD (optional) Hard Disk... -
Page 24: Connector Panel
POWER SUPPLY Connector Panel Power Supply The power supply can be connected to all conventional power supply networks. It automatically adjusts itself to the particular voltage and is fan-cooled. The power output of the power pack is maximum 245 W. The Po wer Supp ly Unit (PSU) car ries the 80plus or 80plus Bronze cer ti fi ca te. -
Page 25: Po Wer Con Nec Tor
BIOS. The power pack must be removed or replaced by authorized qualified personnel only. Only replace power packs released by Wincor Nixdorf. To disconnect the device from the supply voltage completely, switch off the device and disconnect the power plug. -
Page 26: Dc24V (Mo Du Lar Prin Ter)
POWER SUPPLY DC24V (Mo du lar Prin ter) Appropriate POS printers can be connected via the low-voltage jack 24V, max. 3A via non-UPS. A connecting cable with a HOSIDEN plug is required for this. Connect only cables to the 24V connector which are marked with DP-1 or DP-2. -
Page 27: System Unit
Al ways make sure that the sys tem is swit ched off when you do cab ling works. Connecting peripherals with the system switched on is not allowed (exception: USB devices). Example for a connector panel of the BEETLE /M-II plus with a H1- motherboard: PLINK TFT COM3*... - Page 28 SYSTEM UNIT Example for a connector panel of the BEETLE /M-II plus with a G1- motherboard: COM3* COM4* KYBD COM1 COM2* Jack plug, 3.5 mm, MIC Mini DIN (KYBD) D- sub (COM1) D- sub power supplied (COM2*) USB- A (USB 2.0)
-
Page 29: Jack Plug 3.5 Mm (Mic, Spk)
(see chapter "BIOS setup" in the manual “POS Motherboard, H1- CPU”). Mini-DIN (KYBD) The BEETLE /M-II plus has a 6-pin mini-DIN jack for con nec ting a key bo ard. Make sure that the con nec tor is plug ged firm ly into the so cket to pre vent mal functio ning. -
Page 30: D- Sub- Jack Po Wer Supp Lied (Com2*)
SYSTEM UNIT D- Sub- Jack Po wer Supp lied (COM2*) The interface connection is a 9-pin D-sub jack for scanner, user or customer displays without own power suppy. Make sure that the connector for the customer display is screwed firmly to the socket to prevent possible malfunctioning. -
Page 31: Crt (Op Tio Nal)
If a TFT adapter is installed you can connect a Panellink-TFT to the BEETLE /M-II plus. Connect the 40-pin data cable of the LCD to the system. The signals for the touch screen function and the power supply is also made via this cable. -
Page 32: Dis Con Nec Ting Ca Bles
CONNECTING PERIPHERALS Dis con nec ting Ca bles Never unplug a cable by pulling on the cable; always take direct hold of the plug itself. Follow the procedure below when disconnecting cables: Turn off all power and equipment switches. Unplug all power plugs from the grounded-contact power sockets. Unplug all data communication cables from the sockets of the data networks. - Page 33 CONNECTING PERIPHERALS The powered USB connector is disengaged by pressing the spring that is marked by an arrow. To release TFT (LCD) connectors, press the interlocks on the left and right side. With Hosiden-connector (printer), the plug re mains in ser ted un til re lea sed. Pull the plastic covering from the connecting socket with your thumb.
-
Page 34: Dvd- Rom/ Dvd- Rw Drive (Optinal)
DVD- ROM/ DVD- RW DRIVE DVD- ROM/ DVD- RW Drive (optinal) Ge ne ral Optionally the BEETLE /M-II plus can be equipped with a DVD-ROM or DVD-RW drive. The LED at the drive lights up whenever the system accesses the drive. -
Page 35: No Tes About The Discs
DVD- ROM/ DVD- RW DRIVE No tes About the Discs Do not touch the surface of the disk. Always handle by their edges. Never write on a disk with a hard object, like a ball-point pen or pencil and never fix a label directly on the disk. Do not expose disks to direct sunlight and avoid storing them in areas subject to high temperatures or humidity. -
Page 36: Storage Media
The most SSDs are flash memory based. Change Of the Hard Disk Drive First ensure that the device is switched off and that the power connector is disconnected. Open your BEETLE /M-II plus. Loosen the two screws at the back side (see arrows). - Page 37 STORAGE MEDIA Lift the top cover at the back side (1) and pull it out of the front guide (2). Lift up the DVD drive. Push the metal plates (1). Tilt the hard disk hol der in direction of arrow (2).
- Page 38 STORAGE MEDIA Lift up the dri ve and remove it. Loosen the connecting cables. Ca ble of po wer supply Data ca ble Take the holder out. Loo sen by hand the buffer screws (1) and the two Phillips head screws at the holder (2) with a screwdriver.
- Page 39 USB- HUB (OPTIONAL) Handle the hard disk with care when installing it and never touch bare electronics. Change the hard disk. Fix the drive rail with the two screws and the buffer screws to the hard disk. Please pay regard to the cor rect fitting position. Dri ve rail Con nec tor bar Insert the hard disk in reverse order.
-
Page 40: Usb- Hub (Optional)
COM5*- COM8*- INTERFACES USB- Hub (optional) There are three 12V and one 24V USB interfaces on an optional available board. They allow the connection of peripherals such as printers and scanners. Devices like hard drives can also be connected via a USB interface. -
Page 41: Com5*- Com8*- Interfaces (Optional)
CRT- OR TFT ADAP TER COM5*- COM8*- Interfaces (optional) The standard system is configured with three further COM* interfaces. In addition you can install an optional PCI board with maximal four energised COM* interfaces (COM5*, COM6*, COM7*, COM8*). Scanners, customer and operator displays without own power supply are connected to these serial interfaces. -
Page 42: Crt- Or Tft Adap Ter
CHANGE OF THE HARD DISK DRIVE CRT- Or TFT Adap ter Both adapters may be installed in parallel or single. You can connect a CRT monitor or/and a TFT-LCD module with optional touch screen functionality. When installing a TFT- adapter with touchscreen functionality the cable for the internal loudspeaker must be disconnected to activate the loudspeaker in the screen display. -
Page 43: Battery (Optional)
The rechargeable battery provides the modular BEETLE /M-II plus POS system with another significant performance feature. For operating a battery the BEETLE /M-II plus must be equipped with an UPS power supply unit. BEET LE /M-II plus with Bat te ry... - Page 44 SE CU RI TY IN THE EVENT OF A PO WER OU TA GE Peripheral devices that are dependent on their own, separate power supply units (such as VGA monitors) are not supplied with battery power during a power outage. This is also true if the peripheral devices are connected to the power outlet sockets on the POS system.
-
Page 45: Starting Up The System
SE CU RI TY IN THE EVENT OF A PO WER OU TA GE Starting Up the System After installing the BEETLE /M-II plus, switch on the POS system using the ON/OFF button on the front panel and the power switch on the power supply. - Page 46 If the operating system has started up without error, the POS application software is automatically booted if necessary. A message is displayed as soon as the BEETLE /M-II plus is ready for operation. For more detailed information, see the description of your...
-
Page 47: Appendix
TECHNICAL DATA BEETLE /M-II PLUS Appendix Technical Data BEETLE /M-II plus Dimensions Width 310 mm Depth 280 mm (w/o cable cover) 369 mm (with cable cover) Height 126 mm Weightt approx. 6.5 kg Climatic category Class 3K3 DIN IEC 721-3-3... -
Page 48: Interface
INTERFACE Interface COM1 (w/o power supply), COM2* (with power supply) Optional: COM5*- COM8* (with power supply) via PCI- COM- board 2 Standard USB + 2 Standard USB at the front side Optional: 3 PoweredUSB 12V and 1 PoweredUSB 24V via a Hub controller and 3 PoweredUSB 12V in place of COM3*/4* (only for H1 motherboard) optional onboard (with H1 motherboard) -
Page 49: Wall Mounting
WALL MOUNTING Wall Mounting The diameter of the screw shank can not be larger than 3.5 mm and the diameter of screw head not more than 9 mm and the height of max. 3 mm. 3 mm < 3,5 mm 310 mm 190 mm 60 mm... -
Page 50: To Tal Cur Rent Con Sump Ti On Of In Ter Fa Ces
TO TAL CUR RENT CON SUMP TI ON OF IN TER FA CES To tal Cur rent Con sump ti on Of In ter fa ces The total current consumption at 5V interfaces must not exceed 5A. each COM* = 300mA, in total 500mA each USB = 500mA, in total 2A each USB (HUB) -
Page 51: Glossary
GLOSSARY Glossary A bit is a binary digit (0 or 1). It is the smallest unit used in data processing. Controller Serves to control data input and output in a data processing system or between a computer and the connected peripherals. Abbreviation of central processing unit. - Page 52 GLOSSARY PCMCIA Abbreviation for Personal Computer Memory Card International Association. Industry standard for memory cards. Plug and PLay (PnP) PnP means the automatic recognition of hardware components by the system. Thus the installation, integration and configuration of new components is made substantially easier. Peripherals Devices serving as an input/output device or storage for a computer.
-
Page 53: Abbreviations
ABBREVIATIONS Abbreviations European Symbol of Conformity RS 232 Schnittstelle Central Processor Unit (for example INTEL Celeron-M) Cathode Ray Tube Canadian Registration (Recognized by UL) DIMM Dual Inline Memory Module Deutsches Institut für Normen (German Institute for Standards) D-Sub D- Shaped Subminiature DVD-ROM Digital Versatile Disc Random Access Memory DVD-RW... - Page 54 ABBREVIATIONS Verband der Elektrotechnik, Elektronik und Informationstechnik e.V. German Association for Electrical, Electronic and Information Technologies Wide Area Network WLAN Wireless Local Area Network Wincor Nixdorf International GmbH Zero Cache...
- Page 55 Herausgegeben von/Published by Wincor Nixdorf International GmbH D-33094 Paderborn Bestell-Nr./Order No.: 01750186379B...
Need help?
Do you have a question about the BEETLE /M-II plus and is the answer not in the manual?
Questions and answers