Table of Contents
Advertisement
Quick Links
Contents
Description of each part -------------------------------------------------page 1
How to load a ribbon and coupon stock -------------------------------page 2
How to remove jam paper -----------------------------------------------page 3
Cleaning ----------------------------------------------------------------------page 4
Environment for installation ----------------------------------------- page 11
Cables ------------------------------------------------------------------------page 11
Space for installation and operation --------------------------------page 12
Unpacking of the printer and the Bin feeder----------------------page 13
Mounting F9811 printer ----------------------------------------------- page 14
Assembling Pedestal----------------------------------------------------- page 15
Installing firmware ------------------------------------------------------ page 17
Trouble Shooting ---------------------------------------------------------- page 18
Fujitsu 9811 ATB printer
Operator's Guide
---------- Operating the Printer ------------
---------- Printer Installation---------
-------------------- Safe Operation ----------------
----------------------Revision record ----------------
All Right Reserved, Copyright Fujitsu Ltd. 2002
C160-E144-02EN
Advertisement
Table of Contents

Related Manuals for Fujitsu 9811 ATB


Summary of Contents for Fujitsu 9811 ATB
-
Page 1: Table Of Contents
Assembling Pedestal----------------------------------------------------- page 15 Adjusting volume of buzzer and contrast on LCD display --- page 17 Installing firmware ------------------------------------------------------ page 17 Trouble Shooting ---------------------------------------------------------- page 18 -------------------- Safe Operation ---------------- ----------------------Revision record ---------------- All Right Reserved, Copyright Fujitsu Ltd. 2002... -
Page 2: Operating The Printer
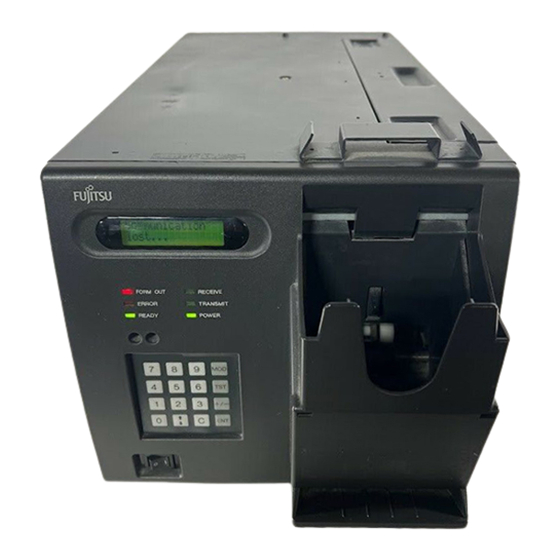
Operating the Printer Description of each part 1. Outside view Knob for feeding roller Clamp for Ribbon Lever for insertion shutter Presser for nip roller Button for paper guide Floppy disk drive LCD display Bin feeder LED indicator Receive Form out Transmit Error Ready... -
Page 3: How To Load A Ribbon And Coupon Stock
Operating the Printer How to load a ribbon and coupon stock 1. Opening and Closing the printer door (Cover) To release, pull up the two lock levers and open the cover. After closing the door remember to lock by pushing down the levers. -
Page 4: How To Remove Jam Paper
Operating the Printer How to remove jam paper Print unit Pre-feed unit Button for paper guide Inside door Clamp for Ribbon Lever for insertion shutter Knob for feeding roller Presser for feed roller After opening the inside door by pulling the button, you can see the Feed Knob. See photo A. Turning the Knob while pushing the presser will move the jammed paper on a horizontal path to the front side. -
Page 5: Cleaning
Operating the Printer Cleaning It is essential to regularly clean the printer in order to keep it in good operating condition. Cleaning object Cleaning period or timing Note Magnetic head When a ribbon is replaced, or if many The magnetic head needs to be cleaned to remove voided encode errors have occurred. -
Page 6: Status & Error Indication And Recovery
ATB inserted Check-in started On initializing ATP’ s application after booting on. ATP program V*.* (The application’s version is shown.) FUJITSU 2000 LH Blank boarding Coupon without magnetic data has been inserted in check-in mode. pass inserted. ERROR BIN1 empty Bin 1 is empty. - Page 7 Operating the Printer Continued 1Normal Operating Messages. Description LCD message B.Z. C.f. E-Code Recovery Exit hopper full The stacker (exit hopper) is full of tickets. ERROR A-8500 Remove the tickets from the stacker (exit hopper). Boarding print has been started. Host check-in started.
- Page 8 Operating the Printer 2. Hardware Errors (Call maintenance personnel if it cannot be resolved) Description LCD message B.Z. C.f. E-Code Recovery The temperature of print head exceeds the specified limit. Abnormal high ERROR A-2600 Try to POWER OFF/ON. If the same error results, temp print head call maintenance personnel.
- Page 9 Operating the Printer Continued 2.Hardware Errors Description LCD message B.Z. C.f. E-Code Recovery Battery Alarm during operation SYS ERROR S0024 ERROR POWER RESET Call maintenance personnel to replace battery. Fan alarm during operation SYS ERROR S0xxx Try to POWER OFF/ON. If the same error results, memorize the ERROR FAN ALARM error number, and call the maintenance personnel and tell the...
- Page 10 Operating the Printer Continued 3. Received Data and Software Errors Description LCD message B.Z. C.f. E-Code Recovery Font load error occurred. The code assigned to the first character Font load error ERROR A-7166 of a font set illegal. first char ill. Check the optional font data.
- Page 11 Operating the Printer Continued 3.Received Data and Software Errors Description LCD message B.Z. C.f. E-Code Recovery Image print error occurred. Specified number is not yet registered. Image print err. ERROR A-7154 unregistered nr Check the host data. Image print error occurred. The vertical direction size of an image Image print err.
-
Page 12: Environment For Installation
Installing the Printer Installation of F9811 – ATB Printer 1. Environment for installation Power supply Temperature / Humidity Altitude Wide range 100 – 240 V AC at 50 Hz / 60 Hz 5 -- 35℃ / 30 -- 85%RH at operation 0 –... -
Page 13: Space For Installation And Operation
Installing the Printer 3. Space for installation and operation Trace of Bin Feeder Door Key Size Ticket Stacker Trace of Printer Door Grip Key Lock Cables Screwed Clamps Cables Key Size Trace of Bin Feeder Door Trace of Printer Door Ticket Stacker 2-Hinge Key Lock... -
Page 14: Unpacking Of The Printer And The Bin Feeder
Installing the Printer 4. Unpacking and checking the attachments. Unpacking the F9811-ATB Printer Please remove the wrapping and each tape shown below in the figures after opening the box. Please check that the following are enclosed: Installation Floppy Disk, Operator’ s Guide, Configuration sheet. -
Page 15: Mounting F9811 Printer
Installing the Printer 5. Mounting F9811 printer Printer and Secure Bin are installed as illustrated below. 1. Change metal plate on the bottom of the printer to the new plate supplied and fix it with supplied screws. Refer to photos A and B. 2. -
Page 16: Assembling Pedestal
Installing the Printer 6. Assembling Pedestal and Bin-feeder Printer, Bin feeder and Pedestal are assembled through four steps as following step: Moving casters to the pedestal from stand bin, step: Adjusting height of the pedestal to fit a counter height step: Mounting the bin-feeder and the printer. - Page 17 Installing the Printer step: Mounting the bin feeder Photo 4 Mount the bin feeder on the assembled pedestal Fix them with four screws after facing in front and right face. Refer to photo 4 and 5 Photo 5 Use screws with hexagonal head, which are attached on the pedestal.
-
Page 18: Adjusting Volume Of Buzzer And Contrast On Lcd Display
Installing the Printer 7.Adjusting the volume of the buzzer and adjusting the contrast on the LCD display. These are adjusted using the controls recessed as shown. If necessary, please adjust them with a small screwdriver. Beep sound Contrast on LCD display The LCD Contrast is adjusted with the right control. -
Page 19: Trouble Shooting
Installing the Printer Trouble Shooting 1. Reading the ERROR LOG from system memory. Push key "ON/OFF" to turn to mode "OFF LINE". LCD display shows “OFF LINE”. Push key "TST" in order to show the memorized ERROR LOG. Message will be displayed as 08/12/01 12:00 Time and Error Code are shown on LCD ERROR 0164... -
Page 20: Safe Operation
PRODUCT MAY CAUSE UNEXPECTED DAMAGE TO THE USERS OR BYSTANDERS. While all efforts have been made to ensure the accuracy of all information in this manual, FUJITSU assumes no liability to any party for any damage caused by errors or omissions or by statements of any kind in this manual, its updates or supplements, whether such errors are omissions or statements resulting from negligence, accidents, or any other cause. -
Page 21: Revision Record
Edition record Revision record Edition Date Description Pages issued 11/12/2001 Initial edition 06 / 02 / 2002 1.Correcting sentence 2.Adding « Assembling pedestal » Page.15 and 16... - Page 22 printed in Japan...