Table of Contents

Related Manuals for Jura The IMPRESSA Z5 – Generation II


Summary of Contents for Jura The IMPRESSA Z5 – Generation II
- Page 1 The IMPRESSA Z5 – Generation II Manual The ‘IMPRESSA Manual’ has been awarded the seal of approval by the independent German Technical Inspection Agency, TÜV SÜD, due to its easy-to-understand style, its thoroughness and coverage of safety aspects.
-
Page 2: Table Of Contents
Model variants ..............................14 Symbol description ............................14 Welcome to the world of IMPRESSA! IMPRESSA Z5 – ‘Two at once’ JURA on the Internet ............................17 Preparing and using for the first time Supplied as standard ...........................18 Setting up ..............................18 Filling the water tank ...........................18 Filling the bean container ...........................19... - Page 3 ‘The milk makes the difference’ 10 Accessories and Service 11 Display messages 12 Troubleshooting 13 Transport and environmentally neutral disposal Transport / Empty system .........................96 Disposal .................................96 14 Technical data 15 Key technologies and products 16 JURA contact details Index...
-
Page 4: Important Safeguards
Important Safeguards IMPORTANT SAFEGUARDS These safeguards apply for machines with UL safety test (see rating plate and chapter 14, ‘Technical data’). Follow the basic safety Follow the basic safety When using electrical appliances, basic safety precautions should precautions precautions always be followed, to reduce the risk of fire, electric shock, and/or injury to persons, including the following: Read all instructions. - Page 5 Important Safeguards Special cord set instructions Special cord set instructions a. A short power supply cord is provided to reduce the risk resulting from becoming entangled in or tripping over a long cord. Your IMPRESSA has a 3-pin grounded plug. b.
- Page 6 Important Safeguards Keep your hands and the cord away from hot parts of the appliance during operation. Never clean with scouring powders or hard implements. NEVER DO NEVER DO Never fill instant coffee, chocolate mix etc. into the grinder or (or you will void your (or you will void your ground coffee funnel (grunder by-pass).
- Page 7 Important Safeguards...
-
Page 8: Control Elements And Accessories
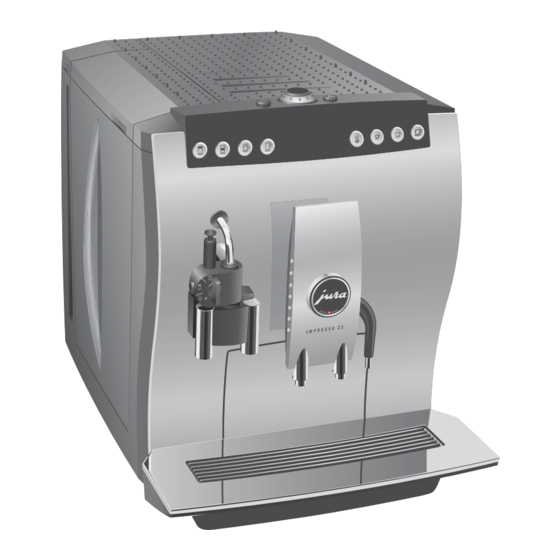
Control elements and accessories Control elements and accessories Figure: IMPRESSA Z5 – Generation II Alu Bean container cover Grinding wheel Water tank cover Bean container with aroma preservation Water tank cover Power switch and power cable (side) Filler funnel for pre-ground coffee One Touch Cappuccino nozzle, long spout Height-adjustable coffee spout One Touch Cappuccino nozzle, short... - Page 9 Control elements and accessories Top of the machine Front On/off button Milk button f Rotary Switch Latte macchiato button Maintenance button Cappuccino button Special Coffee button Display Hot water button Ristretto button Espresso button Coffee button...
-
Page 10: Proper Use
JURA service centre. If the power cable for this machine is damaged, it must be repaired either directly by JURA or by a JURA approved service centre. Make sure that the IMPRESSA and the power cable are not located close to hot surfaces. - Page 11 Only connect the machine to a power supply in accordance with the technical data (see rating plate and Chapter 14, ‘Technical data’). Use only original JURA care products. Use of accessories that are not explicitly recommended by JURA could damage the IMPRESSA.
- Page 12 Important information Safe handling of the CLARIS plus filter cartridges: CLARIS plus filter cartridges should be kept out of the reach of children. Store them dry in the sealed package. Protect them from heat and direct sunlight. Do NOT use damaged CLARIS plus filter cartridges. Do NOT open CLARIS filter cartridges.
-
Page 13: The Impressa Z5 Manual
IMPRESSA. It invites you to actively explore all the different coffee experiences that it offers. As coffee and coffee specialities are very important to JURA, we have compiled a selection of tasty suggestions for you in Chapter 4, ‘Recipes’. -
Page 14: Model Variants
Symbols used Information and tips to make things easier for you as you use your IMPRESSA. References to the online JURA website, where you can find interesting further information: www.jura.com Prompt to take action. This symbol means that you are being prompted to perform some action. -
Page 15: Welcome To The World Of Impressa
JURA fully automated machine to use on a daily basis. We wish you many stimulating and enjoyable moments with your IMPRESSA. -
Page 16: Impressa Z5 - 'Two At Once
JURA has now developed the second generation of the revolutionary IMPRESSA Z line to satisfy the high demands of the growing com- munity of speciality gourmets. -
Page 17: Jura On The Internet
JURA on the Internet JURA on the Internet Visit us on the Internet. At www.jura.com you will find interesting and up-to-date information on your IMPRESSA and on every aspect of coffee. Knowledge Builder Knowledge Builder You can familiarize yourself with your IMPRESSA Z5 in a fun way on the PC. -
Page 18: Preparing And Using For The First Time
Supplied as standard Supplied as standard The following items are supplied as standard: Your JURA IMPRESSA fully automatic coffee machine Stainless steel vacuum milk container Milk pipe The Welcome Pack, which includes: The IMPRESSA Z5 – Generation II Manual IMPRESSA Z5 –... -
Page 19: Filling The Bean Container
2 Preparing and using your IMPRESSA for the first time Remove the water tank and rinse it with cold water. Fill the water tank with fresh, cold mains water and reinsert. Filling the bean Filling the bean The bean container has an aroma preservation cover. This will ensure container container that your coffee beans retain their aroma for longer. - Page 20 A small amount of water flows from the cappuccino nozzle and the hot water spout. This operation stops automatically. WELCOME TO JURA appears on the display. UNIT IS HEATING , the maintenance button c lights up.
-
Page 21: Using And Activating Filter
You can also try out the ‘Insert filter’ operation online. Visit the Knowledge Builder at www.jura.com. Further information on the CLARIS plus filter cartridge can be found in Chapter 8, ‘CLARIS plus filter cartridge – Water for perfect coffee’. -
Page 22: Assessing And Setting Water Hardness
2 Preparing and using your IMPRESSA for the first time Lift the cartridge holder and insert the filter cartridge into the water tank, applying slight pressure. Close the cartridge holder. It will click into place audibly. Fill the water tank with fresh, cold water and reinsert. Place a receptacle (containing at least 500 ml) under the cappuccino nozzle. -
Page 23: Adjusting Grinder
2 Preparing and using your IMPRESSA for the first time Wait for about one minute. You will then be able to read the degree of water hardness from the discolouration of the Aquadur® test strip and the description on the packaging. You can now adjust the water hardness. -
Page 24: Switching On
Precondition: Your IMPRESSA is switched on at the power switch and the On/Off button Q is illuminated (standby). Q T Press the On/Off button to switch the IMPRESSA on. WELCOME TO JURA UNIT IS HEATING , the maintenance button c lights up. -
Page 25: Switching Off (Standby)
2 Preparing and using your IMPRESSA for the first time Switching off Switching off When you switch your IMPRESSA off, the spouts with which a coffee (Standby) (Standby) speciality or milk have been prepared are rinsed. Place a receptacle under the coffee spout and the cappuc- cino nozzle. -
Page 26: Familiarising Yourself With The Control Options
If you prefer to familiarise yourself with your IMPRESSA in a fun way on the computer, the interactive Knowledge Builder tutorial program can be found on the Internet at www.jura.com. Preparation at the Preparation at the Prepare your favourite coffee speciality at the touch of a button. -
Page 27: One-Off Setting Before And During Preparation
3 Familiarising yourself with the control options Preparing a coffee speciality Preparing a coffee speciality Example: Proceed as follows to prepare one espresso. at the touch of a button at the touch of a button Precondition: is shown on the display. COFFEE READY Place an espresso cup under the coffee spout. -
Page 28: Entering A Permanent Setting For The Amount Of Water For A Cup Size
3 Familiarising yourself with the control options Changing the coffee Changing the coffee Example: Proceed as follows to prepare a strong cup of coffee. strength before preparation strength before preparation Precondition: is shown on the display. COFFEE READY Place a cup under the coffee spout. g T Turn the Rotary Switch until appears on the dis- STRONG... -
Page 29: Permanent Settings In Programming Mode
3 Familiarising yourself with the control options u T Press and hold the Ristretto button. and the coffee strength is displayed. 1 RISTRETTO u T Hold the Ristretto button down until ENOUGH? PRESS appears. BUTTON u T Release the Ristretto button. Coffee preparation starts and the ristretto flows into the cup. -
Page 30: Time Format
3 Familiarising yourself with the control options Programme item Subitem Explanation Adjust the water hardness. HARDNESS NOT ACTIVE (is only displayed – 1° dH 30° dH when the filter is not activated) ENERGY ESM Select an energy saving mode. SAVE NO SAVE LEVEL1, SAVE LEVEL2... - Page 31 3 Familiarising yourself with the control options Settings in programming mode always follow the same model. Example: To change the strength of one espresso from NORMAL proceed as follows: STRONG Precondition: is shown on the display. COFFEE READY k T Keep the Rotary Switch pressed until MAINTENANCE appears.
-
Page 32: View Information And Care Status
3 Familiarising yourself with the control options g T Turn the Rotary Switch until is displayed. EXIT k T Press the Rotary Switch to exit programming mode. COFFEE READY View information and View information and Under the programme item you can query the INFORMATION care status care status... - Page 33 3 Familiarising yourself with the control options...
-
Page 34: Recipes
4 Recipes You can use your IMPRESSA to create coffee classics or extraordinary specialities in your home. You can find additional coffee recipes online at www.jura.com. Further information on how to operate your IMPRESSA can be found in Chapter 3, ‘Familiarising yourself with the control options’. - Page 35 4 Recipes...
- Page 36 4 Recipes...
- Page 37 4 Recipes...
- Page 38 4 Recipes...
- Page 39 4 Recipes Winter’s dream coffee Ingredients 2 strong Espressi 200 ml of hot cocoa (for two people) 1 pinch of gingerbread seasoning 100 ml milk Sugar to suit personal taste 1-2 gingerbread cakes for decoration Prepare 2 Espressi. Stir Espresso with cocoa and gingerbread seasoning and distribute into two glasses. Froth the milk and add to the Espressos.
-
Page 40: Preparation At The Touch Of A Button
A ‘barista’ is someone who is a professional at preparing espresso and coffee. The barista knows every coffee speciality and is a master at preparing perfect beverages. In conjunction with your JURA IMPRESSA, you too can achieve perfect results. In addition to the simple preparation at the touch of a button, you can also adapt the coffee or espresso to suit your own individual taste. -
Page 41: Ristretto
5 Preparation at the touch of a button tion. Select a finer grind for espresso than for coffee. The fine- ness of grind affects the time the water requires to run through the coffee powder. A finer coffee powder prolongs the extrac- tion time so that the maximum aroma is unfolded when espresso is prepared. -
Page 42: Espresso
5 Preparation at the touch of a button Espresso Espresso The classic coffee drink from Italy. There is a definite crema on the surface of the espresso. Example: This is how to prepare an espresso. Place an espresso cup under the coffee spout. i T Press the Espresso button. -
Page 43: Latte Macchiato
5 Preparation at the touch of a button Attach the milk pipe to the nozzle. Insert the other end in a milk carton/bottle or connect it to the vacuum milk container. Place a cup under the cappuccino nozzle. Turn the selection lever of the nozzle to the milk foam posi- tion p. - Page 44 5 Preparation at the touch of a button Place a glass under the cappuccino nozzle. Turn the selection lever of the nozzle to the milk foam position p. To enable the typical layers of a Latte Macchiato to form even more effectively, add 10 ml of cool milk to the glass before preparing this speciality.
-
Page 45: Pre-Ground Coffee
5 Preparation at the touch of a button Pre-ground coffee Pre-ground coffee You can choose a second coffee blend with the filler funnel for pre- ground coffee. Never add more than two level measuring spoons of pre- ground coffee. Use pre-ground coffee which is not ground too finely. Very fine coffee can block up the system so that the coffee only comes out in drips. -
Page 46: Hot Milk
5 Preparation at the touch of a button Hot milk Hot milk Precondition: is shown on the display. COFFEE READY Remove the milk pipe from the packaging of the vacuum milk container. For a milk carton/bottle use the long pipe, for the vacuum milk container the short pipe. - Page 47 5 Preparation at the touch of a button The pre-set amount of water flows into the cup. Preparation stops automatically. appears on the COFFEE READY display.
-
Page 48: Permanent Settings In Programming Mode
6 Permanent settings in programming mode 6 Permanent settings in Programming mode 6 Permanent settings in Programming mode Products Products With the programme item you can enter individual PRODUCTS settings for all coffee products, milk, hot water and coffee-milk products. Settings for coffee products, Settings for coffee products, The following permanent settings can be entered for coffee... - Page 49 6 Permanent settings in programming mode For 1 milk and 1 special coffee you can also select whether the preparation of 2 milks or 2 special coffees should be doable or not doable. Settings for Settings for The following permanent settings can be entered for coffee-milk products: coffee-milk-products coffee-milk-products...
- Page 50 6 Permanent settings in programming mode Permanent settings in programming mode always follow the same model. Example: Proceed as follows to change the amount of milk of 1 latte macchiato from , the pause from 16 SECS 20 SECS and the amount of water from 30 SEC 40 SEC 45 ML...
-
Page 51: Energy-Save Mode
6 Permanent settings in programming mode g T Turn the Rotary Switch until 1 LATTE MAC. PAUSE is displayed. 30 SEC k T Press the Rotary Switch to enter the programme item. 1 LATTE MAC. PAUSE 30 SEC g T Turn the Rotary Switch until 1 LATTE MAC. -
Page 52: Time And Weekday
6 Permanent settings in programming mode Example: Proceed as follows to change the energy saving mode from ENERGY SAVE NO ENERGY LEVEL1 Precondition: is shown on the display. COFFEE READY k T Keep the Rotary Switch pressed until MAINTENANCE displayed. g T Turn the Rotary Switch until is displayed. -
Page 53: Programmable Switch-On Time
6 Permanent settings in programming mode k T Press the Rotary Switch to confirm the weekday setting. appears briefly on the display. CONFIRMED √ TIME 09:50 g T Turn the Rotary Switch until is displayed. EXIT k T Press the Rotary Switch to exit programming mode. COFFEE READY Programmable Programmable... -
Page 54: Automatic Switch-Off
6 Permanent settings in programming mode g T Turn the Rotary Switch until UNIT ON MINUTES is displayed. 07:30 k T Press the Rotary Switch to confirm the minute setting. appears briefly on the display to confirm CONFIRMED √ the setting. UNIT ON 07:30 g T Turn the Rotary Switch until is displayed. -
Page 55: Rinses
6 Permanent settings in programming mode Example: Proceed as follows to change the automatic switch-off time from 5 HRS 2 HRS Precondition: is shown on the display. COFFEE READY k T Keep the Rotary Switch pressed until MAINTENANCE appears. g T Turn the Rotary Switch until OFF AFTER 5 HRS displayed. -
Page 56: Unit Amount Of Water/Time Format
6 Permanent settings in programming mode g T Turn the Rotary Switch until CAPPU. RINSE NOW displayed. k T Press the Rotary Switch to confirm the setting. appears briefly on the display to confirm CONFIRMED √ the setting. CAPPU. RINSE NOW g T Turn the Rotary Switch until is displayed. -
Page 57: Logo
Logo You can choose various logos which appear when the display is not used for other information. The following logos can, for example, be selected: JURA Logo Animated coffee cup Time No logo Example: Proceed as follows to show the time on the display. -
Page 58: Language
6 Permanent settings in programming mode Language Language You set the language when you used the machine for the first time. You can choose among the following languages. German English French Italian Dutch Example: To change the language from ENGLISH DEUTSCH proceed as follows. - Page 59 6 Permanent settings in programming mode g T Turn the Rotary Switch until is dis- RENAME ABC... played. k T Press the Rotary Switch to enter the programme item. RENAME PRODUCT NAME The welcome text and closing can be selected by turning the Rotary Switch.
-
Page 60: Maintenance
7 Maintenance 7 Maintenance 7 Maintenance Your IMPRESSA has the following integrated maintenance pro- grammes: Rinse machine Filter change Clean machine Descale machine Rinse cappuccino nozzle Clean cappuccino nozzle Clean or descale the machine or change the filter whenever the appropriate indicator lights up. Maintenance tips Maintenance tips To ensure that you get many years’... -
Page 61: Changing The Filter
If the CLARIS plus filter cartridge is not activated, you will not be prompted to change the filter. You can also try out ‘changing the filter’ online. Visit the Knowledge Builder at www.jura.com. Change following a prompt Change following a prompt... -
Page 62: Cappuccino Cleaning
7 Maintenance c T Press the maintenance button. INSERT FILTER PRESS BUTTON Remove the water tank and empty it. Open up the cartridge holder and remove the old CLARIS plus filter cartridge and the extension piece. Fit the extension on top of a new CLARIS plus filter car- tridge. -
Page 63: Clean Machine
Do not interrupt the cleaning programme. The quality of cleaning will be impaired if you do so. JURA cleaning tablets are available from stockists. You can also try out the ‘clean machine’ operation online. Visit the Knowledge Builder at www.jura.com. - Page 64 Open the cover of the bean container. Open the cover of the filler funnel for pre-ground coffee. Insert a JURA cleaning tablet into the filler funnel. Close the cover of the filler funnel and the cover of the bean container.
-
Page 65: Descale Machine
Clean up any splashes immediately. The descaling programme lasts approx. 45 minutes. JURA descaling tablets are available from stockists. If you use a CLARIS plus filter cartridge and this is activated, you will not be prompted to change the filter. - Page 66 SOLVENT IN TANK Remove the water tank and empty it. Completely dissolve the contents of one blister (3 JURA descaling tablets) in a container that holds 600 ml of water. This may take several minutes.
- Page 67 7 Maintenance Replace the cappuccino nozzle. Place a receptacle under the hot water and coffee spout and the cappuccino nozzle. c T Press the maintenance button. , water flows out of MACHINE IS DECALCIFYING the hot water spout and the cappuccino nozzle. water flows out of UNIT IS HEATING RINSING...
-
Page 68: Rinsing The Cappuccino Nozzle
Use only original JURA care products. The IMPRESSA will not prompt you to clean the cappuccino nozzle. The JURA Auto-Cappuccino Cleaner is available from stock- ists. You can also try out the ‘Cleaning the cappuccino nozzle’ operation online. Visit the Knowledge Builder at... - Page 69 7 Maintenance Starting cappuccino Starting cappuccino Precondition: is shown on the display. COFFEE READY k T Keep the Rotary Switch pressed until cleaning manually cleaning manually MAINTENANCE appears. k T Press the Rotary Switch to enter the programme item. CAPPUCCINO CLEANING k T Press the Rotary Switch.
-
Page 70: Dismantling And Rinsing The Cappuccino Nozzle
7 Maintenance Dismantling and Dismantling and rinsing the rinsing the cappuccino nozzle cappuccino nozzle Carefully pull off the cappuccino nozzle. Dismantle the cappuccino nozzle completely. Rinse all the nozzle parts thoroughly under running water. Reassemble the cappuccino nozzle and attach it once more to the connector. -
Page 71: Descaling The Water Tank
7 Maintenance Clean the bean container with a soft, dry cloth. Fill the bean container with coffee beans, then close the aroma preservation cover and the bean container cover. The cleaning of the bean container is now complete. Descaling the Descaling the Limescale deposits may form in the water tank. - Page 72 7 Maintenance...
-
Page 73: Claris Plus Filter Cartridge - Water For Perfect Coffee
Very few of us have ready access to a spring. The answer to this is: CLARIS plus filter cartridge from JURA. It trans- forms the hardness of the mains water into pH-neutral water. On top... - Page 74 CLARIS plus wherever water is harder than 10° German hardness (dH). You can determine the water hardness before using your JURA coffee machine for the first time with the Aquadur® test strip included in the Welcome Pack.
- Page 75 After 50 litres of water have been dispensed or after two months at the latest, the filter will cease to work. After this, the cartridge must be replaced. Your JURA coffee machine will prompt you to change the filter. This process is described in detail in Chapter 7, ‘Maintenance –...
- Page 76 8 CLARIS plus filter cartridge – Water for perfect coffee Pictures on the next few pages: Water – always pleasant and freshly filtered. CLARIS plus filter cartridges do not require any accessories and do not take up any extra space. They can be inserted directly into the water tank. Water for perfect coffee specialities.
-
Page 81: 'The Milk Makes The Difference
9 ‘The milk makes the difference’ 9 ‘The milk makes the difference’ 9 ‘The milk makes the difference’ Coffee specialities are taking the entire planet by storm. Up until a few years ago, classics, such as Espresso and Café Crème were the most popular choices. -
Page 82: Accessories And Service
Scale is the biggest enemy of all household appliances that Descaling tablets Descaling tablets involve the use of mains water. JURA has developed a descaling tablet for the IMPRESSA which removes scale and at the same time is easy on your machine. -
Page 91: Display Messages
11 Messages on plain text display 11 Display messages Message Cause/Result Action TRAY EMPTY The drip tray is full. You cannot Empty the drip tray. prepare any coffee products, hot water or milk products. WATER TANK FILL The water tank is empty. Fill the water tank You cannot prepare any coffee (See Chapter 2, ‘Preparing and... -
Page 92: Filter Change
11 Messages on plain text display Message Cause/Result Action After 220 preparations or Clean the machine COFFEE READY 80 switch-on rinses, the (See Chapter 7, ‘Maintenance – CLEAN IMPRESSA will prompt you to Cleaning the machine’). clean it. After 250 preparations the Clean the machine COFFEE READY (flashes) - Page 93 11 Messages on plain text display Message Cause/Result Action CLEANER FOR The IMPRESSA prompts you to Perform cappuccino CAPPUCCINO clean the cappuccino nozzle. cleaning (refer to Chapter 7 PRESS BUTTON ‘Maintenance – Cleaning the cappuccino nozzle’). BEANCOVER MISSING The beancover is not inserted Insert the beancover.
-
Page 94: Troubleshooting
12 Troubleshooting 12 Troubleshooting Problem Cause/Result Action Grinder is making a very There are foreign objects Remove the foreign objects (see loud noise. in the grinder. Chapter 7, ‘Maintenance – Removing foreign objects’). The frother does not The cappuccino nozzle is Rinse and clean the cappuccino produce enough milk dirty. - Page 95 Turn the IMPRESSA off at the power ERROR are displayed. switch. Contact Customer Support in your country (see Chapter 16 ‘JURA contact details’). If you have not been able to solve the problem, contact Customer Support in your country. You will find the phone number in Chapter 16, ’.
-
Page 96: Transport And Environmentally Neutral Disposal
13 Transport and environmentally neutral disposal 13 Transport and environmentally neutral disposal 13 Transport and environmentally neutral disposal Transport / Empty Transport / Empty Keep the packaging of your IMPRESSA. It should be used to protect system system the machine during transportation. In order to protect the IMPRESSA from frost during transportation, the system must be emptied. -
Page 97: Technical Data
14 Technical data 14 Technical data 14 Technical data The voltage and current vary according to the safety test. Rating plate Rating plate Please refer to the rating plate before connecting the device. The rating plate is located on the bottom of your IMPRESSA. The information shown on the rating plate has the following meaning: V AC = alternating current in volts W = power output in watts... - Page 98 14 Technical data Voltage 230 V AC, 50 Hz Technical data Technical data 120 V AC, 60 Hz 220 –240 V AC, 50 Hz 220 V AC, 50 Hz Power 1350 W S D F G Safety test Energy Save No 23 Wh Energy Save Level 1 16 Wh...
- Page 99 14 Technical data...
-
Page 100: Key Technologies And Products
IMPRESSA X series for catering and office applications Obtain the advice of the JURA experts. You will find the purchase advisor at www.jura.com. For perfect coffee quality it is important to get the grinding right. To this end, a powerful 6-level powerful conical burr grinder with grinding cones constructed out of hardened steel is provided. - Page 102 IMPRESSA Z IMPRESSA S IMPRESSA J IMPRESSA F...
- Page 103 IMPRESSA C IMPRESSA X IMPRESSA X...
-
Page 105: Jura Contact Details
16 JURA contact details 16 JURA contact details China Shanghai HJ Coffee Co., Ltd. Australia Global Coffee Solutions Pty Ltd. Customer Service Phone +86 21 62940690 ext.31 E-mail service@hjcoffee.com Customer Service Phone +61 1300 552 883 Fax +61 0242 846 099 Opening Hours Monday to Friday 09:00 –... - Page 106 16 JURA contact details Opening Hours Monday to Friday 9:00 am – 6:00 pm Estonia Saturday 9:00 am – 1:00 pm Infomelton OÜ Distributor Address/ Pacific Coffee Company Ltd Customer Service Phone +372 651 88 55 Service Address 701–704 Hollywood Center...
- Page 107 16 JURA contact details Israel Lithuania J.Feffer l.t.d. JSC Pretendentas Customer Service Phone +972 353 350 38 Customer Service Phone + 370 315 73442 Fax +972 353 305 54 Mobile +370 650 84779 E-mail feffer-j@barak-online.net E-mail alma@pretendentas.lt Opening Hours Sunday–Thursday 08:00 – 18:00 Opening Hours Monday to Friday 09:00 –...
- Page 108 16 JURA contact details Puerto Rico ProExpo CA Consultores S.A. New Zealand Euro Espresso Ltd. Customer Service Phone +506 234 7404 Fax +506 253 5296 Customer Service Phone +64 9 277 1334 E-mail info@grupocapresso.com Fax +64 9 277 9375 E-mail info@euroespresso.co.nz Distributor Address/ ProExpo CA Consultores S.A.
- Page 109 Imes Sanayi Sitesi C blok 308 Sok. 475/3 Hans Strydom Drive Yukari Dudullu-Istanbul, 34776 KYA Sand Service Address International Coffee Equipment CC JURA Corner Building, 1st Floor United Arab Emirates 475/3 Hans Strydom Drive KYA Sand Boncafé Middle East LLC. Customer Service...
-
Page 110: Index
Index Index Energy-save mode 51 Espresso 42 Accessories 82 Filter Adjusting grinder 23 Change 61 Assessing and setting water hardness 22 Using and activating 21 Automatic switch-off 54 Fineness of grind Adjusting grinder 23 Bean container 8 First-time use 19 Cleaning 70 First-time use 19 Filling 19... - Page 111 Index One Touch Cappuccino nozzle 8, 16 Safety 10 Service 82 Settings Pre-ground coffee 45 Default settings in programming mode 48 Preparation Entering a default setting for the amount At the touch of a button 40 of water for a cup size 28 Cappuccino 42 One-off settings before and during Coffee 42...
- Page 112 Feedback Feedback Your opinion is important to us! Use the contact link at www.jura.com. The Instructions for Use contain information which is protected by copyright. It is not permitted to photocopy or translate these Instructions for Use into another language without the express written consent of JURA Elektroapparate AG.
Need help?
Do you have a question about the The IMPRESSA Z5 – Generation II and is the answer not in the manual?
Questions and answers