Table of Contents
Advertisement
Advertisement
Table of Contents

Related Manuals for LifeSize Express 200


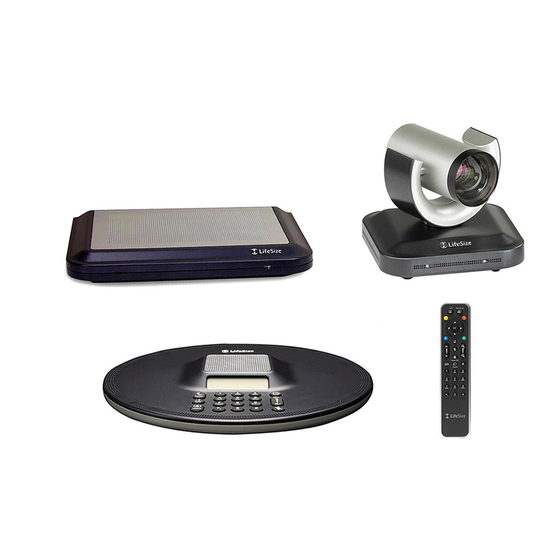
Summary of Contents for LifeSize Express 200
- Page 1 ® LifeSize Express 200 Installation Guide...
- Page 2 LifeSize Communications. Trademark Acknowledgments LifeSize® is the trademark of LifeSize Communications Inc. All other trademarks are the property of their respective owners. Patent Notice For patents covering LifeSize®...
-
Page 3: Preparing For Installation
2.7 meters (9 feet) in front of it; in a multi-user conference room, place a LifeSize MicPod or LifeSize Phone at the center of the participants as their detection patterns are omnidirectional. -
Page 4: Supported Display Types And Resolutions
Supported Display Types and Resolutions LifeSize Express 200 can connect to HD displays (720p minimum) through an HDMI cable, including: • Plasma, LCD, and LED flat panel displays • Large screen rear projection TV displays (720p displays) • Front projection displays •... -
Page 5: Network Bandwidth
DNS server. Initial Configuration During the installation process, your LifeSize system prompts you to configure it for the first time. LifeSize recommends that you gather all the necessary information prior to installation. The following sections provide guidelines for collecting and a means of recording this data. - Page 6 The System Name, Video Number, and Voice Number appear in the user interface on the main screen. The system name may also appear in the local and corporate directories. LifeSize recommends that you change the default system name to one that meaningfully identifies the system to your users.
- Page 7 Video Dialing preference is Auto which enables the system to determine the best method to use to place calls. LifeSize Express 200 supports VoIP and ISDN for voice calls. VoIP uses H.323 or SIP. When placing a call using the Voice button on a LifeSize Phone connected to the system, you can dial IP addresses as well as VoIP or ISDN phone numbers.
- Page 8 Audio Preferences: Active Microphone Volume You can adjust the audio level for the active microphone by selecting Active Microphone Volume and pressing OK on the LifeSize remote control. Note: A built-in acoustic echo canceller and noise reducer are active when Microphone In, Camera 1, or Line In is the active microphone.
- Page 9 If you choose LifeSize Phone as the active microphone, the Active Microphone Volume preference is not available. The LifeSize Phone microphones adjust volume automatically. The voice stream bypasses all processing in the LifeSize system, including the volume and tone controls, and is fed directly into the transmitted voice path.
- Page 10 Use the audio meter to visually verify that the transmit level peaks in the desired -28 to -22 dB range. LifeSize recommends a volume setting of 5 to 8 for Active Microphone Volume for most LifeSize MicPod applications. LifeSize Express 200 Installation Guide...
- Page 11 Audio Preferences: Video and Voice Call Output If you plan to use external speakers other than LifeSize Phone for audio output in both video and voice calls, ensure that the Video Call Audio Output and Voice Call Audio Output preferences are set to Line Out.
- Page 12 Face the back of the codec or ensure that all connectors are visible when connecting a cable to the codec. To install the components of your LifeSize system, remove all components from the product packaging, including cables, and place them in the desired positions in your conference room.
- Page 13 Refer to the LifeSize quick reference card included with your system for a visual depiction of the proper setup. The numbers that appear on the quick reference card correspond to the following steps: 1.
- Page 14 5. If you are using LifeSize Focus for both video and audio, you can skip step 5. Otherwise, do one of the following: a. If you are using a single LifeSize MicPod for audio, insert the end of the cable from the LifeSize MicPod into the microphone port marked with the microphone symbol on the back of the codec.
-
Page 15: Locking The Lifesize Codec
See “Status Icons” on page 23 for an explanation of status icons you may encounter. Locking the LifeSize Codec You can lock the LifeSize codec with a secure loop to prevent physical removal of the device. For assistance, contact your LifeSize Partner or LifeSize Technical Services. LifeSize Express 200 Installation Guide... -
Page 16: Configuring A Second Display
When configured, display 2 shows either DVI-I input or presentations (near and far end) when a presentation is sent or received. The following conditions apply when using two displays with LifeSize Express 200: • The presentation icon that appears on screen during a call to indicate that a near or far end presentation is in progress appears in display 1. -
Page 17: Optional Peripherals
Optional Peripherals You can connect the following optional peripherals to enhance your LifeSize system: Peripheral Usage DVI-I In DVI-I port for connecting laptops for presentations or to share PC data. For devices and PCs with VGA output, LifeSize includes a DVI-A to VGA cable. -
Page 18: Configuring Dual Lifesize Micpods
LifeSize MicPods directly to the female ends of the splitter. If the LifeSize MicPods are installed in an area where the cord could be pulled or tripped upon, refer to “Attaching the LifeSize MicPod Strain Relief Clip” on page 19. -
Page 19: Attaching The Lifesize Micpod Strain Relief Clip
Attaching the LifeSize MicPod Strain Relief Clip If the LifeSize MicPod is installed in an area where the cord could be pulled or tripped upon, LifeSize recommends using the strain relief clip included with your LifeSize MicPod to reduce the chance of disconnecting or damaging the plug or the LifeSize video communications system codec. -
Page 20: Verifying Your Installation
Configuring Display Output from LifeSize Phone If you are using LifeSize Phone and your display shows the initial configuration screen but the image is distorted and unusable or the display is blank, you can configure the display from the LifeSize Phone user interface. Follow these steps: 1. -
Page 21: Ip Address Displays Invalid Value
4. Disconnect the PSU from the AC source. Connect the PSU to the LifeSize codec. Reconnect the PSU to the AC source. If the LifeSize codec fails to boot and the green LED on the PSU dims, the codec may be the source of the problem. -
Page 22: Camera Issues
User (or Administrator) Preferences : Diagnostics : High Definition Camera. Attached Video Input Device Not Working When you connect a video input device that has capabilities not supported by a LifeSize system, the status Out of range appears on the System Information page for that input. -
Page 23: Status Icons
Warning: Temperatures that require the codec to reboot can permanently damage codec components. Ensure the room that houses the codec is properly ventilated and temperature controlled. LifeSize Express 200 Installation Guide...
Need help?
Do you have a question about the Express 200 and is the answer not in the manual?
Questions and answers