
Related Manuals for Ameriphone XL-40


Summary of Contents for Ameriphone XL-40
-
Page 1: Operating Instructions
® The Extra Loud & Clear XL-40 AMPLIFIED TELEPHONE with lighted keypad! Ñ Operating Instructions Ç ∆ M46802 ©2003 XL-40 5270-4023 10/03... - Page 2 Important Safety IMPORTANT INSTRUCTIONS Instructions When using your telephone 8.Do not cover the slots and equipment, basic safety precautions openings on this telephone. should always be followed to This telephone should never reduce the risk of fire, electric be placed near or over a shock and persons including the radiator or heat register.
- Page 3 Important Safety Instructions 15. Never install telephone apart. Opening or removing wiring during a lightning covers may expose you to storm. dangerous voltages or other 16. Never install telephone risks. Incorrect reassembly jacks in wet locations can cause electric shock when unless the jack is specifically the appliance is subsequently designed for wet locations.
- Page 4 Important Safety Instructions label identifies certified equipment. cause to request the user disconnect This certification means that the the equipment. equipment meets certain telecommunications network Users should ensure for their own protective operational and safety protection that the electrical requirements. The Department ground connections of the power does not guarantee that the utility, telephone lines and internal...
-
Page 5: Table Of Contents
Warranty Service ................1 Sales Receipt ..................1 Help from Ameriphone ..............1 Package Checklist ................2 Features ..................3 Setting up Your XL-40 Installing the Backup Batteries ............4 Setting the Dialing Mode ..............5 Connecting for Desk or Wall Mount ..........5 Desktop Use ................5 For Wall Mounting ..............5 Using Your XL-40 Incoming Voice Volume ..............7... -
Page 6: Introducing The
Introducing the XL-40 Thank you for selecting the XL-40 Help from Ameriphone Amplified Telephone from Ameriphone. These Operating For help with using your XL-40, call Instructions and the associated our Customer Relations department Quick Operating Guide provide at 800-874-3005. you with the information you... -
Page 7: Package Checklist
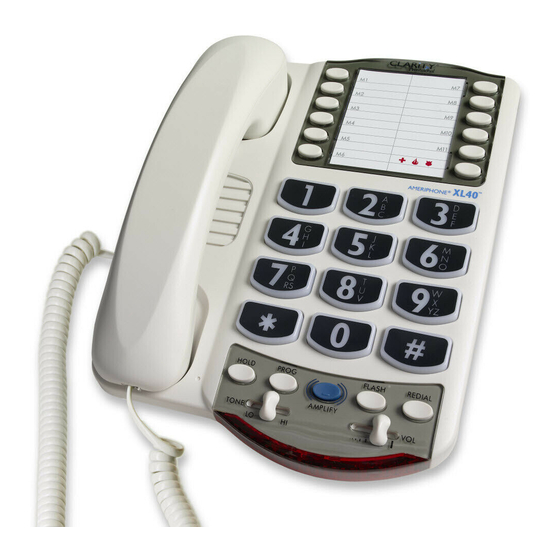
Package Checklist ¤ HOLD PROG FLASH REDIAL AMPLIFY TONE Handset Base Unit XL-40 Telephone Line Cords OPERATING INSTRUCTIONS Handset QUICK GUIDE Coil Cord Operating Guides AC Adapter Mounting Bracket Figure 1 - Package Components... -
Page 8: Features
Features on the XL-40 RINGER volume switch AUDIO OUTPUT jack AC adapter and phone RINGER AUDIO RING TONE DIAL line connection Lo Med Hi OUTPUT TONE/PULSE switch RING TONE switch Phone number directory MEMORY button ¤ REDIAL button FLASH button... -
Page 9: Setting Up Your
Setting up Your XL-40 There are five initial steps involved To install new batteries: in setting up your XL-40 for the 1. Slide open the battery first time. compartment cover on the 1. Insert four AA alkaline bottom of the telephone batteries for back-up in case (Figure 3). -
Page 10: Setting The Dialing Mode
1. Connect one end of the you hang up. telephone line cord to the “Line” jack on the back of the XL-40 and the other end to the phone outlet on your wall. Connect the handset cord to the telephone as shown in Figure 5. - Page 11 Setting up Your XL-40 (continued) 5. Angle the phone downward to feel for the LOWER protruding nail head. Insert the WALL JACK'S nail head into the LOWER part of the phone's mounting bracket. Figure 7 - Mounting Bracket 6. Once the lower nail head...
-
Page 12: Using Your
Using Your XL-40 Incoming Voice Volume HOLD PROG FLASH REDIAL You can adjust the volume of AMPLIFY TONE incoming calls by simply sliding the VOL control. This gives you up to 18 dB more volume. If you Figure 10 - Volume Slide Control want more amplification, follow the directions below. -
Page 13: Incoming Voice Tone
Lo Med Hi OUTPUT Incoming Voice Tone Figure 13 - Ringer Volume & Pitch The XL-40 provides extra amplification in the sound frequency 2. The RING TONE has two pitch range you need to boost. To settings: LO and HI. -
Page 14: Last Number Redial
Note: If you pick up an extension Flash phone on the same line when the Press the FLASH button shown in XL-40 is on HOLD, the XL-40 will Figure 16 to access special release the HOLD, and you can services available from your local... -
Page 15: Special Features
Special Features call is not answered by a person Unanswered Call/Voice Mail or an answering machine after 1 Message Light ring, provided that you set the If you subscribe to voice mail switch underneath the phone to messaging with your telephone Missed Calls. -
Page 16: Programming The Memory Buttons
Special Features (continued) 2. Enter the phone number on the Programming the Memory Buttons keypad (Figure 21) just as you You can automatically dial twelve would dial it normally. programmed telephone numbers Note: Press REDIAL if you want using the memory buttons shown to insert a brief pause between in Figure 19. -
Page 17: Direct Audio Output
Direct Audio Output must consult your implant The AUDIO OUTPUT socket allows manufacturer. you to connect the XL-40 to a hearing aid, neck loop, cochlear • Plug the mono end of the plug implant or other assistive listening into the speech processor. -
Page 18: Regulatory Compliance
FCC Part 68 rules and requirements adopted by the ACTA. A compliant If this telephone equipment, the telephone cord and modular plug, XL-40 telephone, causes harm to RJ11 USOC, is provided with this the telephone network, the product. It is designed to be... - Page 19 If you have warranty information, please contact questions about what will disable Walker / Ameriphone, 1-800- alarm equipment, consult your 874-3005. If the equipment is telephone company or a qualified causing harm to the telephone installer.
- Page 20 Your XL-40 Telephone has been 2.To the extent possible, tested and found to comply with relocate the television, radio the limits of a Class B digital...
- Page 21 THE PARTY RESPONSIBLE with the above conditions may not FOR PRODUCT COMPLIANCE prevent degradation of service in Ameriphone Products by Walker, some situations. A Division of Plantronics, Inc. 12082 Western Avenue Repairs to certified equipment...
- Page 22 Regulatory Compliance (continued) user to this equipment, or the devices does not exceed five. equipment malfunctions, may give [The term “IC:” before the the telecommunications company certification/registration number cause to request the user to only signifies that the Industry disconnect the equipment. Canada technical specifications Users should ensure for their own were met.]...
-
Page 24: Warranty
XL-40 Amplified defective and returned within 30 Telephone, or property damage days of the date of purchase, your caused by your XL-40 Amplified Ameriphone dealer will replace it Telephone or its failure to work, or at no charge. - Page 25 We suggest you save the original package materials in the event If your XL-40 Amplified Telephone you need to ship the XL-40 is not covered by this warranty, Amplified Telephone. When call us at 800-874-3005 voice shipping for warranty repair,...
-
Page 26: Specifications
High frequency (3kHz): 40dB arise during operation of your Wide band (300 to 3000Hz): telephone. Should the difficulty 30dB continue, contact Ameriphone or your authorized dealer for Tone control range assistance. Full range: 300 to 3000Hz using one slide control. -
Page 27: Index
Wall Mount ......5 Connecting the Speech Processor ......12 Direct Audio Output ....12 Features ........3 Flash ........9 Help from Ameriphone ....1 Hold ........8 Incoming Voice Tone ....8 Incoming Voice Volume ....7 Installing the Backup Batteries ..4 Last Number Redial ....9 Package Checklist ....2 Programming the Memory Buttons ....11...
Need help?
Do you have a question about the XL-40 and is the answer not in the manual?
Questions and answers