Table of Contents
Advertisement
Advertisement
Table of Contents

Related Manuals for Mede8er MED250X


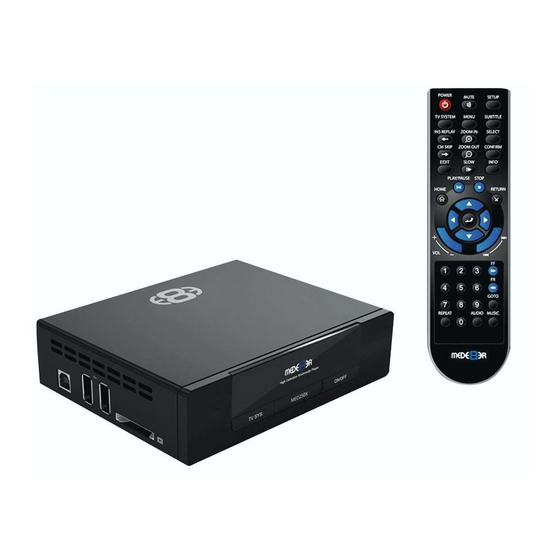
Summary of Contents for Mede8er MED250X
-
Page 1: User Manual
User Manual MED250X High Definition Multimedia Player... -
Page 2: Table Of Contents
INDEX page 1 Index page 2 Introduction General Overview page 3 page 4 Installing a Hard Drive page 5 Connections - Audio & Video page 6 TV Output Settings page 7 Remote Functionality - Firmware Update Procedure page 8 Home Page page 9 Media Scanner page10... -
Page 3: Important Safety Instructions
Please check the Mede8er forum for the latest user guide. www.mede8erforum.com Warranty Mede8er products carry a 24 month from date of purchase warranty. In the event of warranty service please provide proof of purchase. Return your product to the store that it was purchased from or return it directly to Sanji Electronics (Pty) Ltd 106, 16th Rd Midrand, Gauteng, South Africa. -
Page 4: General Overview
GENERAL OVERVIEW Page3... -
Page 5: Installing A Hard Drive
Make sure that the DC power cable is unplugged. Place the Mede8er on a flat surface and unscrew the 3x rear panel screws as indicated in figure a. Lift the cover from the rear side and remove it. Plug the SATA data and power cables into a compatible 2.5"... -
Page 6: Connections - Audio & Video
Press the On/Off button on the Mede8ers front panel and front facia LED will turn on Blue. You can put your Mede8er into standby by pressing the On/Off button on the remote. When in standby the front facia LED will turn Red. -
Page 7: Tv Output Settings
Connect the Mede8er to your TV by one of the connection options as shown on page 4 and change the input option on your TV to match the option you selected. If you do not get to see the Mede8er GUI on your... -
Page 8: Remote Functionality
- Now press the on/off button and hold it pressed for 10 seconds and then release. After approximately 15 seconds the LED on the Mede8er will flash blue and you will get a progress bar with a percentage indicator on your TV display (some TV's may not display this) wait until the Mede8er re boots itself +- 4 minutes. -
Page 9: Home Page
HOME PAGE The Mede8er Home Page is the central point where you can launch all the user applications. Press the Right/Left Navigation buttons on the remote to navigate the Home Page and press “Enter” to launch the selected page. MEDIA LIBRARY... -
Page 10: Media Scanner
MEDIA SCANNER The Mede8er has a built in Media Scanner that will scan all your Media Files and allow user functionality such as Search, Genre, Last Played etc. You can select “Auto Scan” options in the Setup menu. The Media Scanner will automatically update the database when the Mede8er is powered “on”... -
Page 11: Media Library
MEDIA LIBRARY Use the Media Library to browse all your media files. The Mede8er allows you to customise the Media Library view to suit your personal needs. To change the view just press the “Menu” button on the remote and a dialogue screen will open on the bottom right hand side of the screen. The current selection will be highlighted in yellow. -
Page 12: File Manager - Single Files
FILE MANAGER The Mede8er has a built in File Manager to manage and transfer files between your media sources. The File Manager is launched by pressing the “Edit” button on the remote Control while you are Media Library. FILE MANAGER - SINGLE FILE To Copy, Delete, Move or Rename a single file just focus on the file (that you require to perform the action on) and press the “Edit”... -
Page 13: File Manager - Multiple Files
FILE MANAGER - MULTIPLE FILES To Copy, Delete, Move or Rename multiple files just press the “Edit” button on the remote control while you are in Media Library view. Select “Multiple Select” and a new dialogue screen will open. Navigate to the files or folders on the left screen “A” that you want to perform the action on and press the “Select”... -
Page 14: Music Playlists
MUSIC PLAYLISTS With the Mede8er you can create multiple music Playlist’s from the remote control. Open Media Library and press the “Edit” button and select Multiple Select. On left hand side screen “A” navigate to your music files and press “Select” on the music files you want to add to the File List Window “B”. -
Page 15: Music Playlists Continued
MUSIC PLAYLIST’S CONTINUED With the Mede8er you can create multiple music Playlist’s from the remote control. Open Media Library and press the “Edit” button and select Multiple Select. On left hand side screen “A” navigate to your music files and press “Select” on the music files you want to add to the File List Window “B”. -
Page 16: Media Library - Music Player
MEDIA LIBRARY - MUSIC PLAYER If you select “Menu“ and then “Thumbnail View” you will be able to browse your music collection by embedded cover art. Page15... -
Page 17: Video File Cover Art Preview
VIDEO FILE COVER ART PREVIEW To browse your Media Library by cover art just select “Menu” and then “Thumbnails” and the Mede8er will preview the cover art in a grid view. You can navigate the library by using the Navigation Buttons ie Left, Right, Up and Down. -
Page 18: Time Bar - Info Screen
TIME BAR - INFO SCREEN To display the Mede8er Time Bar press the Right or Left Navigation buttons on the remote during video play. The Time Bar screen will show and display the current time and the total length of the video. The Time Bar will dynamically update the current position in minutes as you press the right or left navigation buttons. -
Page 19: Goto - Video Search
GOTO - VIDEO SEARCH Press the GOTO button on the remote and the GOTO dialogue screen will open. The GOTO screen allows you to change Time, Title, and Chapter. Press the Up/Down/ Left/Right Navigation buttons to change the value then press “Enter” once you have made your selection. To remove the screen press GOTO button again or press the Return button. -
Page 20: Subtitles
SUBTITLES Mede8er supports various types of subtitle files. If the subtitle is embedded into the video file it will automatically be available on the Subtitle Dialogue Screen. External Subtitles must be placed into the same folder as the video file and must be named to be exactly the same name as the video file eg Cloudy.With.A.Chance.Of.Meatballs.2009.720p.BluRay.HebDub.x264-WiKi.mkv... -
Page 21: Pictures
PICTURES If you select “Menu“ and then “Thumbnail View” you will be able to browse your picture collection by grid thumbnail view. Select a picture and it will zoom to full screen. Now for more options press the “Menu” button on the remote and you will have a host of extra options. - Page 22 High Definition Multimedia Player www.mede8erforum.com MED250X www.mede8er.com www.mede8er.eu For more information or support please visit www.mede8er.eu/support/ or call +31(0)10-7142861 during business hours. Sanji Electronics (Pty) Ltd 106 16th Rd Midrand, Gauteng, South Africa. Tel: 2711 2667500 Fax: 2711 2667501 Email sales@mede8er.com...
Need help?
Do you have a question about the MED250X and is the answer not in the manual?
Questions and answers