Mira DISCOVERY Installation And User Manual
Thermostatic mixer
Hide thumbs
Also See for DISCOVERY:
- Installation & user manual (20 pages) ,
- Installation and user manual (40 pages) ,
- Installation and user manual (25 pages)

Related Manuals for Mira DISCOVERY


Summary of Contents for Mira DISCOVERY
- Page 1 MIRA DISCOVERY THERMOSTATIC MIXER Installation and User Guide These instructions are to be left with the user...
-
Page 2: Table Of Contents
CONTENTS Introduction ..................... 3 Patents and Design Registration ............3 Safety : Warnings ..................5 Pack Contents ..................7 Specifications ..................9 Operating Parameters ................9 Installation ..................... 12 Suitable Plumbing Systems ..............12 General ....................12 Installation Methods ................14 Exposed Shower Control .............. -
Page 3: Introduction
INTRODUCTION Thank you for purchasing a quality Mira product. To enjoy the full potential of your new product, please take time to read this guide thoroughly, having done so, keep it handy for future reference. The Mira Discovery Thermostatic Mixer is a Thermostatic Shower Control with separate flow and temperature controls. -
Page 4: Recommended Usage
Guarantee For domestic installations, Mira Showers guarantee the Mira Discovery against any defect in materials or workmanship for a period of three years from the date of purchase (shower fittings for one year). For non-domestic installations, Mira Showers guarantee the Mira Discovery against any defect in materials or workmanship for a period of one year from the date of purchase. -
Page 5: Safety : Warnings
Mira thermostatic mixers are precision engineered and should give continued safe and controlled performance, provided: They are installed, commissioned, operated and maintained in accordance with manufacturers recommendations. - Page 6 10. Care is required when adjusting flow or temperature, make sure that the temperature has stabilised. Rapid/excessive movement of the flow and/ or temperature control levers may result in momentary changes in blend temperature. 11. When this product has reached the end of its serviceable life, it should be disposed of in a safe manner, in accordance with current local authority recycling, or waste disposal policy.
-
Page 7: Pack Contents
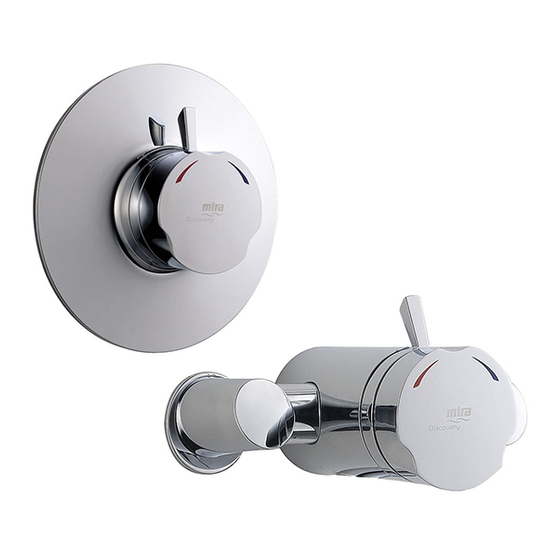
PACK CONTENTS Tick the appropriate boxes to familiarise yourself with the part names and to confirm that the parts are included. Exposed Discovery Thermostatic Mixer Mira Discovery Thermostatic Mixer 2 x Concealing Plates 2 x 15 mm Compression Nuts ... - Page 8 Built-in Discovery Thermostatic Mixer Mira Discovery Thermostatic Mixer Control Assembly (attached to the Building-in Shroud) 3 x 15 mm Compression Nuts 1 x O-Key 3 x 15 mm Olives 2 x Wall Plugs ...
-
Page 9: Specifications
SPECIFICATIONS Operating Parameters For Type 2 valves, the supply conditions specified in section: ‘Type 2 Valves - Application’ take precedence over the operating parameters which follow. Pressures • Max Static Pressure: 10 Bar. • Max Maintained Pressure: 5 Bar. Min Maintained Pressure (Gravity System): 0.1 Bar. (0.1 bar = 1 Metre head •... - Page 10 Typical Flow Rates on Low Pressure Systems - Mira Discovery with Adjustable Fittings or Rigid Head: Typical Flow Rates on High Pressure Systems (with 12 Litres/Min Flow Regulator fitted in shower control outlet) - Mira Discovery with Adjustable Fittings or Rigid Head:...
-
Page 11: Dimensions
Dimensions Exposed Discovery Shower Control Ø56 Built-in Discovery Shower Control 67 - 85 Ø183 Building-in Depth Dimensions in mm... -
Page 12: Installation
INSTALLATION Suitable Plumbing Systems Gravity Fed: The thermostatic mixer must be fed from a cold water cistern (usually fitted in the loft space) and a hot water cylinder (usually fitted in the airing cupboard) providing nominally equal pressures. Mains Pressurised Instantaneous Hot Water System (Combination Boiler): The thermostatic mixer can be installed with systems of this type with balanced pressures. - Page 13 The water supplies to this product must be isolated if the product is not to be used for a long period of time. If the product or pipework is at risk of freezing during this period they should also be drained of water. All pipework must be checked for leaks before the product installation is completed.
-
Page 14: Installation Methods
Installation Methods Exposed Discovery Shower Control The Exposed Discovery Shower Control can be installed with Rear, Rising or Falling Supply Inlets. For Rear Entry Supplies, go to section: ‘Exposed Shower Control, 1. Rear Supplies’. For Rising or Falling Supplies, go to section: ‘Exposed Shower Control, 2. -
Page 15: Exposed Shower Control
Exposed Shower Control 1. Rear Supplies 1.1 Use the Installation Template to mark the positions of the holes for the Backplate and the pipe centres. Template Note! Allow a minimum of 150 mm either side of the Shower Control, to allow the hot and cold inlet Compression Nuts to be tightened with the Spanner supplied. - Page 16 Caution! It is essential at this point that the supply pipework is thoroughly flushed through before connection to the Shower Control. Failure to do so may result in product malfunction. 1.9 Put the Compression Nuts and Olives onto the pipework. 1.10 Remove the Elbow Shrouds from the Shower Control.
-
Page 17: Rising Or Falling Supplies
2. Rising or Falling Supplies 2.1 Remove the Elbow Shrouds from the Shower Control. 2.2 Rising Supplies: Loosen the Grubscrew on each Elbow using the 2.5 mm hexagon key (supplied) and pull off the Elbows from the Shower Control. Refit each Elbow on the opposite side and rotate 90°... - Page 18 2.7 Attach the Backplate to the wall using the Fixing Screws (supplied). Securing Screws Note! The Grubscrew should be at the bottom. Caution! It is essential at this point that the supply pipework is thoroughly flushed through before connection to Backplate the Shower Control.
-
Page 19: Built-In Shower Control
Built-in Shower Control 1. Solid Wall or Stud Partition (Using Securing Brackets - Mounting off Front Face) 1.1 Determine the route for the hot and cold supply pipework and for the outlet pipework. When connecting to the BIV Shower Fittings it is recommended that the outlet be positioned above and to one side of the Shower Control. - Page 20 1.7 Fit the Securing Brackets to the Shower Control. Important! Make sure that the Backplate Securing Hole correct holes are used, otherwise the Backplate cannot be fitted. Note! The Securing Brackets can be rotated for suitable fixing points. Backplate Rotate for Securing Hole Suitable 1.8 Mark the positions for the Countersunk...
- Page 21 1.14 Attach the Building-in Shroud to the Shower Control using the two Maximum / Securing Screws. Minimum Limits 1.15 Using the ‘Finished Wall Indicator’ Finished Wall F9802 on the Building-in Shroud as a guide, finish the wall. Caution! Make sure that the finished wall is within the maximum and minimum limits or the control components will not fit correctly.
-
Page 22: Solid Wall Or Stud Partition (Using Rear Fixing Points On Shower Control)
2. Solid Wall or Stud Partition (Using Rear Fixing Points on Shower Control) 2.1 Refer to section: ‘1. Solid Wall or Stud Partition (Using Securing Finished Wall Brackets - Mounting off Front Surface Face)’ and follow steps 1.1 to 1.4. 2.2 Cut away the plasterboard or brick work to the required depth. - Page 23 2.3 Mark the positions of the Fixing Outlet Pipe to Screw holes on the wall. Fittings Rear Fixing 2.4 For solid walls drill two 6 mm holes Point for the Wall Plugs. Securing Screw 2.5 Insert the Wall Plugs (supplied) and attach the Shower Control to the wall with the Securing Screws provided.
-
Page 24: Laminated Panels
3. Laminated Panels (Using Securing Brackets - Mounting off Rear Face) Note! For laminated panels the shower control must be positioned from the rear of the panel. Panel thickness must be between 4 and 12 mm (if a thicker panel is used, it will be necessary to recess the securing brackets into the rear of the panel). - Page 25 3.8 Fit the hot and cold supply pipes and Outlet Pipe to tighten the compression nuts. Fittings Falling Supplies: For falling supplies loosen the grubscrew on each Elbow using the 2.5 mm Hexagon Key (supplied). Remove the Elbows and install on opposite sides.
-
Page 26: Control Assembly
Control Assembly Important! The Yellow Lugs on the Flow Control must be in the fully clockwise (off) position in order to fit the Control Flow Control ‘Yellow Lugs’ Assembly. Note! The Flow Control Lugs on pre 2006 models are Black. Rotate the Temperature Knob fully clockwise and carefully pull it off. - Page 27 Align the Green Temperature Hub Green Temperature Hub with the Lever Retainer Clips as illustrated. Lever Retainer Clips Slide the Flow Lever Adapter over the Cartridge and onto the yellow lugs on the Flow Control, exactly as illustrated. Flow Lever Adapter 10.
-
Page 28: Reversed Inlet Supplies
REVERSED INLET SUPPLIES The Discovery Shower Control is supplied with inlet connections Hot-Left, Cold-Right and Bottom-Outlet as standard. If the hot and cold water supply pipes have been reversed during installation the following procedure must be performed. Isolate the hot and cold water supplies. - Page 29 11. Rotate the Cartridge 180° to reverse the inlets to the Cartridge. Caution! Make sure the two Cartridge Side Seals are not damaged. 12. Refit the Cartridge into the Shower Control Body, make sure that the lugs engage in the slots in the Body. Note! To assist in refitting the Cartridge, rotate 45°...
-
Page 30: Operation
OPERATION Shower Control (Exposed and Built-in Controls) Note! The shower performance may be effected if other water appliances are operated whilst the shower is in use. Turn the Flow Lever Anticlockwise to the Preset Maximum Flow Turn the Temperature Control Knob Clockwise to decrease the Temperature, or Anticlockwise to the Preset Maximum Temperature... -
Page 31: Commissioning
Note! Make sure that any inlet isolating valves are fully open. If excessive flow rate is experienced from the Shower Control, install the supplied Flow Regulator, refer to the Discovery Fittings Installation and User Guide. Important! The fitting of any flow regulator will invalidate TMV2 compliance due to the minimum flow rate requirements. -
Page 32: Type 2 Valves
The approved designations for Type 2 Valves are as follows: Models Designation Mira Discovery LP-S, HP-S Important! The fitting of any flow regulator will invalidate TMV2 compliance due to the minimum flow rate requirements. Do not fit flow regulators in TMV2 applications. - Page 33 The British Burns Association recommends 37 to 37.5°C as a comfortable bathing temperature for children. In premises covered by the Care Standards Act 2000, the maximum mixed water outlet temperature is 43°C. The thermostatic mixing valve will be installed in such a position that maintenance of the TMV and its valves and the commissioning and testing of the TMV can be undertaken.
- Page 34 designated maximum mixed water outlet temperature setting of the valve. Temperature readings should be taken at the normal flow rate after allowing for the system to stabilise. The sensing part of the thermometer probe must be fully submerged in the water that is to be tested.
-
Page 35: Fault Diagnosis
(refer to ‘Specifications’). Fit flow regulator (supplied) to shower valve outlet. For more information contact Mira Showers or visit the website. F l u c t u a t i n g o r Check the showerhead, hose and filters for any reduced flow rate. -
Page 36: Maintenance
MAINTENANCE General The Mira Discovery Shower Control is designed to be maintenance free, as such there are no serviceable parts in the cartridge. However regular cleaning will keep the shower in pristine condition, refer to section: ‘Maintenance, Cleaning’. Filters are fitted to the inlets of the mixer to protect the cartridge and will give many years of trouble free showering. - Page 37 Filters - Exposed Models To clean or replace the inlet filters: Isolate the hot and cold water supplies. Operate the Flow Lever to drain any residual water. Remove the Elbow Shrouds. Unscrew the Filter Caps with the ‘O’ key (supplied) or a 12 mm hexagonal ‘O’...
- Page 38 Filters - Built-in Models To clean or replace the inlet filters: Note! Refer to the section ‘Installation, Control Assembly’ for illustrations. Isolate the hot and cold water supplies. O p e r a t e t h e F l o w L e v e r a n d Temperature Knob to drain any residual water.
-
Page 39: Spare Parts
SPARE PARTS Exposed Thermostatic Shower Control 090 95 Pipe Concealing Plates 1595 036 Temperature Hub Assembly 1595 037 Handle Pack 1595 038 Handle Adapter Pack 1595 039 Cartridge Assembly Pack (also includes components identified ‘D’) 1595 040 Body Trim 1595 041 Elbow Shroud Pack (Identified ‘A’) 1595 042 Elbow Pack Assembly (Identified ‘B’) -
Page 40: Built-In Thermostatic Shower Control
Built-in Thermostatic Shower Control 1595 036 Temperature Hub Assembly 1595 037 Handle Pack 1595 038 Handle Adapter Pack 1595 039 Cartridge Assembly Pack 1595 044 Concealing Plate Assembly 1595 046 Seal Pack (Identified ‘A’) 1595 066 Filter Pack 1595 067 Screw Pack (Identified ‘B’) 1595 070 Component Pack... -
Page 41: Accessories
ACCESSORIES Genuine Mira accessories can be purchased direct from Customers Services (our contact details can be found on the back cover of this guide) or from approved stockists or merchants. Eco Showerhead Everclear Showerhead Logic Showerhead Holder White - 2.1668.001 White - 2.1616.030... -
Page 42: Notes
NOTES... - Page 43 NOTES...
-
Page 44: Customer Service
You have the assurance of a the product. fully trained Mira Technician, genuine Mira spare parts and ● Water or electrical supply, waste and isolation issues. a 12 month guarantee on any chargeable work done.
Need help?
Do you have a question about the DISCOVERY and is the answer not in the manual?
Questions and answers