Table of Contents
Advertisement
Español Français Deutsch
FOLLOW THESE STEPS TO SET UP
WALL AND MANTEL CLOCKS.
• SETTING UP YOUR CLOCK
Located in the shipping carton with the clock will be a key to wind the clock. If provided
on your model, the shipping carton may also include a pendulum and finial that are
separately packed. Please keep all of the original packaging material.
WARNING: KEEP PLASTIC BAGS AND SMALL PARTS AWAY FROM CHILDREN.
Access to the clock movement and chimes is made through the back of the clock.
Howard Miller uses a combination of rubber bands, foam, styrofoam, metal, and
cardboard to secure the movement and chimes during shipping.
Cut rubber bands with scissors and discard.
DO NOT PULL ON THE RUBBER BANDS TO BREAK.
Remove foam, styrofoam, and cardboard from around the movement and chimes.
When possible, pull in the direction shown to remove. (See figure 1 & 2)
For clocks with a pendulum, cut the rubber band or remove the metal spring clip from
the back side of the movement by first pulling one end free. (See figure 2).
Open the front door and remove the white plastic insert holding the minute hand at the
3:00 location (this insert is not used on all models).
Follow the remaining instructions as they apply to your clock.
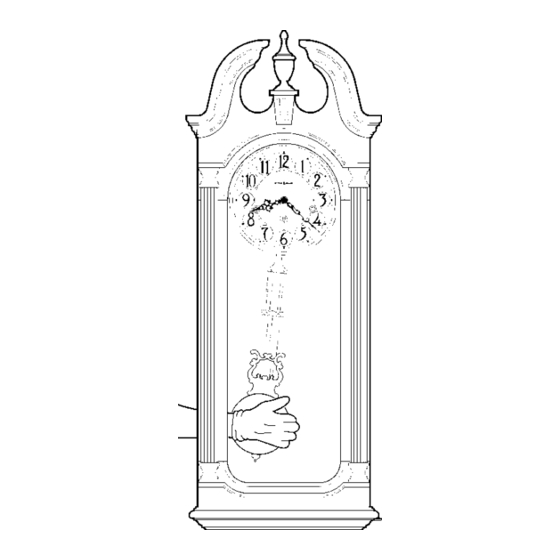
• FOR CLOCKS THAT HAVE A PENDULUM -
Follow these instructions for hanging pendulum.
NOTE: To perform the following steps, Howard Miller suggests wearing cotton gloves
or using a soft cloth when handling parts.
Some pendulums have a colored protective plastic film covering the pendulum disk.
Carefully remove this film before hanging the pendulum.
To hang the pendulum, locate the pendulum guide through the front door or back
access panel. While holding the pendulum guide with one hand, slip the pendulum
through the front door with your other hand. Place the pendulum hook over the pin or
through the slot on the end of the pendulum guide, and lower the pendulum until it is
hanging securely on the pendulum guide. (See figure 2).
• FOR CLOCKS THAT HAVE HANGING WEIGHTS
Follow these instructions for hanging weights.
Do not remove the styrofoam blocks
operating for at least eight (8) hours.
Check the weights to ensure that they are tightly assembled. Check to make sure
that the cable is in the cable pulley. Hang the weights on the pulley. (See figure 3).
WALL AND MANTEL CLOCK
INSTRUCTION MANUAL
English
1-5
6-18
-
until after your clock has been
1
BACK
PLATE
CHIME
RODS
CHIME HAMMERS
FIGURE 1
PULL TO
REMOVE
FOAM
CHIME HAMMERS
CHIME
RODS
FIGURE 2
FIGURE 3
TIME
ADJUSTMENT
LEVER
PULL TO
REMOVE
FOAM
SUSPENSION
SPRING
SPRING
CLIP
PENDULUM GUIDE
PENDULUM
Advertisement
Table of Contents

Related Manuals for Howard Miller WALL AND MANTEL CLOCK


Summary of Contents for Howard Miller WALL AND MANTEL CLOCK
-
Page 1: Instruction Manual
WARNING: KEEP PLASTIC BAGS AND SMALL PARTS AWAY FROM CHILDREN. Access to the clock movement and chimes is made through the back of the clock. Howard Miller uses a combination of rubber bands, foam, styrofoam, metal, and CHIME HAMMERS cardboard to secure the movement and chimes during shipping. -
Page 2: Setting Time/Starting Clock
Refer to this label when contacting your dealer or Howard Miller. For easy reference in the future, take a moment to record these numbers in the space provided on page 5 of these instructions. Attach your sales receipt to this manual for future reference. -
Page 3: Chime Selection
MOVE CHIME SELECTION LEVER ONLY TROUBLE SHOOTING WHEN MINUTE HAND IS IN SAFE TIME Ensure that all instructions provided with your Howard Miller product have been carefully AREA followed. These instructions will provide detailed information to answer most questions. Contact the Howard Miller web site (www.howardmiller.com) for a list of frequently asked questions that may conveniently resolve your problem or answer your questions. -
Page 4: Limited Warranty
Howard Miller warrants to the original consumer/purchaser or recipient that this product will be free from defects in material and workmanship under normal use and service for a period of one year from date of purchase. Howard Miller’s obligation under this warranty shall be limited to repairing the product with new or renewed components or, at its option, replacing it with a new or renewed product. -
Page 5: Service Information
• Have the Howard Miller model number and serial number and a complete description of the problem available. • Return Authorization is required for all returns to Howard Miller. If you have been given authorization to return the clock to Howard Miller, you will be given a Return Authorization number (RGA#). -
Page 6: Para Armar Su Reloj
El acceso al mecanismo del reloj y su melodía es por la parte de atrás del reloj. TIRÓN PARA QUITAR BARRAS DE (Ver figura 1). Howard Miller utiliza una combinación de ligas, espuma, metal y ESPUMA. CARILLON cartón para asegurar su envío. Corte las ligas de hule con un par de tijeras y... -
Page 7: Montage Ihrer Uhr
Der Zugang zum Uhrwerk und dem Geläut befindet sich auf der Miller utilise un ensemble d’élastiques, de mousse, de styromousse, de Rückseite der Uhr. (Siehe Abbildung 1) Howard Miller verwendet eine métal et de carton pour maintenir le mouvement et le carillon en place Kombination von Gummibändern, Schaummaterial, Schaumstoff,... -
Page 8: Para Darle Cuerda A Su Reloj
Favor de referirse a esta etiqueta cuando contacte al distribuidor de este reloj, o directamente con Howard Miller. Para una fácil referencia, sugerimos que tome un momento para escribir estos números en el espacio indicado en la página 15. -
Page 9: Allgemeine Informationen
Unterseite der Uhr angebracht. Bei Anfragen bei Ihrem Händler oder sur le dessus de celle-ci, dans le coin supérieur du fond de l’horloge ou bei Howard Miller beziehen Sie sich bitte auf dieses Etikett. Für dans celle-ci, au-dessus du dos du cadran. Reportez-vous à cette einfache Bezugnahme in der Zukunft nehmen Sie sich einen étiquette lorsque vous prenez contact avec votre représentant ou avec... -
Page 10: Para Regular El Tiempo
• Su reloj requiere poco cuidado y mantenimiento. A continuación están los pasos DEN GONGAUSWAHLHEBEL NUR BEWEGEN, WENN SICH DER que debe seguir para mantener la calidad excepcional de su reloj Howard Miller. MINUTENZEIGER IN DER „SICHEREN ZONE” BEFINDET • De cuerda a su reloj cada siete días. -
Page 11: Melodiewahl
Hitze oder Kälte ist ggf. eine frühere Wartung extrêmement sec, humide ou salé, la chaleur ou le froid peuvent notwendig. Howard Miller empfiehlt, das Gehwerk von einem Fachmann imposer un entretien plus fréquent. Howard Miller ne vous warten zu lassen. -
Page 12: Si Su Reloj No Suena Cuando Debe
Asegure de que todas las instrucciones incluidas aquí fueron cuidadosamente efectuadas. Estas instrucciones le ofrecerán información detallada, la cual contestará la mayoría de sus preguntas. Para ver un listado de preguntas frecuentes visite el sitio web de Howard Miller (www.howardmiller.com) con ello podría convenientemente resolver su problema o encontrar respuestas a sus preguntas. -
Page 13: Uhr Schlägt Nicht Die Richtige Stunde
Assurez-vous d’avoir suivi attentivement toutes les instructions fournies Vergewissern Sie sich, daß alle Anweisungen, die mit Ihrem Produkt von Howard avec votre horloge Howard Miller. Ces dernières répondent en détail à la Miller geliefert wurden, sorgfältig befolgt worden sind. Diese Anweisungen geben Ihnen genaue Information für die Beantwortung der meisten Fragen. -
Page 14: Si Su Reloj No Funciona
UHR LÄUFT NICHT Obwohl nicht empfohlen wird, Ihre Uhr selbst zu reparieren, sollten Sie die folgenden Punkte nachprüfen, ehe Sie sich an Howard Miller oder Ihren genehmigten Fachhändler wenden. Nehmen Sie keine Änderungen vor, die Sie sich nicht zutrauen. -
Page 15: Garantia Limitada
Howard Miller le garantiza al consumidor/comprador original, o recipiente de este producto, que este reloj estará libre de defectos en material y fabricación bajo uso y servicio normal, por un período de un año a partir de la fecha de compra. La obligación de Howard Miller bajo esta garantía se limitará... -
Page 16: Garantie Limitée
à compter de la date d’achat lorsqu’il fait l’objet d’une utilisation et d’un entretien normaux. L’obligation de Howard Miller aux termes de la présente garantie est limitée à la réparation du produit avec des composants neufs ou remis à neuf ou, à... -
Page 17: Beschränkte Garantie
Service für ein Jahr ab Kaufsdatum frei von Material- und Verarbeitungsfehlern ist. Howard Millers Verbindlichkeit unter dieser Garantie ist auf die Reparatur des Produkts mit neuen oder repanerten Komponenten beschränkt. Das Produkt kann nach dem Ermessen von Howard Miller mit einem neuen oder repanerten Produkt ersetzt werden. - Page 18 REPARATURINFORMATIONEN Bevor Sie sich an den Reparaturservice wenden, stellen Sie bitte sicher, dass die mit dem Howard Miller Produkt gelieferte Anleitung gründlich befolgt wurde. Darin werden häufig gestellte Fragen ausführlich beantwortet. Besuchen Sie die Howard Miller Website (www.howardmiller.com) für eine Liste mit häufig gestellten Fragen, die Ihnen ggf. beim Lösen Ihres Problems helfen und Ihre Fragen beantworten können. Die meisten Probleme können ohne Rücksenden der Uhr schnell behoben werden.
- Page 20 860 East Main Avenue Zeeland, Michigan 49464-1300 www. howardmiller.com © Copyright Howard Miller 496978-R3...
Need help?
Do you have a question about the WALL AND MANTEL CLOCK and is the answer not in the manual?
Questions and answers
where is the night off position on asandringham model 613-108
Is there a parts list for model #620-160 Serial # 63450105 Howard Miller Dual Chime Wall Clock?