Table of Contents
Advertisement
Advertisement
Table of Contents

Related Manuals for Cyber Suite LED Keypad

Summary of Contents for Cyber Suite LED Keypad
- Page 1 LED Keypad User Manual...
-
Page 3: Table Of Contents
DISABLE AUDIBLE OUTPUT ............22 MESSAGES ................23 PANIC ALARM................23 FIRE ALARM ................24 CONFIGURATION ..........25 ZONE DESCRIPTION..............25 FIRE ZONE................. 25 ONE KEY ARMING ............... 26 PANIC KEYS ................26 TIMERS ..................27 USERS ..................27 CyberSuite™ LED Keypad User Manual... -
Page 4: Introduction
Please consult the configuration section on page 25 to find out how your system is configured. Some features may not be available depending on your system configuration. CyberSuite™ LED Keypad User Manual... -
Page 5: Operation
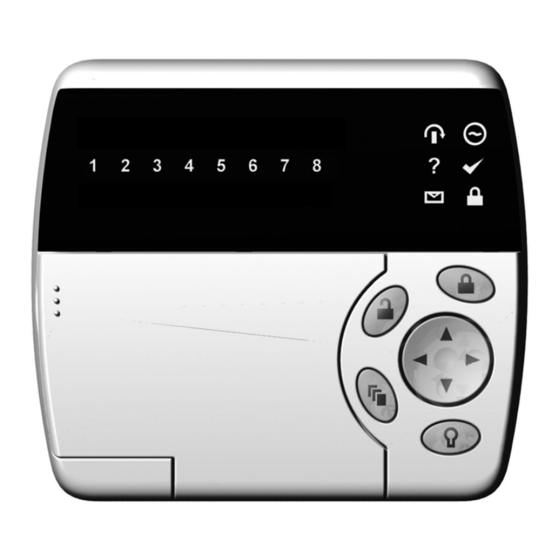
Refer to the system configuration tables on page INDICATOR LIGHTS The CyberSuite™ LED keypad features three status indicator lights showing the condition of the CyberSuite™ Security System. Bypass... -
Page 6: Ready Indicator
This indicator will be cleared the next time you arm your system. OFF: No alarm memory present. CyberSuite™ LED Keypad User Manual... - Page 7 VISUAL DISPLAY The CyberSuite™ LED keypad features an easy to use 8 zone display, which in conjuction with the status LED’s allows you to monitor your system at a glance. When not using the menu system for programming options or modifying user accounts, your keypad will display the...
-
Page 8: User Codes
If you are forced to arm or disarm your system, entering the user code assigned to User 08 will arm or disarm the system and immediately transmit a silent message (Duress Code) to the Property Management System or Security Company. CyberSuite™ LED Keypad User Manual... -
Page 9: Setup Login
Logging Out of the Setup Menu To leave programming mode, press the CLEAR until the ARMED status LED stops flashing, or do not press any key for 10 seconds and you will be automatically logged out. CyberSuite™ LED Keypad User Manual... -
Page 10: User Setup Options
(see page 6 for details) • Enter the following key press sequence: , [USER NUMBER] , [USER CODE] , • The ARMED LED will then flash quickly, prompting you to confirm the user code by pressing: [USER CODE] , CyberSuite™ LED Keypad User Manual... - Page 11 To delete a user code • Enter SETUP LOGIN mode if you have not done so already (see page 6 for details) • Enter the following key press sequence: , [USER NUMBER] CyberSuite™ LED Keypad User Manual...
-
Page 12: Modifying User Options
The available options are described below. • Option 1 – Arm Only Code Enabled allows the user code to be used only for arming the CyberSuite™ system. CyberSuite™ LED Keypad User Manual... - Page 13 Each user may have only 1 of the following Triple Badge options enabled at any time. Enabling one of the triple badge user options will automatically disable all other Triple Badge user options for you. CyberSuite™ LED Keypad User Manual...
- Page 14 Equipped Systems Only Enabled allows the selected user to hold a door open for 2 hours upon presenting their card 3 times in quick succession. Disabled prevents triple card presenting from latch opening the door. CyberSuite™ LED Keypad User Manual...
- Page 15 Any user that has a Triple Badge Latch Option enabled may present their card three times while the door is latched open to cancel the latching and immediately lock the door. CyberSuite™ LED Keypad User Manual...
-
Page 16: User Card Numbers
Deleting a User Card • Enter SETUP LOGIN mode if you have not done so already (see page 6 for details) • Enter the following key press sequence: , [USER NUMBER] CyberSuite™ LED Keypad User Manual... -
Page 17: Trouble Conditions
• Enter the following key press sequence: The numbered LED corresponding to the trouble condition(s) present will be lit, and can be identified by the numbered item in the TROUBLE LIST beginning on the next page. CyberSuite™ LED Keypad User Manual... -
Page 18: Trouble List
Fire Zones and Fire Loop trouble detection MUST be enabled by your property manager or installation company. Please refer to the system configuration table on page 26. CyberSuite™ LED Keypad User Manual... -
Page 19: Arming/Disarming
Disarming Your System 1. Enter through a designated entry point (Entry Door), the entry delay time will start and the keypad will emit a continuous audible tone. CyberSuite™ LED Keypad User Manual... -
Page 20: Regular Arming
Stay Arming Your System 1. Check that all zones that are not stay zone(s) are closed and ready to arm. 2. Press the stay key then enter your [USER CODE]. 3. The exit delay will start. CyberSuite™ LED Keypad User Manual... -
Page 21: Force Arming
Force Arming Your System 1. Check that all zones that are not force zone(s) are closed and ready to arm. 2. Press the force key then enter your [USER CODE]. 3. The exit delay will start. CyberSuite™ LED Keypad User Manual... -
Page 22: Bypassing Zones
The Bypass Recall Feature reinstates the previous bypass entries saved in memory. This eliminates the need to manually re-program the bypass entries every time you arm the system if you are always bypassing the same zone(s). CyberSuite™ LED Keypad User Manual... -
Page 23: One Key Arming
(i.e. cleaners) to arm without giving them access to any other alarm system operations. One key arming MUST be enabled by your property manager or installation company. Refer to the system configuration table on page 26. CyberSuite™ LED Keypad User Manual... -
Page 24: Special Features
The alarm memory can also be accessed from the main menu by pressing followed by the enter key. Clearing Alarm Memory The alarm memory is cleared automatically next time you arm your CyberSuite™ system. CyberSuite™ LED Keypad User Manual... -
Page 25: Chime Zones
Disabling Audible Output 1. Press and hold the clear key. 2. Keypad will generate one long audible tone (rejection tone) to signify that the audible output is disabled. To enable the audible output repeat the above steps. CyberSuite™ LED Keypad User Manual... -
Page 26: Messages
Press & hold keys for a medical alarm. Press & hold keys for a fire alarm. All Panic Alarm activations MUST be enabled by your property manager or installation company. Please refer system configuration table on page 26. CyberSuite™ LED Keypad User Manual... -
Page 27: Fire Alarm
30 seconds. Pressing any key on the keypad during the first 30 seconds will silence the alarm for 90 seconds. Fire Alarm functions MUST be enabled by your property manager installation company. Please refer system configuration table on page 25. CyberSuite™ LED Keypad User Manual... -
Page 28: Configuration
FIRE ZONE The following lists the fire zone configuration for your system. Enabled Disabled Fire Zone Delayed Fire Zone Your fire zone is located on zone ____________ and operates with a delay of _____ seconds. CyberSuite™ LED Keypad User Manual... -
Page 29: One Key Arming
Force Arming Instant Arming PANIC KEYS The following lists the panic key configurations that are enabled on your system. Enabled Disabled [1] + [3] Panic Alarm [4] + [6] Medical Alarm [7] + [9] Fire Alarm CyberSuite™ LED Keypad User Manual... -
Page 30: Timers
The following table should be used to keep a record of the users programmed in your CyberSuite™ system. Record the name of the user only. Do not write the user code. All users can arm and disarm the system. USER USER NAME DURESS ARM ONLY MASTER CyberSuite™ LED Keypad User Manual... - Page 31 CyberSuite™ LED Keypad User Manual...
- Page 32 Unit C, 6 Ascension Place, Mairangi Bay, P.O. Box 302-340 North Harbour, Auckland, New Zealand. Phone: +64 (9) 476 7124 Fax: +64 (9) 476 7128 www.integratedcontroltechnology.com...
Need help?
Do you have a question about the LED Keypad and is the answer not in the manual?
Questions and answers