Table of Contents
Advertisement
Quick Links
Advertisement
Table of Contents

Related Manuals for R-Tech P100HF


Summary of Contents for R-Tech P100HF
- Page 1 P100HF PLASMA CUTTER OPERATION INSTRUCTIONS...
- Page 3 Thank you for selecting the R-Tech Plasma 100HF Inverter Plasma Cutter The Plasma 100HF has many benefits over traditional transformer plasma cutters, including infinite power control, HF pilot start and HF pilot restart which is ideal for cutting mesh etc , quick fitting cost effective torch, long life cost effective torch consumables and...
-
Page 4: Technical Specifications
Cutting Capability – Duty Cycle The R-Tech Plasma 100HF is rated at 100 Amps at 60% duty cycle on a ten minute basis. If the duty cycle is exceeded a thermal protector will shut machine off until the machine cools. - Page 5 Safety Precautions Read entire section before starting installation WARNING! Electric Shock can kill – Only qualified personnel should perform this installation. Turn off input power at the fuse box before working on this equipment. Do not touch electrically live parts. Always connect the machine to an earthed mains supply as per national recommended standards.
-
Page 6: Electrical Installation
Electrical Installation WARNING! ELECTRIC SHOCK CAN KILL Machine grounding and High Frequency Interference Protection This plasma cutter must be grounded to earth. See national electrical codes fro proper grounding methods. The high frequency generator being similar to a radio transmitter may cause interference to radio, TV and other electronic equipment. - Page 7 smaller than recommended will result in ‘nuisance’ shut off from welder inrush currents even if cutting at low amperages. Failure to follow these instructions can cause immediate failure within the welder and void machines warranty. Turn the input power OFF at the mains switch & fuse box before working on this equipment. Have a qualified electrician install &...
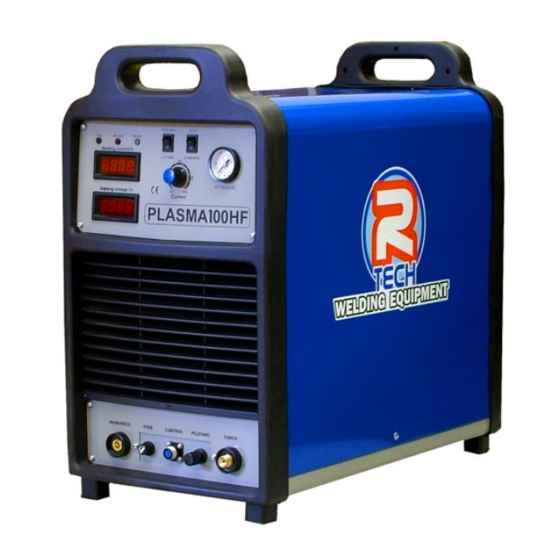
- Page 8 Connections for Plasma 100HF Rear Machine connections Fig 1 1. Air pressure regulating knob This regulates the air pressure as displayed in gauge on front of machine. To adjust pressure pull knob upwards and turn to adjust pressure, once correct pressure is obtained press down knob to secure.
- Page 9 - Not normally used 4. Mains input cable Fit required plug as per your electrical installation 5. On / Off Switch Turns machine On / Off Front machine connections Fig 2 1. Earth / Workpiece connector Connect the earth lead (negative - ) to this connector. Insert male connector into socket and twist clockwise until tight.
-
Page 10: Controls And Settings
5. Torch power connector Connect the main torch cable by screw clockwise until tight. Controls and Settings Fig 3 1. Air pressure gauge This shows the air pressure as set by regulator at rear of machine. This should be set to 55PSI when the test gas button is activated. 2. -
Page 11: Operating Machine
position for plasma cutting with a hand held and machine type torch When in the up position this is in auto mode, this is for special applications when using automated machinery. Not normally used Operating machine SAFETY PRECAUTIONS WARNING! ELECTRIC SHOCK CAN KILL Do not touch electrically live parts or electrode with skin or wet clothing. - Page 12 Operating Machine Please ensure all torch consumables are tight before use 1. Ensure machine has been setup as previously stated 2. Turn on the machine and the power light indicates and cooling fan is running 3. Set the function switch in the ‘test gas’ position, air will flow from torch head, now set the air pressure in gauge using adjuster on regulator on rear of machine to 55PSI, Once the correct air pressure has been set press down the adjuster on air regulator and set the function switch to the ‘cutting’...
- Page 13 settings on some scrap material until you find the best amperage / cutting speed for user. If you ever have any questions on settings call us and speak to one of our experienced technicians who will be happy to help you. Replacing torch consumables WARNING! ELECTRIC SHOCK CAN KILL...
-
Page 14: Routine And Periodic Maintenance
Maintenance Routine and periodic maintenance WARNING! ELECTRIC SHOCK CAN KILL Turn the input power OFF at the mains switch & fuse box and remove mains plug from socket before working on this equipment. Have a qualified electrician install & service this Plasma cutting equipment. Allow machine to sit for 5 minutes minimum after disconnection from mains power to allow the power capacitors to discharge before working inside this equipment. -
Page 15: Fault Diagnostics
HF PCB Failure – Contact R-Tech for repair Machine keeps overheating - Warning light is lit on machine Check if fan is running – if not contact R-Tech for repair Check the cooling vents for obstruction, blow out machine with clean dry low pressure... - Page 16 Fit new consumables as per instructions earlier in this manual Plasma Torch Consumables parts list R-Tech Torch Spares Plasma 40HF Part No. Electrode P40-EL Cutting Tip 1.0mm 40 Amp...
Need help?
Do you have a question about the P100HF and is the answer not in the manual?
Questions and answers