Harman P43 User Manual
Pellet stove p43
Hide thumbs
Also See for P43:
- Owner's manual (44 pages) ,
- Owners manual care and operation (42 pages) ,
- Installation & operating manual (40 pages)
Table of Contents
Advertisement
installation & Operating Manual
P43 Pellet Stove Owners Manual
r10
"Ce manuel est disponible en Français sur demande"
SaFetY nOtice
PleaSe read thiS entire Manual beFOre YOu inStall and uSe YOur new rOOM heater. Failure
tO FOllOw inStructiOnS MaY reSult in PrOPertY daMage, bOdilY injurY, Or even death.
FOr uSe in the u.S. and canada. Suitable FOr inStallatiOn in MObile hOMeS.
iF thiS harMan StOve iS nOt PrOPerlY inStalled, a hOuSe Fire MaY reSult. FOr YOur SaFetY, FOl-
lOw inStallatiOn directiOnS.
cOntact lOcal building Or Fire OFFicialS abOut reStrictiOnS and inStallatiOn inSPectiOn
reQuireMentS in YOur area.
cOntact YOur lOcal authOritY (Such aS MuniciPal building dePartMent, Fire dePartMent, Fire
PreventiOn bureau, etc.) tO deterMine the need FOr a PerMit.
cette guide d'utiliSatiOn eSt diSPOnible en FrancaiS. chez vOtre cOnceSSiOnnaire de harMan
hOMe heating.
R1
Save theSe inStructiOnS.
Manual item# 3-90-04301
Advertisement
Table of Contents

Related Manuals for Harman P43


Summary of Contents for Harman P43
-
Page 1: Safety Notice
FOllOw inStructiOnS MaY reSult in PrOPertY daMage, bOdilY injurY, Or even death. FOr uSe in the u.S. and canada. Suitable FOr inStallatiOn in MObile hOMeS. iF thiS harMan StOve iS nOt PrOPerlY inStalled, a hOuSe Fire MaY reSult. FOr YOur SaFetY, FOl- lOw inStallatiOn directiOnS. - Page 3 8cm min 3"min P43 Pellet Stove...
-
Page 4: Table Of Contents
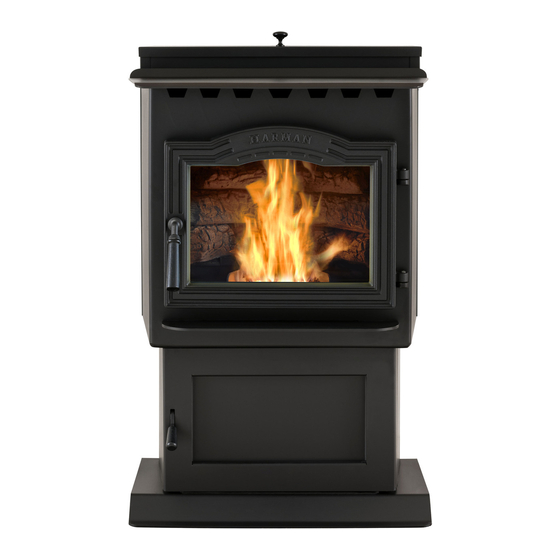
The P43 Pellet Stove has huge features in a small package, giving you 0 to 43,000 BTU when you need it, automatically. You basically need to set your desired room temperature and fill the hopper. With the P43 you will notice even heat throughout your zone and a level of convenience you never thought possible. - Page 5 FlOOr, Or a ceiling. thiS aPPliance. inStallatiOn and rePair OF thiS cautiOn harMan StOve ShOuld be dOne bY a dO nOt cOnnect tO anY air QualiFied Service PerSOn. we recOM- Mend that the StOve be inSPected diStributiOn duct Or SYSteM.
-
Page 6: Installation
The P43 is bolted (1/4 x 1" hex head bolts) to the skid to prevent movement during shipping. To free the stove from the skid you must remove the hold-down bolts in the rear of the pedestal base. - Page 7 1" on or near this unit. 6" warning 6" (152mm) the Structural integritY OF the ManuFactured hOMe FlOOr, wall, and ceiling/rOOF MuSt be Maintained. 6"- 152mm (measured from dO nOt inStall in SleePing rOOM. glass) Fig. 6 P43 Pellet Stove...
-
Page 8: Venting
(if from the horizontal center-line of the regulator. in canada) = Area where termination is not permitted = Venting Terminal = Air Supply Inlet P43 Pellet Stove... -
Page 9: Outside Air
However, in some cases a perfect seal is not achieved. For this reason and the fact that the P43 operates with a positive vent pressure we specify that the joints also be sealed with silicone. -
Page 10: Vent Configurations
There is a break-away hole on the rear panel (part #1-00-677077) of the P43 stove which must be removed before con- necting the flex pipe. The pipe should be run outside and terminate to the side or below the vent pipe outlet so the flue outlet is more than 12"... - Page 11 Note: Do not place joints within wall pass- throughs. cautiOn Keep combustible materials (such as grass, leaves, etc.) at least 3 feet away from the flue outlet on the outside of the building. 12" min. wall to outlet 3 ft. Fig. 9 to combustibles P43 Pellet Stove...
- Page 12 The connector pipe should extend through the smoke chamber to the base or into the first flue tile. Be sure to design the venting so that it can be easily cleaned. Fig. 11 P43 Pellet Stove...
- Page 13 The pipe or liner inside the chimney should be 4" diameter. In this method a cap should also be installed on the chimney to keep out rain. Fig. 13 P43 Pellet Stove...
- Page 14 #8 installing through the ceiling Through the ceiling vent, follow PLvent manufacturers Fig. 15 recommendations when using wall and ceiling pass through. note: do not place joints within wall pass-throughs. 12" min. wall to outlet Fig. 16 P43 Pellet Stove...
-
Page 15: Esp Control
P43 autOMatic ignitiOn eSP cOntrOl Feed adjuster Power Light Sets the maximum Indicates power to the feed rate. control. Test Runs all motors at full speed for one minute Status Light to check operation. Will be lit in either stove... - Page 16 P43 autOMatic ignitiOn/OPeratiOn The P43 is a fully automatic stove that features two room temperature Mode operating modes; Stove temperature Mode and room temperature Mode. In Stove Temperature Mode, you select a burn rate and the stove will remain at the same burn rate regardless of the room temperature.
- Page 17 P43 autOMatic ignitiOn/OPeratiOn Stove temperature Mode Shut down Procedure In the Stove Temperature Mode and with the igniter The best way to shut down the stove is to simply let it toggle switch in the Auto position, the stove will light run out of pellets.
- Page 18 P43 autOMatic Start uP Starting First Fire igniter Switch to"autO"(up position) Make sure the unit is plugged into a 120 VAC, 60 HZ electrical source. The power light should be the only light lit. SeeHint #7. Fig. 17 nOtice: be sure there is no unburned fuel Flame Guide 1"...
-
Page 19: Manual Operation
P43 Manual ignitiOn/OPeratiOn The P43 Pellet Stove is capable of manual operation. This also allows the operator to manually control operation during an emergency (i.e. igniter failure, when using a 502H battery backup, as opposed to the 512H, or when using certain generators.) The unit can be switched between "AUTO"... - Page 20 P43 Manual Start uP Starting First Fire igniter Switch to"Manual" (down position) Fig. 20 Make sure the unit is plugged into a 120 VAC, 60 HZ electrical source. The power light should be the only light lit. Fig. 19 nOtice: be sure there is no unburned fuel See Hint #7.
-
Page 21: Low Draft Voltage Adjustment
The P43 is then factory set at a 1. Plug unit into a 120VAC, 60 HZ outlet. mid-point adjustment and in most cases will not need any 2. -
Page 22: Maintenance
Before re-using the appliance, have the venting system thoroughly inspected and replace any damaged components. The glass in your Harman stove is a special ceramic glass. • dO nOt abuse the glass by striking or slamming the door. - Page 23 4. Scrape burnpot with flat end of scraper provided Wheel with the stove. Inspect the holes on the burnpot surface. See Fig. 33. 5. Open burn pot clean-out. Clean fly ash from burn Blower Cover pot and replace cover. Latch Fig 27 P43 Pellet Stove...
- Page 24 The stove should be cleaned after each ton of pellets (50 bags) and the venting system inspected and cleaned after each heating season. Fig. 33 Probe Be careful not to damage ESP probe when cleaning with brush. Fig. 31 P43 Pellet Stove...
-
Page 25: Burn Pot Cleaning And Maintenance
P43 Maintenance - burn Pot burn Pot cleaning and Maintenance 1. Scrape the top holed surface and sides of the burn pot.(Fig 33) It is not necessary to completely remove all material from the burn pot. The excess will be pushed out during the next use. -
Page 26: Safety Features
P43 Maintenance - cleaning the Feeder body Pellet fines may accumulate in the feeder body over a period of time; therefore, a yearly inspection and cleaning of this area must be performed. To clean out fines: 5/16" Hex Head 5/16" Hex Head Screws (2 on 1. -
Page 27: Troubleshooting
3% or more. with fines and small bits of ash. The P43 is capable of burning all 3 categories of pellets due to a patented feeder and burn pot sys- 4. The holes in the burnpot may be getting filled tem. - Page 28 Flue Size 3 inch Outside air Size 2 3/8" i.d. inch Fuse rating 6 amp P43 wiring diagram HARMAN P43/P61A/P68 PELLET STOVE WIRING DIAGRAM MALE/FEMALE CONNECTIONS BROWN WHITE GREEN WIRE IS GROUND REMOTE SENSOR PORTS 6 AMP GLASS FUSE BONDED TO STOVE BODY...
-
Page 29: Options
This will allow the swell latch of the hopper extension to fully expand to the bottom side of the hole for a proper seal. P43 Pellet Stove... - Page 30 Damp pellet as a result of using fuel with higher ash or mineral fuel could turn back into sawdust which does not flow content. properly through the feed system. P43 Pellet Stove...
- Page 31 Addendum for Burning Corn and Pellet Fuel Mixture Harman pellet burning, free-standing stoves and inserts have been tested to ASTM E1509 for burning shelled corn in a mixture with wood pellets. The listing approves up to a 50% corn and 50% pellet mixture. Different mixtures of corn will have distinctively different burn characteristics depending upon moisture content and variety.
- Page 32 Contact your dealer if you have questions about UPS compatibility with your appliance. harman Surefire 512h battery back-up The 512H connects to a 12 volt deep cycle battery that will run your appliance for up to eight (8) hours. It includes a trickle charge feature that keeps your battery charged when power is available.
-
Page 33: Warranty
1 year Burners, logs and refractory years Limited 3 years Firebox and heat exchanger Lifetime All replacement parts 90 Days beyond warranty period See conditions, exclusions, and limitations on next page. 4021-645C 12-29-10 Page 1 of 2 P43 Pellet Stove... - Page 34 THE EXTENT PROVIDED BY LAW, HHT MAKES NO EXPRESS WARRANTIES OTHER THAN THE WARRANTY SPECIFIED HEREIN. THE DURATION OF ANY IMPLIED WARRANTY IS LIMITED TO DURATION OF THE EXPRESSED WARRANTY SPECIFIED ABOVE. 4021-645C 12-29-10 Page 2 of 2 P43 Pellet Stove...
-
Page 35: Service Parts
P43 Pellet Service Parts beginning Manufacturing date: n/a Steel Pellet Stove ending Manufacturing date: active 1-90-04300-1 (black), 1-90-04300-2 (charcoal), 1-90-04300-3 (goldenfi re), 1-90-04300-4 (Metallic blue), 1-90-04300-5 (honey glo), 1-90-04300-10 (Mojave red), 1-90-04300-12 (Forest green) 11 12 Part number list on following page. - Page 36 P43 Pellet Service Parts beginning Manufacturing date: n/a ending Manufacturing date: active IMPORTANT: THIS IS DATED INFORMATION. When requesting service or replacement parts for your appliance please provide model number and serial number. All parts listed Stocked in this manual may be ordered from an authorized dealer.
- Page 37 P43 Pellet Service Parts beginning Manufacturing date: n/a ending Manufacturing date: active IMPORTANT: THIS IS DATED INFORMATION. When requesting service or replacement parts for your appliance please provide model number and serial number. All parts listed Stocked in this manual may be ordered from an authorized dealer.
- Page 38 P43 Pellet Service Parts beginning Manufacturing date: n/a ending Manufacturing date: active IMPORTANT: THIS IS DATED INFORMATION. When requesting service or replacement parts for your appliance please provide model number and serial number. All parts listed Stocked in this manual may be ordered from an authorized dealer.
- Page 39 Service & Maintenance log date Of Service Performed by description Of Service P43 Pellet Stove...
- Page 40 Proudly Printed On 100% Recycled Paper...
Need help?
Do you have a question about the P43 and is the answer not in the manual?
Questions and answers