Table of Contents
Advertisement
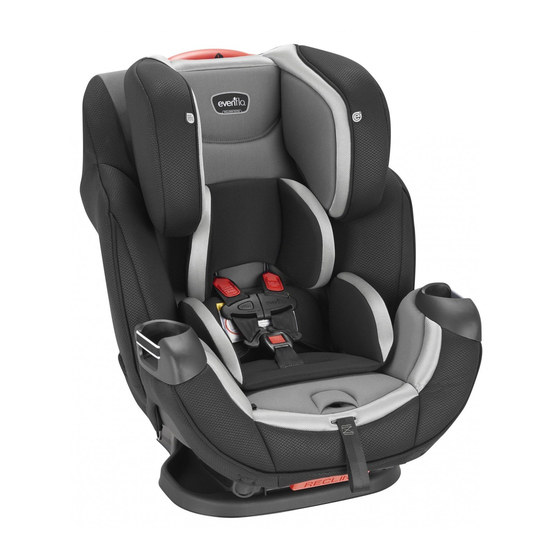
Symphony
Child Restraint System
Owner's Manual
Keep for future use.
Rear-facing
2.3 to 18 kg
(5 to 40 lbs)
48 to 94 cm
(19 to 37 in.)
Forward-facing
10 to 29.4 kg
(22 to 65 lbs)
71 to 127 cm
(28 to 50 in.)
Booster
18 to 49.8 kg
(40 to 110 lbs)
110 to 145 cm
(43.3 to 57 in.)
Para instrucciones en Español,
llamar al: 1-800-233-5921.
WARNING:
To reduce the risk of serious injury
or death, read this owner's manual prior
to installing and using this child restraint.
© 2013 Evenflo Company, Inc.
65
™
25706655
10/13
Advertisement
Table of Contents

Related Manuals for Evenflo Symphony 65


Summary of Contents for Evenflo Symphony 65
- Page 1 Symphony ™ Child Restraint System Owner’s Manual Keep for future use. Rear-facing 2.3 to 18 kg (5 to 40 lbs) 48 to 94 cm (19 to 37 in.) Forward-facing 10 to 29.4 kg (22 to 65 lbs) 71 to 127 cm (28 to 50 in.) Booster 18 to 49.8 kg...
-
Page 2: Table Of Contents
More children are killed every year as passengers in Table of Contents car crashes than by any other type of injury. To reduce the risk of SERIOUS INJURY or DEATH, read Important Information this owner’s manual and your vehicle owner’s manual Warnings ................ -
Page 3: Warnings
WARNING WARNING Air Bag Warnings General Warnings Rear-facing, Forward-facing, and Booster Use Rear-facing, Forward-facing, and Booster Use • DO NOT use this child restraint in the front seat of a • Failure to follow installation instructions can result in vehicle equipped with an air bag, unless the air bag the child striking the vehicle’s interior during a sudden has been deactivated. - Page 4 Recline Position #1. Consult vehicle owner’s manual, try a different seating • DO NOT use the tether strap when the child restraint location, or call Evenflo for further assistance. is in the rear-facing position. • ONLY use this child restraint on forward-facing •...
- Page 5 WARNING WARNING Booster Seat Position Warnings Seat Belt Warnings Booster Use Only Booster Mode Only • DO NOT use this booster seat rear-facing. • The shoulder belt MUST be threaded through the shoulder belt guide (p. 46). Seat Belt Warnings •...
-
Page 6: Safe Practices
• DO NOT attach additional padding, toys, or other • Put sharp or heavy items in the trunk. Anything loose devices not made by Evenflo or described in these can be deadly in a crash. -
Page 7: Recall Information For U.s. Customers
LATCH Symbol – Alerts you to important restraint’s model number, and manufacturing date to: information about LATCH safety. Evenflo Company, Inc., 1801 Commerce Dr., Tether Anchor Symbol – Alerts you to Piqua, OH 45356, or call 1-800-233-5921. important information about tether anchor safety. -
Page 8: Visual Glossary
Visual Glossary Visual Glossary Your vehicle components may be significantly different than pictured. Consult your owner’s manual to help you identify your vehicle components. Front Seat Lap and Shoulder Belts Rear Fold-down Armrest Front Headrests Consult your vehicle Tether Headrests owner’s manual. -
Page 9: Securing The Child In The Child Restraint
Securing the Child in the Child Restraint Securing the Child in the Child Restraint 1. Loosen harness. 5. Remove all slack in Press the harness release harness. button on the front of the Pull upward on the seat, then pull up on the harness straps near the harness strap behind the hips, as shown, to... -
Page 10: Removing The Child From The Child Restraint
Removing the Child from the Child Restraint This page is intentionally blank. 1. Loosen harness straps. Press the harness release button on the front of the seat while pulling up on the harness strap behind the fastened chest clip. 2. Disconnect chest clip. Push the release button and pull the chest clip apart. -
Page 11: Rear-Facing Installation Checklist
To properly secure this child restraint, it MUST move more than 25 mm (1 inch) from side to side or front to back at the rear-facing belt path. To make installation easier, watch the installation video of this child restraint at www.evenflo.com. -
Page 12: Which Type Of Lower Anchor Connector Is On Your Child Restraint
Which Type of Lower Anchor Connector Moving Lower Anchor Connector Assembly to Rear-facing Belt Path Is on Your Child Restraint? Your child restraint will have one of the two types of lower anchor connecters shown below. Follow the in- SureLatch structions on the following pages to properly install the Lower Anchor Connector Lower Anchor Connector... -
Page 13: Rear-Facing Installation With Lower Anchor Connectors
Moving Lower Anchor Connector Rear-facing Installation with Lower Assembly to Rear-facing Belt Path Anchor Connectors IMPORTANT: 1. Remove lower an- • If you are using the vehicle seat belt to secure the child chor connectors restraint, DO NOT use lower anchor connectors. from the forward- •... - Page 14 Rear-facing Installation with Lower Rear-facing Installation with Lower Anchor Connectors Anchor Connectors 3. Increase recline 4a. Secure the child angle, if necessary. restraint – If level line is not parallel SureLatch Con- to the ground, discon- nector. nect lower anchor Using your full weight, connectors and place push the child restraint...
-
Page 15: Rear-Facing Installation With Seat Belt
Rear-facing Installation with Seat Belt Rear-facing Installation with Seat Belt IMPORTANT: Lap and Shoulder Lap Belt Only • If you are using lower anchor connectors to secure the Belt Combination child restraint, DO NOT use the vehicle seat belt. • Before installing this child restraint rear-facing with the vehicle seat belt, you MUST move the lower anchor con- nector assembly to the forward-facing belt path so that it does not interfere with the vehicle seat belt. - Page 16 Rear-facing Installation with Seat Belt Rear-facing Installation with Seat Belt 4. Install locking clip, if necessary. You MUST use a locking clip if your vehicle has: Locking Clip installed properly A lap/shoulder seat belt combination that has a buckle tongue that slides freely along the belt 13 mm (0.5 inch)
-
Page 17: Forward-Facing Installation Checklist
If the child weighs more than 29.4 kg (65 lbs) OR belt path. their shoulders are above the highest harness level, To make installation easier, watch the installation MUST use this child restraint as a booster seat. video of this child restraint at www.evenflo.com. -
Page 18: Which Type Of Lower Anchor Connector Is On Your Child Restraint
Which Type of Lower Anchor Connector Moving Lower Anchor Connector Is on Your Child Restraint? Assembly to Forward-facing Belt Path Your child restraint will have one of the two types of lower anchor connecters shown below. Follow the in- SureLatch structions on the following pages to properly install the Lower Anchor Connector Lower Anchor Connector... -
Page 19: Forward-Facing Installation With Lower Anchor Connectors
Moving Lower Anchor Connector Forward-facing Installation with Lower Assembly to Forward-facing Belt Path Anchor Connectors IMPORTANT: 1. Remove lower an- • If you are using the vehicle seat belt to secure the child chor connectors restraint, DO NOT use lower anchor connectors. from the rear-facing •... - Page 20 Forward-facing Installation with Lower Forward-facing Installation with Lower Anchor Connectors Anchor Connectors 4a. Secure the child Near Side Far Side restraint – SureLatch Con- nector. Using your full weight, push the child restraint firmly into the vehicle seat, as shown, to set it in place.
-
Page 21: Forward-Facing Installation With Seat Belt
Forward-facing Installation with Lower Forward-facing Installation with Seat Belt Anchor Connectors IMPORTANT: • If you are using lower anchor connectors to secure the child restraint, DO NOT use the vehicle seat belt. • Before installing this child restraint forward-facing with the vehicle seat belt, you MUST move the LATCH as- sembly to the rear-facing belt path so that it does not interfere with the vehicle seat belt. - Page 22 Forward-facing Installation with Seat Belt Forward-facing Installation with Seat Belt 5. Install locking clip, Access Flap if necessary. You MUST use a locking Forward-facing clip if your vehicle has: Locking Clip Belt Path Shoulder installed properly A lap/shoulder seat belt Belt combination that has a buckle tongue that slides...
-
Page 23: Tether Strap
Forward-facing Installation with Seat Belt This page is intentionally blank. 5. Connect and tighten tether strap. Connect the tether hook to the vehicle tether an- chor behind the vehicle seat, as shown. (Please consult your vehicle owner’s manual, as tether anchor locations may vary.) Pull the strap and tighten the tether securely. -
Page 24: When To Put Your Child In A Booster Seat
When to Put Your Child How can you tell if a child is ready to transition to a booster seat? in a Booster Seat You should consider using a booster seat if the following conditions apply: • The child is mature enough to sit in the booster seat Booster seats raise the child up and help to position the and not put the belts under his/her arm or behind his/ vehicle lap and shoulder belt correctly. -
Page 25: Booster Installation Checklist
Using Symphony as a Booster Installation Checklist Booster Seat 1. Convert child restraint to booster seat. See “Converting into a Booster Seat,” p. 48. Child Requirements 2. Secure booster seat to the vehicle seat. Weight: 18 to 49.8 kg (40 to 110 lbs) Make sure the bottom and back of the booster seat Height: Child is 110 to 145 cm (43.3 to 57 inches) are touching vehicle seat and back. -
Page 26: Converting Into A Booster Seat
Converting into a Booster Seat Converting into a Booster Seat 1. Remove the seat pad 4. Conceal harness (p. 57). tabs. Adjust the headrest to Tuck harness tabs its uppermost position completely into (p. 53). adjustment slots, as shown. Pull the lower anchor connectors from the Note: If the harness tabs forward-facing belt path... - Page 27 Converting into a Booster Seat Converting into a Booster Seat Remove the crotch strap Place the child restraint in Recline Position #1 (p. 53), then lay it on its back. Locate the crotch strap anchor on the bottom. Unclip the anchor, push it through the seat, and remove, as shown.
-
Page 28: General Information
Adjusting the Headrest General Information Headrest Adjust Lever Using the SureLatch Connectors To adjust, squeeze the Not available on all models. headrest adjust lever, as To remove the SureLatch con- shown, while sliding the nector from a vehicle lower headrest up or down to anchor bar or from its storage the desired position. -
Page 29: Using The Trutether Adjuster
Not available on all models. To view a video about installing a locking clip, go to Tether straps equipped with the TruTether adjuster attach www.evenflo.com. to vehicle tether anchors exactly the same as tether straps Use the locking clip with: with standard tether adjusters. -
Page 30: Removing The Seat Pad
Installing the Locking Clip Removing the Seat Pad Access Flap Hold the lap/shoulder belts together just Disconnect all lower behind the free sliding anchor connectors buckle tongue while you from the D-rings on unfasten the seat belt. the seat pad. Open the access flap. -
Page 31: Securing Your Child Restraint In Aircraft
Securing Your Child Restraint in Aircraft Installing Child Restraint Rear-facing in Aircraft The Federal Aviation Administration (FAA) recommends that you secure your child for air travel in an appropri- Buckle/Crotch ate child restraint based on your child’s weight and size. Strap Turbulence can happen with little or no warning. -
Page 32: Installing Child Restraint Forward-Facing In Aircraft
Aircraft buckle could be behind the child’s back after tightening the Seat Belt belt. For your child’s comfort, Evenflo recommends cushioning 1. Place the child restraint in position. the child’s back by placing a small pillow or folded-up blanket, Adjust the child restraint to its most upright position or a folded-up jacket, over the belt buckle. -
Page 33: Care And Cleaning
(1 inch) from side to side or front to back at Proper Disposal of This Child Restraint the belt path, the aircraft seat belt is not tight At the end of this child restraint’s useful life, Evenflo enough, and you MUST install again until the air- encourages you to dispose of it properly. -
Page 34: Replacement Parts
You can order replacement parts online at www.evenflo.com Product, Evenflo warrants to the original end user (“Pur- or call Evenflo. When you contact us, please have the product chaser”) this Product (including any accessories) against model number and date of manufacture (found on the back defects in material or workmanship. - Page 35 • USA: 1-800-233-5921, 8 AM to 5 PM E.T. • Canada: 1-937-773-3971 • México: 01-800-706-12-00...
Need help?
Do you have a question about the Symphony 65 and is the answer not in the manual?
Questions and answers