Table of Contents
Advertisement
everystage™ dlx/lx
Child Restraint System
Owner's Manual
Keep instructions for future use.
Rear-facing*
1.8 to 22.6 kg
(4 to 50 lbs)
43 to 122 cm
(17 to 48 in.)
Forward-facing
with Harness*
10 to 29.4 kg
(22 to 65 lbs)
71 to 124 cm
(28 to 49 in.)
At least 2 years old
Booster*
18 to 54.4 kg
(40 to 120 lbs)
112 to 145 cm
(44 to 57 in.)
At least 4 years old
* See page
Para instrucciones en Español,
llamar al: 1-800-233-5921
WARNING!
To reduce the risk of serious injury
or death, read this owner's manual prior
to installing and using this child restraint.
© 2018 Evenflo Company, Inc.
-
for complete requirements.
4
5
25701468
10/18
1
Advertisement
Table of Contents

Related Manuals for Evenflo Everystage lx


Summary of Contents for Evenflo Everystage lx
- Page 1 * See page for complete requirements. Para instrucciones en Español, llamar al: 1-800-233-5921 WARNING! To reduce the risk of serious injury or death, read this owner’s manual prior to installing and using this child restraint. © 2018 Evenflo Company, Inc. 25701468 10/18...
-
Page 2: Table Of Contents
More children are killed every year as passengers Table of Contents (TOC) in car crashes than by any other type of injury. To reduce the risk of SERIOUS INJURY or DEATH, read Child Requirements ..............this owner’s manual and your vehicle owner’s manual Premature Infant Use .............. -
Page 3: Child Requirements
MUST meet the size and age are at or below the top of requirements below. In addition, Evenflo recommends consulting the child restraint headrest with your child’s physician before allowing your child to • At least 2 years old transition from rear-facing to forward-facing use of this child restraint. -
Page 4: Premature Infant Use
Evenflo or death. Air bags may cause serious injury or death to requires that the evaluation recommended by the AAP children 12 years of age and under. - Page 5 DO NOT use the child restraint. Consult vehicle WARNING/MISE EN GARDE owner’s manual, try a different seating location, or call Evenflo for further assistance. Children have STRANGLED in loose or partially buckled ONLY use this child restraint on forward-facing •...
- Page 6 DEATH or SERIOUS WARNING! DEATH or SERIOUS WARNING! INJURY can occur. INJURY can occur. Rear-Facing ONLY Warnings Booster Mode ONLY Warnings To help prevent serious injury or death: To help prevent serious injury or death: • When using this restraint rear-facing, DO NOT loosen •...
- Page 7 WARNING! DEATH or SERIOUS WARNING! DEATH or SERIOUS INJURY can occur. INJURY can occur. Seat Belt Warnings (cont.) Seat Belt Warnings To help prevent serious injury or death: To help prevent serious injury or death: • DO NOT use with lap/shoulder belts with •...
- Page 8 WARNING! DEATH or SERIOUS DEATH or SERIOUS WARNING! INJURY can occur. INJURY can occur. Seat Belt Warnings (cont.) LATCH/UAS Warnings To help prevent serious injury or death: What is LATCH? Vehicle Top Tether If you have any of these types of vehicle belt systems Anchor Points LATCH is an acronym for listed, these are SAFE to use to install your child restraint...
- Page 9 • NEVER use the vehicle seat belts when using the lower devices not made by Evenflo or described in these anchor connector assembly. Using both together can instructions for the child restraint. Items not tested with cause slack in a sudden stop or crash.
-
Page 10: Safe Practices
The information you provide must be complete. Or register online at www.evenflo.com/registercarseatcanada. ATTENTION : Cette carte pourait être importante à la sécurité de recommend that children ride rear-facing for as long as votre enfant. -
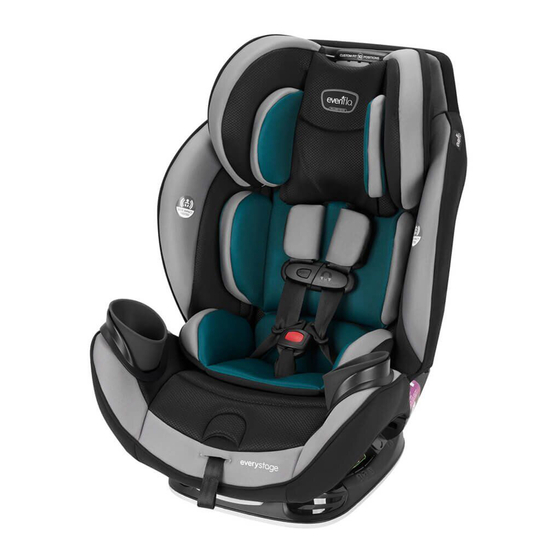
Page 11: Child Restraint Features
Child Restraint Features Front Description Adjustable Headrest Harness Covers* Harness Storage Compartment (behind seat pad) Harness Straps Harness Release Button (under flap) Harness Adjust Strap Recline Handle (under front edge of seat) Headrest Adjust Lever Instruction Manual Storage (behind headrest pad) Seat Pad Shoulder Belt Guide (see p.52) Chest Clip... - Page 12 Child Restraint Features (cont.) Child Restraint Features (cont.) Cupholder Body Pillow Note: The body pillow is WARNING for REAR-FACING use only. The optional Body Pillow, • the cup holder when the child restraint is in the when placed in the restraint, forward-facing position only.
- Page 13 Child Restraint Features (cont.) Child Restraint Features (cont.) Storing Lower Anchor ( UAS) Straps Lower Anchor Connector ( UAS) Which Type of Lower Anchor To store the lower anchor (UAS) in its storage compartment, insert into the storage compartment UNTIL Connector Is on Your Child Restraint? it clicks into compartment as shown below: Your child restraint will have one of the two types of Lower...
-
Page 14: Rear-Facing
Using the Child Restraint Using the Anti-Rebound Bar - Rear-facing Only Rear-facing WARNING WARNING The Anti-rebound Bar is for use REAR-FACING ONLY. When using this restraint rear-facing, DO NOT loosen the NEVER use the Anti-rebound Bar in Forward-facing vehicle seat belt to provide more leg room as this may keep or Booster Modes. -
Page 15: Rear-Facing Installation With
Rear-facing Installation with Lower Rear-facing Installation with Lower Anchor (UAS) Connectors Anchor (UAS) Connectors (cont.) DO NOT install by this method for a child Moving Lower Anchor Connector weighing more than 18kg (40 lbs). Assembly to Rear-facing Belt path ALWAYS store the tether strap . - Page 16 Rear-facing Installation with Lower Rear-facing Installation with Lower Anchor (UAS) Connectors (cont.) Anchor (UAS) Connectors (cont.) 4. Ensure child restraint is secure. Lift pad off front edge - To secure a child restraint that has EasyClick™ of seat as shown. connectors, go to Step 4a.
-
Page 17: Lower Anchor Connectors
Rear-facing Installation with Lower Rear-facing Installation Anchor (UAS) Connectors (cont.) with Vehicle Seat Belts IMPORTANT: • Before installing this child restraint rear-facing with the Re-check the level vehicle seat belt, you MUST move the Lower Anchor indicator. Ball should Connector Assembly (UAS) to the forward-facing belt be between the green path so that it does not interfere with the vehicle seat zone for rear-facing. - Page 18 Rear-facing Installation with Rear-facing Installation with Vehicle Seat Belts (cont.) Vehicle Seat Belts - Lap Belt Rear Pull the seat pad off of the Lap belt Rear-facing slot front of the child restraint. belt path Route the lap belt through the rear-facing belt path Front and continue through the...
- Page 19 Rear-facing Installation with Vehicle Rear-facing Installation Checklist Seat Belts - Lap/Shoulder Belt Pull the seat pad off of the 1. Secure child restraint to the vehicle seat. Lap/ Rear front of the child restraint. • Child restraint is in Recline Position #1, #2, or #3 Shoulder Rear-facing slot...
-
Page 20: Forward-Facing With Harness
Forward-facing Installation with Lower Using the Child Restraint Anchor (UAS) Connectors Forward-facing with Harness Moving Lower Anchor Connector Child Requirements: Assembly to Forward-facing Belt path • Weight: 10 to 29.4 kg (22 to 65 lbs) To access the Lower Anchor Connector Assembly, you •... - Page 21 Forward-facing Installation with Lower Forward-facing Installation with Lower Anchor (UAS) Connectors Anchor (UAS) Connectors (cont.) 4. Ensure child restraint is secure. DO NOT install by this method for a child weighing more than 18kg (40lbs). - To secure a child restraint that has EasyClick™...
-
Page 22: Forward-Facing Installation With Lower Anchor Connectors
Forward-facing Installation with Lower Forward-facing Installation with Anchor (UAS) Connectors (cont.) Lower Anchor Connectors (cont.) - Attaching Tether Straps Attach lower anchor / UAS Hook connectors to the vehicle Strap Tether lower anchor bars until they Anchor lock onto the bars on both sides of the seat. - Page 23 Forward-facing Installation with Lower Forward-facing Installation Anchor (UAS) Connectors (cont.) with Vehicle Seat Belt IMPORTANT: Re-check the level • Before installing this child restraint forward-facing with indicator. Ball should be the vehicle seat belt, you MUST move the Lower Anchor between the blue zone Connector (UAS) Assembly to the rear-facing belt path for forward-facing.
- Page 24 Forward-facing Installation with Forward-facing Installation Vehicle Seat Belt - Lap Belt with Vehicle Seat Belt (cont.) Raise headrest to its highest Place child restraint in your position (p. 58), then lift Back pad vehicle forward-facing, as Lap belt back pad away from child shown.
- Page 25 Forward-facing Installation with Forward-facing Installation with Vehicle Seat Belt - Lap/Shoulder Belt Vehicle Seat Belt - Attaching Tether Strap Raise headrest to its highest Lap/Shoulder position (p. 58), then lift belt Tether back pad away from child Back pad Anchor Hook restraint for easier access.
-
Page 26: Forward-Facing Installation With Vehicle Seat Belts
Forward-facing Installation Forward-facing CHECKLIST with Vehicle Seat Belt 1. Secure child restraint to the vehicle seat. Re-check the level indicator. • Child restraint is in Position #4 or #5 (p. 58). Ball should be between • Anti-rebound Bar has been removed for forward- the blue zone for facing use. -
Page 27: Using The Child Restraint In Booster Mode
When to Put Your Child Using the Child Restraint in a Booster Seat in Booster Mode Child Requirements Booster seats raise the child up and help to position the • Weight: 18 to 54.4 kg (40 to 120 lbs) vehicle lap and shoulder belt correctly. When the child is •... - Page 28 How can you tell if a child is ready to transition Booster Installation Checklist to a booster seat? You should consider using a booster seat if the following conditions apply: 1. Convert child restraint to booster seat. • The child is mature enough to sit in the booster seat •...
-
Page 29: Converting Seat Into Booster Mode
Converting Seat into Booster Mode Converting Seat into Booster Mode (cont.) Reassemble the loose Loosen harness straps by crotch buckle onto the pushing the harness release shoulder straps and button on the front of the fasten the chest clip. seat. At the same time, pull on the harness straps. -
Page 30: Adjusting The Headrest/Harness Position
Adjusting the Headrest/ Adjusting the Crotch Strap Harness Position Position Lever To adjust, squeeze the headrest This child restraint has two Crotch Strap positions: adjust lever, as shown, while sliding the headrest up or To reposition the crotch down to the desired position. strap, first recline the seat When the headrest is in one to Recline Position #1... -
Page 31: Securing The Child In The Child Restraint
Securing the Child in the Child Restraint Securing the Child in the Child Restraint (cont.) Insert both buckle tongues into the buckle. Pull up on the harness strap to check that the buckle tongues are fastened and to remove any slack from the webbing Place baby in the child restraint. -
Page 32: Removing The Child From The Child Restraint
Removing the Child from the Child Removing the Tether Strap Restraint WARNING! Loosen the harness strap by pressing the harness release • To avoid a strangulation hazard, you MUST tightly roll or button located on the front fold excess tether strap and secure with the strap/rubber of the seat. -
Page 33: Installing Child Restraint Rear-Facing In Aircraft
Installing Child Restraint Installing Child Restraint Rear-facing in Aircraft (cont.) Rear-facing in Aircraft The Federal Aviation Administration (FAA) recommends that you secure your child for air travel in an appropriate child Fasten the aircraft seat restraint based on your child’s weight and size. Turbulence belt. -
Page 34: Installing Child Restraint Forward-Facing In Aircraft
For your child’s comfort, Evenflo opening on the opposite recommends cushioning the child’s back by placing a side of the child restraint. -
Page 35: Removing The Seat Pad
Removing the Seat Pad Removing the Seat Pad (cont.) Snaps Raise headrest and Lift the head support flap unfasten the snaps on up and unfasten the snap the fabric flap. strap at bottom of head support pad. Snap Remove elastic straps Pull the strap out of from around the the opening in the... - Page 36 Removing the Seat Pad (cont.) Removing the Seat Pad (cont.) Push buckle through Unfasten snap, on each side opening in seat pad as of seat pad. shown. Snap Buckle Remove the seat pad from the edge of seat pad as shown. Repeat on the other side of the seat.
-
Page 37: Care And Cleaning
Removing the Seat Pad (cont.) Care and Cleaning • DO NOT lubricate or immerse in water the LATCH Unclip tether from the connectors, the buckle, or any other part of this child tether anchor bar and push restraint, unless rinsing is permitted, as stated on the through slot in seat pad as back of the buckle for your restraint. -
Page 38: Replacement Parts/Useful Life
When this child restraint reaches the expiration date For future reference, record the model number of your found on the date of manufacture label, Evenflo child restraint AND the date of manufacture below. encourages you to dispose of it properly. Most components of this child restraint are recyclable. -
Page 39: Limited Warranty
Evenflo’s sole obligation under this express limited warranty shall be, at Evenflo’s option, to repair or replace any Product that is determined to be defective by Evenflo and determined to be covered by this warranty.
Need help?
Do you have a question about the Everystage lx and is the answer not in the manual?
Questions and answers