Table of Contents
Advertisement
Advertisement
Table of Contents

Subscribe to Our Youtube Channel
Related Manuals for VuPoint Magic Wand PDSDK-ST470-VP-BX2


Summary of Contents for VuPoint Magic Wand PDSDK-ST470-VP-BX2
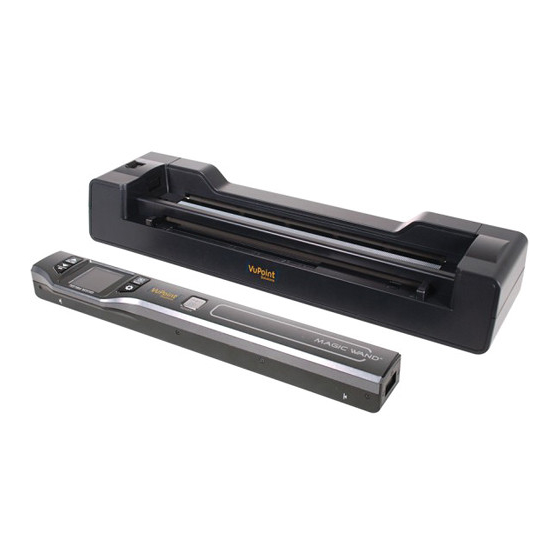
- Page 1 Magic Wand™ Portable Scanner with Auto-Feed Dock PDSDK-ST470-VP-BX2 User Manual...
-
Page 2: Table Of Contents
Table of Contents KEY FEATURES ............................2 FUNCTIONAL PARTS ..........................2 EXPLANATION OF THE STATUS ICONS ....................4 GETTING STARTED ..........................4 4.1........................4 HARGING THE ATTERY 4.2. SDHC M ) ..........5 NSERTING A MICRO MICRO EMORY NOT INCLUDED 4.3. -
Page 3: Key Features
Getting to know your PDSDK-ST470-VP-BX2 Scanner 1. Key Features JPEG, PDF-A4 or PDF-Letter scan-format selection. Color or Monochromatic (mono) scan selection. 300 (LO)/600 (MI) /1050 (HI)/1200 (HI) DPI scan quality selection. Directly save JPG (JPEG)/PDF files to the microSD/microSDHC card. - Page 4 Power On/ Off: Press and hold this key for 3 seconds to turn power on or off. In Power on mode: 1) When using the scanner without the docking station, press this button to start scanning, press this button again to stop; 2) When the scanner is on the docking station with PC connection, press this button to switch between Standby mode and USB mode.
-
Page 5: Explanation Of The Status Icons
Connect to a computer with the USB cable provided to view USB interface and transfer files To charge up the built-in battery with an optional AC/DC power adapter 3. Explanation of the Status Icons Item Function Description Scan Format JPG/PDF-A/PDF-L LO: 300 DPI Scan Resolution MI: 600 DPI... -
Page 6: Inserting A Microsd/Microsdhc Memory Card (Not Included)
NOTE: Once the battery is fully charged while the scanner is off, battery indicator will briefly display on LCD screen and will turn off automatically. 4.2. Inserting a microSD/microSDHC Memory Card (not included) To operate the scanner, you must insert a microSD/microSDHC card (not supplied) to record and store your pictures. -
Page 7: Setup Menu
button for 3 seconds to turn on the scanner. Press and hold then press . Release both buttons afterwards to enter into auto- calibration mode. The message “1. Calibration starts. Do not move the device!” will display on LCD screen. Do not move the scanner until the second message “2. -
Page 8: Date/Time
Year Month Date/Time Date and Time Date Hour Minute Inst.Preview Instant preview Auto Off Auto Power Off 3 Min Delete All Delete All Files Formatting the microSD Yes (All contents on Format memory Card... -
Page 9: Viewing Scanned Files After Scanning
Slide the scanner across the document slowly, keeping your hand stable to get the best picture quality. Press again to stop scanning when the scanner has reached to the end of the document. NOTE: If the scan is done too quickly or when there is any abnormal operation, “Scan Error”... -
Page 10: Using The Docking Station
7. Using the Docking Station 7.1. Attaching the scanner to the Docking Station to scan Slide the docking latch from Lock to Release Place the scanner on the Docking Station inserting the right side of the scanner first. Make sure the scanner is securely locked to the Docking Station with a microSD card properly inserted to the portable scanner. - Page 11 The Docking Station will automatically pass the original through. During the scan, scanning status icon will be displayed on the LCD screen to indicate scanning is in progress. Scan complete. If the scanner is connected to the computer via the USB interface, press once to enter into USB mode to view scanned files on your computer.
-
Page 12: Releasing The Scanner From The Docking Station
If “Scan Error" icon display on the LCD screen, you need to replace the original memory card with a higher class microSD/microSDHC card. (Class 6 or above is recommended). The error will still save the image after the scan completes. If instant preview is set to "on", no matter if the scan result is normal or abnormal, the scanned image will be displayed shortly on the LCD screen before the scanner returns to standby mode. -
Page 13: Scanner Only Computer
Press the button again to switch back to scanning mode. NOTE: If the Removable Device Window does not launch automatically, go to your “My Computer” and find the device under Removable Storage. 8.2. Scanner only Computer Connect your scanner to your computer to view pictures on the computer monitor. Connect your scanner to your computer and then turn on your scanner. -
Page 14: Image Preview
9. Image Preview Press to enter Playback mode. The last scanned image will be displayed. to select your desired image. Press to zoom in the image. Press indicators will appear on the screen when pressing in step 2, press to view the upper portion of the image, press to view the lower portion of the image. -
Page 15: Deleting Single File
Press to return to the previous Playback screen, press it again to return to standby mode. NOTE: When scanning one relatively long document or scanning several documents in a row, the scanned image cannot be magnified if the file size exceeds 9 MB. 10. -
Page 16: Computer System Minimum Requirements
Scanner without dock: Color High resolution 12 seconds Mono High resolution 10 seconds Color Medium resolution 8 seconds Color Medium resolution 6 seconds Color Low resolution 3 seconds Mono Low resolution 2 seconds Color High resolution 150 Scans (Min.) (when docked) 140 Scans (Min.) Capacity (Based on 1GB Mono High resolution... -
Page 17: Troubleshooting
13. Troubleshooting Problem Cause Solution Cannot power on the Low battery Recharge the battery scanner 1. The microSD/microSHDC card 1. Insert a microSD/microSDHC card has not been installed 2. Transfer the pictures from the Pictures cannot be 2. Memory is full scanner to the computer to create saved when scanning 3. - Page 18 FCC (Federal Communications Commission) This device complies with Part 15 of the FCC Rules. Operation is subject to the following two conditions: This device may not cause harmful interference, and This device must accept any interference received, including interference that may cause undesired operation.
Need help?
Do you have a question about the Magic Wand PDSDK-ST470-VP-BX2 and is the answer not in the manual?
Questions and answers