Advertisement
Living Speaker System
LS3100
Sound System Controller (LAP-301)
Front Speakers (SLM-301)
Wireless Subwoofer (SLW-301)
Instruction Manual
Thank you for purchasing an Onkyo product. Please read this
manual thoroughly before making connections and plugging
in your new Onkyo product.
Following the instructions in this manual will enable you to
obtain optimum performance and listening enjoyment from
your new product.
Please retain this manual for future reference.
Contents
Before Use .........................2
Connections ....................14
Operations .......................17
Useful Function...............21
Appendix..........................22
E
n
Advertisement
Table of Contents

Related Manuals for Onkyo LS3100


Summary of Contents for Onkyo LS3100
-
Page 1: Table Of Contents
Operations .......17 Instruction Manual Useful Function....21 Appendix......22 Thank you for purchasing an Onkyo product. Please read this manual thoroughly before making connections and plugging in your new Onkyo product. Following the instructions in this manual will enable you to obtain optimum performance and listening enjoyment from your new product. -
Page 2: Before Use
Before Use WARNING: WARNING AVIS RISK OF ELECTRIC SHOCK RISQUE DE CHOC ELECTRIQUE TO REDUCE THE RISK OF FIRE OR ELECTRIC DO NOT OPEN NE PAS OUVRIR SHOCK, DO NOT EXPOSE THIS APPARATUS The lightning flash with arrowhead symbol, within an TO RAIN OR MOISTURE. - Page 3 If you cannot turn on the unit, Don’t put candles or other burning objects on contact your Onkyo dealer. top of this unit. 3. Care—Occasionally you should dust the unit all 17.
- Page 4 If water or any FCC WARNING other liquid gets inside this unit, have it checked Changes or modifications not expressly approved by by your Onkyo dealer. the party responsible for compliance could void the 8. Handling Notes user’s authority to operate the equipment.
- Page 5 øvrige relevante krav i only by qualified service personnel. direktiv 1999/5/EF. Hiermit erklärt Onkyo Corporation, dass sich das IMPORTANT Gerät LAP-301 in Übereinstimmung mit den The wires in the mains lead are coloured in grundlegenden Anforderungen und den übrigen...
-
Page 6: Speaker Precautions
In general, Braun tubes used for color television sets, etc. are extremely sensitive and can be affected even Onkyo Corporation izjavlja, da je ta LAP-301 v skladu z bistvenimi zahtevami in drugimi by the magnetism of the earth. If a speaker system is relevantnimi določili direktive 1999/5/ES. - Page 7 • Powerful Digital Amplifier trademarks owned by Bluetooth SIG, Inc. and any • 20 W/Ch (4 Ω, 1 kHz, 0.8%, 2 Channels use of such marks by Onkyo is under license. Other Driven, FTC) trademarks and trade names are those of their •...
- Page 8 ■ ■ Using the Remote Controller Replacing the Battery Use only a battery of the same type (CR2025). Pull out firmly in the direction of the arrow pressing the tab in the direction of the arrow. Remove the plastic film before using the Push remote controller.
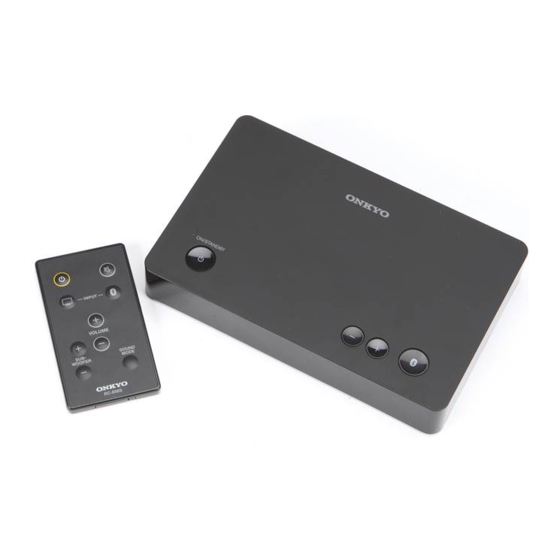
- Page 9 Getting to Know the LS3100 Top Panel (LAP-301) For detailed information, see the pages in parentheses. ON/STANDBY button (17) Volume –/+ buttons (17) ON/STANDBY LED (17) /TV input button (17) Remote control sensor (8) Bluetooth LED (17) Rear Panel (LAP-301)
-
Page 10: Remote Controller
Front Speakers (SLM-301) Remote Controller Cabinet (Front) (Side) Slit for stand Speaker terminals Hole for eye bolt (Rear) Caution For detailed information, see the pages in • The front grilles are not designed to be removed so parentheses. do not attempt to remove them forcibly, as this will (On/Standby) button (17) damage them. - Page 11 Placement This section explains how to mount/place the controller, the front speaker and the subwoofer. In this instruction manual, Sound System 5-11/16" Controller (LAP-301) is described as (145 mm) Screw “controller”. Keyhole slots for wall mounting Bottom of the LAP-301 •...
- Page 12 ■ Attaching the stand Mounting/Placing the Front Insert the stand into the stand slit on the rear of Speakers the front speaker. (Table top) Front speaker can be placed on the table top or mounted to the wall by using supplied stands. Slit for stand ■...
-
Page 13: Placing The Subwoofer
■ ■ Wall mounting Fixing the front speakers to prevent a falling accident Attach the supplied stand referring to When you mount the speaker to the wall, make the illustration for wall mounting. sure to set it firmly so that it cannot slip and fall. -
Page 14: Connections
Connections Connections Speaker Connection Precautions Connecting the Front Speakers Read the following before connecting your Connect the supplied front speaker. Connect speakers: positive (+) terminal of the front speaker to • You can connect speakers with an impedance positive (+) terminal of the controller of between 4 and 8 ohms. -
Page 15: Using The Subwoofer
• Don’t connect the different types of jacks together. The audio quality is the same as optical. • When you find the both audio output from your TV and LS3100, turn the audio output from your TV speaker off by setting on the TV. -
Page 16: Connecting The Power Cord
Connecting the Power cord Note • Before connecting the power cord, connect all of (LAP-301) your speakers and TV. • Turning on the unit may cause a momentary power Connect the supplied AC adapter and surge that might interfere with other electrical the power cord. -
Page 17: Operations
Operations Operations Enjoying the sound ■ Operating with the remote controller Turn on the connected TV. INPUT INPUT to select the TV Press selector. VOLUME +/- See also: • “Listening to an audio from Bluetooth SOUND MODE device” (➔ page 19) SUBWOOFER +/- To adjust the volume, use VOLUME +/–. - Page 18 Adjusting the Subwoofer Level Setting the Auto Power On This function switches between standby mode Press SUBWOOFER +/– on the remote and ready mode. When Auto Power On controller. function is set to on, the controller will enter ready mode, and when set to off, it will enter You can adjust the volume of subwoofer while standby mode.
- Page 19 “Onkyo LS3100” appears on the enjoy television, music and all display of your Bluetooth-enabled other content without device, select the “Onkyo LS3100”. If a annoying volume fluctuations. prompt requests a password (PIN code), key in the “0000”. When a Bluetooth connection is •...
- Page 20 Bluetooth-enabled device, and then select the “Onkyo LS3100” as the audio output device. • The controller can store the pairing information of up to 8 Bluetooth devices. If the pairing is done for...
-
Page 21: Useful Function
Useful Function Programming the controller for use of existing remote controller The controller can be operated with your existing TV remote controller or any other remote controller by programming the controller. This section explains how to program the controller to operate ON/STANDBY function on the controller by pressing the 5 (number button) on your TV remote controller as an example. -
Page 22: Appendix
If you have any trouble using the controller, Power look for a solution in this section. If you can’t ■ resolve the issue yourself, contact your Onkyo Can’t turn on the controller dealer. Make sure that the power cord is —... - Page 23 Audio Remote Controller ■ ■ There’s no sound, or it’s very quiet The remote controller doesn’t work Make sure that all audio connecting Make sure that the battery is installed plugs are pushed in all the way. with the correct polarity. Make sure that the input of TV is Make sure that the remote controller is connected properly.
- Page 24 ■ Pairing the controller and the subwoofer Onkyo is not responsible for damages (such as CD rental fees) due to unsuccessful Turn on the controller before performing recordings caused by the unit’s malfunction.
-
Page 25: Specifications
Specifications ■ Audio Output Controller (LAP-301) Speaker Output SPEAKER OUT Rated Output Power All channels: (North American) ■ Others 20 watts minimum continuous power per channel, 4 ohm loads, Wireless Subwoofer 2 channels driven at 1 kHz, with a maximum total harmonic distortion of 0.8% (FTC) (Others) 2 ch ×... - Page 26 Subwoofer (SLW-301) Rated Output Power (FTC) (North American) 50 watts minimum continuous power, 4 ohms, driven at 100 Hz with a maximum total harmonic distortion of 1% Rated Output Power (IEC) (Others) 50 watts minimum continuous power, 4 ohms, driven at 100 Hz with a maximum total harmonic distortion of 1% Play Frequency Band...
- Page 27 Memo...
- Page 28 1301, 555 Tower, No.555 West NanJin Road, Jin an, Shanghai, China 200041, Tel: 86-21-52131366 Fax: 86-21-52130396 http://www.cn.onkyo.com/ Y1209-1 SN 29401317 (C) Copyright 2012 Onkyo Corporation Japan. All rights reserved. * 2 9 4 0 1 3 1 7 *...
- Page 29 Snabbguide Snelgids ~~fLkJ.Uf Package Contents Contenu du paquet Contenidos del paquete Contenuto della confezione Lieferumfang lnhoud van de verpakking Forpackningens innehall .:Jl:!~. <!) (On/Standby) ag.(Mute) ON/STANDBY LED Bluetooth LED 0/C) INPUT ONKYO VOLUME SOUND MODE SUBWOOFER C>ON/STANDBY Volume 0ffV input...
- Page 31 1,.---,--- · · · · - - - ~ u:~~ 000000000000000000000000000000000 0000 0000000000 0000 0000000000 ~~~~ oooooooooo 0000 €V 00001 1000000000000000000000000 Y1209-1 SN 29401322 2 9 4 0 1 3 2 2 Copyright 2012 Onkyo Corporation Japan. All rights reserved.
- Page 33 On kyo remboursera les frais d'expedition de retour pour les produits sous garantie. Les services fournis ou les reparations Onkyo offre maintenant un soutien technique 7 jours sur 7. Pour obtenir de I' aide, des reponses avos questions, effectuees l'egard d'articles qui ne...
- Page 34 PURCHASE AN ONKYO PRODUCT FROM AN UNAUTHORIZED DEALER, YOUR ONKYO WARRANTY MAY NOT BE VALID, IF YOU PURCHASE AN ONKYO PRODUCT FROM AN UNAUTHORIZED DEALER, YOUR ONKYO WARRANTY MAY NOT BE VALID, please use our authorized dealer locator. please use our authorized dealer locator.
Need help?
Do you have a question about the LS3100 and is the answer not in the manual?
Questions and answers