Table of Contents
Advertisement
Quick Links
Download this manual
See also:
User Manual
Advertisement
Table of Contents

Related Manuals for Navigon MobileNavigator 5


Summary of Contents for Navigon MobileNavigator 5
- Page 1 User's manual MobileNavigator | 5 as on June 2006...
- Page 2 The information contained herein may be changed at any time without prior notification. This manual nor any parts thereof may not be reproduced for any purpose whatsoever without the express written consent of NAVIGON AG, nor transmitted in any form either electronically or mechanically, including photocopying and recording.
-
Page 3: Table Of Contents
User's manual MobileNavigator | 5 Table of contents Introduction..............3 Search facilities and conventions........4 Liability ................4 Support ................5 Trademarks ..............5 Before you begin ............7 Installing the software ............8 2.1.1 Inserting the memory card into the device ....8 2.1.2 Installing the navigation software ...... - Page 4 User's manual MobileNavigator | 5 5.4.3 Indicating destinations on the map ......49 5.4.4 Favourites ............51 5.4.5 Recent destinations ..........53 5.4.6 Using your home address ........54 Destination management ..........54 5.5.1 Saving a destination ..........54 5.5.2 Renaming a destination........
-
Page 5: Introduction
User's manual MobileNavigator | 5 Introduction Topics covered in this chapter: 1.1 Search facilities and conventions page 4 1.2 Liability page 4 1.3 Support page 5 1.4 Trademarks page 5 Introduction - 3 -... -
Page 6: Search Facilities And Conventions
Limitation of liability The software and the manual are subject to change without notice. NAVIGON AG may not be liable for the correctness of the information contained in this manual nor for damages resulting from the use of this manual. -
Page 7: Support
Mondays to Fridays 9am to 6pm 0905-8480701 (£0.25 per minute from the British landline network) Email: support.uk@navigon.com Further information may be found on the web site of NAVIGON www.navigon.com in the "Service&Support" section. Trademarks Registered All brands and trademarks mentioned in this document are... -
Page 9: Before You Begin
User's manual MobileNavigator | 5 Before you begin Topics covered in this chapter: 2.1 Installing the software page 8 Inserting the memory card into the device Installing the navigation software Transmitting maps to a memory card Restoring the files of the memory card 2.2 Installing the hardware page 10 Installing the PNA in the vehicle... -
Page 10: Installing The Software
User's manual MobileNavigator | 5 Installing the software 2.1.1 Inserting the memory card into the device Insert the memory Before using MobileNavigator you must insert the memory card card into the device… containing the cartographic data into the device. 1. Unpack the memory card carefully. Pay attention not to touch contacts and not to make them dirty. -
Page 11: Transmitting Maps To A Memory Card
User's manual MobileNavigator | 5 2.1.3 Transmitting maps to a memory card Transmit maps to a Detailed instructions on transmitting maps to the memory card memory card… may be found in the separate manual in the enclosure. On your MobileNavigator DVD 1, you will find the Installer- Tool which guides you through the map transmitting procedure. -
Page 12: Installing The Hardware
User's manual MobileNavigator | 5 Installing the hardware 2.2.1 Installing the PNA in the vehicle Attention: The mounted holder must not interfere with the driver’s attention to traffic. In case this is not possible, use the provided adhesion plate to mount the holder somewhere else so that safe driving is granted. -
Page 13: Fitting The Pna On Your Bike
User's manual MobileNavigator | 5 This is how you 8. Insert the jack plug of the TMC dipole aerial into the TMC connect the dipole aerial connection on the left side of the device. aerial 9. Use the suckers to fix the aerial to the windscreen. 2.2.2 Fitting the PNA on your bike Mount the fitting... -
Page 14: The Basic Principle Of Navigation
User's manual MobileNavigator | 5 The basic principle of navigation MobileNavigator The time of complicated and frustrating inquiries on the right way in folded maps is over. From now on MobileNavigator, your navigation system, will guide you, based on satellite information, quickly and safely to your destination. -
Page 15: Important Safety Information
User's manual MobileNavigator | 5 Important safety information Note In your own interest, read the following notices and safety information carefully before starting up your navigation system. 2.4.1 Safety information on navigation Use of MobileNavigator is executed at your own risk. Caution: To protect yourself and others from accidents please do not operate the navigation system while driving! Caution: You must not look at the display except when it is... -
Page 16: Safety Information On Handling The Pna
User's manual MobileNavigator | 5 2.4.2 Safety information on handling the PNA Caution: As it is not waterproof, do not expose your navigation device to water! For example, protect it from rain, snow or hail when you are on your way by bike or on foot. Caution: Disconnect the navigation device from the power supply when you are leaving the car parked for a long period of time. -
Page 17: Operating The Navigation Software
User's manual MobileNavigator | 5 Operating the navigation software Topics covered in this chapter: 3.1 Hardware keys page 16 3.2 Software keyboard page 16 Character keyboard Mobile phone keyboard 3.3 Command buttons page 19 Command buttons with caption 3.4 Lists page 23 Operating the navigation software - 15 -... -
Page 18: Hardware Keys
User's manual MobileNavigator | 5 Hardware keys Hardware keys The following hardware keys, using which you can quickly access the most important functions, are located on the front of the device: Start navigation Starts navigation. Back Opens the precedent screen. Zoom out Works only in map view mode. -
Page 19: Character Keyboard
User's manual MobileNavigator | 5 3.2.1 Character keyboard You may carry out all entries with your finger on the character keyboard. But you may enter capital letters only. You need not enter small letters or special characters when entering a destination's town or street name. MobileNavigator replaces these characters automatically. -
Page 20: Mobile Phone Keyboard
User's manual MobileNavigator | 5 Special characters Tap the icon to enter a special character. The special characters keyboard appears. As soon as you have entered a special character the letter keyboard reappears. You need not enter special characters when entering a destination's town or street name but they may be helpful for entering names for saved destinations and itineraries. -
Page 21: Command Buttons
User's manual MobileNavigator | 5 E.g., to enter an "S", tap the "PQRS" key four times. You need not enter small letters or special characters when entering a destination's town or street name. MobileNavigator replaces these characters automatically. When you are looking for, e.g., a French town called "Héroïnès", simply type "HEROINES". - Page 22 User's manual MobileNavigator | 5 The GPS symbol is placed at the bottom of the screen. The different GPS-icons have the following significance: Symbol Significance The GPS receiver is switched off No GPS - OR – an external GPS receiver is not connected correctly.
- Page 23 User's manual MobileNavigator | 5 Entry Significance Speed Indicates your current speed. Position Indicates the address of your current position. Save Tap this button to add the current address to the F AVOURITES Quit Tap this button to quit the GPS screen. Energy The Energy icon is placed at the bottom right corner of the screen.
-
Page 24: Command Buttons With Caption
User's manual MobileNavigator | 5 2. Tap the Off button to switch the GPS receiver off. 3. When the GPS-symbol in the upper right corner becomes red, tap the Cancel button. Note: Switching the GPS receiver on works the same way. The TMC symbol is placed at the right margin of the screen. -
Page 25: Lists
User's manual MobileNavigator | 5 2. Buttons to select one of two possibilities. These buttons are designed to select one of two possibilities. Normally, the current state is indicated by the caption of the button. They are normally buttons like User mode, Yes-No, On-Off. - Page 26 User's manual MobileNavigator | 5 Example Search for BICKNOR. 1. In the M tap Navigation. AIN MENU The D screen opens. ESTINATION 2. Tap Address. The A screen opens. DDRESS 3. Tap the Town or Postcode entry field. The software keyboard appears. 4.
- Page 27 User's manual MobileNavigator | 5 When the list is very long, you may enter one more letter in order to shorten the list. 5. Enter N. All towns beginning with BICKN or having BICKN in their names are listed. 6. Tap the Down icon repeatedly until BICKNOR appears directly under the white entry field.
- Page 28 User's manual MobileNavigator | 5 7. Tap The A screen reappears. BICKNOR is entered into the DDRESS Town or Postcode field. - 26 - Lists...
-
Page 29: User Modes
User's manual MobileNavigator | 5 User modes Topics covered in this chapter: 4.1 Two different user modes page 28 4.2 Changing the user mode page 28 4.3 Standard mode page 30 4.4 Extended mode page 30 User modes - 27 -... -
Page 30: Two Different User Modes
User's manual MobileNavigator | 5 Two different user modes Survey MobileNavigator can be operated in two different user modes: Standard and Extended. This grants an optimum of usability for each user: Less experienced users and users who do not need using the complete functionality of the software work in standard mode. - Page 31 User's manual MobileNavigator | 5 The U screen appears: SER MODE Your current user mode is indicated on the Current user mode field. 3. Tap Current user mode to switch to the other user mode. The name of the user mode you want to switch to becomes the caption of the entry field.
-
Page 32: Standard Mode
User's manual MobileNavigator | 5 Standard mode Survey In standard mode, the software is easier to operate. As it offers reduced functionality, functions may be accessed quicker. So, if you do not need functions like Route planning or indicating a destination on the map, we recommend working in standard mode. -
Page 33: Navigation
User's manual MobileNavigator | 5 Navigation Topics covered in this chapter: 5.1 General information on navigation page 32 5.2 Starting MobileNavigator page 33 Extended mode Standard mode 5.3 Basic settings page 36 5.4 Indicating a destination page 40 Entering an address Selecting a point of interest Indicating destinations on the map Favourites... -
Page 34: General Information On Navigation
User's manual MobileNavigator | 5 General information on navigation Use of MobileNavigator is executed at your our risk. Caution: To protect yourself and others from accidents, do not program the navigation system while driving. Enter or select your destination and activate the navigation system before you begin to drive! Caution: Do not look at the display unless it is absolutely safe to do so! Safe driving is the first priority! -
Page 35: Starting Mobilenavigator
User's manual MobileNavigator | 5 Starting MobileNavigator Starting the 1. Turn your PNA on. navigation software… 2. Tap the MobileNavigator icon on the desktop. At the first start (and each time you had terminated MobileNavigator via the Quit icon), the following message appears: 3. - Page 36 User's manual MobileNavigator | 5 For details, please refer to "Indicating a destination", page 35. Navigation Tap the Home icon to navigate to your home address. homewards For details, please refer to "Using your home address", page 54. Route planning Tap the Route planning button for itinerary planning purposes.
-
Page 37: Standard Mode
User's manual MobileNavigator | 5 5.2.2 Standard mode The M appears: AIN SCREEN Main screen Note: When you turn your PDA on it shows the screen which was displayed when it was turned off. Nevertheless, you may access the Main screen from all other screens by tapping One destination Tap the Navigation button to indicate a destination for navigation (one stage). -
Page 38: Basic Settings
User's manual MobileNavigator | 5 For details, please refer to "Recent destinations", page 53. Select map Tap the Map button to select another map from the memory card which is currently inserted. For details, please refer to "Working with the map", page 71. Settings Tap the Settings button to modify the settings of MobileNavigator. - Page 39 User's manual MobileNavigator | 5 2. Via the arrow buttons, select the T screen. IME ZONE 3. Tap into the Time zone entry filed. The S screen opens. ELECT THE TIME ZONE 4. Select the time zone of the region you are currently staying in.(GMT without daylight saving time).
- Page 40 User's manual MobileNavigator | 5 In MobileNavigator, you may save your home address to quickly start navigation homewards from anywhere. Saving your home 7. Via the arrow buttons, select the H screen. OME ADDRESS address… 8. Tap Enter your home address. The D screen opens.
- Page 41 User's manual MobileNavigator | 5 The address is indicated on the H screen. OME ADDRESS 11. Tap Save. The M opens. CREEN Navigation - 39 -...
-
Page 42: Indicating A Destination
User's manual MobileNavigator | 5 Indicating a destination Basic principle of In this chapter you will learn about the possibilities for indicating navigation and managing destinations in MobileNavigator. For details on how to start navigation to a destination, please refer to "Starting navigation", page 68. Indicating a In MobileNavigator there are several possibilities to enter or to destination... - Page 43 User's manual MobileNavigator | 5 Tap the Country entry field and select the destination country if it is not yet indicated. Note: Only countries of which at least a part is represented on the currently loaded map may be selected. 1b On the D screen, tap Address.
-
Page 44: Selecting A Point Of Interest
User's manual MobileNavigator | 5 For information on saving destinations, please refer to "Saving a destination", page 54. 5.4.2 Selecting a point of interest Points of interest Points of Interest, also referred to as POIs, are stored in the database of places and may be displayed on the map. Ports, airports, restaurants, hotels, petrol stations, public buildings, and others belong to the special destinations. - Page 45 User's manual MobileNavigator | 5 The P screen opens: OINT OF INTEREST 1c On the P screen, tap …nearby. OINT OF INTEREST Standard mode 1. In the M , tap Navigation. AIN MENU The D screen opens. ESTINATION Tap the Country entry field and select the destination country if it is not yet indicated.
- Page 46 User's manual MobileNavigator | 5 Selecting a Point of The POI screen opens: NEARBY interest nearby… 2. Enter the radius around your current position within which you want to search for points of interest into the Radius entry field. 3. Select the main category of points of interest to search for from the left one of the two Category list fields, e.g.
- Page 47 User's manual MobileNavigator | 5 Point of interest in a certain town Extended mode 1. In the M , tap Navigation. AIN MENU The D screen opens. ESTINATION Tap the Country entry field and select the destination country if it is not yet indicated. Note: Only countries of which at least a part is represented on the currently loaded map may be selected.
- Page 48 User's manual MobileNavigator | 5 Standard mode 1. In the M , tap Navigation. AIN MENU The D screen opens. ESTINATION Tap the Country entry field and select the destination country if it is not yet indicated. Note: Only countries of which at least a part is represented on the currently loaded map may be selected.
- Page 49 User's manual MobileNavigator | 5 Note: You need not make entries into the Category and Subcategory fields. Their purpose is only to shorten the Point of interest list. This list may become very extensive, especially in big towns. For information on saving destinations, please refer to "Saving a destination", page 54.
- Page 50 User's manual MobileNavigator | 5 1c On the P screen, tap …nationwide. OINT OF INTEREST Selecting a Point of The POI screen opens: NATIONWIDE interest of supraregional significance… 2. Select the main category of points of interest to search for from the Category list field (e.g.
-
Page 51: Indicating Destinations On The Map
User's manual MobileNavigator | 5 5.4.3 Indicating destinations on the map You may indicate a destination directly on the map. In addition to towns and streets, you may also select special destinations quickly.. This function is only available in "Extended mode". For information on how to change the user mode, please refer to "Changing the user mode", page 28. - Page 52 User's manual MobileNavigator | 5 A circle of orange points appears round the selected place: Database information on the respective place will be loaded and displayed. Below the information, there are command buttons for several functions which are available for the selected place.
-
Page 53: Favourites
User's manual MobileNavigator | 5 This function is only available in "Extended mode". Tap the Add button to add the selected place to your itinerary. The selected point will be marked by a little flag. It will also be added to the list of route points of the R OUTE screen where it figures as destination point. - Page 54 User's manual MobileNavigator | 5 Standard mode 1. In the M , tap Favourites. AIN MENU Saved destinations The F screen opens. AVOURITES 2. Tap the entry of the respective destination. Note: An asterisk behind a name indicates that a voice command for the respective destination has been stored.
-
Page 55: Recent Destinations
User's manual MobileNavigator | 5 5.4.5 Recent destinations Survey All destinations you have navigated to recently are listed on the screen. On this screen you may: ECENT DESTINATIONS select destinations for navigation purposes, Add destinations to the S list, and AVED DESTINATIONS delete destinations from the R list. -
Page 56: Using Your Home Address
User's manual MobileNavigator | 5 For information on working with lists, please refer to "Lists", page 23. 3. Tap The destination will be taken over. The address is entered into the respective fields. 5.4.6 Using your home address Survey If you have stored your home address you may quickly start navigation home at any place. - Page 57 User's manual MobileNavigator | 5 1. Tap the Save icon. If you have opened the R list, tap the ECENT DESTINATIONS Edit icon. The N screen opens. AME OF ESTINATION 2. Enter a name for the destination. For information on the use of the keyboard, please refer to "Software keyboard", page 16.
-
Page 58: Renaming A Destination
User's manual MobileNavigator | 5 5.5.2 Renaming a destination 1. On the D screen, tap Favourites. ESTINATION The F screen opens. AVOURITES 2. Select the destination you want to rename. For information on working with lists, please refer to "Lists", page 23. -
Page 59: Deleting A Destination
User's manual MobileNavigator | 5 5.5.3 Deleting a destination Precondition You have opened the F as described in "Favourites", AVOURITES page 51 - OR – You have opened the R list as described in ECENT DESTINATIONS "Recent destinations", page 53. 1. -
Page 60: Indicating Route Points
User's manual MobileNavigator | 5 5.6.1 Indicating route points Planning itineraries… 1. On the M , tap Route planning. AIN MENU The R screen opens: OUTE PLANNING 2. Tap the Add route point icon to enter the first route point. The D screen opens. - Page 61 User's manual MobileNavigator | 5 The I screen opens. The destination is TINERARY PLANNING added as stage point 1. 5. Repeat steps 2-4 for every stage point you want to add to the itinerary. Navigation - 59 -...
-
Page 62: Editing, Saving And Managing Itineraries
User's manual MobileNavigator | 5 5.6.2 Editing, saving and managing itineraries Survey You may plan as many itineraries as you want, e.g. for holidays. You may save them and use them later for navigation purposes. At any moment, you may add stage points, modify the order of the stages, or display the itinerary on the map. -
Page 63: Managing Itineraries
User's manual MobileNavigator | 5 Managing itineraries Save itinerary Only itineraries that contain at least one route point may be saved. Otherwise this icon is deactivated. 1. Tap this icon to save the itinerary you have planned. The N screen opens. AME OF THE ITINERARY 2. - Page 64 User's manual MobileNavigator | 5 3. Tap Rename itinerary 1. Tap the Load itinerary icon. (This icon is deactivated if there is no saved itinerary available) The S screen opens: ELECT ITINERARY For information on working with lists, please refer to "Lists", page 23.
- Page 65 User's manual MobileNavigator | 5 4. Tap The S screen reopens. The itinerary has been ELECT ITINERARY renamed. 5. Tap OK to load the renamed itinerary. - OR - Tap the Back icon to open the R screen OUTE PLANNING without loading an itinerary.
-
Page 66: Calculating The Route
User's manual MobileNavigator | 5 2. Tap the Delete icon to delete the selected itinerary. The C screen appears. ONFIRM 3. Tap The S screen reopens. The deleted route is no ELECT ITINERARY more listed. 5.6.3 Calculating the route An itinerary may be calculated even without GPS reception in order to get an impression on the route. - Page 67 User's manual MobileNavigator | 5 1. Tap this icon to calculate the distance and the estimated duration of the entire itinerary. The R screen opens: OUTE OPTIONS 2. Determine the route options. For detailed information on setting the route options, please refer to "Routing options", page 100.
-
Page 68: Displaying The Itinerary On The Map
User's manual MobileNavigator | 5 5.6.4 Displaying the itinerary on the map Show itinerary Tap the Show on map button to display the entire itinerary on the map. The map screen opens. The itinerary is highlighted in orange. The route points are marked by flags. For information on working with maps, please refer to "Working with the map", page 71. - Page 69 User's manual MobileNavigator | 5 1. Tap the Show on map button. The itinerary is displayed on the map. 2. Tap short on any place on the map. The A screen opens. DDITIONAL FUNCTIONS 3. Tap Simulation. The route will be recalculated for simulation purposes. Simulation starts when calculation has finished.
-
Page 70: Starting Navigation
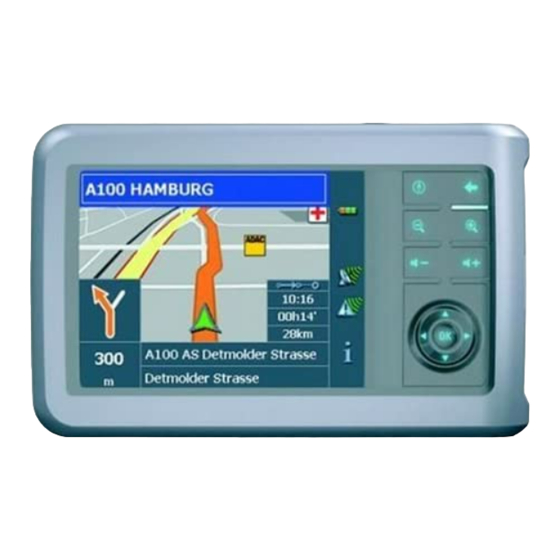
User's manual MobileNavigator | 5 Stopping the You may quit a simulation at any moment. simulation 1. Tap short on any place on the map. The A screen opens. DDITIONAL FUNCTIONS 2. Tap Stop navigation. Starting navigation Precondition You have entered a destination as described in "Indicating a destination", page 40, - OR - You have selected a destination from the F... - Page 71 User's manual MobileNavigator | 5 The system calculates the route. The map screen opens. Your current position is indicated by a green arrow. The route is highlighted in orange. Note: When you start navigation after having planned or loaded an itinerary, then your current position is the start point of the route.
- Page 72 User's manual MobileNavigator | 5 No GPS reception? When the received GPS signal is not sufficient, the following message appears: You have two possibilities: Wait until navigation starts. This will happen as soon as the GPS reception is sufficient. Cancel and restart navigation as soon as the reception of GPS signals is convenient.
-
Page 73: Working With The Map
User's manual MobileNavigator | 5 Working with the map Topics covered in this chapter: 6.1 Selecting a map page 72 6.2 Operating the map page 73 6.3 Representation of the map in navigation mode page 79 6.4 Displaying additional information on the map page 81 Working with the map - 71 -... -
Page 74: Selecting A Map
User's manual MobileNavigator | 5 Selecting a map Provided maps There are additional maps included in the delivery on DVD. In case you want to use one of these maps, copy it via a card reader to a memory card. Proceed as follows: 1. -
Page 75: Operating The Map
User's manual MobileNavigator | 5 The A screen opens: VAILABLE MAPS 3. Tap the entry of the map you want to work with. 4. Tap The selected map is now loaded. The M opens. AIN SCREEN Operating the map Survey There are various pieces of information available on the M screen. - Page 76 User's manual MobileNavigator | 5 The M screen opens. The map is being displayed automatically when you start navigating. Tapping the map Tapping short any place on the map makes the A DDITIONAL screen appear. Depending on whether you are in FUNCTIONS navigation mode or not this screen offers different functions.
- Page 77 User's manual MobileNavigator | 5 Icons Survey The Map screen disposes several icons which allow altering the representation of the map. Hide/show icons This icon allows you to hide all other icons in order to see more of (When without GPS- the map.
- Page 78 User's manual MobileNavigator | 5 Scroll In Scroll mode (button down) you may scroll the map. Tap on the screen and drag to the desired direction. Entire route Tap the Itinerary icon to display the whole itinerary. Map in driving Tap the In driving direction/North oriented icon direction/north oriented...
- Page 79 User's manual MobileNavigator | 5 The A screen opens: DDITIONAL FUNCTIONS Tap this icon to toggle between "Day" and "Night" map view mode. Tap this icon to switch the voice instructions on / off. Preferences Tap Preferences to display the S screen.
- Page 80 User's manual MobileNavigator | 5 Route options This function is only available in navigation mode. Tap Route options to modify them. For details, please refer to "Routing options", page 100. Next destination This function is only available when you are navigating a route with at least one stage point and when you are working in extended mode.
-
Page 81: Representation Of The Map In Navigation Mode
User's manual MobileNavigator | 5 Representation of the map in navigation mode In navigation mode, there is some assistance for navigation, some information on the itinerary and one more command button being displayed: Assistance for The following assistance for navigation is being displayed at the navigation left and at the bottom of the map: Field... - Page 82 User's manual MobileNavigator | 5 Signpost info The upper part of the Map screen displays information on the signposts you have to follow: Note: This information can only be displayed when it is contained in the cartographic material. Speed limit The left part of the map screen shows possible speed limits: Possible restrictions of validity are shown beneath (e.g.
-
Page 83: Displaying Additional Information On The Map
User's manual MobileNavigator | 5 Displaying additional information on the map In MobileNavigator you may determine which information is to be displayed on the map. Modifying any configuration begins on the S screen. ETTINGS Configuring the 1. Open the S screen ETTINGS display of additional... - Page 84 User's manual MobileNavigator | 5 6. Via the arrow buttons select Route information: 7. Tap the command buttons to display (On) or not (Off) the respective information on the map. The desired information on the entire itinerary (upper section) and on the current stage (lower section) will be displayed at the right hand side of the map.
- Page 85 User's manual MobileNavigator | 5 8. Via the arrow buttons select Signpost information. The Show traffic signs command indicates whether signposts indicating exits from motorways or highways are currently being displayed or not. 9. Tap the Show traffic signs command to toggle between On and Off mode.
- Page 86 User's manual MobileNavigator | 5 The S screen allows you to determine whether you PEED LIMIT want to display speed limits in navigation mode and whether you want to be warned acoustically on speeding. Setting Significance This command indicates whether Show traffic signs signposts indicating speed limits are currently being displayed or not.
-
Page 87: Useful Functions For Navigation
User's manual MobileNavigator | 5 Useful functions for navigation Topics covered in this chapter: 7.1 Adding a stage point during navigation page 86 7.2 Next destination page 87 7.3 Blocking a route section page 87 7.4 Using TMC functionality page 88 Useful functions for navigation - 85 -... -
Page 88: Adding A Stage Point During Navigation
User's manual MobileNavigator | 5 Survey In MobileNavigator the following functions are available in navigation mode: Adding a stage point during navigation, see below Skipping the next stage point, see page 87 Blocking a route section, see page 87 Adding a stage point during navigation This function is only available in "Extended mode". -
Page 89: Next Destination
User's manual MobileNavigator | 5 Next destination This function is only available in "Extended mode". For information on how to change the user mode, please refer to "Changing the user mode", page 28. Next destination Next destination This function is only available when you are navigating a route with at least one stage point and when you are working in extended mode. -
Page 90: Using Tmc Functionality
User's manual MobileNavigator | 5 This forces a recalculation of the route. The indicated route section will be evaded. On the map, it will be highlighted in red. Unblocking a route 1. Tap short on any place on the map. section 2. - Page 91 User's manual MobileNavigator | 5 Displaying traffic 2. Use the arrow icons of the "Messages" section to display the information… next / previous traffic message. Every message contains the country, the name or number of the street (motorway, main road, country road), the concerned road section and the kind of obstruction.
- Page 92 User's manual MobileNavigator | 5 Route modification Precondition: You have selected "Route modification with with confirmation confirmation" in the TMC settings. The following screen informs you about a reported instruction concerning your route: Evade Tap the Evade button to evade the reported obstruction. The route will be recalculated in order to evade the obstruction.
- Page 93 User's manual MobileNavigator | 5 Tuning Tuning 1. Tap the Tuning button to toggle between the Auto tuning, Hold station, and Frequency input modes. Auto tuning In Auto tuning mode, the TMC module searches continually for the station which is best received. The name and the frequency of the station are being displayed.
-
Page 95: Configuring Mobilenavigator
User's manual MobileNavigator | 5 Configuring MobileNavigator Topics covered in this chapter: 8.1 Settings page 94 User mode Map information Route information Signpost information Speed limit Volume Representation Touch screen calibration Automode Routing options Itinerary Time zone Format Home address Radio-Mute Product information Configuring MobileNavigator... -
Page 96: Settings
User's manual MobileNavigator | 5 Settings Configuration In MobileNavigator, you may modify the following settings: User mode, see page 95 Map information, see page 95 Route information, see page 96 Signpost information, see page 97 Speed limit, see page 98 Volume, see page 98 Representation, see page 98 Touch screen calibration, see page 98... -
Page 97: User Mode
User's manual MobileNavigator | 5 8.1.1 User mode User mode On the U screen, you may effect the following SER MODE modifications: Your current user mode is indicated on the Current user mode field. Tap Current user mode to switch to the other user mode. The name of the user mode you want to switch to becomes the caption of the entry field. -
Page 98: Route Information
User's manual MobileNavigator | 5 8.1.3 Route information This function is only available in "Extended mode". For information on how to change the user mode, please refer to "Changing the user mode", page 28. Route info On the R screen, you may effect the following OUTE INFORMATION modifications: Element... -
Page 99: Signpost Information
User's manual MobileNavigator | 5 8.1.4 Signpost information Signpost information On the S screen, you may effect the IGNPOST INFORMATION following modifications: The Show traffic signs command indicates whether signposts indicating exits from motorways or highways are currently being displayed or not. Tap the Show traffic signs command to toggle between On and Off mode. -
Page 100: Volume
User's manual MobileNavigator | 5 Caution: Information contained in the cartographic material can be wrong, e.g. due to road works. Traffic situation and road traffic regulations are absolutely prior to the information given by the navigation system. 8.1.6 Volume Volume On the V screen, modify the volume of the spoken OLUME... -
Page 101: Automode
User's manual MobileNavigator | 5 8.1.9 Automode This function is only available in "Extended mode". For information on how to change the user mode, please refer to "Changing the user mode", page 28. Auto mode On the A screen, you may effect the following UTO MODE modifications: Setting... -
Page 102: Routing Options
User's manual MobileNavigator | 5 8.1.10 Routing options Routing options On the R screen, indicate your speed profile. This OUTING OPTIONS entry will have an effect on the calculation of the remaining time and of the estimated time of arrival (ETA). 1. -
Page 103: Itinerary
User's manual MobileNavigator | 5 8.1.11 Itinerary This function is only available in "Extended mode". For information on how to change the user mode, please refer to "Changing the user mode", page 28. Proceeding On the I screen, determine whether you want to TINERARY automatically to the navigate automatically to the next stage point after having... -
Page 104: Tmc
User's manual MobileNavigator | 5 8.1.14 TMC On the TMC screen, determine whether route modifications caused by TMC traffic information are to be carried out automatically or with explicit confirmation. Tap the Route modification field to toggle between Automatically and With confirmation. 8.1.15 Home address Home address On the H... -
Page 105: Glossary
User's manual MobileNavigator | 5 Glossary COM-port A COM port is a connector to a communications interface, usually the serial port. The ports are numbered by a number behind "COM". A communications interface is designed to connect hardware like a mouse or a GPS receiver. GMT (Greenwich Mean Time) is the mean solar time at the Royal Greenwich Observatory in Greenwich near London, England, which by convention is at 0 degrees geographic longitude. -
Page 107: 10 Index
User's manual MobileNavigator | 5 10 Index Additional functions ......76 Indication of destinations Assistance for navigation....79 Favourites ........51 Home address ......54 On the map ......... 49 Points of interest ......42 Recent destinations....... 53 Battery Saved destinations......51 Status......... - Page 108 User's manual MobileNavigator | 5 Exit signposts....... 97 Format ........101 Home address ......102 Navigation Info on the map ......95 Proceed automatically ....101 Itinerary........101 Quit..........77 Itinerary info........ 96 start ........... 68 Representation ......98 Route info........96 Routing options ......
Need help?
Do you have a question about the MobileNavigator 5 and is the answer not in the manual?
Questions and answers