Table of Contents
Advertisement
AM/FM Dual Alarm Clock Radio With
Redi-Set™ Automatic Time Setting
System, Time Projector, Simple-Set
For additional information, online registration,
and exclusive special offers visit our website:
www.timexaudio.com
For questions or comments regarding this or other products,
please call our toll-free number 1-800-888-4491.
Keypad, and Soothing Sounds
Model T736
Advertisement
Table of Contents

Related Manuals for Timex T736


Summary of Contents for Timex T736
- Page 1 Model T736 AM/FM Dual Alarm Clock Radio With Redi-Set™ Automatic Time Setting System, Time Projector, Simple-Set Keypad, and Soothing Sounds For additional information, online registration, and exclusive special offers visit our website: www.timexaudio.com For questions or comments regarding this or other products,...
- Page 2 CAUTION RISK OF ELECTRIC SHOCK. DO NOT OPEN CAUTION: TO REDUCE THE RISK OF ELECTRIC SHOCK, DO NOT REMOVE COVER (OR BACK). NO USER-SERVICEABLE PARTS INSIDE. REFER SERVICING TO QUALIFIED SERVICE PERSONNEL. WARNING: TO REDUCE THE RISK OF FIRE OR ELECTRIC SHOCK, DO NOT EXPOSE THIS APPLIANCE TO RAIN OR MOISTURE.
- Page 3 A Consumer Guide to Product Safety This unit has been designed and manufactured to assure your personal safety. Improper use can result in potential electrical shock or fire hazards. 1. Read these Instructions. 2. Keep these Instructions. 3. Heed all Warnings. 4.
-
Page 4: Table Of Contents
Table of Contents FCC Information ................................1 Introduction ..................................2 Preparation for Use ............................... 2-3 Controls and Indicators..............................4 Display with Indicators..............................5 Operating Instructions ..............................5-8 Listening to The Radio ............................... 8-12 Changing The Lithium Back-Up Battery ......................... 12-13 Care and Maintenance ..............................13 Warranty Information ..............................14 FCC Information This device complies with Part 15 of the FCC Rules, operation is subject to the following two conditions:... -
Page 5: Introduction
Introduction Thank you for purchasing this Timex Dual Alarm Clock Radio with Redi-Set Automatic Time Setting System. The clock in this model will set itself to the correct year, month, date, day, and time, the first time you plug it in, and after every power interruption. -
Page 6: Preparation For Use
Sure Alarm Battery Back-Up System This Timex Redi-Set Clock Radio includes a Sure-Alarm battery back-up circuit that will wake-you up even if the power is ‘off’ at the selected wake-up time. If your power is ‘off’ at the wake up time the clock display will be off and the radio will not operate, but a separate ‘mini-buzzer’... -
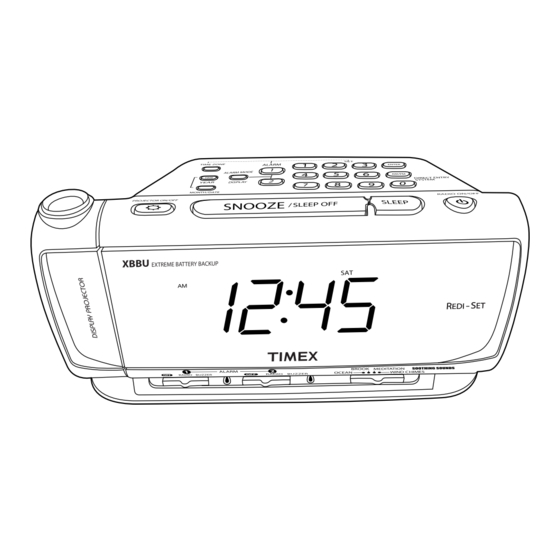
Page 7: Controls And Indicators
Controls and Indicators Controls and Indicators Back View Left View Right View LINE IN... -
Page 8: Display With Indicators
Display with Indicators Day Indicators Aux (Line In) Indicator AM Indicator PM Indicator KHz (AM) Frequency Indicator MHz (FM) Frequency Indicator Alarm 2 Indicator Alarm 1 Indicator Low Battery Indicator Time / Year / Month / Date and Radio Frequency Display Operating Instructions Setting The Time, The First Time IMPORTANT: The first time you connect your Redi-Set clock radio to the AC outlet the internal computer will automatically... -
Page 9: Operating Instructions
Operating Instructions Enter your own 2-digit time zone on the SimpleSet Keypad. For example if you live in the Pacific Time Zone enter “05” on the keypad and then press the ENTER button. The clock will ‘beep’ twice and the time display will change from Eastern Time to Pacific Time. - Page 10 Adjusting The Wake Up Times Your Redi-Set clock radio has two separate alarms that can be set and used independently. You may use the alarms to wake two people at different times, or you may use one alarm for weekdays and the other for weekend wake up times. The initial default setting for Alarm 1 is 6:00 AM.
-
Page 11: Listening To The Radio
Checking The Wake-Up Times And Alarm Mode Whenever you want to check the wake-up time or alarm mode settings, briefly press either the ALARM 1 or ALARM 2 Setting Buttons. The display will change from correct time to “wake-up time” and the DAY indicators will show you the alarm mode that is currently selected. - Page 12 Wake To Radio 1. Turn the radio ‘On’ and select the band, station, and volume level that you wish to hear when the alarm comes ‘On’, then turn the radio ‘Off’ again. 2. Reconfirm the wake-up time and alarm mode settings for the alarm you are using, Alarm 1 or Alarm 2, or both alarms. 3.
- Page 13 Radio And Buzzer Operation You may set one alarm for wake to RADIO and the other for wake to BUZZER. Just set the ALARM 1 and ALARM 2 Selector Controls to the desired positions. Snooze Control After the alarm turns on in the morning you may press the Snooze button to stop the alarm for 9 minutes. After 9 minutes the alarm turns on again.
- Page 14 Projector Operation IMPORTANT: The projected image will be most visible when the room is dark. The image may not be visible during daylight hours or in a brightly lit room. Please note that there is no ‘PM’ indicator in the projector display. If the ‘AM’ indicator does not appear then the time being projected is ‘PM’.
-
Page 15: Changing The Lithium Back-Up Battery
Line Input Jack You may listen to the sound from an iPod, MP3 player, CD player or other external music source by connecting the external device to the Line In jack on the back of this clock radio. Use an audio cable (not included) with 3.5mm mini plugs to connect the headphone jack of the external device to the Line In jack of this unit. -
Page 16: Care And Maintenance
4. Press and hold the MONTH/DATE button for 3 seconds. The month and date (MM/DD) will appear briefly followed by a flashing “0”. Use the SimpleSet keypad to enter the correct month and date in the MM/DD format and then press the ENTER button. -
Page 17: Warranty Information
Limited 90-Day Warranty Information Timex Audio Products, a division of SDI Technologies Inc. (hereafter referred to as SDI Technologies), warrants this product to be free from defects in workmanship and materials, under normal use and conditions, for a period of 90 days from the date of original purchase.
Need help?
Do you have a question about the T736 and is the answer not in the manual?
Questions and answers