Table of Contents
Advertisement
Advertisement
Table of Contents

Related Manuals for Avid Technology Mbox Pro


Summary of Contents for Avid Technology Mbox Pro
- Page 1 ® Mbox Pro User Guide...
- Page 2 Guide Part Number 9329-65070-00 REV C 12/12 Documentation Feedback At Avid, we are always looking for ways to improve our documentation. If you have comments, corrections, or suggestions regarding our documentation, email us at...
-
Page 3: Table Of Contents
Chapter 3. Installing and Connecting Mbox Pro ........ - Page 4 ....... 45 Configuring Mbox Pro for Third-Party Applications ........45 Configuring the Apple Sound Preferences Appendix B.
-
Page 5: Chapter 1. Welcome To Mbox Pro
S/PDIF digital audio input and output, MIDI and Mbox Pro provides up to eight discrete channels of Word Clock I/O, and two front panel headphone input and up to eight discrete channels of output, outputs with independent level controls. -
Page 6: Specifications
96 kHz, 176.4 kHz, and 192 kHz Digital I/O • Two channels of S/PDIF digital input and out- put. S/PDIF inputs are available independent of and in addition to analog inputs 1–6. S/PDIF outputs are always available in Pro Tools Avid Mbox Pro User Guide... -
Page 7: System Requirements And Compatibility
File > Save Choose Save from the the Pro Tools Installation Guide. File menu Mbox Pro can be also be used with a qualified Mac Control+N Hold down the Control key or Windows computer running any other Core Au- and press the N key dio- or ASIO-compliant software. -
Page 8: About Www.avid.com
About www.avid.com The Avid website (www.avid.com) is your best online source for information to help you get the most out of your Pro Tools system. The following are just a few of the services and features available. Register your purchase Product Registration online. -
Page 9: Chapter 2. Mbox Pro Hardware Overview
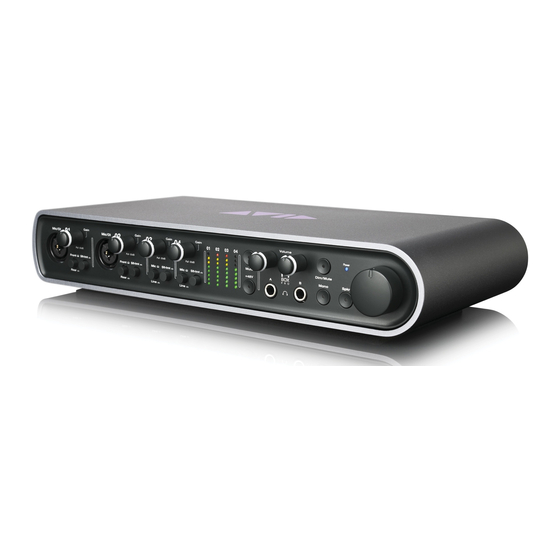
Chapter 2: Mbox Pro Hardware Overview Mbox Pro Front Panel Features Figure 1 identifies controls, indicators, and input and output ports on the front panel on the Mbox Pro. Headphones A and B Volume knob Input combo jacks Dim/Mute –... -
Page 10: Master Volume Knob
(delivering that identical signal to turn off phantom power and wait at least ten both speakers) via the Driver Control Panel or the seconds before connecting or disconnecting Mbox Pro. When engaged, the Mono LED lights. a ribbon microphone. Avid Mbox Pro User Guide... -
Page 11: Headphone Outputs
Headphone Outputs Power Indicator LED Use the A and B, front panel Headphone outputs to The Power LED indicates that the Mbox Pro is re- connect stereo headphones with a 1/4-inch stereo ceiving power from its power supply. Once the connector. -
Page 12: Mbox Pro Back Panel Features
Mbox Pro Back Panel Features Figure 2 identifies each port on the back panel of the Mbox Pro. Aux inputs 5/6 (RCAs and 1/8-inch mini) Insert jacks Power input jack Mic inputs Line inputs Monitor outputs Power switch Foot switch... -
Page 13: Power Switch
The Mbox Pro requires the power supply to function. For stand-alone mode you power on the unit with a power connection and no FireWire connection. Power Switch This button is used to turn Mbox Pro on or off. Chapter 2: Mbox Pro Hardware Overview... - Page 14 Avid Mbox Pro User Guide...
-
Page 15: Chapter 3. Installing And Connecting Mbox Pro
Chapter 3: Installing and Connecting Mbox Pro To use Mbox Pro with Pro Tools or any other Do one of the following: CoreAudio- or ASIO-compatible applications, you • On Mac, locate and double-click must install the Mbox Pro hardware drivers on Avid Mbox Pro.mpkg... - Page 16 Avid Mbox Pro User Guide...
-
Page 17: Chapter 4. Making Studio Connections
Connecting Outputs Adjust the volume using the corresponding Headphone Volume knob on the front panel. To hear audio from Mbox Pro, you will need to By default, Headphone output A mirrors Monitor connect headphones or an external sound system output channels 1–2. -
Page 18: Connecting A Sound System
The default monitor outputs on the back of the the left channel of the stereo (often the white Mbox Pro (Monitor outputs 1 and 2) support 1/4- plug) to Monitor output 1, and the right channel inch plugs. These connections can be balanced... -
Page 19: Audio Inputs
Mic Inputs 3–4/Line Inputs 3–4 Audio Inputs The back-panel Mic inputs 3–4 provide two dedi- Mbox Pro provides six channels of analog inputs, cated XLR connectors for Input channels 3 and 4. and supports microphones, guitars, keyboards, and Toggle each channel’s Front/Rear input source other types of instruments and devices. -
Page 20: Connecting A Microphone
Plug your microphone cable into one of the two facturer. Mic/DI inputs on the front of Mbox Pro (in this example, input 2). Input 1 Mic input... - Page 21 Phantom Power switch (labeled 48V) To use a microphone with an XLR connector: on the front of the Mbox Pro. This switch sends 48V to all four mic inputs. The 48V LED on the Plug your microphone cable into one of the two...
-
Page 22: Connecting Instruments To The Mbox Pro
Mbox Pro press the Phantom Power switch (labeled 48V) on the front of the Mbox Pro. This switch sends Mbox Pro provides three input types (DI, Line, 48V to all four inputs. The 48V LED on the and Aux In) for instruments. -
Page 23: Connecting Keyboards And Mixers
To insert an external processor on an input: mum volume. Using a 1/4-inch insert cable (single TRS con- On the rear panel of the Mbox Pro, use the Input nector to dual TS connectors), connect the sin- Level switch for +4/–10 input line level settings gle TRS connector (the connector with two (one for each stereo pair, 1/2 &... -
Page 24: Connecting Digital I/O
Connect the dual TS connectors (the “Y” end of the cable) to the external processor as follows: To connect Mbox Pro to an external digital device: • Connect the TS connector that corresponds to Using the included breakout cable, connect it to... -
Page 25: Midi Connections
Word Clock, MIDI, and S/PDIF input on the back Make sure the external device is powered on, panel of the Mbox Pro. See “Word Clock, MIDI, that it is set to the correct sample rate, and that it S/PDIF Connector” on page 9. -
Page 26: Word Clock
Pro Tools Clock source. and Out connectors to the appropriate ports on the other Word clock-capable devices in your To configure Pro Tools with Mbox Pro as a Word clock slave: studio. Make sure all Word clock and audio connec-... -
Page 27: Using A Footswitch
To use a footswitch control: Connect a footswitch to the footswitch connec- tor on the back panel of the Mbox Pro. Launch Pro Tools. Choose Setup > Hardware... - Page 28 Avid Mbox Pro User Guide...
-
Page 29: Chapter 5. Using The Driver Control Panel
Several features of Mbox Pro can be accessed di- Mbox Pro. rectly from the Mbox Pro front panel, such as input gain, phantom power, and output levels. But there To open the Driver Control Panel from Pro Tools: are many additional parameters that cannot be ac- Choose Setup >... -
Page 30: Setup
Setup. For example, you can set buffer size, sam- • Standalone Settings ple rate, and clock source. You can also define how Mbox Pro functions when it’s connected to a com- puter or when it’s in standalone mode (not con- nected to a computer). -
Page 31: Hardware Settings
Internal work properly If you have connected a S/PDIF device to S/PDIF your Mbox Pro and would like to use that device as the master clock source, select the option. S/PDIF This will make Mbox Pro clock to the external de- vice’s clock. - Page 32 Hold duration for all soft buttons on the front software running smoothly by processing audio in of the Mbox Pro. Choose between 250 msec, 500 groups of samples rather than one sample at a time. msec, 750 msec, and 1 sec.
- Page 33 Standalone Settings Mode Standalone settings affect the setting of the The Mbox Pro can be in the following three types Mbox Pro when it is in standalone mode with no of sub-standalone modes: host computer connected.
- Page 34 You can choose which Monitor output pairs are which of the three sub-standalone modes the controlled by Mbox Pro’s Master Volume knob. Mbox Pro is in and change them using the Speaker For example, if you enable for all Master Volume...
-
Page 35: Flow
(Only one con- Mbox Pro. This is a useful reference for under- trol room output pair is active at any time in Stereo standing the path of an audio signal flowing mode.) -
Page 36: About
The About pop-up menu lets you view the firm- These 16-input, 2-output mixes allow you to create ware version of the Mbox Pro hardware, and the up to six stereo mixes when running at a sample package version of the Mbox Pro driver installer. - Page 37 The stereo mix features multi-segment meters to The stereo mix section is located in the main view show input channel levels (directly above each of the Control Panel and is divided into five main channel) and main mixer output levels (at the top sections: right of the mixer).
-
Page 38: Stereo Mixes
Pro Tools. • Software Returns 1–2 Output Pairs • Software Returns 3–4 For each Mbox Pro Monitor output pair (Monitor • Software Returns 5–6 outputs 1–2, 3–4, 5–6, S/PDIF Left and Right, or • Software Returns 7–8 Headphones A and B), there is a representative tab •... -
Page 39: Channel Faders
(double-click the knob to return pan to center). “Hardware Inputs 1–2,” then the signal coming Solo into hardware inputs 1–2 of the Mbox Pro would be fed directly to hardware outputs 1–2. Similarly, Each Solo button lets audio be monitored for the if the source were “Software Returns 1–2,”... - Page 40 This knob controls the number of re- Feedback peats for the delay and echo effects. It does not af- fect the reverbs. This knob controls the effects output level Volume being sent to the FX Returns Avid Mbox Pro User Guide...
-
Page 41: Status Indicators
Link button This tells you the status of the hardware; if a prop- FX Returns section erly installed, powered-on Mbox Pro is connected to the computer. Master section of the Driver Control Panel Adjusts the overall level of the stereo Master Fader mix. -
Page 42: Presets
Presets select from: Horizontal The Preset view lets you load and save Mbox Pro Settings files. This is useful if you'd like to save The Horizontal layout is the default layout. It various configurations of the Control Panel so that... - Page 43 Mbox Pro Driver Control Panel, Vertical shown The Vertical layout provides access to all controls and meters in a vertical window. The Vertical lay- Mbox Pro Driver Control Panel, Vertical (Meters Only) out was designed for compact operation, which is shown...
- Page 44 Avid Mbox Pro User Guide...
-
Page 45: Chapter 6. Using The Multi Button
In the Hardware Setup dialog, Pro Tools lets you set three Multi button parameters for your • Add Track Mbox Pro using the “Multi Button Function” pane. • Start/Stop Record (You can also launch the Driver Control Panel • Tap Tempo from here). -
Page 46: Press And Release Options
Each time the Multi button is Save Session tracks and record. But you can personalize the pressed and released, it saves the session. Multi button settings to fit any audio workflow that works for you. Avid Mbox Pro User Guide... -
Page 47: Press And Hold Options
The Multi button can be tapped to ad- Each time the button is held and released, it Tap Tempo Undo just the session tempo. Tapping tempo will cause undoes that last operation you performed in Pro Pro Tools to come out of Conductor mode and Tools. - Page 48 Avid Mbox Pro User Guide...
-
Page 49: Appendix A. Using Coreaudio- And Asio-Compliant Applications
Appendix A: Using CoreAudio- and ASIO- Compliant Applications The Mbox Pro hardware drivers let you use Core- Configuring the Apple Sound Audio (Mac) or ASIO (Windows) compliant appli- Preferences cations with your Mbox Pro. (Mac Only–Required for Using Qualified For driver installation instructions, see... - Page 50 Avid Mbox Pro User Guide...
-
Page 51: Appendix B. Compliance Information
Appendix B: Compliance Information Proposition 65 Warning Environmental Compliance This product contains chemicals, including Disposal of Waste Equipment by Users lead, known to the State of California to cause in the European Union cancer and birth defects or other reproductive harm. -
Page 52: Emc (Electromagnetic Compliance)
Argentine Compliance EMC (Electromagnetic Compliance) Avid declares that this product complies with the following standards regulating emissions and immunity: • FCC Part 15 Class A TÜV • EN 55022 Class A Rheinland • EN 55024 Class A Argentina S. A. -
Page 53: Safety Compliance
60950-1 2nd edition, and Canadian CAN/CSA C22.2 60950- 14) Refer all servicing to qualified service personnel. Servicing 1-07 2nd edition. Avid Technology, Inc., has been authorized is required when the equipment has been damaged in any to apply the appropriate TUV & cTUV marks on its compliant way, such as power-supply cord or plug is damaged, liquid equipment. - Page 54 Avid Mbox Pro User Guide...
- Page 56 Avid Technical Support (USA) Product Information 2001 Junipero Serra Boulevard Visit the Online Support Center at For company and product information, Daly City, CA 94014-3886 USA www.avid.com/support visit us on the web at www.avid.com...
Need help?
Do you have a question about the Mbox Pro and is the answer not in the manual?
Questions and answers