Avid Technology Pro Tools S3 User Manual
And eucontrol 3.3 with pro tools 12.1
Hide thumbs
Also See for Pro Tools S3:
- User manual (63 pages) ,
- Manual (55 pages) ,
- Replacement (2 pages)
Table of Contents

Related Manuals for Avid Technology Pro Tools S3


Summary of Contents for Avid Technology Pro Tools S3
- Page 1 Pro Tools | S3 Guide and EuControl 3.3 with Pro Tools 12.1...
- Page 2 Legal Notices © 2015 Avid Technology, Inc., (“Avid”), all rights reserved. This guide may not be duplicated in whole or in part without the written consent of Avid. 003, 192 Digital I/O, 192 I/O, 96 I/O, 96i I/O, Adrenaline, AirSpeed, ALEX, Alienbrain, AME, AniMatte, Archive, Archive II, Assistant Station, AudioPages,...
-
Page 3: Table Of Contents
Contents Introduction ..................1 What’s Included . - Page 4 Using S3 with Pro Tools ............... . . 27 Track Basics .
-
Page 5: Introduction
Introduction ® ® Welcome to the Pro Tools | S3 studio controller and Ethernet AVB 4 in/6 out audio interface from Avid . The S3 uses Avid’s high-speed EUCON (Extended User Control) control protocol to enable fully integrated control of Pro Tools and other EU- CON-compatible audio and video applications via a 100 MB/s Ethernet connection. -
Page 6: What's Included
What’s Included • S3 control surface • Power supply with IEC cable • Documentation pack, which includes the EuControl software Activation Card, S3 Welcome Letter, Health and Safety Guide and a warranty card If you bought the S3 as part of a VENUE | S3L-X system, see the VENUE | S3L-X System Guide for information on what’s included. Additional Required Equipment •... -
Page 7: Conventions Used In This Guide
Conventions Used in This Guide All of our guides use the following conventions to indicate menu choices and key commands: Convention Action File > Save Choose Save from the File menu Control+N Hold down the Control key and press the N key Control-click Hold down the Control key and click the mouse button Right-click... -
Page 8: How To Use This Pdf Guide
How to Use this PDF Guide These are some useful features of this PDF: • The Bookmarks on the left serve as a continuously visible table of contents. Click a + symbol to expand that heading to show subheadings. Click the – symbol to collapse a subheading. Click on a subject heading to jump to that page. •... -
Page 9: Installation And Setup
Installation and Setup This chapter shows how to get your S3 set up as a studio controller, and consists of the following steps: Connecting S3 • Installing EuControl Software • Enabling EUCON in Pro Tools • Confirming EUCON • Connecting S3 First, connect your S3 directly to your workstation computer (the computer running Pro Tools or other DAW), or connect to a router that is then connected to your workstation computer, then power on S3. - Page 10 Connect one end of an Ethernet Crossover cable into either of the Network ports on the back panel of the S3. Network ports on the back panel of the S3 Connect the other end of the Ethernet cable to an available Ethernet port on your computer, or to the computer’s Thunderbolt port using an Ethernet-to-Thunderbolt adapter.
- Page 11 Toggling Studio and Live Modes The S3 operates in one of the two following modes: Studio Mode Lets you use the S3 with your workstation computer after EuControl software has been installed. If the S3 is in Stu- dio Mode and is connected to an E3 engine (for use in an S3L live mixing system), the S3 will not be recognized by any E3 engines in the network.
-
Page 12: Installing Eucontrol Software
Installing EuControl Software Next, install EuControl software on your workstation computer. An Internet connection is required to download EuControl. To install EuControl software: www.avid.com/account Visit and log into your Avid account (or create an account if you don’t already have one) to download the EuControl installer for your workstation computer’s platform (Mac or Windows). -
Page 13: Updating S3 Firmware
Updating S3 Firmware After installing EuControl, make sure your S3 is running the latest firmware. The firmware is provided within EuControl, so an In- ternet connection is not required. To update S3 firmware: Click (Mac) or double-click (Windows) the EuControl icon and select EuControl Settings . If necessary, click Surfaces to display the Surfaces tab. -
Page 14: Enabling Eucon In Pro Tools
Enabling EUCON in Pro Tools When you first connect your S3, you must enable EUCON in Pro Tools, EUCON subsequently remains enabled in Pro Tools unless you disable it. To enable EUCON in other DAWs, see the documentation provided by the manufacturer. To enable EuControl in Pro Tools: Launch Pro Tools. -
Page 15: Confirming Eucon
Confirming EUCON To confirm installation and communication: Make sure you have enabled EUCON. Open a session if one is not already open. Verify that the channel strip displays above the bottom row of 16 encoders (the Channel Encoders) on the S3 show the track names for the first 16 tracks in the Pro Tools session. -
Page 16: Connecting A Second Workstation
Connecting a Second Workstation The S3 can control applications running on a second computer that is connected to the same network as the primary network, re- ferred to in this guide as a workstation. If EuControl is running on the same workstation as all your audio/video applications you can skip these instructions. -
Page 17: Optimizing Eucontrol After A Pro Tools Update
Optimizing EuControl After a Pro Tools Update If you have recently updated Pro Tools (for example, from Pro Tools to 11.3.1 to Pro Tools 12.x) and were using S3 or other Artist series devices with the previous version of Pro Tools, perform the tasks in this section to make sure you get the latest Appset func- tionality when using S3 with Pro Tools. -
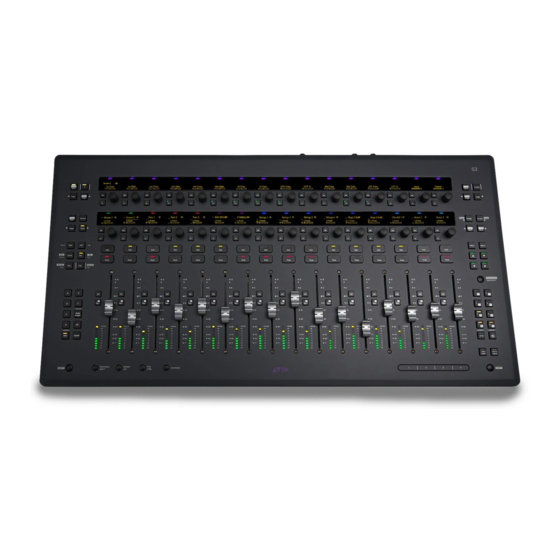
Page 18: S3 Surface Controls Overview
S3 Surface Controls Overview This section provides an overview of the surface controls on the S3 when using S3 with EUCON-compatible applications. For spe- Using S3 with Pro Tools cific S3 workflows, see S3 top panel 1 – Channel Strips 8 –... -
Page 19: Channel Strips
Channel Strips S3 provides 16 channel strips, each with a display, an Assignable Channel Encoder (each with its own encoder Sel and In switches), a Solo switch, a Mute switch, a 100mm motorized touch-sensitive fader, a channel select ( Sel ) switch, a record engage ( Rec )/Automation Mode ( A ) switch, and a level meter. Channel Strip Display Channel Strip Displays Assignable Channel Encoder... -
Page 20: Channel Strip Displays
Channel Strip Displays At the top of each channel strip is an Organic Light Emitting Diode (OLED) display. When S3 is first powered on, the Channel En- Channel Encoder Modes coders are in Normal Mode (see ), and each display shows track information as follows: Kick Snare Channel strip display in Normal Mode... -
Page 21: Assignable Channel Encoders
Assignable Channel Encoders Each channel strip has one touch-sensitive, continuously rotating encoder for adjusting parameters as assigned by the Channel En- Channel Encoder Assignment Switches coder Assignment switches (see ). Each encoder can also be pressed, which is typically used to access sub-menus. Each encoder also has corresponding Sel and In switches. •... -
Page 22: Channel Encoder Assignment Switches
Channel Encoder Assignment Switches The Channel Encoder Assignment switches assign sets of adjustable parameters, called Knob Sets, to the Channel Encoders. A Knob Set is an array of controls used by EuControl-compatible applications to control plug-ins, EQs, dynamics, aux sends, and other processing functions using the controls on the S3. - Page 23 Aux Assigns sends on the Channel Encoders. In Normal Mode, the first send is displayed, and pressing the Page > Channel Encoder Navigation switch assigns the next set of sends to the encoders. In Channel Mode, up to 16 sends for the currently selected channel can be accessed at once. ...
-
Page 24: Fader Banking Controls
Fader Banking Controls Bank tracks to the channel strips using the Bank and Nudge switches. Home and End are shortcuts to the first and last banks, re- spectively. Mixer Close Nudge Nudge Home Bank Bank Fader Navigation controls Bank and Nudge The Bank and Nudge switches change which tracks are assigned to the channel strips, as follows: <... -
Page 25: Left Control
Left Control Multi Assign User Cancel Left Control Switches A–F By default, these switches let you recall custom fader banks and layouts, as created and stored using the Layouts and Assign tabs of the EuControl Settings application. You can recall up to 12 custom fader layouts using switches A–F . A–F recall mixer layouts 1–6. -
Page 26: Channel Control
Channel Control The top row of 16 encoders and associated navigation switches is called Channel Control. Channel Control lets you adjust a variety of parameters for the currently attentioned track. Channel Control and the bottom-row Channel Encoders operate independently, so you can adjust two sets of parameters for a single channel. You can also access controls for the S3’s built-in I/O using Channel S3 Audio I/O Connections Control (see for more information). - Page 27 Channel Control Navigation Switches (Right) These switches provide access to Config mode and the controls for the built-in I/O in Channel Control. Config Back Expnd Page Page Config switch and I/O Controls Config Enables Config mode on the Channel Control Encoders, letting you assign plug-ins to tracks, and assign track and send in- Routing Track Input/Output Assigning Plug-Ins put and output paths.
-
Page 28: View And Arrow Switches
View and Arrow Switches By default, these switches provide recall of Memory Locations, and zoom controls. You can also customize these switches in Eu- Soft Keys Control. See for more information. View 1 View 2 Window Navigation controls View 1 and View 2 Recall Memory Locations 1 and 2 respectively. If no Memory Locations exist, these switches do nothing. ▲... -
Page 29: Right Control
Right Control By default, switches F1–F8 (F9–F16) provide control over the automation mode for one or more selected tracks in two banks of Working with Automation switches. For more information on working with automation on the S3, see Soft Keys You can also customize these switches in EuControl. -
Page 30: Surface Shift
Surface SHIFT Some switches have secondary functions, highlighted in gray above the primary function (such as < Bank/Home , where Home is the secondary function). To access these secondary functions, use either of the two Surface SHIFT switches located at the lower-left and lower-right sides of the console surface. -
Page 31: Using S3 With Pro Tools
Using S3 with Pro Tools This section provides information on the latest Appset functionality when using S3 with the latest version of Pro Tools. If you have Optimizing EuControl After a Pro Tools Update updated from a previous version of Pro Tools, see Track Basics This section shows how to select, attention, and route tracks to outputs. - Page 32 To select a range of tracks (multi-select): Press the first track’s channel Sel switch (usually the leftmost track you want to include in the selection). Hold Multi Select/SHIFT and press Sel on the last (right-most) track. All tracks between the two are selected. To select non-adjacent tracks (add to a selection): Press the channel Sel switch to select any track.
- Page 33 Surround Panning on S3 Use the Channel Encoders or Channel Control to control multichannel pan parameters. To pan in surround using the Channel Encoders: Select a track assigned to a multichannel output path (such as a 5.1 or 7.1 output path). Press Pan .
- Page 34 Routing Track Input/Output You can route track I/O using the Channel Encoders or Channel Control. Using the Channel Encoders To route track input or output using the Channel Encoders: Select a track. If several tracks are selected, make sure the track you want to adjust is attentioned. Do either of the following: •...
- Page 35 Using Channel Control To route track input or track output using Channel Control: Select a track. If several tracks are selected, make sure the track you want to adjust is attentioned. Make sure the top-level Channel Control Knob Set is displayed. Press the Back Channel Control Navigation switch until it is displayed.
-
Page 36: Banking Tracks
Multiple Output Path Assignments You can assign a Pro Tools track to multiple output paths. To assign another track output: Repeat the previous instructions to assign a track output using the Channel Encoders or Channel Control. Rotate the encoder to select the desired output type. Press the corresponding Channel Encoder Sel switch to assign the selected output. -
Page 37: Storing And Recalling Custom Layouts
Storing and Recalling Custom Layouts Layouts let you assign specific tracks to specific channel strips on the S3, and have those channel strips ignore banking and nudging (ensuring that the specific tracks remain available for as long as the Layout is active). You can store Layouts using the Assign and Layouts tabs of the EuControl Settings application. - Page 38 Creating a Custom Layout To create a custom Layout on Bank switch B: Click the Layouts tab, double-click row 2, type in a name, and press Enter. Be sure the Layout you have named is highlighted, then click the Assign tab. Click in the Assigned To column and select a track from the pop-up to assign (lock) that track to the corresponding channel strip.
-
Page 39: Working With Track Groups
Working with Track Groups You can add and remove tracks to Pro Tools track Groups, and suspend or enable Groups using the Channel Encoders or Channel Control on S3. Groups must be created in Pro Tools before they can be accessed and modified on the S3. Using the Channel Encoders To add or remove tracks from a Group using the Channel Encoders: Press Surface SHIFT + Aux/Group . -
Page 40: Working With Vcas
Using Channel Control To work with track Groups using Channel Control: Select a track, and make sure it is attentioned. From the Channel Control top-level Knob Set, press the Channel Control Encoder under the display showing Groups . The Channel Control displays show the available Groups. If the top-level Channel Control Knob Set is not shown, press the Back Channel Control Navigation switch until it is shown. - Page 41 Spilling VCAs in Multi-Master Mode In Multi-Master mode, you can spill up to 12 member tracks of a selected VCA Master, while also spilling up to eight VCA Master tracks to the channel strips. This lets you have access to multiple VCA Masters and a selected VCA’s member tracks simultane- ously.
-
Page 42: Working With Plug-Ins
Working with Plug-Ins You can assign plug-ins to tracks using Channel Control, and adjust them using the Channel Encoders or Channel Control. Assigning Plug-Ins Assign plug-ins to tracks using Channel Control and the Config switch. To assign a plug-in to a track using Channel Control: Select a track, and make sure it is attentioned. - Page 43 Adjusting Plug-Ins Using the Channel Encoders To adjust plug-ins on the Channel Encoders using the Inserts Knob Set: Press Insert . Plug-ins assigned to first Inserts slots (a) for the currently banked channels are shown in the channel displays. If no plug-in is inserted in that slot for the corresponding track, the Inserts slot letter is shown.
- Page 44 Adjusting Plug-Ins Using Channel Control To adjust plug-ins in Channel Control using the Inserts Knob Set: Select a track and make sure it is attentioned. Press the Channel Control Encoder under the display showing Inserts . The Channel Control displays show the plug-ins that are inserted on the attentioned track.
-
Page 45: Working With Sends
Working with Sends This section shows how you can assign and adjust Pro Tools sends. Assigning Sends Use Channel Control to assign sends. You can assign a send to multiple tracks at once using the Multi Assign switch (Do to Se- lected and Do to All). - Page 46 Adjusting Sends You can access and adjust sends using the Channel Encoders or Channel Control. To access a send using the Channel Encoders: Bank to the desired track. Press the Aux Channel Encoder Assign switch. Send assignments in slot a are displayed in the Channel Encoder displays for the currently banked channels.
-
Page 47: Working With Automation
Muting/Unmuting Sends You can mute/unmute individual sends using the Channel Encoders and Channel Control. To mute/unmute a send: Bank to the desired track. Using the Channel Encoders, do the following: • Press Aux . • Use the < Page and Page > keys to navigate the displays until the desired send is shown. Using Channel Control, do the following: •... - Page 48 Using the Function Switches The following table shows the available automation modes on the Function switches. Switch Automation Function Switch Automation Function Write Read Touch Automation Off Latch Automation Match Trim Automation Window Preview Write to All/Selected Punch Preview Write to Start Capture Write to End Punch Capture...
- Page 49 Send Level View To show Send level automation in the Edit window: Press AUX to assign sends to the Channel Encoders. If necessary, press the Page > Channel Encoder Navigation switch until the desired Sends slot is displayed. Hold Control + Command (Mac) or Ctrl + Start (Windows) and touch the Send encoder in the desired track. Send Pan View To show Send pan automation in the Edit window: Press AUX to assign sends to the Channel Encoders.
-
Page 50: S3 Audio I/O Connections
S3 Audio I/O Connections This chapter shows how to use the built-in audio I/O on the S3, including: Enabling S3 Audio on the Workstation Computer Connecting and Adjusting Outputs • • S3 Audio Connections Overview Connecting Hardware Inserts • • Accessing Audio Control on the S3 Connecting and Adjusting Headphones •... -
Page 51: S3 Audio Connections Overview
S3 Audio Connections Overview S3 provides four channels of analog inputs to Pro Tools or other Core Audio-compatible applications that support sample rates of 48 kHz, and four channels of analog outputs for connecting monitors and other outboard audio devices. S3 control surface back panel audio connections 1 –... -
Page 52: Accessing Audio Control On The S3
Accessing Audio Control on the S3 Audio Control–the S3’s built-in I/O controls–are adjusted using Channel Control Encoders 9–16. Audio Control is hidden by de- fault. To access Audio Control: Simultaneously press the right-side < Page and Page > Channel Control Navigation switches. ... -
Page 53: Connecting And Adjusting Outputs
To link and unlink input pairs: To link input pairs 1–2 or 3–4, press and hold Multi-Select/SHIFT Press the Encoder under the display showing In 1 or In 2 to link 1–2, or In 3 or In 4 to link 3–4. In 1-2 In 3-4 10dB... -
Page 54: Connecting Hardware Inserts
To sum an output to mono: Press and hold Multi-Select/SHIFT. Press the Encoder for the output pair you want to sum to mono. Mono appears in the corresponding display. Mono signals are sent equally to each physical output in the pair. Repeat to return to stereo operation. -
Page 55: Saving S3 Monitor Settings
Saving S3 Monitor Settings You can save the current monitor settings on your S3, including monitor preference settings, and MAIN (Outputs 1–2) and ALT (Outputs 1–2) settings. To save the current monitor settings: Make any desired adjustments to the monitor settings on the S3. Under the display showing Save (the 13th Channel Control display), press the lit Encoder Sel switch. -
Page 56: Soft Keys
Soft Keys When using Pro Tools | S3 with Pro Tools and other selected DAWs, an Appset is installed providing default functionality for S3 surface controls. You can customize select switches on S3 using the Soft Key Editor provided in EuControl software. Overview You can customize the functions of the switches in the following sections on the S3: 1 –... -
Page 57: Viewing Soft Key Assignments In The Soft Key Editor
Viewing Soft Key Assignments in the Soft Key Editor To view assignments in the Soft Key Editor: Launch Pro Tools and confirm that EuControl is connected to the S3, indicated by a lit EuControl icon in the Menu Bar (Mac) or the System Tray (Windows). -
Page 58: Using The Soft Key Editor
Using the Soft Key Editor The Soft Key Editor lets you reassign a switch from its default Soft Key assignment (if applicable), add a new command to an un- assigned switch, revert (undo) all recent assignment, and restore to factory default assignments. You can also add a key command to a switch to invoke a keyboard shortcut. - Page 59 To add a new assignment: Launch Pro Tools and confirm the EuControl is connected to the S3, indicated by a lit EuControl icon in the Menu Bar (Mac) or the System Tray (Windows). Show Me Press the switch. Click the selector and choose the section of switches containing the switch you want to assign.
- Page 60 To revert (undo) all assignments since the last time you saved changes: Click the button in the Soft Keys tab. Revert To restore assignments to their factory defaults: Click the Restore button in the Soft Keys tab. Adding a Custom Key Command You can invoke a keyboard shortcut that has no predefined function in the EuControl using the Soft Key Editor.
-
Page 61: Eucontrol Software
EuControl Software EuControl is launched automatically upon starting your computer and runs in the background. EuControl is responsible for finding, linking, and communicating with all Avid media controllers on the network. Accessing EuControl Settings To open the EuControl Settings window, do one of the following: •... -
Page 62: Update Firmware
My Surfaces My Surfaces shows the media controllers connected to your instance of EuControl. The top-to-bottom order corresponds to the left-to-right order of the surfaces, respectively. The leftmost surface is assigned to fader strip 1. Use the + and – buttons to reorder the list. Each media controller can be renamed by double-clicking the existing name and typing a new name. -
Page 63: Workstations
Workstations A media controller can control applications running on a second computer, referred to in this guide as a workstation. The Work- stations tab establishes the list of workstations that the Workstation switch cycles through. Any workstation running EuControl software can be in this list. Workstations tab All Workstations All Workstations lists all EUCON-enabled workstations on the network. -
Page 64: General
Attach/Detach Select a workstation in the My Workstations list and click Attach . A check mark appears in the Attach column next to that work- station. This workstation is now communicating with the media controller(s) connected to your instance of EuControl. If the selected workstation is already attached, the button displays Detach . -
Page 65: Solo Mode
Select by Touch This command lets supported workstations attention (focus) tracks on-screen when their fader is touched on the S3. Auto-bank to Selected Track When this is selected, S3 banks to tracks when the tracks are selected on-screen. The surface will auto-bank such that the selected track appears on the leftmost fader of the surface as long as the selected track is not currently visible on the surface. -
Page 66: Preferences
Preferences Preferences tab Footswitch You can connect a footswitch to S3 for hands-free punch in/out. Connect a footswtich to the 1/4-inch footswitch input on the back panel. To configure the Footswitch in EuControl: In the Footswitch section of the Preferences tab, click to select the desired Punch In and Punch Out assignments: ... -
Page 67: Assign
Artist Control Display This feature does not apply to S3. Display Screen Dim Time This feature does not apply to S3. Assign The Assign tab manages how tracks are assigned to S3 channel strips. By default, tracks are automatically assigned in banks of 16. Assign tab Display Application’s Track Numbers Enabling this option lets EuControl display track numbers as assigned by the currently selected (in focus) application (if that ap-... -
Page 68: Layouts
Layouts Use the Layouts tab to store and recall custom fader layouts. For example, you can use the Assign tab to assign tracks to specific S3 channel strips. You can then save those assignments as part of a fader layout on the Layouts tab, which you can then recall using the Bank A–F switches. -
Page 69: Audio Specifications
Audio Specifications All specifications subject to change. S3 Control Surface Audio Specifications S3 Analog Mic Inputs, Pad Disabled Value Parameter Conditions Units Min. Typ. Max. Volts Phantom Power +7.979 Input Sensitivity @ 997 Hz, Gain = 10 dB (min.) Gain = 60 dB, 150 source impedance -126.1 Equivalent Input Noise (EIN) -0.021... - Page 70 S3 Analog Mic Inputs, Pad Enabled Value Parameter Conditions Units Min. Typ. Max. Volts Phantom Power +28.322 Input Sensitivity @ 997Hz, Gain = 10 dB (min.) -0.016 -0.235 Frequency Response =+8.225 dBu, 20 Hz – 20 kHz relative to INPUT 1 kHz, Gain = 10 dB (min.) 150 ...
- Page 71 S3 Analog Outputs Value Parameter Conditions Units Min. Typ. Max. +24.201 Output Sensitivity @ 997 Hz 103.5 ohms Output Impedance @1 kHz Residual Output Noise 20 Hz – 20 kHz Round Trip Latency Console input to Console output S3 Headphone Output Value Parameter Conditions...
-
Page 72: Appendix A. Compliance Information
Appendix A: Compliance Information Environmental Compliance Disposal of Waste Equipment by Users in the European Union This symbol on the product or its packaging indicates that this product must not be disposed of with other waste. Instead, it is your responsibility to dispose of your waste equipment by handing it over to a designated collection point for the recycling of waste electrical and electronic equipment. - Page 73 FCC Compliance for United States Radio and Television Interference Communication Statement NOTE: This equipment has been tested and found to comply with the limits for a Class B digital device, pursuant to Part 15 of the FCC Rules. These limits are designed to provide reasonable protection against harmful interference in a residential installation.
-
Page 74: Safety Compliance
Safety Compliance Safety Statement This equipment has been tested to comply with USA and Canadian safety certifications in accordance with the specifications of UL Standards: UL60950-1:2007, 2nd Edition and canadian CAN/CSA C22.2 60950-1-07, 2nd Edition. Avid Inc. has been authorized to apply the appropriate UL and CUL mark on its compliant equipment. Warning Important Safety Instructions 1) Read these instructions. - Page 75 Avid Technical Support (USA) Product Information 280 N Bernardo Avenue Visit the Online Support Center at For company and product information, Mountain View, CA 94043 USA www.avid.com/support visit us on the web at www.avid.com...
Need help?
Do you have a question about the Pro Tools S3 and is the answer not in the manual?
Questions and answers