Table of Contents
Advertisement
Quick Links
EN
Dear Customer,
Gigaset Communications GmbH is the legal successor to
Siemens Home and Office Communication Devices GmbH &
Co. KG (SHC), which in turn continued the Gigaset business
of Siemens AG. Any statements made by Siemens AG or
SHC that are found in the user guides should therefore be
understood as statements of Gigaset Communications
GmbH.
We hope you enjoy your Gigaset.
DE
Sehr geehrte Kundin, sehr geehrter Kunde,
die Gigaset Communications GmbH ist Rechtsnachfolgerin
der Siemens Home and Office Communication Devices
GmbH & Co. KG (SHC), die ihrerseits das Gigaset-Geschäft
der Siemens AG fortführte. Etwaige Erklärungen der
Siemens AG oder der SHC in den Bedienungsanleitungen
sind daher als Erklärungen der Gigaset Communications
GmbH zu verstehen.
Wir wünschen Ihnen viel Freude mit Ihrem Gigaset.
FR
Chère Cliente, Cher Client,
la société Gigaset Communications GmbH succède en droit
à Siemens Home and Office Communication Devices GmbH
& Co. KG (SHC) qui poursuivait elle-même les activités Giga-
set de Siemens AG. Donc les éventuelles explications de Sie-
mens AG ou de SHC figurant dans les modes d'emploi
doivent être comprises comme des explications de Gigaset
Communications GmbH.
Nous vous souhaitons beaucoup d'agrément avec votre
Gigaset.
IT
Gentile cliente,
la Gigaset Communications GmbH è successore della Sie-
mens Home and Office Communication Devices GmbH &
Co. KG (SHC) che a sua volta ha proseguito l'attività della
Siemens AG. Eventuali dichiarazioni della Siemens AG o
della SHC nei manuali d'istruzione, vanno pertanto intese
come dichiarazioni della Gigaset Communications GmbH.
Le auguriamo tanta soddisfazione con il vostro Gigaset.
NL
Geachte klant,
Gigaset Communications GmbH is de rechtsopvolger van
Siemens Home and Office Communication Devices GmbH &
Co. KG (SHC), de onderneming die de Gigaset-activiteiten
van Siemens AG heeft overgenomen. Eventuele uitspraken
of mededelingen van Siemens AG of SHC in de gebruiksaan-
wijzingen dienen daarom als mededelingen van Gigaset
Communications GmbH te worden gezien.
Wij wensen u veel plezier met uw Gigaset
ES
Estimado cliente,
la Gigaset Communications GmbH es derechohabiente de la
Siemens Home and Office Communication Devices GmbH &
Co. KG (SHC) que por su parte continuó el negocio Gigaset
de la Siemens AG. Las posibles declaraciones de la
Siemens AG o de la SHC en las instrucciones de uso se
deben entender por lo tanto como declaraciones de la Giga-
set Communications GmbH.
Le deseamos que disfrute con su Gigaset.
PT
SCaros clientes,
Gigaset Communications GmbH é a sucessora legal da Sie-
mens Home and Office Communication Devices GmbH &
Co. KG (SHC), que, por sua vez, deu continuidade ao sector
de negócios Gigaset, da Siemens AG. Quaisquer declara-
ções por parte da Siemens AG ou da SHC encontradas nos
manuais de utilização deverão, portanto, ser consideradas
como declarações da Gigaset Communications GmbH.
Desejamos que tenham bons momentos com o seu Gigaset.
Issued by
Gigaset Communications GmbH
Schlavenhorst 66, D-46395 Bocholt
Gigaset Communications GmbH is a trademark
licensee of Siemens AG
DA
FI
SV
NO
EL
HR
.
SL
Kære Kunde,
Gigaset Communications GmbH er retlig efterfølger til Sie-
mens Home and Office Communication Devices GmbH &
Co. KG (SHC), som fra deres side videreførte Siemens AGs
Gigaset-forretninger. Siemens AGs eller SHCs eventuelle
forklaringer i betjeningsvejledningerne skal derfor forstås
som Gigaset Communications GmbHs forklaringer.
Vi håber, du får meget glæde af din Gigaset.
Arvoisa asiakkaamme,
Gigaset Communications GmbH on Siemens Home and
Office Communication Devices GmbH & Co. KG (SHC)-yri-
tyksen oikeudenomistaja, joka jatkoi puolestaan Siemens
AG:n Gigaset-liiketoimintaa. Käyttöoppaissa mahdollisesti
esiintyvät Siemens AG:n tai SHC:n selosteet on tämän
vuoksi ymmärrettävä Gigaset Communications GmbH:n
selosteina.
Toivotamme Teille paljon iloa Gigaset-laitteestanne.
Kära kund,
Gigaset Communications GmbH övertar rättigheterna från
Siemens Home and Office Communication Devices GmbH &
Co. KG (SHC), som bedrev Gigaset-verksamheten efter Sie-
mens AG. Alla förklaringar från Siemens AG eller SHC i
användarhandboken gäller därför som förklaringar från
Gigaset Communications GmbH.
Vi önskar dig mycket nöje med din Gigaset.
Kjære kunde,
Gigaset Communications GmbH er rettslig etterfølger etter
Siemens Home and Office Communication Devices GmbH &
Co. KG (SHC), som i sin tur videreførte Gigaset-geskjeften i
Siemens AG. Eventuelle meddelelser fra Siemens AG eller
SHC i bruksanvisningene er derfor å forstå som meddelelser
fra Gigaset Communications GmbH.
Vi håper du får stor glede av din Gigaset-enhet.
Αγαπητή πελάτισσα, αγαπητέ πελάτη,
η Gigaset Communications GmbH είναι η νομική διάδοχος της
Siemens Home and Office Communication Devices GmbH &
Co. KG (SHC), η οποία έχει αναλάβει την εμπορική
δραστηριότητα Gigaset της Siemens AG. Οι δηλώσεις της
Siemens AG ή της SHC στις οδηγίες χρήσης αποτελούν
επομένως δηλώσεις της Gigaset Communications GmbH.
Σας ευχόμαστε καλή διασκέδαση με τη συσκευή σας Gigaset.
Poštovani korisnici,
Gigaset Communications GmbH pravni je sljednik tvrtke
Siemens Home and Office Communication Devices GmbH &
Co. KG (SHC), koji je nastavio Gigaset poslovanje tvrtke
Siemens AG. Zato sve izjave tvrtke Siemens AG ili SHC koje
se nalaze u uputama za upotrebu treba tumačiti kao izjave
tvrtke Gigaset Communications GmbH.
Nadamo se da sa zadovoljstvom koristite svoj Gigaset
uređaj.
Spoštovani kupec!
Podjetje Gigaset Communications GmbH je pravni naslednik
podjetja Siemens Home and Office Communication Devices
GmbH & Co. KG (SHC), ki nadaljuje dejavnost znamke
Gigaset podjetja Siemens AG. Vse izjave podjetja Siemens
AG ali SHC v priročnikih za uporabnike torej veljajo kot izjave
podjetja Gigaset Communications GmbH.
Želimo vam veliko užitkov ob uporabi naprave Gigaset.
© Gigaset Communications GmbH 2008
All rights reserved.
Subject to availability. Rights of modifications
reserved.
www.gigaset.com
Advertisement
Table of Contents

Related Manuals for Siemens Gigaset CE460 IP R


Summary of Contents for Siemens Gigaset CE460 IP R
- Page 1 Nadamo se da sa zadovoljstvom koristite svoj Gigaset de la Siemens AG. Las posibles declaraciones de la uređaj. Siemens AG o de la SHC en las instrucciones de uso se deben entender por lo tanto como declaraciones de la Giga- Spoštovani kupec! set Communications GmbH.
- Page 2 Devices GmbH & Co. KG (SHC), kroz koju je nastavljeno poslovanje kompanije Gigaset kao dela Siemens AG. Stoga sve izjave od strane Siemens AG ili SHC koje se mogu naći u korisničkim uputstvima treba tumačiti kao izjave kompanije Gigaset Communications GmbH.
- Page 3 Siemens Home and Office Communication Devices GmbH & Co. KG Schlavenhorst 66 D-46395 Bocholt Gigaset © Siemens Home and Office Communication Devices GmbH & Co. KG 2007 All rights reserved. Subject to availability. Rights of modification reserved. CE460 IP R...
-
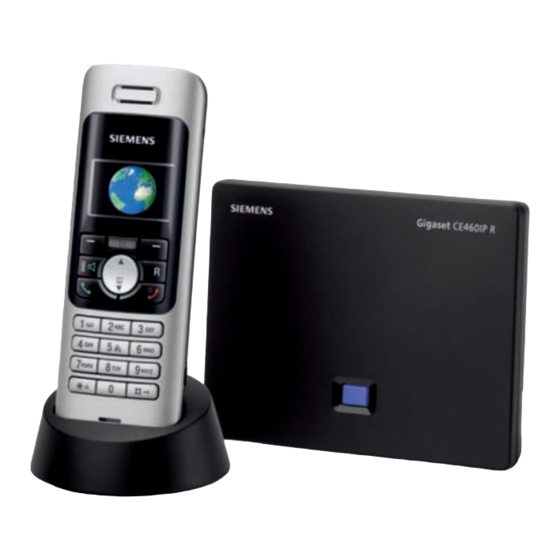
Page 4: The Handset At A Glance
The handset at a glance The handset at a glance Handset keys 1 Display in idle status (example) 2 Battery charge status e V U (1/3 charged to fully charged) flashes: battery almost flat e V U flashes: battery charging 3 Control key (page 31) 4 Display keys (page 32) 5 End call key, On/Off key... -
Page 5: Table Of Contents
Contents Contents VoIP telephony via Gigaset.net Searching for subscribers in the Gigaset.net directory ... . . 34 The handset at a glance ..1 Calling a Gigaset.net subscriber . - Page 6 Contents Making VoIP settings ..59 Phone Web configurator ..85 Setting the base station phone's IP address Connecting the PC to the phone Web in LAN ......59 configurator .
-
Page 7: Safety Precautions
Safety precautions Warning: Read the safety precautions and the user guide before use. Explain their contents and the potential hazards associated with using the telephone to your children. Only use the mains adapter supplied, as indicated on the underside of the base station. Use only recommended rechargeable batteries (page 121) of the same type! Never use a conventional (non-rechargeable) battery or other battery types as this could result in sig- nificant health risks and personal injury. -
Page 8: Gigaset Ce 460 Ip R - More Than Just A Telephone
Gigaset CE 460 IP R – more than just a telephone Gigaset CE 460 IP R – more than just a telephone Your Gigaset CE 460 IP R is not only a router and phone in one device that you can use to make cost-effective calls via the Internet (VoIP - Voice over IP) and with which you can con- nect other participants in your local network (e.g. -
Page 9: Voip - Making Calls Via The Internet
VoIP – making calls via the Internet VoIP – making calls via the Internet With VoIP (Voice over Internet Protocol), your calls are not made via a fixed connection as in the telephone network, but rather they are transmitted via the Internet in the form of data packets. - Page 10 VoIP – making calls via the Internet Base station phone You can make phone or VoIP telephony settings with the handset or on your PC via the phone Web configurator (see page 85). The phone settings are protected with a system PIN. The phone is supplied with the following standard settings for connection to the router.
-
Page 11: First Steps
Inserting the batteries Warning: Only use the rechargeable batteries recommended by Siemens Home and Office Communication Devices GmbH & Co. KG on page 121. Never use a conventional (non-rechargeable) battery or other battery types as this could result in significant health risks and personal injury.For example, the bat- teries could explode. - Page 12 Setting up the handset for use First steps ¤ Insert the batteries the right way round (see figure). The polarity is indicated in the battery compartment. Closing the battery cover ¤ First align the notches on the side of the battery cover with the lugs on the inside of the casing.
- Page 13 First steps Setting up the handset for use Opening the battery cover ¤ If fitted, remove belt clip. ¤ Insert a fingernail into the notch and pull the battery cover upwards. Connecting the charging cradle Connecting the charging cradle and mounting it on the wall (if required) is described at the end of this user guide.
-
Page 14: Installing The Base Station
Installing the base station First steps The batteries may warm up during charging. This is not dangerous. After a while the charge capacity of the batteries will decrease for technical reasons. Please note: You will find explanations for the symbols and typographical conventions used in this user guide in the appendix, page 112. -
Page 15: Connecting The Base Station
First steps Connecting the base station Connecting the base station To be able to make calls via VoIP with your base station, you must connect the base station with the Internet (WAN connection). You can connect additional devices to the base station LAN connection;... - Page 16 Connecting the base station First steps Connecting the base station with the modem Connect the socket labelled WAN on your base station with your DSL modem. To do this, use the Ethernet cable supplied. 1 Side view of the base station 2 Network plug (WAN) with network cable 3 DSL modem Connecting the PC with the base station...
- Page 17 First steps Connecting the base station Connecting the base station and modem with the mains power supply Reconnect your modem to the mains power supply and turn it on. Please note: With some modems, you must wait a few minutes before turning it back on. Please consult your modem description.
-
Page 18: Configuring The Internet Connection On The Base Station Router
Configuring the Internet connection on the base station router First steps Configuring the Internet connection on the base station router Make the basic Internet access settings for the base station router via your PC. All data required for the configuration of the Internet connection can be obtained from your Internet service provider. - Page 19 You can find detailed information about this in the full user guide (Quality of Service – QoS). This is available on the Internet at: www.siemens.com/gigaset. More entries and settings for the Internet connection can be made at a later stage via the Router Settings menu of the router Web configurator (page 71).
-
Page 20: Making Settings For Voip Telephony On The Base Station Phone
Making settings for VoIP telephony on the base station phone First steps Completing the router configuration ¤ After entering your access data, click Next>. Web page is displayed. Apply Settings ¤ Click Finish. The start screen will be displayed again. Internet Status is displayed on the right-hand side of the start screen. - Page 21 §§§§§Yes§§§§ Press the display key. §Yes§ The phone establishes an Internet connection to the Siemens server, where various profiles with gen- eral access data are available for different VoIP providers. If the phone cannot establish the connec- tion, will be displayed. See page 21 for details on how you can test/establish the Server not accessible! Internet connection if necessary.
- Page 22 Making settings for VoIP telephony on the base station phone First steps After changing the display: Select your VoIP provider and press §OK§ The necessary data for your VoIP provider is downloaded and saved on the phone. Please note: If the data for your VoIP provider is not offered for download, you must make the necessary settings with the Web configurator at a later stage (page 90).
- Page 23 First steps Making settings for VoIP telephony on the base station phone Entering names in the Gigaset.net directory With Gigaset.net you can call other Gigaset.net users directly over the Internet free of charge, without setting up an account with a VoIP provider and without making any further settings.
- Page 24 Making settings for VoIP telephony on the base station phone First steps No connection to the Internet/VoIP server If one of the following messages is displayed instead of the internal name after the con- nection assistant is closed, then either a fault has occurred or your information was incom- plete: Server not accessible! The phone has no connection to the Internet.
-
Page 25: Belt Clip And Headset
First steps Belt clip and headset SIP registration failed! Your personal data for registering with the VoIP provider may have been entered incom- pletely or incorrectly. ¤ Check your entries for Username, Password. In Authentication Name Authentication particular, check your use of upper and lower case. To do this, open the following menu on your handset: ¢... -
Page 26: Menu Trees
Phone menu Menu trees Phone menu There are two ways to select a function: Using number combinations ("shortcut") ¤ To open the main menu, press with the handset in idle status. §Menu§ ¤ Enter the number combination that is in front of the function in the menu tree. ¤... - Page 27 Phone menu Settings 4-1 Date/Time page 11 4-2 Handset 4-2-1 Display 4-2-1-1 Screensaver page 52 4-2-1-2 Colour Scheme 4-2-1-3 Contrast 4-2-1-4 Backlight 4-2-2 Language page 52 4-2-3 Auto Answer page 53 4-2-4 Register Handset page 48 4-2-5 Reset Handset page 56 4-3 Base 4-3-1 Calls List Type 4-3-1-1 Missed Calls...
- Page 28 Phone menu ¢ ¢ Submenu "Settings Base Telephony" 4-3-7 4-3-7 Telephony 4-3-7-2 Connection page 61 Assistant 4-3-7-7 VoIP 4-3-7-7-1 Status on HS page 63 4-3-7-7-2 Select VoIP page 61 Provider 4-3-7-7-3 Username page 62 4-3-7-7-4 Authentication page 62 Name 4-3-7-7-5 Authentication page 62 Password...
-
Page 29: Router Web Configurator Menu
Router Web configurator menu Router Web configurator menu Home page 65 page 15 Basic Setup Wizard the basic router settings Router Settings Internet Connection page 71 Firewall page 74 Address Translation page 75 (NAT) page 78 page 78 Routing page 79 Local Network page 80 DHCP Clients... -
Page 30: Phone Web Configurator Menu
Phone Web configurator menu Phone Web configurator menu Home page 65 Settings IP Configuration page 87 Telephony Connections page 90 Audio page 97 Number Assignment page 100 Dialing Plans page 103 Directory page 103 Advanced Settings page 101 Messaging Messenger page 109 E-Mail page 111... -
Page 31: Making Calls
Making an external call Making calls Making an external call External calls are calls made via the Internet (VoIP). ¤ Enter the required number/IP address using the keypad. ¤ Press the talk key c. Please note: – You can specify for each handset registered to your base station which of your VoIP phone num- bers (which VoIP account) should be used for outgoing external VoIP calls (page 100). -
Page 32: Accepting A Call
Accepting a call Accepting a call The handset indicates an incoming call in three ways: by ringing, by a display on the screen and by the flashing handsfree key d. Please note: The handset will indicate the following calls: – Calls to receiving numbers that are assigned to this handset (page 100). –... -
Page 33: Handsfree Talking
Handsfree talking Handsfree talking In handsfree mode, instead of holding the handset to your ear you can stand it up or lay it down, e.g. on the table in front of you, to allow others to participate in the call. Activating/deactivating handsfree mode Activating while dialling Enter the number and press the handsfree key. -
Page 34: Operating The Handset
Activating/deactivating the handset Operating the handset Activating/deactivating the handset Press and hold the end call key. You will hear the confirmation tone. Activating/deactivating the keypad lock Press and hold the hash key. You will hear the confirmation tone. The Ø icon appears in the display when the keypad lock is activated. -
Page 35: Display Keys
Display keys During an external call Open the directory. Adjust the loudspeaker volume for earpiece and handsfree mode. Display keys The current display functions are shown in the bottom display line in reversed highlights. The function of the display keys changes depending on the particular operating situation. Example: §§§§INT§§§... -
Page 36: Menu Guidance
Menu guidance Menu guidance Your telephone's functions are accessed using a menu that has a number of levels. Main menu (first menu level) ¤ To open the main menu, press with the handset in idle status. §Menu§ Accessing a function ¤... -
Page 37: Voip Telephony Via Gigaset.net
Exclusion of liability Gigaset.net is a voluntary service provided by Siemens Home and Office Communication GmbH & Co KG with no liability or guarantee for the availability of the network. This service can be terminated at any time with a notice period of three months. - Page 38 Searching for subscribers in the Gigaset.net directory Once the connection has been established, you will be asked to enter a name that you want to search for. Nickname: Enter the name or part of a name (max. 25 characters). Press the display key. §Menu§...
- Page 39 Searching for subscribers in the Gigaset.net directory Using other functions Precondition: The hit list is displayed. ¢ q (Select entry) §Menu§ The following functions can be selected with q: Copy to Directory Copy the number to the handset directory. The number and name (where appropriate abbreviated, max.
-
Page 40: Calling A Gigaset.net Subscriber
Calling a Gigaset.net subscriber Entering/editing a name Press the display key. §Change§ Edit name or enter new name (max. 25 characters) and press §OK§ You can delete the name with ˜. If there is not yet an entry with this name in the Gigaset.net directory, the name is saved. A message to this effect is displayed. -
Page 41: Network Services - Voip
Settings for all calls Network services - VoIP Settings for all calls Call forwarding takes place locally in your base station. Please note that call forwarding may incur additional costs. Ask your VoIP provider. Setting up call forwarding ¢ ¢ ¢... -
Page 42: Functions During A Call
Functions during a call Functions during a call The following functions are only available if you permit two parallel VoIP connections for your telephone (see page 97, Allow 1 VoIP call only). Consultation During a VoIP call: ¢ External Call §Menu§... -
Page 43: Using The Directory And Lists
Directory Using the directory and lists The options are: Directory Last number redial list Calls list You can store up to 100 entries in the directory. You can create a personalised directory for your own individual handset. However, you can send the list or individual entries to other handsets (page 42). - Page 44 Directory Selecting a directory entry Open the directory. You have the following options: Use q to scroll to the entry until the required name is selected. Enter the first character of the name, or scroll to the entry with q. Dialling with the directory ¢...
- Page 45 Directory Sending the directory to another handset Preconditions: The sending and receiving handsets must both be registered on the same base station. The other handset can send and receive directory entries. ¢ ¢ ¢ q (select entry; page 41) Send Entry Send List §Menu§...
-
Page 46: Last Number Redial List
Last number redial list Last number redial list The last number redial list contains the ten numbers last dialled with the handset (max. 32 numbers). If one of the numbers is in the directory, the corresponding name will be displayed. Open the last number redial list: ¤... -
Page 47: Opening Lists With The Message Key
Opening lists with the message key Opening lists with the message key You can use the message key f to open the following lists: Network mailbox, see page 47 Preconditions: Your network provider supports this function and the network mailbox is configured for fast access (page 47). - Page 48 Opening lists with the message key Setting the calls list type ¢ ¢ ¢ Settings Base Calls List Type §Menu§ Missed Calls / All Calls Select and press (‰ = on). §OK§ Press and hold (idle status). The calls list entries are retained when you change the list type. Opening the calls list ¢...
- Page 49 Opening lists with the message key Managing entries in the calls list ¢ Calls List: 01+02 Select entry. Press the display key. §Menu§ The following functions can be selected with q: Delete Entry As in the directory, page 41 Copy to Directory Copy the number to the directory (page 42).
-
Page 50: Using The Network Mailbox
Configuring the network mailbox for fast access Using the network mailbox Some VoIP providers offer answer machines on the network – network mailboxes. You can use the relevant network mailbox if you have requested it from your VoIP provider. The network mailbox only answers incoming calls made via the relevant line (VoIP phone number). -
Page 51: Using Several Handsets
Registering handsets Using several handsets Registering handsets You can register up to six handsets to your base station. Please note: After registration, all the phone numbers for the phone will be assigned to the handset as receiving numbers. It uses the first VoIP number as sending numbers. For how to change the assignments, see page 100. -
Page 52: De-Registering Handsets
De-registering handsets Registering other handsets You can register other Gigaset handsets and handsets for other devices with GAP function- ality as follows. Please note: Other handsets may not support all base station functions. On the handset ¤ Start to register the handset as described in its user guide. On the base station ÷... -
Page 53: Changing The Name Of A Handset
Changing the name of a handset Changing the name of a handset The names "INT 1", "INT 2" etc. are assigned automatically at registration. You can change these names. The changed name is displayed in every handset's list. Press the display key. §INT§... -
Page 54: Internal Consultation Calls
Making internal calls Transferring a call to another handset You can transfer an external call to another handset (connect). Press the display key. §INT§ The external participant hears the hold music. Select handset or and press Call All §OK§ When an internal participant answers: ¤... -
Page 55: Handset Settings
Changing the display language Handset settings Your handset is preconfigured, but you can change the settings to suit your individual requirements. Changing the display language You can view the display texts in different languages. ¢ ¢ ¢ Settings Handset Language §Menu§... -
Page 56: Activating/Deactivating Auto Answer
Activating/deactivating auto answer Activating/deactivating auto answer When this function is activated, when a call arrives you can simply lift the handset out of the charging cradle without having to press the talk key c. ¢ ¢ Settings Handset §Menu§ Auto Answer Select and press (‰... -
Page 57: Advisory Tones
Advisory tones Setting the ringer volume The ringer volume is the same for all types of ring. ¢ ¢ Audio Settings Ringer Volume §Menu§ Or in idle status: Press briefly. Then: Adjust the volume and press §OK§ Press and hold (idle status). Setting the ringer melody Set different ringer melodies for external calls, internal calls and the alarm clock. -
Page 58: Using The Handset As An Alarm Clock
Using the handset as an alarm clock Activating/deactivating advisory tones ¢ ¢ Audio Settings Advisory Tones §Menu§ Select and press (‰ = on). §OK§ All advisory tones are activated or deactivated. Setting the battery low beep ¢ ¢ Audio Settings Battery Low §Menu§... -
Page 59: Restoring The Handset To The Factory
Restoring the handset to the factory settings Restoring the handset to the factory settings Each individual handset setting is reset, in particular the language, display, volume, ringer and alarm clock settings (see from page 52 onwards). The last number redial list is cleared. Entries in the directory, the date and time, and the handset's registration to the base station will be retained. -
Page 60: Activating/Deactivating The On Hold Music
Activating/deactivating the on hold music Resetting the base station via the menu Each individual setting is reset, in particular: all router settings the router password VoIP settings such as VoIP provider and account data (page 61, page 90) and DTMF settings (page 101) settings for the local network (page 59, page 87) the names of the handsets (page 50) -
Page 61: Activating/Deactivating Repeater Mode
Activating/deactivating repeater mode Activating/deactivating repeater mode With a repeater you can increase the range and reception strength of your base station. You will need to activate repeater mode. This will terminate any calls being made via the base station at that time. Precondition: A repeater is registered. -
Page 62: Making Voip Settings
Your phone will check daily whether a newer firmware update is available via the Internet on the Siemens configuration server. If this is the case, when the handset is in idle status is displayed and the message key f flashes. - Page 63 Setting the base station phone's IP address in LAN Activating/deactivating dynamic assignment ¢ ¢ ¢ Settings Base Local Network §Menu§ Enter the system PIN and press §OK§ (‰ = on) dynamic IP address Select and press to change the current settings. §OK§...
-
Page 64: Entering/Changing The First Voip Account With The Connection Assistant
Telephony VoIP (enter system PIN) Select VoIP Provider §Menu§ The phone establishes a connection with the Siemens configuration server on the Internet. Select country and press §OK§ Select VoIP provider and press §OK§ Your VoIP provider data is downloaded and saved in your phone. - Page 65 After the first download of the VoIP provider settings, your phone will check daily whether a newer version of the files for your VoIP provider is available via the Internet on the Siemens configuration server. If there is an update for one of your VoIP providers, the message...
-
Page 66: Activating/Deactivating Display Of Voip
Activating/deactivating display of VoIP status codes Activating/deactivating display of VoIP status codes If the function is activated, a VoIP status code for your service provider is displayed. Activate the function e.g. if you have problems with VoIP connections. You will receive a provider-specific status code, which supports the service when the problem is analysed. -
Page 67: Using The Web Configurators
Configuring the base station router and phone via a PC Using the Web configurators You can manage your Gigaset CE 460 IP R via your PC's Web browser with two Web configurators: Use the router Web configurator to make the settings for your base station router. Use the phone Web configurator for the settings for your base station phone. -
Page 68: Starting The Web Configurator
Starting the Web configurator Starting the Web configurator Precondition: The settings of an available firewall allow the PC and base station to com- municate with each other. You need to establish a connection with the PC Web browser to the respective Web config- urator (router Web configurator or phone Web configurator) to be able to access the func- tions of both Web configurators. -
Page 69: Structure Of The Web Pages
Structure of the Web pages Structure of the Web pages The Web pages contain the UI elements displayed in Figure 2. Navigation area Working area Buttons Menu bar Figure 2 Example of the structure of a Web page Menu bar In the menu bar, the Web configurator menus are depicted in the form of tab pages. - Page 70 Structure of the Web pages Navigation area The functions of the menu selected in the menu bar are listed in the navigation area. If you click a function, the associated page opens in the working area with information and/ or fields for your inputs. If a function is assigned subfunctions, these are displayed with the function as soon as you click the function.
-
Page 71: Opening Web Pages
Opening Web pages Buttons Buttons are displayed in the bottom section of the working area. Save entries on the phone. Cancel Reject changes made on the Web page and reload the settings that are currently saved in your phone to the Web page. Opening Web pages A brief outline of the navigation to the individual Web configurator functions is given below. -
Page 72: Router Web Configurator
Connecting the PC to the router Web configurator Router Web configurator You can use the router Web configurator to configure the base station router. Save your Internet access data (page 71) and the address for your DNS server (page 78) on your router. - Page 73 Login Please note: – If you have forgotten your password or your system PIN, you will have to reset your base station to the factory settings. Please note that this will restore all other settings too (page 57). – If you do not make any entries for a lengthy period, you will be automatically de-registered. The next time you try to make an entry or open a Web page, the Login Web page will be displayed.
-
Page 74: Internet - Configuring The Connection To The Internet
Internet – configuring the connection to the Internet. Internet – configuring the connection to the Internet. If you have configured the router for your Gigaset CE 460 IP R using the wizard for the basic settings, then you will also have configured the WAN connection (Internet access). You can check, change or extend these settings in the menu. - Page 75 Connection – entering access data for the Internet connection Connection = PPPoE The protocol PPPoE (Point-to-Point-Protocol over Ethernet) is used by many Internet provid- ers. It allows several subscribers in a local network to access the Internet via a single Inter- net account.
- Page 76 Connection – entering access data for the Internet connection Connection = Dynamic IP Address The router is assigned an Internet address dynamically. This IP address is only temporarily assigned to the router. It can change. No more data must be entered for this connection type.
-
Page 77: Setting Up The Firewall
Setting up the Firewall Setting up the Firewall Your router's integrated firewall monitors and limits the exchange of data between sub- scribers of your local network and the Internet. Activating the firewall does not affect the router's performance. When the firewall is activated you can: ¤... -
Page 78: Setting Up Nat
Setting up NAT MAC Filter When the firewall is activated, you can restrict access to the Internet for certain PCs and PC applications based on their MAC address. ¤ ¢ ¢ ¢ Open the following Web page: Router Settings Internet Firewall Filter. - Page 79 Setting up NAT Port Forwarding Port forwarding enables you to make services from applications in your local network avail- able to Internet users as well. The router can use a specific port to automatically forward incoming requests from the Internet to a PC in the local network and thus set up a virtual server, for example to publish your Internet page on your own Web server.
- Page 80 Setting up NAT Port Mapping Port mapping is essentially an automatic form of port forwarding. It involves ports being released on the router for a PC in the local network, and the PC "manages" these ports itself. The router allows messages received by these ports through in both directions. ¤...
-
Page 81: Dns - Entering The Dns Server
DNS – entering the DNS server UPnP If you activate UPnP (Universal Plug and Play) on your router, then PCs in your local network that have UPnP installed in their operating system can offer their own services on the Inter- net, and also automatically use services offered on the Internet. -
Page 82: Setting Routing
Setting Routing Allocating VoIP connections the optimum bandwidth You can find the optimum setting for by carrying out tests while making a Upstream Rate phone call during a data upload. First, in the field enter the upload stream rate given by your Internet provider. Upstream Rate Then proceed as follows: ¤... -
Page 83: Configuring The Local Network
Configuring the local network Configuring the local network You can use the LAN configuration to define a private IP address for the router and to con- figure the LAN DHCP server. Defining the router's private IP address ¤ ¢ Open the following Web page: Router Settings Local Network. -
Page 84: Defining The Router's Name And Domain
Defining the router's name and domain Displaying DHCP Clients ¤ ¢ ¢ Open the following Web page: Router Settings Local Network DHCP Clients. A list will be displayed of all subscribers (PCs etc.) in your local network that have been assigned a dynamic IP address. -
Page 85: Setting Or Changing A Password
Setting or changing a password Setting or changing a password The Web configurator for the router is secured with the password "0000" by default. To pre- vent unauthorised changes to the router configuration, you should change the password from time to time. ¤... -
Page 86: Updating The Router's Firmware
Updating the router's firmware Updating the router's firmware Siemens always provides you with the latest version of the router firmware. This is available on the Internet at: www.siemens.com/gigaset To load the new firmware onto your router you must first download it from the Internet onto your PC. -
Page 87: Checking Status Information Via The Router
Checking status information via the router Checking status information via the router General information about the router is displayed. ¤ In the menu list, click on the Status tab. The following information is displayed: Internet Connection Type Current connection type for the Internet connection. For settings, see page 71. IP Address Current router IP address for the connection to the Internet. -
Page 88: Phone Web Configurator
Connecting the PC to the phone Web configurator Phone Web configurator You can make the following settings using the phone Web configurator: Connecting your base station phone to the local network (page 87) Configuring for the telephony – Make VoIP provider settings (page 90) –... -
Page 89: Logging In, Setting The Web Configurator
Logging in, setting the Web configurator language Logging in, setting the Web configurator language Once you have successfully established the connection, the Web page will be Login displayed in the Web browser. You can select the language you want the menus and Web configurator dialogues to be displayed in. -
Page 90: Ip Configuration
IP Configuration IP Configuration Make the necessary settings for operating your phone in your local network and to connect it to the Internet. For more detailed explanations of the individual components/terms, see the glossary (page 135). The base station phone and router are set by default so that there is a connection between them. - Page 91 IP Configuration Preferred DNS server Enter the IP address for the preferred DNS server. You can enter the private IP address for the base station router here. The router forwards base station phone address requests to its DNS server (page 78). The default is 192.168.1.1.
-
Page 92: Configuring Telephone Connections
Configuring telephone connections Configuring telephone connections You can configure up to six VoIP phone numbers on your phone. You need to set up a VoIP account with a VoIP provider for each VoIP phone number. You must save the access data for each account and for the relevant VoIP provider in the phone. - Page 93 Configuring telephone connections Active You can use the option in the column to activate ( ) and deactivate ( ) VoIP Active connections. If a connection is deactivated, the phone will not register for this connec- tion with the VoIP service. Your phone cannot be reached via this VoIP phone number. The connection can be activated/deactivated by clicking directly on the option.
- Page 94 Configuring telephone connections Provider The name of your VoIP provider will be shown if you have already selected it. Click the Select VoIP Provider button to select your provider and to start downloading the general data for the VoIP provider from the Internet if required. To find out how to do this, please read "Selecting the VoIP provider and downloading the VoIP provider data"...
- Page 95 Area: General Provider Data If you have downloaded the general settings for the VoIP provider from the Siemens con- figuration server (page 96), then the fields in this area will be preset with the data from the download. Generally speaking, you will not need to make any settings in this area.
- Page 96 Network Please note: If you have downloaded the general settings for your VoIP provider from the Siemens configuration server (page 96), some fields in this area will be preset with the data from this download (e.g. the settings for the STUN server and the outbound proxy).
- Page 97 Configuring telephone connections The phone requests the public IP address from a STUN server on the Internet (Simple Traversal of UDP over NAT). The phone's STUN server must be deactivated. STUN enabled (see below). STUN may not be enough, however, with your router's symmetric NAT. You may have to forward an additional SIP and RTP port to the phone (Port Forwarding to all routers involved, see page 76) and set a value outside the 5056 –...
- Page 98 Configuring telephone connections Outbound proxy Enter the (fully qualified) DNS name or the IP address of your provider's outbound proxy. Please note: With many providers, the outbound proxy is identical to the SIP proxy. Outbound proxy port Enter the number of the communication port used by the outbound proxy. The default port is 5060.
- Page 99 Selecting the VoIP provider and downloading the VoIP provider data Profile files with the general access data for the most important VoIP providers are available for download on the Siemens server on the Internet. The IP address for the server is stored in your phone (page 106).
-
Page 100: Optimising Voice Quality For Voip Connections
Optimising voice quality for VoIP connections Optimising voice quality for VoIP connections You can make general and connection-specific settings to improve the voice quality for VoIP telephony. ¤ ¢ ¢ Open the following Web page: Settings Telephony Audio. The voice quality for VoIP connections is mainly determined by the voice codec used for transferring the data and the available bandwidth of your DSL connection. - Page 101 Optimising voice quality for VoIP connections Voice Quality Default settings for the codecs used are stored in your phone: one setting optimised for narrow bandwidths and one setting optimised for wide bandwidths. ¤ Activate one of the options Optimized for low bandwidth Optimized for high bandwidth you wish to accept a default setting for all VoIP connections.
- Page 102 Optimising voice quality for VoIP connections If the receiving device does not accept any of the voice codecs in the list, Selected codecs the connection is not established. An appropriate message will be displayed on the handset. Please note: – You should only deactivate codecs (put them in the Available codecs list) if there is a particular reason.
-
Page 103: Assigning Sending And Receiving Numbers
Assigning sending and receiving numbers to handsets Assigning sending and receiving numbers to handsets You can assign up to six VoIP phone numbers to your phone. You can assign these numbers to the individual handsets that are registered to your base station as receiving and sending numbers. -
Page 104: Setting Dtmf Signalling For Voip
Setting DTMF signalling for VoIP Setting DTMF signalling for VoIP DTMF signalling, for example, is required to check and control some network mailboxes via digit codes. ¤ ¢ ¢ Open the following Web page: Settings Telephony Advanced Settings. Make the desired settings for the DTMF signals in the DTMF over VoIP Connections area. -
Page 105: Defining Local Communication Ports For Voip
Defining local communication ports for VoIP Defining local communication ports for VoIP ¤ ¢ ¢ Open the following Web page: Settings Telephony Advanced Settings. In the Listen Ports for VoIP Connections area, specify which local ports the telephone is to use for VoIP telephony. -
Page 106: Setting Area Code Predialling
Setting Area Code Predialling Setting Area Code Predialling In VoIP calls you must generally always dial the area code – even for local calls. You can save the annoying need to dial the area code for local calls by activating the Area function. - Page 107 Loading and deleting directories to/from the PC. Loading the directory file from the PC to the handset ¤ In the field: enter the tsv file (complete path name) that is to Transfer directory to handset be loaded onto the handset. Click the button to navigate to the file.
- Page 108 Loading and deleting directories to/from the PC. Format of the directory file (tsv file) The following describes the structure of the tsv file as it is created from the phone. The phone expects the same structure if you load a tsv file from the PC onto a handset. A tsv file created by Outlook™...
-
Page 109: Defining The Server For Firmware Updates, Starting The Update
83. Downloading the firmware update directly from the Internet The server on which Siemens makes new firmware versions available for your base station is set by default. The URL of the Internet server is displayed in the Data server field. -
Page 110: Activating/Deactivating The Automatic Version Check
Activating/deactivating the automatic version check Starting a firmware update Preconditions: No calls are being made using your base station. There is no internal connection between the registered handsets. The base station menu is not open in any of the handsets. ¤... -
Page 111: Checking Status Information Via Your
Checking status information via your phone Checking status information via your phone General information about your phone is displayed. ¤ In the menu list, click on the Status tab. The following information is displayed: IP Configuration IP address The phone's current IP address within the local network. For assigning the IP address, see page 87. -
Page 112: Messaging
Messaging Messaging Your Gigaset CE 460 IP R base station has messaging functions that you can use via a mes- saging-capable handset, e.g. a Gigaset S45 handset. The handset must be registered with your base station. The following messaging functions are available: Messenger functions The messenger client in your base station enables instant messaging (immediate message transfer, chatting). - Page 113 Messaging Making settings ¤ ¢ ¢ Open the following Web page: Settings Messaging Messenger. ¤ In the field, select whether you wish to use the Jabber Messenger Account Gigaset Net server or another provider's messenger server (Other). The access data for Gigaset.net is already stored in the base station.
- Page 114 Please note: For how e-mail notifications are displayed on a Gigaset S45 IP handset and opened for reading, please refer to the detailed user guide for the Gigaset S450 IP on the Internet at: www.siemens.com/gigaset.
-
Page 115: Appendix
Symbols and typographical conventions used Appendix Symbols and typographical conventions used This section explains the meaning of certain symbols and typographical conventions that are used in this user guide. Enter digits or letters. The display functions currently in the bottom display line are shown in reversed §Menu§... -
Page 116: Questions And Answers
Questions and answers Questions and answers If you have any questions about using your phone, visit us at www.siemens.com/gigaset- customercare at any time. The table below contains a list of common problems and possi- ble solutions. Please note: To support the service team, it is helpful if you have the following information to hand: –... - Page 117 Questions and answers You hear an error tone when keying an input (a descending tone sequence). Action has failed/invalid input. ¥ Repeat the operation. Watch the display and refer to the user guide if necessary. You have forgotten the system PIN or the router password. ¥...
- Page 118 File corrupt! ¥ Please only use firmware and downloads that are made available on the preconfigured Sie- mens server (page 106) or at www.siemens.com/gigasetcustomercare. 3. If is displayed, the download server may not be accessible. Server not available! ¥...
- Page 119 Questions and answers VoIP status codes If you have problems with your VoIP connections, activate the Status on HS function (page 63, page 107). You will then receive a VoIP status code that will support you in prob- lem analysis. Also enter the code during problem analysis by the Service department. In the following tables you will find the meanings of the most important status codes and messages.
- Page 120 Questions and answers Status Meaning code 0x416 URI is faulty. 0x420 Wrong ending. 0x421 Wrong ending. 0x423 The requested service is not supported by the VoIP provider. 0x480 The dialled number is temporarily unavailable. 0x481 The recipient is not available. 0x482 Double service query.
- Page 121 Questions and answers Status Meaning code 0x505 The server rejects the query because the indicated version number of the SIP protocol does not at least concur with the version that the server or the SIP device uses that is involved in this query.
-
Page 122: Searching For Service Information
Searching for service information Searching for service information You may need the service information of your device (base station and handset) for Customer Services. Base station service information Precondition: You are conducting an external call. The connection has been established for at least 8 sec. -
Page 123: Service (Customer Care)
You can get assistance easily when you have technical questions or questions about how to use your device by using our online support service on the Internet at: http://www.siemens.com/gigasetcustomercare This site can be accessed at any time wherever you are. It will give you 24/7 support for all our products. -
Page 124: Authorisation
( LAN IEEE 802.3 ). Country-specific requirements have been taken into consideration. We, Siemens Home and Office Communication Devices GmbH & Co. KG, declare that this device meets the essential requirements and other relevant regulations laid down in Directive 1999/5/EC. - Page 125 At the time of going to print, batteries up to 850 mAh were available and had been tested in the system. Due to the constant progression in battery development, the list of recom- mended batteries in the FAQ section of the Gigaset Customer Care pages is regularly updated: www.siemens.com/gigasetcustomercare...
-
Page 126: General Specifications
Specifications Base station power consumption Around 1 W, depending on the current status. General specifications Interfaces Ethernet DECT standard is supported GAP standard is supported No. of channels 60 duplex channels Radio frequency range 1880–1900 MHz Duplex method Time multiplex, 10 ms frame length Channel grid 1728 kHz Bit rate... -
Page 127: Writing And Editing A Text Message
Writing and editing a text message Writing and editing a text message The following rules apply when writing a text: The cursor is controlled with t s. Characters are added to the left of the cursor. Press the hash key # briefly to switch from "Abc" mode to "123", from "123" to "abc", and from "abc"... - Page 128 Writing and editing a text message Entering special characters Standard characters Space Space Abc--> Â 123 --> £ â ¥ £ < ¤ & ¥ > § ¤ ¿ ¡ “ ‘ *) Directory and other lists...
- Page 129 Writing and editing a text message Greek Space Space Abc--> Â 123 --> £ â £ < & > § “ ‘ *) Directory and other lists...
-
Page 130: Gigaset Ce 460 Ip R - Free Software
Use of the free software contained in this product extending beyond the program sequence intended by Siemens is at the user's own risk – i.e. there shall be no claims for liability for defects against Siemens Home and Office Communication Devices GmbH & Co. - Page 131 Gigaset CE 460 IP R – Free software GNU LESSER GENERAL PUBLIC LICENSE Version 2.1, February 1999 Copyright (C) 1991, 1999 Free Software Foundation, Inc., 59 Temple Place, Suite 330, Boston, MA 02111-1307 USA Everyone is permitted to copy and distribute verbatim copies of this license document, but changing it is not allowed.
- Page 132 Gigaset CE 460 IP R – Free software For example, on rare occasions, there may be a special need to encourage the widest possible use of a certain library, so that it becomes a de-facto standard. To achieve this, non-free programs must be allowed to use the library.
- Page 133 Gigaset CE 460 IP R – Free software d) If a facility in the modified Library refers to a function or a table of data to be supplied by an appli- cation program that uses the facility, other than as an argument passed when the facility is invoked, then you must make a good faith effort to ensure that, in the event an application does not supply such function or table, the facility still operates, and performs whatever part of its purpose remains meaningful.
- Page 134 Gigaset CE 460 IP R – Free software Any executables containing that work also fall under Section 6, whether or not they are linked directly with the Library itself. 6. As an exception to the Sections above, you may also combine or link a "work that uses the Library" with the Library to produce a work containing portions of the Library, and distribute that work under terms of your choice, provided that the terms permit modification of the work for the customer's own use and reverse engineering for debugging such modifications.
- Page 135 Gigaset CE 460 IP R – Free software 10. Each time you redistribute the Library (or any work based on the Library), the recipient automati- cally receives a license from the original licensor to copy, distribute, link with or modify the Library subject to these terms and conditions.
- Page 136 Gigaset CE 460 IP R – Free software 16. IN NO EVENT UNLESS REQUIRED BY APPLICABLE LAW OR AGREED TO IN WRITING WILL ANY COPY- RIGHT HOLDER, OR ANY OTHER PARTY WHO MAY MODIFY AND/OR REDISTRIBUTE THE LIBRARY AS PER- MITTED ABOVE, BE LIABLE TO YOU FOR DAMAGES, INCLUDING ANY GENERAL, SPECIAL, INCIDENTAL OR CONSEQUENTIAL DAMAGES ARISING OUT OF THE USE OR INABILITY TO USE THE LIBRARY (INCLUD- ING BUT NOT LIMITED TO LOSS OF DATA OR DATA BEING RENDERED INACCURATE OR LOSSES SUS-...
-
Page 137: Accessories
Various different screensavers Illuminated keypad Handsfree talking Polyphonic ringer tones Directory for around 100 entries Alarm clock Headset socket www.siemens.com/gigaset Gigaset Handset S45 Illuminated colour display (4096 colours) Illuminated keypad Handsfree talking Polyphonic ringer tones Directory for around 150 entries... -
Page 138: Glossary
Glossary ADSL Asymmetric Digital Subscriber Line Special form of DSL. Application Layer Gateway NAT control mechanism of a router. Many routers with integrated NAT use ALG. ALG lets the data packets in a VoIP connec- tion pass and adds the public IP address of the secure private network. The router's ALG should be deactivated if the VoIP provider offers a STUN server or an outbound proxy. - Page 139 Codec Coder/decoder Codec is a procedure that digitises and compresses analogue voice before it is sent via the Internet and decodes – i.e. translates into analogue voice – digital data when voice packets are received. There are different codecs, with differing degrees of compression, for instance.
- Page 140 You can specify the IP address of the primary/secondary DNS server. See also: DynDNS. Domain name Name of one (or several) Web server(s) on the Internet (e.g. Siemens-Home). The domain name is assigned to the relevant IP address by DNS. DSCP Differentiated Service Code Point See Quality of Service (QoS).
- Page 141 Exposed Host Exposed host refers to a PC outside the firewall. See also: DMZ Firewall You can use a firewall to protect your network against unauthorised external access. This involves combining various measures and technologies (hard and/or software) to control the flow of data between a private network you wish to protect and an unpro- tected network (e.g.
- Page 142 Gateway Connects two different Networks with one another, e.g. router as Internet gateway. For phone calls from VoIP to the telephone network, a gateway has to be connected to the IP network and the telephone network (gateway/VoIP provider). It forwards calls from VoIP to the telephone network as required.
- Page 143 IP (Internet Protocol) TCP/IP protocol on the Internet. IP is responsible for addressing parties in a Network using IP addresses and routes data from the sender to the recipient. IP determines the paths (routing) along which the data packets travel. IP address A unique address for a network component within a network on the basis of the TCP/IP protocols (e.g.
- Page 144 Maximum Receive Unit Defines the maximum user data volume within a data packet. Maximum Transmission Unit Defines the maximum length of a data packet that can be carried over the network at a time. Music on hold Music that is played while you are on a Consultation call or Toggling. The waiting par- ticipant hears music while on hold.
- Page 145 Port Data is exchanged between two applications in a Network via a port. Port Forwarding The Internet gateway (e.g. your router) forwards data packets from the Internet that are directed to a certain Port to the port concerned. This allows servers in the LAN to offer services on the Internet without you needing a public IP address.
- Page 146 Random Access Memory Memory in which you have reading and storage rights. Such items asmelodies and screen pictures are stored in the RAM after being loaded into the phone via the Web con- figurator. Registrar The registrar manages the current IP addresses of Network subscribers. When you reg- ister with your VoIP provider, your current IP address is saved on the registrar.
- Page 147 Server Provides a service to other Network subscribers (Clients). The term can indicate a com- puter/PC or an application. A server is addressed via IP address/Domain name and Port. SIP (Session Initiation Protocol) Signalling protocol independent of voice communication. Used for establishing and ending a call.
- Page 148 Uniform Resource Identifier Character string used to identify resources (e.g. e-mail recipient, http://siemens.com, files). On the Internet URIs are used as a uniform identification for resources. URIs are also described as an SIP address.
- Page 149 User identification Name/number combination for access e.g. to your VoIP account. Virtual private network (VPN) Virtual Private Network Computer network that uses a public network (e.g. the Internet) to transport private data. Virtual server A virtual server provides a service on the Internet that does not run on itself, but on a different network subscriber instead.
-
Page 150: Index
Index Index Auto answer ....Automatic area code (de)activating ....Symbols Automatic log-off phone Web configurator . - Page 151 Index Call forwarding ....name ....(de)activating .
- Page 152 Index order of entries ....Earpiece volume ....saving entry ....E-mail saving the first number .
- Page 153 Index Gateway provider ....Gigaset.net ....Idle status (de)activating the connection .
- Page 154 Index server ..... configuring (router) ... . IP filter, router firewall .
- Page 155 Index displayed (VoIP) ....Paging ..... entering/editing for Gigaset.net .
- Page 156 Index Port Forwarding ....Resource name (messenger) ..router ..... . . Restoring to factory settings setting up (router) .
- Page 157 Index Router Web configurator ..Specifications ....connecting with the PC ..Speed dial .
- Page 158 Index ......configuring (on handset) ..Toggling ....configuring (Web config.) .