Table of Contents
Advertisement
Quick Links
Advertisement
Table of Contents

Related Manuals for Miele CT 400 MP


Summary of Contents for Miele CT 400 MP
-
Page 1: Mobile Tepan
Operating and installation instructions Built-in Tepan CT 400 P Mobile Tepan CT 400 MP To avoid the risk of accidents or damage to the appliance it is essential to read these instructions before it is installed and used for the first time. -
Page 2: Table Of Contents
Contents Description of the appliance ......... 3 Built-in Tepan . -
Page 3: Description Of The Appliance
Description of the appliance Built-in Tepan CT 400 P a Tepan plate (approx. Ø 40 cm when heated up) b Control c In-operation indicator light (yellow) d Temperature indicator light (red) e Kitchen furniture front f Mains connection cable * * The appliance may be supplied with or without a plug depending on country of destination. -
Page 4: Mobile Tepan
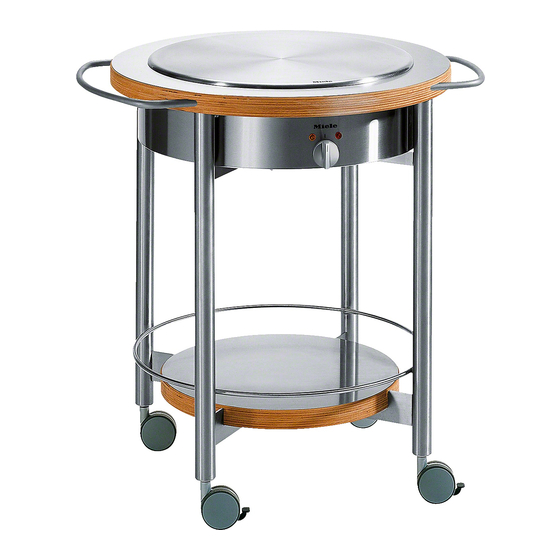
Description of the appliance Mobile Tepan CT 400 MP a Tepan plate (approx. Ø 40 cm when heated up) b Control c In-operation indicator light (yellow) d Temperature indicator light (red) f Mains connection cable g Shelf h Shelf CT 400 MA (see "Optional accessories") - Page 5 Description of the appliance CT 400 MP dimensions...
-
Page 6: Optional Accessories
E-Cloth (Miele UK only) For cleaning surfaces such as stainless steel, glass, plastic and chrome without the use of chemicals These accessories are available from - your Miele dealer or - the Miele Spare Parts Department (see back cover for contact details). -
Page 7: Warning And Safety Instructions
Warning and Safety instructions isolator switch, or if the appliance is To avoid the risk of accidents and supplied without a plug, it must be damage to the appliance, please installed and connected by a suitably read these instructions carefully qualified and competent person in strict before using it for the first time. - Page 8 Warning and Safety instructions Correct usage Safety with children For safety reasons this appliance The appliance is only intended for must only be operated when it has use by adults who have read these been built in, either into a worktop or in instructions.
- Page 9 Warning and Safety instructions Packaging e.g. cling film, Wood is a natural product. polystyrene and plastic wrappings Differences in colour and grain are must be kept out of the reach of babies a natural characteristic of wood and and young children. Danger of therefore quite normal in the Tepan unit.
- Page 10 Warning and Safety instructions Protection from burning and Do not cover the appliance, e.g. with a cloth, kitchen foil, etc. This scalding could be a fire hazard if the appliance The surface of the appliance is hot is switched on by mistake. when in use, and remains hot for Never leave the appliance quite a while after being switched off.
- Page 11 Always ensure that food is socket and withdraw the plug. Contact sufficiently cooked or reheated. the Miele Service Department. Many factors will affect the overall Do not reconnect the appliance to the cooking time, including the size and mains electricity supply until after it has amount of food and its temperature.
-
Page 12: Caring For The Environment
Caring for the environment Disposal of the packing Disposal of your old appliance material Electrical and electronic appliances often contain materials which, if The transport and protective packing handled or disposed of incorrectly, has been selected from materials which could be potentially hazardous to are environmentally friendly for disposal human health and to the environment. -
Page 13: Operation
Operation Cleaning and heating up for Switching on and off the first time To switch the tepan plate on, turn the control in a clockwise direction a. To Before using for the first time, clean the switch off, turn the control in an appliance with a damp cloth and a little anti-clockwise direction b. -
Page 14: Settings
Operation Settings Cooking process Settings Keeping cooked food warm 1 - 2 Steaming fruit, e.g. apple slices, peach halves, 2 - 4 sliced bananas, etc. Gentle stir frying of chopped / sliced vegetables, e.g. 5 - 7 leeks, mushrooms, green/red peppers, onion etc. Gentle frying of fish, meat, sausages, 7 - 9 escalopes etc. -
Page 15: Tips
Operation Tips – To prevent meat drying out, do not season with salt until after it has Wipe the surface of the tepan plate been cooked. before each use to remove any dust – Thicker cuts should be cooked first particles or other soiling which may on a high heat and then finished on a have settled on it since it was last... -
Page 16: Cleaning And Care
Cleaning and care Tepan plate (Built-in and Do not use a steam cleaner to clean Mobile Tepan) this appliance. The steam could The tepan plate should be cleaned reach electrical components and after each use. cause a short circuit. Pressurised steam could also cause permanent Use a spatula to remove any large damage to the surface and to... -
Page 17: Mobile Tepan Stainless Steel Surrounds And Framework
To help prevent re-soiling, a proprietary conditioning agent for stainless steel such as Neoblank (available from the Miele UK Spare Parts Department) can also be used on the stainless steel framework and surrounds. Follow the manufacturer's instructions and apply sparingly with an even pressure following the direction of the grain. -
Page 18: Problem Solving Guide
Check whether the house mains fuse current local and national safety has blown. If it has contact a qualified regulations. Unauthorised repairs electrician or the Miele Service Dept. could be dangerous. The (See back page for address). manufacturer cannot be held liable... -
Page 19: After Sales Service, Data Plate
– Your Miele dealer, or – the Miele Service Department (see address on back cover). When contacting the Service Department, please quote the model and serial number of your appliance, which are given on the data plate. -
Page 20: Ct 400 P Installation Instructions
CT 400 P installation instructions Safety instructions for After installation, ensure that the connection cable cannot come into installation contact with the underside of the appliance. Make sure that there is no Fit wall units and extractor hood mechanical obstruction, such as a before fitting the tepan to avoid drawer, which could damage it. -
Page 21: Accessories
CT 400 P installation instructions Accessories Protection during transport – 1 control with marked settings For protection during transport, the switching unit a is secured to the – 4 Spax screws 4 x 15 mm for underside of tepan with two domed securing the switching unit nuts b. -
Page 22: Building-In Dimensions
CT 400 P installation instructions Building-in dimensions Ø 570 Ø 500 Ø 55 0 1 2 2 ß 1 7 4 a Building-in depth b Integrated switching unit (this is fitted behind the kitchen furniture front with only the control visible c Connecting cable - 500 mm long d Mains connection cable - 1800 mm long * e Protective shelf... -
Page 23: Worktop Cut-Out
CT 400 P installation instructions Worktop cut-out ^ Prepare the worktop cut-out as shown in the diagram. Make sure that the distance between the worktop cut-out and the edge of the worktop is at least 50 mm. ^ Seal the cut surfaces with a suitable heat-resistant sealant to avoid swelling caused by moisture. -
Page 24: Drilling Holes In The Furniture Front Panel For The Switching Unit
CT 400 P installation instructions Drilling holes in the furniture Important: front panel for the switching Humidity may cause variation in the unit size of the drilling template. Use the drilling template supplied e to Please check the dimensions drill the holes for the switching unit in before drilling. -
Page 25: Securing The Switching Unit
CT 400 P installation instructions Securing the switching unit ^ Place the switching unit in position, as illustrated with its spindle and ^ Carefully place the stainless steel indicator lights pressed from inside tepan plate facedown on top of the into the drill holes made previously. -
Page 26: Fitting The Tepan Plate
^ Feed the connection cable down through the cut-out. ^ Carefully lower the tepan into the cut-out. When doing this, make sure that the Miele logo a is positioned above the switching unit (see illustration). ^ Connect the tepan plate to the mains electricity supply (AC 230 V / 50 Hz). -
Page 27: Fitting The Indicator Light Covers And The Control
CT 400 P installation instructions Fitting the indicator light covers and the control ^ Fit the control c on to the switching unit spindle with the "0" pointing to the top. ^ Stick the symbol for the zero setting d centrally on the front panel in between the two holes drilled for the indicator lights. -
Page 28: Protective Shelf
CT 400 P installation instructions Protective shelf Sealant A protective shelf must be fitted imme- diately below the switching unit to ensure that the underside of the appliance cannot be accessed or touched after it has been built in. Do not use any sealant unless expressly instructed to do so. -
Page 29: Shelf Ct 400 Ma
Shelf CT 400 MA Dimensions Fitting the shelf The shelf can be fitted either on the right or the left hand side of the mobile tepan unit. ^ Screw the brackets supplied to the underside of the shelf (see illustration). ^ Position the shelf on top of the handle so that the handle fits into the groove on the underside of the shelf. -
Page 30: Electrical Connection
Electrical connection General notes For extra safety it is advisable to install a residual current device (RCD), with a All electrical work should be carried trip current of 30 mA. out by a suitably qualified and When switched off there must be an competent person, in strict all-pole contact gap of 3 mm in the accordance with current local and... -
Page 31: Built-In Tepan
Electrical connection Built-in Tepan Important This appliance is supplied for The appliance must only be connection to a single phase 230-240 V operated when built-in. This is to 50 Hz supply with a 3-core cable. ensure that all electrical parts are shielded. - Page 34 Alteration rights reserved / xx06 M.-Nr. 06 760 290 / 02 en - –...
Need help?
Do you have a question about the CT 400 MP and is the answer not in the manual?
Questions and answers