Miele CS 1327 Operating And Installation Manual
Tepan yaki
Hide thumbs
Also See for CS 1327:
- Operating and installation instructions (40 pages) ,
- Operating and installation instructions (36 pages) ,
- Operating and installation instructions (36 pages)

Related Manuals for Miele CS 1327


Summary of Contents for Miele CS 1327
- Page 1 Operating and Installation Instructions Tepan Yaki CS 1327 en - US To prevent accidents and appliance damage, read these instructions before installation or use. M.-Nr. 09 054 720...
-
Page 2: Table Of Contents
Contents IMPORTANT SAFETY INSTRUCTIONS....... . . 3 Guide to the Tepan Yaki ..........7 Before using for the first time. -
Page 3: Important Safety Instructions
IMPORTANT SAFETY INSTRUCTIONS Correct usage WARNING- When using your Only use the Tepan Yaki for appliance follow basic residential cooking, and for the precautions, including the purposes described in this manual. following: Other uses are not permitted and can be dangerous. Read all instructions before installation or use to prevent Persons who lack physical, sensory... - Page 4 Install the appliance so that the power cord does not come into contact Installation, repair and maintenance with any portion of the cooktop which work should be performed by a Miele may become hot during use. authorized service technician. Work by unqualified persons could be Before servicing, disconnect the dangerous and may void the warranty.
- Page 5 IMPORTANT SAFETY INSTRUCTIONS Safety Do not store aerosols, combustibles or any other easily flammable materials The appliance is hot during use and underneath or adjacent to the remains so for some time after being appliance. switched off. Be careful not to touch the appliance if it may still be hot.
- Page 6 IMPORTANT SAFETY INSTRUCTIONS When wiping spills on a hot appliance with a wet sponge or cloth, be careful to avoid steam burns. Do not let flammable materials, i.e. cooking grease, accumulate on the appliance. Do not use a steam cleaner to clean this appliance.
-
Page 7: Guide To The Tepan Yaki
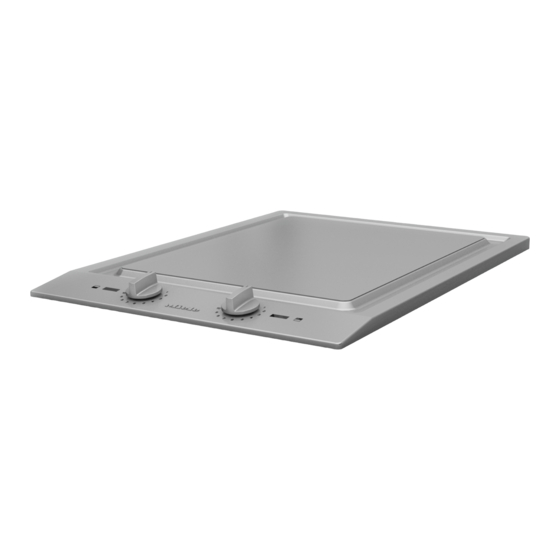
Guide to the Tepan Yaki a Rear heated area Indicators b Front heated area c Cooking zone indicators d Display g On/Off indicator e Control knob, rear cooking zone h Temperature control light f Control knob, front cooking zone i "Residual Heat" indicator... -
Page 8: Before Using For The First Time
Before using for the first time Clean the appliance Heat the appliance ^ Before using for the first time, clean Metal components of the appliance the appliance with a damp cloth and have a protective coating which may dry with a soft cloth. give off a slight odor the first time the appliance is heated. -
Page 9: Use
The Tepan Yaki is divided into two When the appliance is switched on, the heating areas, which can be used and On/Off indicator and temperature control light %come on. The temperature adjusted separately. For large quantities, you can use the entire control light "responds"... -
Page 10: Settings
Settings Cooking Setting Range Keep cooked foods warm 1 - 2 Sauté fruit, e. g. diced apples, halved peaches, 2 - 4 sliced bananas, etc. Sauté vegetables, e. g. sliced mushrooms, onions, 5 - 7 peppers, etc. Gently pan-fry fish 7 - 9 Quickly pan-fry meat, firm fish, eggs, pancakes, 9 - 11... -
Page 11: Grilling Tips
Grilling tips Before each use, wipe the griddle with a damp cloth, to remove dust or other residue. – It is best to pre-heat the appliance for 8-10 minutes, at the preferred cooking temperature. For power settings 9 to 12, pre-heat at level 12. –... -
Page 12: Cleaning And Care
– Do not use any sharp or pointed objects which could damage the seal a few drops of stainless steel cleaner between the frame and the (available from Miele) using a damp countertop. cloth. ^ Wipe off the cleaner with water and –... -
Page 13: Frequently Asked Questions
Unauthorized repairs could cause injury or appliance damage. What if the appliance does not heat up after it is turned on? Possible fault Solution The circuit breaker has tripped. Check whether a fuse is blown. If the problem persists contact Miele. -
Page 14: Technical Service
Technical Service In the event of a fault which you cannot easily fix yourself, please contact the Miele Technical Service Department at the address on the back of this booklet. When contacting Technical Service please quote the serial number and model of the appliance. - Page 15 Miele appliance. Please note that unless expressly approved in writing by the Miele Ser- vice department, Extended Service Contracts offered by other providers for Miele products will not be recognized by Miele.
-
Page 17: Installation Instructions
Installation Instructions IMPORTANT: SAVE FOR THE LOCAL ELECTRICAL INSPECTOR'S USE Information is subject to change. Please refer to our website to obtain the most current product specification, technical & warranty information. To prevent accidents and appliance damage read these instructions before installation or use. -
Page 18: Important Installation Safety Instructions
IMPORTANT INSTALLATION SAFETY INSTRUCTIONS Note to the installer: This appliance has not been Please leave this instruction book designed for maritime use or for use in mobile installations such as recreational with the consumer for the local vehicles or aircraft. electrical inspector’s use. - Page 19 IMPORTANT INSTALLATION SAFETY INSTRUCTIONS Safety distances above the appliance The minimum safety distance given by the hood manufacturer must be maintained between the cooktop and the hood above it. See the installation instructions of the hood for these safety measurements. If the hood manufacturers instructions are not available or if flammable objects are installed over the cooktop (e.g.
- Page 20 2" (50mm) 2" (50 mm) CS 1112 CS 1122 CS 1221 CS 1326 CS 1327 CS 1411 not recommended 6" (150 mm) CS 1312 CS 1322 10" (250 mm) for CS 1011 CS 1012 / 1012-1...
-
Page 21: Installation
Installation Safety distance from the wall covering If a wall covering is installed, a minimum safety distance must be maintained between the countertop cut-out and the covering, since high temperatures can damage these materials. If the covering is made of a combustible material (such as wood), the distance between the countertop cut-out and the wall covering must be a minimum of 2"... - Page 22 Installation Installation dimensions a Spring clips b Appliance front c Installation height d Power supply box with connection cable, L = 78 3/4" (2000 mm) e Rating label...
- Page 23 Installation Cut out If during installation the seal around ^ Make the countertop cut-out for the the frame does not sit flush with the desired number of appliances. countertop in the corners, the corner Remember to maintain a minimum radius, maximum "...
-
Page 24: Installation Of Multiple Appliances
Installation Installation of multiple appliances When installing more than one combiset appliance, a support bar b must be installed between the appliances. Countertop cut-out Countertop cut-out two appliances three appliances For the installation of three appliances For the installation of two appliances the width of the countertop cut-out D is the width of the countertop cut-out D is the sum of A and B and C. - Page 25 Installation Sample calculations for a countertop cut-out for three appliances appliance width appliance width appliance width Countertop minus 5/16" minus 5/16" cut-out (8 mm) (8 mm) 11" (280 mm) 11 5/16" (288 mm) 11" (280 mm) 33 3/8" (848 mm) 11"...
- Page 26 Installation a Spring clips b Support bars c Space between support bar and countertop d Cover The illustration represents the attachment of spring clips a and support bars b for 3 appliances. An additional support bar is required for each additional appliance. The position for attachment of an additional support bar depends on the width of appliance B.
-
Page 27: Attach The Spring Clips And Support Bars
Installation Attach the spring clips and support bars Wood or solid surface countertops ^ Place the supplied spring clips a and the support bars b at the marked positions as shown above, by laying them on the upper edge of the cut-out and then securing them with the "... - Page 28 Installation Granite countertop The screws are not needed for granite countertops. ^ Coat the side and lower edges of the spring clips between a and b with silicone. ^ Fill the space e between the support bars b and the countertop with ^ Position and attach the spring clips silicone.
- Page 29 Installation ^ Place the front edge of the next Installing the appliance(s) appliance into the cut-out. ^ Feed the power cord down through ^ Connect the appliance(s) to the main the cut-out. power supply (see "Electrical ^ Place the front edge of the appliance connection").
-
Page 30: Sealing
Installation Sealing Tiled surfaces The grouting a and shaded area under The appliance must not be the appliance frame must be flat and permanently sealed into the countertop even so that the frame will lie evenly when installed. The sealing strip under and the sealing strip under the edge of the edge of the appliance provides a the upper part of the appliance can... -
Page 31: Electrical Connection
Electrical connection Power supply CAUTION: Before installation or ^ Be sure your electrical supply servicing, disconnect the power matches the rating label. supply by either removing the fuse, shutting off the main power or The rating label is located on the manually "tripping"... -
Page 32: Help Protect Our Environment
Help protect our environment Disposal of packing materials Disposal of an old appliance The cardboard box and packing Old appliances contain materials that materials are biodegradable and can be recycled. Please contact your recyclable. Please recycle. local recycling authority about the possibility of recycling these materials. - Page 36 Alteration rights reserved / 0112 M.-Nr. 09 054 720 / 00 INFORMATION IS SUBJECT TO CHANGE. PLEASE REFER TO OUR WEBSITE TO OBTAIN THE MOST CURRENT PRODUCT SPECIFICATIONS, TECHNICAL & WARRANTY INFORMATION.