Cub Cadet CC 760ES Operator's Manual
33” wide cut mower — cc 760 & cc 760es
Hide thumbs
Also See for CC 760ES:
- Operator's manual (36 pages) ,
- Illustrated parts manual (29 pages) ,
- Specifications (2 pages)
Table of Contents
Advertisement
Available languages
Available languages
Safe Operation Practices • Set-Up • Operation • Maintenance • Service • Troubleshooting • Warranty
O
'
M
peratOr
s
anual
33" Wide Cut Mower — CC 760 & CC 760ES
WARNING
READ AND FOLLOW ALL SAFETY RULES AND INSTRUCTIONS IN THIS MANUAL
BEFORE ATTEMPTING TO OPERATE THIS MACHINE.
FAILURE TO COMPLY WITH THESE INSTRUCTIONS MAY RESULT IN PERSONAL INJURY.
CUB CADET LLC, P.O. BOX 361131 CLEVELAND, OHIO 44136-0019
Printed In USA
Form No. 769-06629
(November 10, 2010)
Advertisement
Chapters
Table of Contents

Related Manuals for Cub Cadet CC 760ES


Summary of Contents for Cub Cadet CC 760ES
- Page 1 Safe Operation Practices • Set-Up • Operation • Maintenance • Service • Troubleshooting • Warranty ’ peratOr anual 33” Wide Cut Mower — CC 760 & CC 760ES WARNING READ AND FOLLOW ALL SAFETY RULES AND INSTRUCTIONS IN THIS MANUAL BEFORE ATTEMPTING TO OPERATE THIS MACHINE.
-
Page 2: Table Of Contents
Visit us on the web at www.cubcadet.com ◊ Call a Customer Support Representative at (800) 965-4CUB ◊ Locate your nearest Cub Cadet Dealer at (877) 282-8684 ◊ Write us at Cub Cadet LLC • P.O. Box 361131 • Cleveland, OH • 44136-0019... -
Page 3: Safe Operation Practices
Important Safe Operation Practices WARNING: This symbol points out important safety instructions which, if not followed, could endanger the personal safety and/or property of yourself and others. Read and follow all instructions in this manual before attempting to operate this machine. Failure to comply with these instructions may result in personal injury. - Page 4 A missing or damaged discharge cover can cause blade When starting engine, pull cord slowly until resistance contact or thrown object injuries. is felt, then pull rapidly. Rapid retraction of starter cord (kickback) will pull hand and arm toward engine faster than Many injuries occur as a result of the mower being pulled you can let go.
- Page 5 Service Check the blade and engine mounting bolts at frequent intervals for proper tightness. Also, visually inspect blade Safe Handling Of Gasoline: for damage (e.g., bent, cracked, worn) Replace blade with the original equipment manufacture’s (O.E.M.) blade only, To avoid personal injury or property damage use extreme listed in this manual.
-
Page 6: Spark Arrestor
Notice Regarding Emissions Spark Arrestor Engines which are certified to comply with California and federal WARNING: This machine is equipped with an EPA emission regulations for SORE (Small Off Road Equipment) internal combustion engine and should not be used are certified to operate on regular unleaded gasoline, and on or near any unimproved forest-covered, brush may include the following emission control systems: Engine covered or grass-covered land unless the engine’s... -
Page 7: Safety Symbols
Safety Symbols This page depicts and describes safety symbols that may appear on this product. Read, understand, and follow all instructions on the machine before attempting to assemble and operate. Symbol Description READ THE OPERATOR’S MANUAL(S) Read, understand, and follow all instructions in the manual(s) before attempting to assemble and operate DANGER —... - Page 8 2 — i ectiOn MpOrtant peratiOn ractices...
-
Page 9: Assembly & Set-Up
Assembly & Set-Up Contents of Crate • One Lawn Mower • One Oil Drain Tube • One Deck Wash Hose Coupler • One Lawn Mower Operator’s Manual • One Engine Operator’s Manual Mower Set-Up Attaching the Negative Battery Cable (for Electric Start Models) NOTE: The positive battery terminal is marked Pos. - Page 10 Unfolding the Handle Attaching the Shift Lever Remove the star knobs and carriage screws from the lower Remove the screw and the lock nut that secures the shift handle. See Fig.3-3. lever to the shift lever plate. See Fig. 3-5. Remove the remaining screw and nut from the lower shift lever plate.
- Page 11 Checking Tire Pressure WARNING! Under any circumstance do not exceed manufacturer’s recommended psi. Equal tire pressure should be maintained at all times. Refer to sidewall of tire for recommended pressure. The rear tires on your unit may be over-inflated for shipping purposes.
-
Page 12: Controls And Features
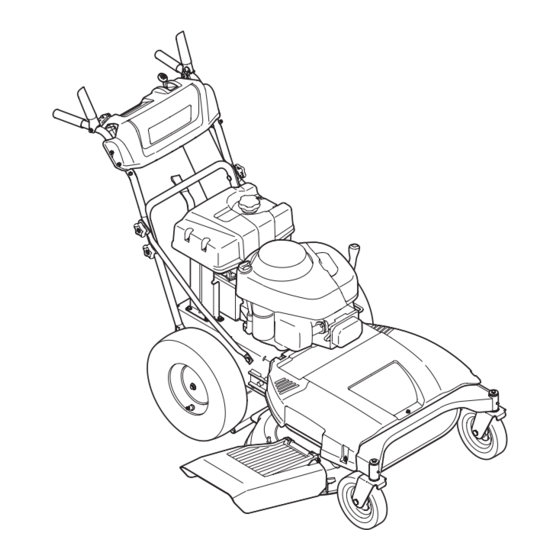
Controls and Features Throttle/Choke Control Blade Control Fuel Tank Cap Ignition Switch Deck Height Lever Systems Indicator Monitor Drive Control Gear Shift Lever Figure 4-1 Lawn Mower controls and features are illustrated in Fig. 4-1 and described on the following pages. WARNING! Read and follow all safety rules and instructions in this manual, including the entire Operation section, before attempting to operate this machine. -
Page 13: Drive Control
Ignition Switch (Electric Start Models Only) Blade Control WARNING! Located on the right-hand handle, Never leave a running machine unattended. Always disengage blades, stop engine the blade control is used to engage and remove key to prevent unintended starting. the mowing deck. To operate, press and hold the lever against the handlebar grip. - Page 14 Charge the battery as instructed in the Service section of this manual or have the charging system checked by your Cub Cadet dealer. 4 — c ectiOn OntrOls and...
-
Page 15: Operation
Operation Starting the Engine Stopping the Engine WARNING! For Mowers Equipped with Electric Start If you strike a foreign object, stop the engine and remove the ignition key (if so equipped). Refer to the Set-Up and Assembly section of this manual for Thoroughly inspect the machine for any damage. -
Page 16: Engaging The Blades
• Do not mow slopes greater than 15 degrees as shown on the slope gauge. The Cub Cadet Wide Cut mower is equipped with a mulch kit • Do not mow on wet grass. Unstable footing could cause which incorporates special blades, already standard on your slipping. - Page 17 Installing / Removing Mulch Baffle WARNING! Before installing or removing the mulch plug, disengage blades, stop the engine and remove key if so equipped to prevent unintended starting. Stop the engine and wait for all parts to stop moving. Installing the Mulch Baffle Insert the right-side tab (A) of the baffle into the bracket on the deck.
-
Page 18: Maintenance & Adjustment
Maintenance & Adjustments Maintenance Pop open the protective cap on the end of the oil drain valve to expose the drain port. See Fig 6-2. WARNING! Before performing any maintenance or repairs, disengage blades, stop engine and remove key if so equipped to prevent unintended starting. Oil Fill Cap/Dipstick Engine Refer to the Engine Owner’s Manual for all engine maintenance... -
Page 19: Tire Pressure
Battery (Electric Start Models Only) Position the mower on a level, clear spot on your lawn, near enough for your garden hose to reach. CALIFORNIA PROPOSITION 65 WARNING CAUTION: Make certain the mower’s discharge Battery posts, terminals, and related accessories chute is directed AWAY from your house, garage, contain lead and lead compounds, chemicals known parked cars, etc. -
Page 20: Blade Timing Belt
Lubrication Blade Timing Belt WARNING! The cutting deck spindles are driven by timing (cogged) belt, Before lubricating, repairing, or assuring that the deck blades are always perpendicular to each inspecting, always disengage PTO, set parking other. At least once a season, or after striking any foreign object, brake, stop engine and remove key if so equipped to check the timing belt as follows: prevent unintended starting. -
Page 21: Handle Height Adjustment
Adjustments The top of each spindle pulley is marked with an arrow. See Fig. 6-6. The arrows should be perpendicular (at a 90˚ WARNING! angle) to each other. Shut the engine off and remove the ignition key (if so equipped) before making adjustments. -
Page 22: Maintenance Schedule
Maintenance Schedule Each use or Every season Every season Every season Every Prior every 5-10 10 Hours to Storing Hrs. 25 Hours 50 Hours 100 Hours Clean Mower Check Engine Oil Level Check Air Filter Replace Air Filter Element † Change Engine Oil/Oil Filter ††... -
Page 23: Cutting Deck Removal
Service Cutting Deck Removal WARNING! Before performing any maintenance or repairs, disengage blades, stop engine and remove key if so equipped to prevent unintended starting. To remove the cutting deck, proceed as follows: Remove the belt cover by removing the three screws and washers which secure it to the frame. -
Page 24: Cutting Blades
Carefully unhook the mower’s lift assembly from the rear deck supports. Use the deck height lever to raise the lift assembly to its highest position. Remove the wooden blocks from under the deck and gently slide the cutting deck toward the rear of the machine. - Page 25 If the blades cannot be installed perpendicular to each other, the blade Jump Starting timing belt must be reset. See your Cub Cadet dealer WARNING! Never jump start a damaged or frozen to have the deck’s timing belt reset.
- Page 26 See your specially designed to engage and disengage safely. Cub Cadet dealer to have the transmission drive belt replaced. A substitute (non-OEM) V-belt can be dangerous by not disengaging completely. For a proper working Fuse (Electric Start Models Only) machine, use factory approved belts.
-
Page 27: Troubleshooting
Troubleshooting Problem Cause Remedy Engine fails to start Choke not activated. Place throttle/choke control in CHOKE position. Fuel tank empty, or stale fuel. Fill tank with clean, fresh (less than 30 days old) gas. Blocked fuel line. Clean fuel line and replace fuel filter. Faulty spark plug. -
Page 28: Replacement Parts
Replacement Parts Component Part Number and Description 759-3336 Spark Plug (Briggs) (Champion RC12YC) 951-10292 Spark Plug (MTD) BS-698413 Air Filter Cartridge (Briggs & Stratton) 751-12260 Air Filter Cartridge (MTD) 751-12256 Pre-Cleaner (MTD) 951-10514 Fuel Cap 951-3013 Fuel Filter 751-11501 Oil Filter (MTD) 954-04139 Belt (Mowing Deck Engagement) 942-04154A... - Page 29 Component Part Number and Description 925-1707D† Battery 946-04604 Throttle/Choke Control (Cable) 925-2054A† Ignition Key 931-04244 Discharge Chute Assembly 631-04252 Mulch Baffle 731-05766 Trail Shield † If Equipped Phone (800) 965-4CUB to order replacement parts or a complete Parts Manual (have your full model number and serial number ready).
-
Page 30: Model Number
Attachments & Accessories The following attachments and accessories are compatible for the Cub Cadet Wide Cut Mower. See your Cub Cadet dealer or the retailer from which you purchased your mower for information regarding price and availability. Model Number Description 19A20001100 Grass Collector, 33”... - Page 31 Notes...
- Page 32 FEDERAL and/or CALIFORNIA EMISSION CONTROL WARRANTY STATEMENT YOUR WARRANTY RIGHTS AND OBLIGATIONS MTD Consumer Group Inc, the United States Environmental Protection Agency (EPA), and, for those products certified for sale in the state of California, the California Air Resources Board (CARB) are pleased to explain the emission (evaporative and/or exhaust) control system (ECS) warranty on your outdoor 2006 and later small off-road spark-ignited engine and equipment (outdoor equipment engine) In California, new outdoor equipment engines must be designed, built and equipped to meet the State’s stringent anti-smog standards (in other states, 1997 and later model year equipment must be designed, built, and equipped to meet the U.S.
- Page 33 WARRANTED PARTS: The repair or replacement of any warranted part otherwise eligible for warranty coverage may be excluded from such warranty coverage if MTD Consumer Group Inc demonstrates that the outdoor equipment engine has been abused, neglected, or improperly maintained, and that such abuse, neglect, or improper mainte- nance was the direct cause of the need for repair or replacement of the part.
-
Page 34: Warranty
Refer to applicable manufactur- er’s warranty for terms and conditions. The limited warranty set forth below is given by Cub Cadet LLC with respect to new merchandise purchased or leased and used in the b. Routine maintenance items such as lubricants, filters, blade... - Page 35 Medidas importantes de seguridad • Configuración • Funcionamiento • Mantenimiento • Servicio • Solución de problemas • Garantía anual del OperadOr 33” Cortacésped Amplio — CC 760 & CC 760ES ADVERTENCIA LEA Y SIGA TODAS LAS INSTRUCCIONES DE ESTE MANUAL ANTES DE PONER EN FUNCIONAMIENTO ESTA MÁQUINA.
- Page 36 Elija entre las opciones que se presentan a continuación: ◊ Visite nuestro sitio web en www.cubcadet.com ◊ Llame a un representante de Asistencia al Cliente al (800) 965-4CUB ◊ Escríbanos a Cub Cadet LLC • P.O. Box 361131 • Cleveland, OH • 44136-0019...
- Page 37 Medidas importantes de seguridad ADVERTENCIA: La presencia de este símbolo indica que se trata de instrucciones importantes de seguridad que se deben respetar para evitar poner en peligro su seguridad personal y/o material y la de otras personas. Lea y siga todas las instrucciones de este manual antes de poner en funcionamiento esta máquina.
- Page 38 No ponga las manos o los pies cerca de las piezas rotatorias Nunca opere la cortadora sin las guardas apropiadas, o en la tolva de la cortadora. El contacto con las cuchillas cubierta de descarga, guarda para recorte, manija de puede producir la amputación de manos y pies.
- Page 39 Niños Nunca saque la tapa del gas ni agregue combustible mientras el motor está caliente o en marcha. Deje que el Pueden ocurrir accidentes trágicos si el operador no está atento motor se enfríe por lo menos dos minutos antes de volver a a la presencia de niños.
- Page 40 No modifique el motor Nunca trate de ajustar una rueda o la altura de corte mientras el motor está en marcha. Para evitar lesiones graves o la muerte, no modifique el motor Los componentes de la tolva para recorte, cubierta bajo ninguna circunstancia.
- Page 41 Símbolos De Seguridad Esta página representa y describe la seguridad los símbolos que pueden parecer en este producto. Lea, comprenda, y siga todas instrucciones de la máquina antes de intentar ensamblar y operar. Símbolo Descripción LEA EL MANUAL(S) DEL OPERADOR Lea, comprenda, y siga todas instrucciones en el manual (manuales) antes de operar el producto.
- Page 42 2 — M ección edidas iMpOrtantes de seguridad...
-
Page 43: Importante Medidas Importantes De Seguridad 37 Ensamblado Y Configuración
Montaje y Configuración Contenido del cajón • Una cortadora de césped • Un tubo de drenaje de aceite • Un acoplador de manguera para lavado de plataforma • Un Manual del operador de la • Un Manual del operador del motor cortadora de césped Configuración de la cortadora de césped Instalación del cable negativo de la batería... - Page 44 Despliegue de la manija Colocación de la palanca de cambios Extraiga las perillas en estrella y los tornillos del carro de la Extraiga el tornillo y la tuerca de seguridad que sujetan la manija inferior. Vea la Fig. 3-3. palanca de cambios a la placa de la palanca de cambios. Vea la Fig.
- Page 45 Control de la presión de los neumáticos Gasolina y aceite El tanque de combustible tiene capacidad para dos galones. ¡ADVERTENCIA! La presión máxima de los Quite la tapa de combustible girándola en sentido contrario al neumáticos en cualquier circunstancia es de 30 psi. de las agujas del reloj.
-
Page 46: Controles Y Características
Controles y Características Control del regulador/cebador Control de las cuchillas Tapón del tanque de combustible Palanca de Interruptor de altura de la encendido plataforma Monitor del indicador de sistemas Control de la transmisión Palanca de cambios Figura 4-1 Los controles y características de la cortadora de césped se ilustran en la Fig. 4-1 y se describen en las páginas siguientes. ¡ADVERTENCIA! Lea y respete todas las normas de seguridad y las instrucciones de este manual, incluida la sección Funcionamiento en su totalidad, antes de intentar operar esta máquina. - Page 47 Interruptor de encendido Control de las cuchillas (Modelos de Arranque Eléctrico Sólo) Ubicado en la manija derecha, el control de las cuchillas se usa para enganchar ¡ADVERTENCIA! Nunca deje la máquina en la plataforma de corte. Para operar este funcionamiento sin vigilancia. Siempre desenganche control, presione y retenga la palanca las cuchillas, apague el motor y retire la llave, para contra la empuñadura de la barra de...
- Page 48 Controle la batería como se indica en la sección Servicio de este manual o haga que el sistema de carga sea verificado por su distribuidor Cub Cadet . 4 — c ección OntrOles y aracterísticas...
-
Page 49: Funcionamiento
Funcionamiento Encendido del motor Detención del motor ¡ADVERTENCIA! Para cortadoras de césped equipada con arranque eléctrico Si golpea un objeto extraño, detenga el motor y saque la llave de encendido (si Consulte la sección Configuración y Montaje de este manual para está... - Page 50 • No corte el césped cerca de pozos, hundimientos, bancos, podría perder el equilibrio. Las cortadoras de césped anchas Cub Cadet vienen equipadas • No pode pendientes mayores de 15 grados como lo indica con un kit para abono que incorpora cuchillas especiales, que vienen de serie en su cortadora, para recircular los recortes de el medidor de pendientes.
- Page 51 Instalación / Extracción de la tolva de abono ¡ADVERTENCIA! Antes de instalar o extraer la clavija de abono, desenganche las cuchillas, apague el motor y retire la llave, para evitar que alguien encienda accidentalmente el motor. Detenga el motor y espera que todas las piezas dejen de moverse.
-
Page 52: Mantenimiento Y Ajustes
Las reparaciones cubiertas por la garantía deben ser llevadas a cabo por un distribuidor de Cub Cadet. Cambio de aceite del motor ¡ADVERTENCIA! Si el motor se ha puesto en funcionamiento recientemente, el motor, silenciador y las superficies metálicas circundantes estarán... - Page 53 Batería (Modelos de Arranque Eléctrico Sólo) Coloque la cortadora en una zona nivelada y despejada del césped, suficientemente cerca para que la manguera del ADVERTENCIA PROPOSICIóN 65 DE jardín alcance. CALIFORNIA : Los bornes de la batería y los PRECAUCIóN: Asegúrese de que el canal de accesorios afines contienen plomo y compuestos de descarga de la cortadora está...
- Page 54 Lubricación Correa de sincronización de la cuchilla ¡ADVERTENCIA! Los husillos de la plataforma de corte se mueven por medio de una Antes de lubricar, reparar o correa (dentada) de sincronización, garantizando que las cuchillas de inspeccionar, desconecte la potencia de arranque la plataforma siempre están perpendiculares entre sí.
- Page 55 Si las flechas en la superficie de cada polea de husillo no están perpendiculares (a un ángulo de 90˚ grados) entre sí, consulte a su distribuidor Cub Cadet para volver a colocar la correa de sincronización de la plataforma. ¡ADVERTENCIA! No haga funcionar la máquina si...
- Page 56 Calendario de mantenimiento Cada uso o Cada tempo- Cada tempo- Cada tempo- Antes de Cada 10 cada 5-10 rada o cada rada o cada rada o cada almacenar horas Horas 25 horas 50 horas 100 horas Limpie las cortadoras Inspeccione el nivel de aceite del motor Controle el filtro de aire Reemplace el elemento del filtro de aire †...
-
Page 57: Servicio
Servicio Extracción de la plataforma de corte ¡ADVERTENCIA! Antes de realizar cualquier mantenimiento o reparación, desconecte las cuchillas, apague el motor y retire la llave para evitar el encendido accidental del motor. Para extraer la plataforma de corte, proceda de la siguiente manera: Para sacar la cubierta de la correa saque los tres tornillos y arandelas que la sujetan al bastidor. - Page 58 Con cuidado desenganche el montaje de elevación de la cortadora de los soportes posteriores de la plataforma. Use la palanca de altura de la plataforma para levantar el montaje a su posición más alta. Retire los tacos de madera de debajo de la plataforma y deslice suavemente la plataforma de corte hacia el fondo de la máquina.
- Page 59 Arranque con pinzas para batería debe volver a calibrar la correa de sincronización. Consulte a su distribuidor Cub Cadet para volver a ¡ADVERTENCIA! Nunca arranque con pinzas una calibrar la correa de sincronización de la plataforma.
- Page 60 V sustituta (que no sea del fabricante del deben retirar varios componentes y se requieren herramientas equipo original) puede resultar peligroso si la misma especiales. Solicite a su distribuidor Cub Cadet que realice el no se desengrana completamente. Para que la reemplazo de la correa de transmisión.
-
Page 61: Solución De Problemas
Solución de Problemas Problema Causa Solución El motor no No se ha activado el cebador Coloque el control del regulador/cebador en la arranca posición CHOKE (cebador). El depósito de combustible está vacío o el Llene el depósito con gasolina limpia y nueva (de combustible se ha echado a perder. -
Page 62: Piezas De Reemplazo
Piezas de reemplazo Componente Número de pieza y Descripción 759-3336 Bujía Briggs & Stratton (Champion RC12YC) 951-10292 Bujía (MTD) BS-698413 Cartucho filtro de aire Briggs & Stratton 751-12260 Cartucho filtro de aire Cartridge (MTD) 751-12256 Pre-limpiador (MTD) 951-10514 Tapón del tanque de combustible 951-3013 Filtro de combustible 751-11501... - Page 63 Componente Número de pieza y Descripción 925-1707D† Batería 946-04604 Control del regulador/cebador (cable) 925-2054A† Llave de encendido 931-04244 Conjunto de canal de descarga 631-04252 Tolva de abono 731-05766 Escudo posterior † Si está equipado Llame por teléfono al (800) 965-4CUB para solicitar piezas de reemplazo o un Manual de Repuestos completo (tenga el número de modelo y número de serie de su máquina a mano).
-
Page 64: N Úmero De Modelo
Los siguientes aditamentos y accesorios son compatibles con la cortadora de césped ancha Cub Cadet. Consulte con su distribuidor Cub Cadet o con el representante al cual le ha comprado la cortadora para obtener más información con respecto a precios y disponibilidad. - Page 65 Notas...
- Page 66 DECLARACIÓN FEDERAL y/o DE CALIFORNIA SOBRE GARANTÍAS EN EL CONTROL DE EMISIONES SUS DERECHOS Y OBLIGACIONES EN CUANTO A LA GARANTÍA MTD Consumer Group Inc, la Agencia de Protección Medioambiental de los Estados Unidos (EPA), y para aquellos productos certificados para su venta en el es- tado de California, el Departamento de los Recursos del Aire de California (CARB) se complacen en explicar la garantía que cubre al sistema de control (ECS) de emisiones (evaporativas y/o de escape) de su equipo y motor (motor de equipos de exteriores) de encendido por chispa para todo terreno, pequeño, de exteriores del año 2006 y años posteriores En California, los nuevos motores de equipos de exteriores deben estar diseñados, construidos y equipados para cumplir con las...
- Page 67 Durante la totalidad del período de garantía del motor y equipo para todo terreno arriba mencionado, MTD Consumer Group Inc mantendrá un suministro de piezas bajo garantía suficiente para satisfacer la demanda esperada de tales piezas. Cualquier pieza de reemplazo se podrá usar para el cumplimiento del mantenimiento o las reparaciones bajo garantía y se suministrarán sin cargo para el propietario.
- Page 68 La siguiente garantía limitada es otorgada por Cub Cadet LLC con b. Los artículos necesarios para el mantenimiento de rutina como por respecto a productos nuevos adquiridos o arrendados y utilizados en los ejemplo lubricantes, filtros, afiladores de cuchillas, sincronización...