Table of Contents
Advertisement
Advertisement
Table of Contents

Related Manuals for Trek Fusion


Summary of Contents for Trek Fusion
- Page 1 Fusion & Fusion C Owner’s Manual...
- Page 2 Congratulations for purchasing a Trek cycling computer.
- Page 3 Pacer (Fig. 2)- compares Fig. 1 current speed to average speed. Arrow Up (shown) shows current speed equal or greater than average. Arrow Down indicates current speed is less than average speed. Fig. 2 © Copyright Trek Bicycle Corporation 2001 All rights reserved...
- Page 4 Upper Display (scroll with Set button) SET button (Fig. 3). Used to scroll through features on upper screen lines. Also used in Reset of computer, referred to as <SET>. Fig. 3 RIDE TM - Ride Time (Fig. 4). 99:59:59 max- imum hours.
- Page 5 TIME- Clock (Fig. 6) show- ing time of day. Fig. 6 Lower Line (scroll with Mode button) MODE button (Fig. 7). Used to scroll through fea- tures on lower screen lines. Also used in Reset of com- puter, referred to as <MODE>. Fig.
- Page 6 ODOMTR - Odometer (Fig. 9). Programmable, cumulative distance with maximum mile- age of 62130MI or 99999KM. Continuously measured and accumulated. Rollover to zero Fig. 9 when maximum mileage is reached. Sets to zero when computer is restarted or the battery is changed. AVG SPD - Average Speed (Fig.
- Page 7 crankset, per minute (Fig. 12). This feature not available on all models. Additional Features- 6 Language scroll bar for easy usage Waterproof Auto Start/Stop/Sleep - Computer turns on automatically when wheel turns. Enters Sleep mode after 2 seconds of no signal to preserve average speed.
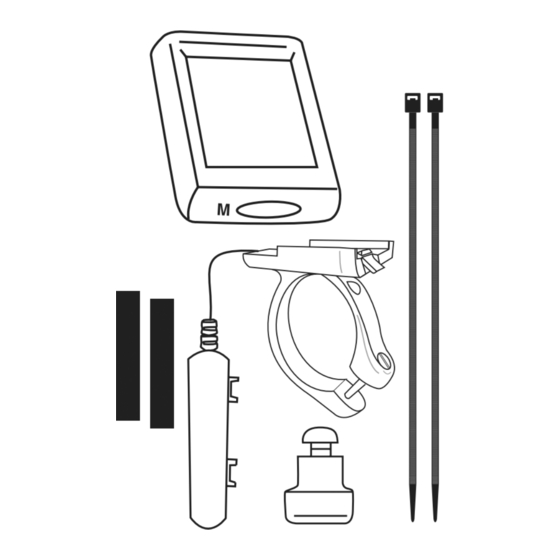
- Page 8 Install the computer on your bike Install the Sensor and Magnet 1. Position the sensor unit to the inside of either the right or left fork blade between 3-6in (75-150mm) up from the fork blade tip (Fig. 14). Attach the sensor to the fork blade with quick ties, but do not tighten the ties yet.
- Page 9 Install the Sensor Wiring and Handlebar Bracket Before proceeding, check that the wire is of adequate length to mount the bracket on the handlebar. The handlebars should freely rotate without placing tension on the wire, which could damage a wire that is too short. 4.
- Page 10 Attach the Computer to the Handlebar Bracket 6. From in front of the handlebars, slide the computer back onto the bracket until it snaps firmly into position. 7. To remove the computer from the bracket push the com- puter away from you with your thumb, with your index finger against the back of the mount- Fig.
- Page 11 9. Attach the cadence magnet to the left crankarm, aligning the magnet with the cadence sensor (Fig. 20). The magnet should have 3-5 mm clearance from the sensor. If 3-5 mm Fig. 20 the sensor and magnet are too close, or touching, rotate the sensor unit away from the magnet until adequate clearance is achieved.
-
Page 12: Wheel Size
Calibrate the Computer Quick Set-Up Your Trek Computer has a preset wheel size (as marked on the box) and is ready to ride. The next section describes how to change the factory settings. Follow those instructions which cover the setting(s) you would like to change. - Page 13 Set Day and Date 1. Press <Set> to scroll to DAY/DT. 2. Hold <Set> until SET DT displays, replaced by a two digit display, with a digit flashing. 3. Press <Mode> to scroll the number menu. 4. Press <Set> to select a number and advance to the next digit.
- Page 14 7. Repeat #4 and #5 to set both digits or minutes. 24 HRS displays. 8. Press <Mode> to scroll clock types 24HR and 12HR. Press <Set> to choose. After selection is made with <Set>, DONE displays, then the com- puter returns to normal operation. Set the Odometer - 1.
- Page 15 ReSet (Ride Memory) Your computer has Ride Memory that calculates and stores Trip Distance, Average Speed, Maximum Speed, and Ride Time. This data can be reset to zero, and the computer will automatically begin storing data again. 1. In any mode, simultaneously press <Mode> and <Set>.
- Page 16 First Use- after ReStart or Battery Install 1. ENG displays. Press <Mode> to scroll the language options. 2. Press <Set> to select. SET WHL displays, then a wheel size. 3. Press <Mode> to scroll wheel sizes. 4. Press <Set> to select wheel size see page 12 for Custom option).
- Page 17 has completed one revolution and the valve stem is again at its bottom-most position. Make another mark, as before. 4. Measure the distance between the two marks. 5. Record your measurement in mm__________. This is your wheel calibration setting. Note: 1 inch = 25.4mm Calibrate the computer with Custom Wheel size 6.
Need help?
Do you have a question about the Fusion and is the answer not in the manual?
Questions and answers