Mitsubishi Electric PAR-21MAA Operating Manual
City multi control system and mitsubishi mr. slim air conditioners
Hide thumbs
Also See for PAR-21MAA:
- Instruction book (146 pages) ,
- Installation manual (104 pages) ,
- Technical manual (76 pages)
Table of Contents
Advertisement
Quick Links
Advertisement
Table of Contents

Related Manuals for Mitsubishi Electric PAR-21MAA


Summary of Contents for Mitsubishi Electric PAR-21MAA
- Page 1 Mitsubishi Electric OPERATING MANUAL CITY MULTI Control System and Mitsubishi Mr. Slim Air Conditioners PAR-21MAA H & H Air Conditioning PO Box 4316 EIGHT MILE PLAINS QLD 4113 Ph: 07 3276 1800 Fax: 07 3276 1900 sales@hhaircon.com.au www.hhaircon.com.au...
-
Page 3: Table Of Contents
WT04474X01 CITY MULTI Control System and Mitsubishi Mr. SLIM Air Conditioners MA Remote Controller PAR-21MAA Instruction Book Contents 1. Safety Precautions ................ 2 2. Parts Names .................. 4 3. Screen Configuration ..............6 4. Setting the Day of the Week and Time .......... 6 5. -
Page 4: Safety Precautions
Safety Precautions G Precautions are classified as follows, according to the level of potential danger. WARNING Denotes a condition or operation which, if handled incorrectly, may lead to serious injury or death. CAUTION Denotes a condition or operation which, if handled incorrectly, may lead to bodily injury or property damage. WARNING Do not attempt to install this equipment yourself. - Page 5 CAUTION Keep hazardous materials away from this equipment. Do not use sharp-tipped objects to press the buttons. Do not install this equipment in locations where there is risk of combustible Use of sharp tips may lead to electric shock or equipment failure. gas leakage.
-
Page 6: Parts Names
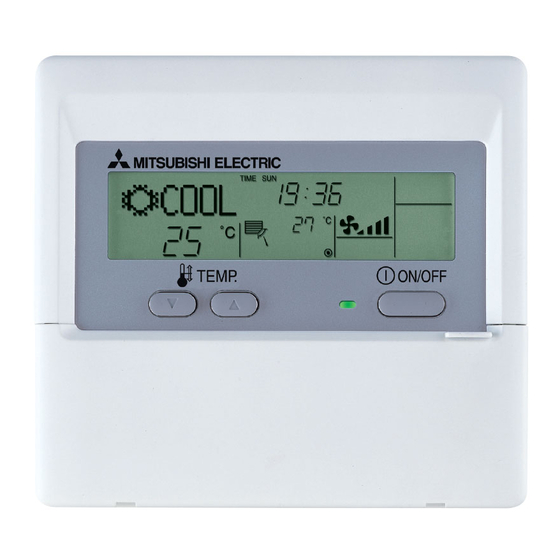
Parts Names “Sensor” indication Display Section Displayed when the remote controller sensor is used. Day-of-Week For purposes of this explanation, Shows the current day of the week. all parts of the display are shown as lit. During actual operation, only Time/Timer Display the relevant items will be lit. - Page 7 Check button (Clear button) Back MENU ON/OFF FILTER Ahead BACK MONITOR/SET CHECK TEST Airflow Up/Down button OPERATION PAR-21MAA CLOCK CLEAR Timer On/Off button (Set Day button) Louver button Operation button) To preceding operation Opening the number. door. Ventilation button Operation button) To next operation number.
-
Page 8: Screen Configuration
Function Selection of remote controller Set Day/Time MENU ON/OFF FILTER TIME SUN BACK MONITOR/SET CHECK TEST PAR-21MAA CLOCK OPERATION CLEAR <How to Set the Day of the Week and Time...> Standard Control Screens Day of the Week Setting ˚F˚C ˚C TIME SUN... -
Page 9: Using The Remote Controller
ON/OFF MENU ON/OFF FILTER BACK MONITOR/SET CHECK TEST PAR-21MAA CLOCK OPERATION CLEAR <To Start Operation> <To Stop Operation> I Press the ON/OFF button 1. I Press the ON/OFF button 1 again. • The ON lamp 1 and the display area •... - Page 10 <Selecting the Mode> <Room Temperature Display> I With the unit running, press the Mode button 2 as many times as necessary. During operation, the intake temperature is shown at 4. • Each press switches operation to the next mode, in the sequence shown below. Note: The currently selected mode is shown at 2.
-
Page 11: Fan Speed, Airflow Direction, And Ventilation
(2) Fan Speed, Airflow Direction, and Ventilation <To Change the Fan Speed...> <To Change the Airflow’s Up/Down Direction> I Press the Fan Speed button 5 as many times as necessary while the system is I With the unit running, press the Airflow Up/Down button 6 as necessary. running. - Page 12 <Using Ventilation> On Mr. Slim models On CITY MULTI models G To run the ventilator together with the indoor unit: G To run the ventilator together with the indoor unit: I Press the ON/OFF button 1. I Press the ON/OFF button 1. •...
-
Page 13: Using The Timer
• 10:00 • 10:00 • 10:00 • 10:00 No. 2 <Operation 2 settings for every • OFF • OFF • OFF • OFF PAR-21MAA CLOCK OPERATION CLEAR day> … Turn off the air conditioner at 10:00. No. 8 Note: By setting the day to “Sun Mon Tues Wed Thurs Fri Sat”, you can set the same operation to be carried out at the same time every day. - Page 14 <Setting the Weekly Timer> <How to View the Weekly Timer Settings> Shows the selected operation (ON or OFF) Shows the time setting Timer Settings * Does not appear if operation is not set. TIMER ˚C WEEKLY Shows the temperature setting ˚C WEEKLY * Does not appear if temperature is not set.
-
Page 15: Using The Simple Timer
7. After completing steps 3 to 6 above, press the Filter BACK MONITOR/SET CHECK TEST Note: PAR-21MAA CLOCK OPERATION CLEAR Your new settings will be cancelled if you press the Mode (Return) button 2 before button 4. pressing the Filter 8. - Page 16 <Viewing the Current Simple Timer Settings> Examples If ON and OFF times have both been set at the simple timer, operation and display are as Timer Setting indicated below. Example 1: TIMER Start the timer, with ON time set sooner than OFF time AFTER ON Setting: 3 hours SIMPLE...
-
Page 17: Using The Auto Off Timer
BACK MONITOR/SET CHECK TEST TIMER AFTER PAR-21MAA OPERATION CLOCK CLEAR AUTO OFF 1. Be sure that the “Auto Off” is visible on the screen (at 1). 2. Hold down the Timer Menu button B for 3 seconds, so that “Monitor” is indicated on the screen (at 4). - Page 18 <To Turn Off the Auto Off Timer...> G Hold down the Timer On/Off button 9 for 3 seconds, so that “Timer Off” appears (at 6) and the timer value (at 7) disappears. ˚C ˚C AUTO OFF G Alternatively, turn off the air conditioner itself. The timer value (at 7) will disappear from the screen.
-
Page 19: Locking The Remote Controller Buttons (Operation Function Limit Controller)
1. While holding down the Filter button 4, press and hold down the ON/OFF button 1 TIME SUN for 2 seconds—so that the “Locked” indication disappears from the screen (at 1). FUNCTION ˚C ˚C TEMP. ON/OFF ˚C ˚C MENU ON/OFF FILTER BACK MONITOR/SET CHECK TEST PAR-21MAA CLOCK OPERATION CLEAR – 17 –... -
Page 20: Other Indications
(5) Other Indications <Centrally Controlled> <Flashing Mode Indicator> ˚C ˚C ˚C ˚C TEMP. TEMP. ON/OFF ON/OFF G Displayed when operation is controlled by central controller, etc. I When flashes continuously Restricted operations are shown below. Displayed when another indoor unit connected to the outdoor unit is already operating •... - Page 21 <Flashing Error Codes> On CITY MULTI Models On Mr. Slim Models ERROR CODE ERROR CODE ON lamp ON lamp ON/OFF ON/OFF (Flashing) (Flashing) Error Code Error Code Indoor Unit No. Indoor Unit’s Refrig- Indoor Unit No. erant Address Alternating Display If you have entered contact number to be called in the event of a problem, the screen displays this number.
-
Page 22: Function Selection
Function Selection Function selection of remote controller The setting of the following remote controller functions can be changed using the remote controller function selection mode. Change the setting when needed. Item 1 Item 2 Item 3 (Setting content) 1. Change Language Language setting to display •... - Page 23 See [4]–3. (3) MENU ON/OFF FILTER Timer function setting (“WEEKLY TIMER”) SELECTION”) BACK MONITOR/SET CHECK TEST PAR-21MAA CLOCK OPERATION See [4]–3. (4) CLEAR Contact number setting for error situation (“CALL.”) Press the E button. Press the D button. → Temperature display °C/°F setting (“TEMP MODE °C/°F”) See [4]–4.
- Page 24 [Detailed setting] • To increase or decrease the temperature, press the [ TEMP. ( ) or ( button F. [4]–1. CHANGE LANGUAGE setting • To switch the upper limit setting and the lower limit setting, press the [ button H. The selected setting will flash and the temperature can be set. The language that appears on the dot display can be selected.
- Page 25 (4) Contact number setting for error situation ON/OFF] button D. • To switch the setting, press the [ 1 CALL OFF : The set contact numbers are not displayed in case of error. 2 CALL **** *** **** : The set contact numbers are displayed in case of error. CALL_ : The contact number can be set when the display is as shown on the left.
-
Page 26: Specifications
Specifications Item Details 120 (H) × 130 (W) × 19 (D) mm Dimensions Weight 0.2 kg Power Source 10 to 13V DC (Supplied from indoor unit) Power Consumption 0.3 W Ambient Usage Environment 0° to 40°C, 30% to 90% relative humidity Composition –...