Philips Magic 5 User Manual
Hide thumbs
Also See for Magic 5:
- User manual (32 pages) ,
- User manual (44 pages) ,
- User manual (32 pages)
Table of Contents
Advertisement
Quick Links
Advertisement
Table of Contents

Related Manuals for Philips Magic 5


Summary of Contents for Philips Magic 5
- Page 1 User Manual...
-
Page 2: Dear Customer
In purchasing this machine, you have decided on a quality With the installation guide on the following pages, you can PHILIPS product. Your machine satisfies the full range of start using your machine quickly and easily. Detailed de- requirements for private use or in everyday office and busi- scriptions can be found in the following sections of this ness environments. -
Page 3: Installation Guide
Installation guide Inserting Paper Paper Format Before you can receive or copy documents, you must insert paper. Please use only suitable paper in the standard format Contained in the packing A4 (210 × 297 millimetre · preferably 80 g/m ). Observe the information in the technical data. -
Page 4: Connecting The Telephone Cord
Connecting the Telephone Cord Initial Installation Connecting the Telephone Cable Starting the Initial Installation Connect the telephone cord to the device by inserting it in After you have connected your machine to the power sup- the socket designated with C. Insert the telephone ply, the initial installation process begins. -
Page 5: Inserting Batteries In Cordless Telephone
Inserting batteries in cordless telephone 1 Insert the new batteries in the battery compartment with the positive and negative poles as shown in the pic- ture in the battery compartment. Never use non-rechargeable batteries in the cordless telephone. Follow the specifications in the technical data. -
Page 6: Table Of Contents
Overview 45 Service code ..........page 45 46 Ink film stock..........page 42 47 Firmware version ........page 35 Overview of the Menu Functions Sudoku 48 Sudoku ............. page 32 The following functions are available on your device. 5 Fax Switch There are two ways in which you can call functions: 51 Day............ -
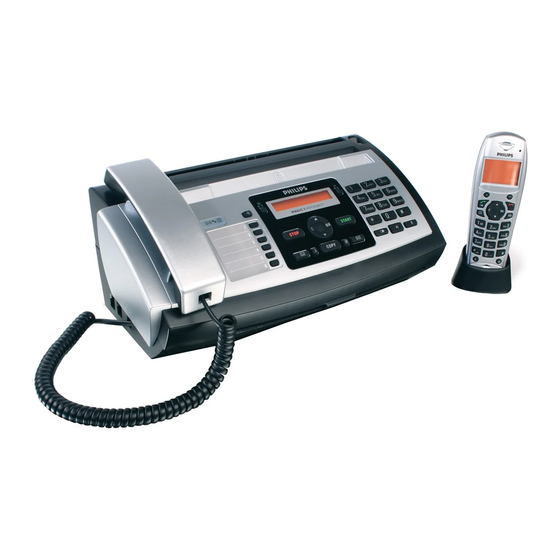
Page 7: Machine Overview
Machine Overview ‚ Scanner ƒ Rollers of the automatic document feeder Primo · Voice overview ‚ Handset „ Rests of the intake rollers ƒ Paper tray … Document guide / scanner film „ Document feeder (printed part up) † Cover for scanner and automatic document feeder …... -
Page 8: Cordless Telephone Panel
Cordless telephone panel õ—Programmable button (the saved function appears on the display) Philips Dect Panel Programmable button right ô—Programmable button (the saved function appears on the display) / calling options / confirming selection The green button “/L—Press briefly: Place calls / receives calls / hands... -
Page 9: Panel
Panel OK Button _—Calling the menu functions/ confirming input Start Button Message Button G—Press briefly: Starting transmission of messages ä—Lights up, if new messages are received / list of / press and hold: Starting fax polling the new messages with submenus / blinks in the case of de- Answering Machine Button vice error (for example no ink film) b—Calling answering machine menu... -
Page 10: General Safety Information
General Safety Infor- Set up your machine so that the power socket is easily ac- cessible. The machine does not have an on/off button. In an emergency, disconnect your machine from the power mation supply by pulling the power plug. Never touch the power or telephone cable if the insulation Your machine has been tested in conformity with stand- is damaged. -
Page 11: Speed Dialling
Table of Contents Broadcasting ..............25 Delayed Fax Transmission ........... 26 Receiving Faxes ............26 Dear Customer, ............2 Polling Faxes ............... 26 About this User Manual ..........2 Using Fax Templates ........... 26 Installation guide ........3 7 Copier ..........27 Contained in the packing .......... -
Page 12: Received Calls
1 Telephone func- Inserting a Dialling Pause It can be necessary to insert a dialling pause into the tele- tions phone number, for instance for the outside line access code, for an extension or sub-address or in a long distance number. -
Page 13: Call Waiting
Other telephone calls On the cordless telephone Low battery charge Not supported everywhere This function is not available if the battery charge of (Function is not supported in all countries and the cordless telephone is low. Place the cordless tele- networks) phone into the charging station. -
Page 14: Placing Internal Calls
3 Confirm with _. Calling Line Identification (CLIP) 4 Using / select HANDSET 0 . Country- and Network-Specific (country and network dependent) 5 Confirm with _. CLIP Definition The number of the caller appears on the display of the de- 6 Press ’... -
Page 15: Telephone Book Of The Device
2 Telephone book Deleting an Entry 1 Press _, 16 and _. of the device 2 Use / to select the entry you would like to delete. Help 3 · Telephone Functions 3 Confirm with _. Press i and 3 to print an overview of the tele- 4 Confirm DELETE: YES with _. -
Page 16: Speed Dialling
Deleting a Group 1 Press _, 13 and _. 2 Use / to select the group you would like to delete. 3 Confirm with _. 4 Use / to select DELETE MEMBER? . 5 Confirm twice with _. 6 Use / to select DELETE: ALL . 7 Confirm with _. -
Page 17: Telephone Book Of The Cordless Telephone
3 Telephone book Adding an additional number Additional number If you have added an additional number to an entry, of the cordless this entry appears twice in the telephone book. The symbol of the category appears before the name. telephone 1 Long press m (at least two seconds). -
Page 18: Looking Up Handsets
4 Cordless telephone Emergency call number It is recommended not to save any actual emergency call number (e.g. police or fire brigade) with this function, so that you do not accidentally call this emergency call number. Looking for cordless telephone 1 Press /, and using / select SETTINGS . - Page 19 7 Confirm with _. Modifying the time 8 Select the desired ring tone using /. Modifying the time Before you can modify the timer settings, you must switch 9 Confirm with _. off the current timer. 1 Press õ Stop . 10 Using /, set the volume.
- Page 20 11 Modify the date. 7 The transmitting unit starts ringing. Press “ to accept the call. 12 Confirm with _. 8 Activate hands-free on the receiver unit: Press “ to 13 Modify the time. switch hands-free on/off. Using /, set the volume. 14 Confirm with _.
-
Page 21: Activation
5 Answering Ma- Listening to the Outgoing Message 1 Press b. chine 2 Dial using / OUTGOING MSG. . 3 Confirm using _. Help 3 · Answering Machine Press i and 3 to print an overview of the answer- You can also load the function by pressing _, ing machine functions. -
Page 22: Messages
Recording the outgoing message: Listening to New Messages 1 Press /, and using / select VOICE MAIL . Indication of New Messages If new messages have been received on the answering ma- 2 Confirm using _. chine, the ä button blinks. The number of new messages is shown on the display. -
Page 23: Forwarding
Deleting Heard Messages reached, the machine calls the number. If the call is an- swered, a greeting text is played. Then the person on the line Deleting New Messages Messages not yet heard must be heard first before de- must enter the access code. If no code is entered or an incor- leting them. -
Page 24: Short Messages
Remote Control Functions On the cordless telephone 1 Press /, and using / select VOICE MAIL . Listening to Messages 2 Confirm using _. Listen to the current message again: Press ‚. 3 Using / select MESSAGES . Listen to all messages: Press ƒ. 4 Confirm with _. -
Page 25: Fax
6 Fax Busy Number If the subscriber is busy, the machine dials again after a certain period of time. Press H to interrupt the Help 4 · Fax transmission process. After the transmission, the ma- Press i and 4 to print the instructions for sending chine prints out a transmission report, depending on faxes and for fax switch settings. -
Page 26: Polled Reception
Sending a Fax to a Group Polling Faxes Directly 1 Insert the document. 1 Enter the desired telephone number with the number pad or select a saved entry. 2 Press _, 13 and _. If you would like to poll fax messages from an ex- 3 Use / to select the group to which you would like to tension number or a sub-address, add this after send a fax. -
Page 27: Copier
7 Copier Help 5 · Copier Press i and 5 to print help for copying. 10 Documents · A5/A4 Use documents with sizes A5 or A4 with 60 to 100 g/m weight. You can insert up to 10 documents at a time. Inserting Documents 1 Insert the documents face down into the document feeder. -
Page 28: Sending Sms Messages
1 Press W. 8 SMS You can also call the function by pressing / and Not supported everywhere selecting using / SMS . Confirm using _. (Function is not supported in all countries and networks) 2 Using / select SEND SMS . Help 8 ·... -
Page 29: Reading Sms
7 Confirm using _. Reading an SMS 8 Press ô Confirm to send the message. Press õ On the device EDIT ENTRY to edit the message again. Reading new SMS SMS to fax Reading an SMS on the Machine After reception of a new SMS message, the ä button You can send an SMS as a fax to a fax machine. -
Page 30: Printing Sms
Calling SMS functions On the cordless telephone Deleting individual SMS On the device 1 Select the SMS to read. SMS Functions on the Machine 1 While reading an SMS message, press _ to load ad- 2 Press ô Select . ditional SMS functions. - Page 31 Switching SMS Reception On and Off Switching SMS Reception Off If you are using a cordless telephone with SMS function on the same telephone line, then the specific device at which you will receive an SMS message will depend on the specif- ic manufacturer.
-
Page 32: Sudoku 48 Sudoku
9 Fun and Games Help 7 Games and Fun Press i and 7 to print the instructions for the Games and Fun functions of your device. Sudoku Sudoku Sudoku is a Japanese number puzzle. The game has 3 × 3 squares divided into 3 ×... -
Page 33: Print Reduced In Size
10 Settings on the Entering Your Name 1 Press _, 95 and _. device 2 Enter your name. You can enter characters using the numeric keys (see button labels) Enter special charac- Cursor navigation 1 You can move the cursor using /. Use V to delete ters using 0. -
Page 34: Fax Journal
3 Confirm with _. Setting the Volume 4 Enter the time at which the machine should switch to Setting the Ring Tone Volume You can adjust the volume of the ring tone when the device ˜ (night) mode, for example 22 00 for 10 o'clock is ringing or when you set the ring tone. -
Page 35: Printing Entries
Printing Numbers and Entries List of Numbers The list of numbers and entries contains the last ten calls received and numbers dialled as well as the saved entries and groups. Press _, 23 and _. The list is printed. Printing Help Pages Help 1 ·... -
Page 36: Settings On The Cordless Telephone
3 Using / indicate, whether you would like to set the 11 Settings on the ring tone for internal or external calls. 4 Confirm with _. cordless telephone 5 Select the desired ring tone using /. Back and close 6 Confirm with _. Press V to return to the previous menu level. -
Page 37: Programmable Buttons
1 Press /, and using / select SETTINGS . Programmable buttons 2 Confirm using _. Programmable buttons Your cordless telephone has two programmable buttons õ 3 Dial using / ADVANCED SET. . and ô, to which you can assign functions for the quick 4 Confirm using _. -
Page 38: Registering
12 Telephone Lines Voice Mailbox You cannot simultaneously use the answering machine fa- and Additional cility of your telephone service provider (= voice-mail box) and receive faxes on your devices. Get the mail-box func- tion for your telephone connection deactivated or set the Devices number of rings for the fax switch to lower than 5 on your device (also see Chapter Setting the Fax Switch, Page 34). -
Page 39: Easylink
17 Enter the same pin code which you entered on the oth- De-registering cordless telephone er device. On the device 18 Confirm using _. 1 Press _, 83 and _. 19 Using / select the number with which you would like 2 Using / select which cordless telephone you are to register the cordless telephone on the device. - Page 40 Taking Over the Line If you pick up on an additional telephone and the machine continues to ring or attempts to receive a fax, you can dis- connect the machine from the line. Press ** on the ad- ditional telephone. Changing Codes Easylink Codes Only change the codes if it is absolutely necessary.
-
Page 41: 13 Service
4 Remove both the rolls from the device. The used ink 13 Service film cannot be reused. Disruptions Should disruptions occur, follow the instructions on the display and on the error report. Changing the ink film Original Consumable Materials Use only original consumable materials. These are available from a specialised retailer or through our order service. -
Page 42: Ink Film Stock
8 Place the smaller roll without film in the front tray. The Changing the batteries in the blue gear wheel must be on the right hand side and the cordless telephone pin must be inserted in the depression on the left hand side. -
Page 43: Fixing A Paper Jam
Fixing a Paper Jam Fixing a Document Jam 1 Remove the paper from the paper feeder and take the 1 Remove the paper from the paper feeder and take the paper tray out of the device. paper tray out of the device. 2 Open the device by lifting the panel using grip in the 2 Open the device by lifting the panel using grip in the centre and folding it down. -
Page 44: Cleaning
6 Turn the blue gear wheel forward to tension the ink 3 Open the scanner cover and the cover of the automatic film. The ink film must not have any creases. document cover by first pushing the support (A) and then the support (B) inside. -
Page 45: Service Code
7 Turn the blue gear wheel forward to tension the ink 2 Enter a service code: film. The ink film must not have any creases. 7117—Deletes all changed settings and saved data. The device is reset to factory settings and the initial instal- lation process is started. - Page 46 Problems with the connection The device rings once, remains silent for a short while and This is absolutely normal. The fax switch checks the call af- starts ringing again. ter the first ring. If it is a voice call, the device continues to ring.
-
Page 47: 14 Appendix
(UK Terms and Conditions) Technical Data At the beginning of April 2002, SAGEM SA bought the PHILIPS fax business unit. SAGEM SA is now the Euro- Philips Dimensions Dimensions (L x H x W) ....313 × 129 × 197 mm... -
Page 48: Declaration Of Conformity (Doc)
• supply of new versions of software The CE symbol confirms conformity with the EU direc- tives that apply to the device. • work on any equipment or software modified or added without the prior written consent of SAGEM • malfunctions not resulting from the Equipment or from software installed in user workstations for the purpose of use of the equipment •... - Page 49 This user manual was printed on recycled paper bleached All rights reserved. No part of this publication may be re- without chlorine. This satisfies the highest standards for produced, stored in a retrieval system or transmitted in any low environmental impact. The cardboard packaging used form or by any means, electronic, mechanical, photocopy- and the packaging inserts of paper and cardboard can be ing, recording, or otherwise, without the prior written per-...
-
Page 52: Customer Information
Telephone: 09 05 - 693 02 40 (0.15 £/minute) Fax: 08 70 - 124 02 02 Use only PHILIPS accessories. The warrantee does not cover damages to the device resulting from other consumables. In United Kingdom, you can order PHILIPS accessories on telephone using our toll-free number.