Table of Contents
Advertisement
Quick Links
S_FA/RtS
Owner's Manual
Manual de Instrucciones
Manuel d'instructions
SEWING MACHINE
MAQUINA
DE COSER
MACHINE
A COUDRE
Model
}
Modelo
Mod61e
385.18330
CAUTION:
Before using this sewing
machine,
read this manual
and follow all Safety Rules
and Operating
Instructions.
• Safety Instructions
• Warranty
• Specifications
• Operation
• Care and Maintenance
• Troubleshooting
Sears Canada Inc., Toronto, Ont., M5B 2B8
Advertisement
Table of Contents

Related Manuals for Kenmore 385.18330


Summary of Contents for Kenmore 385.18330
- Page 1 S_FA/RtS Owner's Manual Manual de Instrucciones Manuel d'instructions SEWING MACHINE MAQUINA DE COSER Modelo 385.18330 Model MACHINE A COUDRE Mod61e CAUTION: • Safety Instructions • Warranty Before using this sewing • Specifications machine, read this manual • Operation and follow all Safety Rules •...
- Page 2 IMPORTANT SAFETY INSTRUCTIONS Your sewing machine is designed and constructed only for HOUSEHOLD use. Read all instructions before using this sewing machiner DANGER--To reduce the risk of electric shock: 1o This sewing machine should never be left unattended when plugged in Always unplug this sewing machine from the electric outlet immediately after using and before cleaning, 2.
- Page 3 INSTRUCCIONES DE SEGURIDAD IMPORTANTES Su m&quina de coser est& dise5ada y construida s61o para uso dom_stico_ Lea todas las instrucciones antes de usar esta m_quina de coser. PELIGRO -- Para reducir el riesgo de descarga el6ctrica: 1_ La m&quina nunca se debe desatender cuando se ha conectado_ Siempre debe desconectarla de la toma el_ctrica tan pronto termine de usarla y antes de limpiarla Siempre debe desconectarla...
- Page 4 IMPORTANTES CONSIGNES DE SI CURITI Votre machine & coudre n'est con(}ue et construite que pour t'usage m_nager. Lisez toutes ces consignes avant d'utiliser cette machine & coudre. DANGER -- Comment r_duire le risque de choc _lectrique: Une machine ne devrait jamais _tre laissde sans surveillance Iorsqu'elle est branch_e. D_branchez cette machine de la prise dlectrique imm_diatement apr_s ravoir utilis6e et avant d'entreprendre son entretien.
- Page 5 WARRANTY FULL 25 YEAR WARRANTY ON DEFECT IN MATERIAL OR WORKMANSHIP For 25 years from the date of purchase, Sears will, free of charge, repair defects in material or workmanship which appear in the internal mechanical part of the sewing machine. FULL TWO YEAR WARRANTY ON ELECTRICAL EQUIPMENT OF SEWING MACHINE...
- Page 6 Machine Specifications Item Specification Sewing speed (Maximum): Over 730/830 r,p m., Stitch length: 4 mm (Maximum) Stitch width: 6,,5 mm (Maximum) Stitch package (Stitch functions): (Built-in stitches): Buttonhole: 1 step built-in buttonhole Machine dimensions: W 422 mm (166") x D 172 mm (648") x H 297 mrn (11 ,,7") Weight (Net): 8,5kg (18,5 lbs)
-
Page 7: Table Of Contents
TABLE OF CONTENTS SECTION I. NAME OF PARTS III. Straight stitch sewing (continued) Cabinets ................. 2 • To snap on the zipper foot ........Names of Parts • Fabric preparation ............................ Available Accessories and Attachments ....4 oTO sew ................42 SECTION I!. - Page 8 INDICE SECCION I. NOMBRE DE LAS PARTES SECCION III. COSTURA DE PUNTADA RECTA Gabinete .................... 3 (continuaci6n) Nombre de las partes ................ • Como colocar el pie para cremalleras Accesorios y refacciones disponibtes ..............• Preparaci6n de la tela ............
- Page 9 TABLE DES MATIERES PIECES PARTIE 1. IDENTIFICATION DE LA MACHINE PARTIE III. COUTURE AU POINT DROIT (suite) Mallette de transport ..............3 La couture des fermetures & glissiSre ....... 43-45 identification des pi_ces ..............• Pour fixer le pied & fermeture & glissi_re ....... Accessoires disponibles •...
-
Page 10: Cabinets
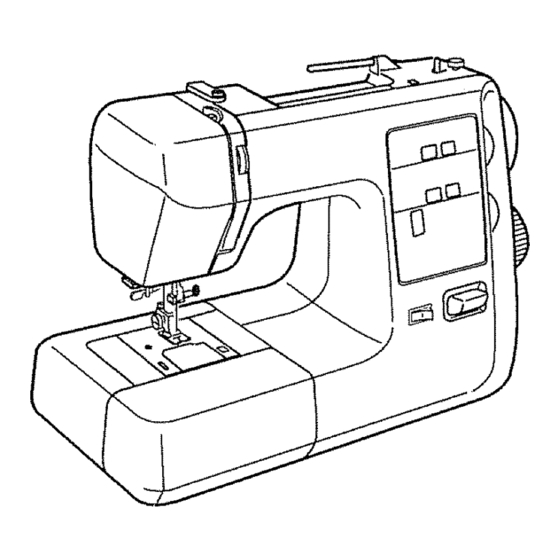
SECTION I. NAMES OF PARTS Cabinets A full line of sewing machine cabinets and Tote bags are available through the RSOS catalog at your nearest Sears retail store,, Names of Parts Q Reverse stitch control (_) Sewing guide display Q Stitch selector Stitch length setting display ®... -
Page 11: Seccion
PARTIE I. IDENTIFICATION DES PIECES SECCION I. NOMBRE DE LAS PARTES LA MACHINE Gabinete Mallette de transport Usted encontrard una linea completa de gabinetes y Vous trouverez dans les magasins Sears, ainsi que dans bolsas de mano para su m_quina de coser in el notre catalogue une gamme complete de moubles et de cat&logo RSOS que est&... -
Page 12: Available Accessories And Attachments
Available Accessories and Attachments "1 All parts listed may be ordered from any Sears store or service center. WHEN ORDERING REPAIR PARTS, ALWAYS GIVE THE FOLLOWING INFORMATION: 1oPART NUMBER 2. PART DESCRIPTION 3, MODEL NUMBER 4. NAME OF ITEM (SEWING MACHINE) If the parts you need are not stocked locally, your order will be electronically transmitted to a Sears Repair Parts Distribution Center for expedited handling... -
Page 13: Accesorios Y Refacciones Disponibtes
Accesorios y refacciones disponibles Accessoires disponibles Todaslas partes listadas se pueden ordenar de cualquiar Toutesces pi_cespeuvent_tre commandSesdans un magasin ou tiendade Sears o centre de servicio de Sears un centre de r_paration Sears CUANDO ORDENE REPUESTOS, SIEMPRE JOIGNEZ TOUJOURS A VOTRE COMMANDE PRORORCIONE LA SIGUIENTE INFORMACION: RENSEIGNEMENTS... -
Page 14: Section I!. Getting Ready To Sew
SECTION Ih GETTING READY TO SEW Connecting Machine to Power Supply Q Power supply plug Power switch (_) Outlet Machine socket (_ Machine plug (_ Light bulb Before connecting the power cord, make sure the voltage and frequency shown on the machine conform to your electrical power. -
Page 15: Conexi6N De La M_Quina A La Red El6Ctrica
SECCION !!. PREPARACION DE LA PARTIE II. PRI_PAREZ-VOUS ,&.COUDRE MAQUINA PARA COSER Branchez la machine Conexi6n de la mdquina a la red el_ctrica (_ Clavija de toma de corriente (_) Interrupter de corriente (_) Prise _lectrique (_) tnterrupteur (_) Red el_ctrica (_ Enchufe de la m_quine (_) Prise de courant (_ Prise de ta machine... -
Page 16: Pressure Adjusting Lever
Pressure Adjusting Lever (_ Pressure adjusting lever The pressure adjusting lever should be set at "3" for regular sewing. Reduce pressure to "2" for applique, cut work, draw work and basting. Set pressure at "1" when sewing chiffon, lace, organdy and other fine fabrics. -
Page 17: Ajuste De La Prasi6N Del Prensatelas
Ajuste de la presion del prensatelas Levier de rdglage de la pression (_ Palanca del ajuste de la presi6n (_ Levier de r_glage de la pression La palanca del ajuste de ia presi6n debe set situada en el "3" Le levier de r_glage de la pression devrait _tre r_gl_ sur la position "3" para costura normal. -
Page 18: Set The Speed Range Switch
Set the speed range switch Your machine has two ranges of speed -- a low range for slower, intricate work and high one for faster, general work On the low setting the machine witl sew no faster than appoximately two-third the speed of the high one, even when HIGH the foot control is fully depressed°... -
Page 19: Ajusta El Interruptor De Marchas De Velocidad
Ajuste el interrupter R6glage de I'interrupteur de gamme de vitesse de marches de velocidad Votre machine est _quipde de deux gammes de viteeses,- Su m_quina de coser tiene dos marches de velecidad - una marcha m_s lenta, para cosidos dificuitosos y una marcha m&s rapida pare lente pour les ouvrages compfiqu6s _ r6aliser lentement et une plus rapide pour le travail g6n6ral que ron peut accomplir... -
Page 20: Changing Presser Feet
Changing Presser Foot (_) Snap-on button (red button) (_) Groove To remove: Raise the needle to its highest position by turning the handwheel counterclockwise,, Raise the presser foot, and press the red button 0 on the back of the foot holder, To atlach: Place a selected presser foot so the pin (_ on the foot lies just under the groove (_ on the foot holder. -
Page 21: C6Mo Quitar/Poner El Prensatelas
C6mo quitar/poner el prensatelas Retrait et fixation du pied presseur (_) Bouton de d_crochage (bouton rouge) (_) Boton de fij_ci6n de prensatelas (b6ton roio ) (_) Enclavadura (_ Eneoehe (_) Pasador (_) Broche Pare quitar: Suba la aguja haste su posici6n m&s alta girando Retrait: Faites monter l'aiguille le pius haut possible en el volante en elsentido contrarie alas afujas de relojr Suba el tournant le volant dans le sans antihoraire. -
Page 22: F: Satin Stitch Foot
Presser Foot Types (continued) o Satin stitch foot (Foot F) Use this foot for satin stitch and outlining applique. Foot F: For: Darning (page 46) Pie F: Satin stitch (page 48) Pied F: Monogramming (page 50) Applique (page 50) Shell stitch (page 60) Decorative stitch of geometric patterns (page 64) ,,,J Smocking (page 68) -
Page 23: Gufa De Acolchado
Tipos de pie (continuacidn) pieds presseurs (suite) Diffdrents • Pied _, point de bourdon (Pied F) • Pie para puntada decorativa (Pie F) Utilice este pie para puntada decorafiva y aplicaciones.. Servez-vous de ca pied pour Is pourtour des appliques et la point. -
Page 24: Selecting Needle And Thread
Selecting Needle and Thread For general sewing use needle size 11 or 14. A fine thread and needle should be used for sewing lightweight fabrics so the fabric will not be marred. Heavy fabrics require a needle large enough to pierce the fabric without fraying the needle thread. -
Page 25: Selecci6N De Aguja E Hilo
aguja Selecci6n e hilo Pare el cosido general se utitizan agujas del tamafio 11 o 14_ Los hiles y agujas delgados deber_,n utiiizarse pare coser tejidos ligeros evitando asf que _stos se puedan echar a perder. Cosa tejidos gruesos con una aguja to suficientemente gruesa come pare que pueda penetrar el tejido sin que el hilo de la aguja se deshilache. - Page 26 raiguiile Choix de et du fil Pour los coutures normales, utilisez une aiguille n=11 out 4. On devrait utiiiser du fiI fin et une aiguille fine avec les tissus I_gers pour ne pas les endommager. Les tissus Iourds n_cessitent une aiguilie assez grosse pour percer le tissu sans effilocher le ill de t'aiguille. Dans un jeu d'aiguitles, il y a une aiguilte de chaque grosseur 11, 14, t6, 18 et une aiguille &bout bleu_ L'aiguilte &...
- Page 27 (blank page) (p_gina blanca) (page blanche)
-
Page 28: Bobbin Winding
Bobbin Winding • Removing the hook cover plate (_) Hook cover plate release button (_) Hook cover plate Slide the hook cover plate release button Q to the right, and remove the hook cover plate (_. ° Horizontal spool (_ Spool pin Large spool holder (_ Small spool holder Lift up the spool pin Q., Place a spool of thread on the spool... -
Page 29: Bobinado De La Canijla
Bobinadode lacanilla Remplissage de la canette • C6mo sacar la canilla ° Retrait de la canette (_ Pulsador de apertura de Ia tapa de acceso a canilla (_ Bouton de ddgagementdu couverclede navette Tapa de accsso a canilla (_) Couvercle de navette Deslice el pu_sador Q hacia la derecha y quite la tapa (_, Coulissez le bouton de d_gagement du couvercle (_) vers la droite, et retirez le couvercle (_o... -
Page 30: Bobbin Winding
• Bobbin winding (_) For horizontal spool pin (_ For additional spool pin Pull the handwheel out to the right, Draw thread from the spool. Guide the thread around the thread guide. Thread through the hole in the bobbin from the inside to the outside. -
Page 31: Bobinado De La Canilla
• Bobinado de la canilla o Remplissage de la canette _) Para el portacarretes horizontal (_) Pour porte-bobine horizontal Para el prortaearretes adicional (_) Pour pode-bobine suppl_mentaire Hale la volante manual a la derecha. Tirez Is volant vers la droite. Tirez surfe fil de la bobine. -
Page 32: Inserting The Bobbin
• Inserting the bobbin (_ End of thread (_ Notch (_) Notch (_ Threading chart Place a bobbin in the bobbin holder with the thread running off counterclockwise, Guide the thread into the notch _ on the front side of the bobbin holder. -
Page 33: Cotoeaci6N De Ta Canilla En Et Portacanillas
• Insertion de la canette • Colocaci6n de la canilla en el portacanillas Q Extreme de hilo (_ Extr6mit_du fil (_ Ranura (_ Encoche (_ Ranura _) Encoche (_ Esquema de enhebrado (_ Guide d'enfilage Ponga una canil]a dentro de] portacanillas de mode que ePhilo Placez Ia canettedans son support, le fil se d_roulant en sens antihoraire, se suelte en el sentido contrarie a [as agujas del reloj,... -
Page 34: Threading The Machine
Threading the Machine ° Threading the machine Raise the thread take-up lever to its highest position by turning the handwheel counterclockwise. Raise the presser foot lifter. Place a spool on the spool pin, with thread coming off as shown° Draw the end of thread around the upper threa d guide. While holding the thread near the spool, draw the end of the thread down around the check spring holder. -
Page 35: Enhebrado Del Hilo De La Aguja
Enhebrado del hilo de la aguja Enfilage de la machine =Enhebrado del hilo de la aguja • Enfilage de ia machine Suba el tirahitos hasta su posiciSn m&e alta girando et volante en Faites reenter le levier reieveur tendeur de fil te plus haut el sentido contrario alas agujas del reloj. -
Page 36: Adjust The Needle Thread Tension For Straight
• Drawing up bobbin thread [] Raise the presser foot. Hold the needle thread lightly with your left hand and turn the handwheel counterclockwise for one complete turn° [] Bring the bobbin thread up by pulling the needlethread [] Pull both threads under and to the back of the presser foot, leaving 4_0 to 6.0"... -
Page 37: Ajuste De La Tensi6N Def Hilo Superior Para Puntada Recta
• Extracci6n del hilo de la canilla • Comment remonter le fi! de la canette Remontez de le pied presseur,Tenez le fil de I'aiguitle [_Suba el prensatelas, Sujete ligeramente el hilo de la aguja con su mano izquierda y gire el volante en el sentido contrario a souplement de la main gauche,et tournezle volantd'un 1as agujas de1 reloj una vuelta completa°... -
Page 38: Tension Is Too Loose
• Tension is too loose (_ Needle thread (Top thread) Q Bobbin thread (Bottom thread) (_ To tighten (_ Right side (Top side) (_ Wrong side (Bottom side) The needle thread shows through on the wrong side of the fabric and it feels bumpy Turn the dial to a higher tension setting number to tighten the needle thread tension_ Adjust the Needle Thread Tension for Zigzag Stitch... -
Page 39: El Hilo Est6 Demasiado Flojo
• Si la tension est trop faible - El hilo estd demasiado flojo (_ Fit de t'aiguifle (Fil du supSrieur) (_ Hito de la aguja (Hilo superior) Fil de la canette (Fii du inf_rieur) (_ Hilo de ta canilla (Hilo inferior) (_) Pour augmenter la tension (_) Para apretar... -
Page 40: Stitch Selector
Stitch Selector (how to select stitches) Raise the needle to the highest position, and select a pattern by turning the stitch selector_ The red mark will be shown on the selected stitch. (Set the stitch length control at SS when using the stretch stitch.) * Window 0 shows stitch number, foot number and stitch. -
Page 41: Selector De Puntada
puntada (c6mo puntadas) Selector seleccionar Sdlecteur de point (comment choisir les points) RemontezI'aiguilleIs plushautpossible,st s_lectionnezles Levante la aguja hasta la posiciSn m_s alta, y seieccione de puntadas girando el selector de puntadao pointsen tournantle s_lecteurde point. La marca roja ser& mostrada en el puntada elegido. Le repbrerouge indiqueIs pointchoisi. -
Page 42: Stitch Width Control
Stitch Width Control (how to adjust the stitch width) Turn the stitch width control until the desired number is shown at the indicating mark, The larger the number, the greater the stitch width_ mark shows the adjustment range when using the twin needle, The blue zone is the appropriate adjustment range for buttonhole sewing. -
Page 43: Control De La Anchura De Puntada
Rdglage de la largeur du point (comment rdgler la largeur Control de ia anchure de puntada (c6mo ajustar du point) anchure de las puntadas) Gire el control de la anchura hasta que et ntJmero deseado se yea Tournez Is rdglags de la largeur du point jusqu'& ce que le nurn_ro la marca indicativa.. -
Page 44: Adjusting Stretch Stitch Balance
Adjusting Stretch Stitch Balance If stretch stitch patterns are uneven when you sew on a particu- lar fabric, adjust them with the feed balancing dia!,, To adjust distorted patterns If patterns are drawn out, correct by turning the dial in the direction of "-"+ If patterns are compressed, correct by turning the dial in... -
Page 45: Equilibrio De Los Patrones Distorsionades
Equilibrio patrones de los distorsionados Pour corriger un motif ddformd Si observa atguna distorsi6n al coser patrones de puntada eldstica Comment r_glar r_quitibre d*un motif extensible: en una tela especifica, ajfistefos con el eje equilibrador de puntada_ Si les motif extensibles sont irr_guliers Iorsque vous piquez un Equilibrador de patrones de puntada distorsionada tissu particulier, corrigez-les avec le bouton d'_quilibrage.. -
Page 46: Straight Stitch Sewing
SECTION I!1.STRAIGHT STITCH SEWING Straight Stitch O Stitch selector: 6to8 _1 D Cl:_¢1) (_ Stitch width: ® Red zone _) Stitch length: ® ® (_) Needle thread tension: 2 to6 _) Presser foot A: Zigzag foot ( I ! I ) Presser foot H: Straight stitch foot( ,i, only ) NOTE:... -
Page 47: Puntada Recta
SECCION II1. COSTURA DE PUNTADA RECTA PARTIE II1. COUTURE AU POINT DROIT Puntada recta Point droit (_ Selector de patr6n: 6 a 8 6&8 C) S_lecteur de point: (_ Control de la anchura: 6,,5 (_ Largeur du point: (_ Control de la tongitud: Zona roja Longueur du point: Zone rouge... -
Page 48: Turn A Square Corner
Turn a Square Corner Q Cornering guide To turn a square corner 5/8"(1.6cm) from the fabric edge, 1. Stop stitching and lower the needle by turning the handwheel counterclockwise_ 2. Raise the presser foot and turn the fabric to line the edge with the 5/8"(1 _6cm) seam guide. -
Page 49: Para Girar En Esquinas De ,_Ngulo Recto
girar en esquinas de dngulo Pare recto Couture d'un angle droit (_ Gufa para esquinas (_ RepUte pour tourner Pare girar en una esquina de dngulo recto a 16 cm(5/8") de! borde Pour piquer un angle droit _, 1.6cm(5/8") du bord du tissu. de _atela°... -
Page 50: Zipper Sewing
The quilting will help to keep the stitching lines straight. Loosen the quilter holding screw.. Slide the quilter in the hote to the desired width and tighten the screw. Sew, guiding the quilter over the previous row of stitching. (_ Quilter holding screw (_) Quilt_ (_ Hole ®... -
Page 51: Costura De Cremafleras
La guia de acolchado Ie ayuda a coser tfneas rectas de puntadaso Le guide & matelasser vous aidera & coudre des lignes paral[eles Afloje el torni]to de sujeci6n de la gufa. Desserrez la vis, enfilez le guide & matelasser dans l'ouverture DesEce la gu,_adentro de su alojamiento hasta conseguir et jusqu'&... - Page 52 Zipper Sewing (Continued) [] Attach the zipper foot with the pin of the foot on the right-hand side_ Lower the zipper foot on the top side at the bottom of the zipper so that the needle pierces the fabric next to the fold and the zipper tape (_.
- Page 53 Costura de cremalleras (continuaci6n) La couture des fermetures & glissi_re (Suite) Enganche et pie per la parte derwcha del pasador_ Baje el pie Fixez le pied & fermeture la broche du c6t_ droit.Abaissez le centrela cremallerade forma que la agujacoincidaencima de1 piedsur le bas de I'endroitde la fermeture, pourque !'aiguille perce le tissuau ras du pli,et du rubende la fermeture(_.
-
Page 54: To Drop Or Raise The Feed Dogs
To Drop or Raise the Feed Dogs The drop feed dogs !ever is located underneath the free arm bed on the back side of the machine. (_ To drop the'feed dogs, push the lever in the direction of the arrow as illustrated. (_) To raise the feed dogs, push the lever in the direction of the arrow as illustrated and turn the handwheel toward you,... -
Page 55: C6Mo Subir/Bajar Los Dientes Del Transporte
bajar tranporte C6mo subir / los dientes Comment monter et descendre griffes d'entrainement La palanca de monde para los dientes dei transporte est_ bebajo del braze _ibre colocabo en la parts del rev_s de la m&quina_ Le tevier des griffes d'entrainement est situd sous le berceau du bras libre _ I'arri_re de la machine°... -
Page 56: Iv. Zigzag Stitches
SECTION IV. ZIGZAG STITCHES WfDTH Basic Zigzag (_ Stitch selector: _) Stitch width: 1 to 6.5 ® ® Stitch length: Red zone Needle thread tension: 3 to 5 ® (_) Presser foot: A Zigzag foot The zigzag stitch is one of the most common and versatile stitches°... -
Page 57: Puntada De Zig-Zag
SECCION IV. PUNTADAS DE ZIG-ZAG PARTIE IV. POINTS ZIG-ZAG Zig-zag simple Puntada de zig-zag SSlecteur de point: (_ Setector de patr6n: (_ Largeur du point: 1 & 6..5 (_ Control de la anchura: 1 a 6.5 (_) Longueur du point: Zone rouge (_) Control de la longitud: Zona roja... -
Page 58: Monogramming
Monogramming (_) Stitch selector: VVIDTH _j3 Stitch width: 3 to 6.5 ® Stitch length: 0.5 to 1 ® ® (_ Needle thread tension: 1 to 4 O Presser foot F: Satin stitch foot Pressure adjusting lever: 1 or 2 Attach a piece of stabilizer on the wrong side (Bottom side) of the fabric. -
Page 59: Monogramas
Monogramas Monogrammes (_ Selector de patr6n: (_ S_lecteur de point: (_ Control de la anchura: 3 to 6.5 (_) Largeur du point: 3 to 6.5 (_ Longueur du point: 0.5 _ 1 (_) Control de la Iongitud: 0°5 a 1 Tension du fil de I'aiguiila: 1 _ 4 (_ Tensi6n del hiio de la aguja:... -
Page 60: Bar Tacking
Bar Tacking (_ Stitch selector: WIDTH ® (_) Stitch width: 2 to 65 (_) Stitch length: 0.5 to t LENGTH ® ® Needle thread tension: 2 to 6 ® O Presser foot A: Zigzag foot This is similar to a very short satin stitch and is used to reinforce points of strain such as corners, pockets /' I and straps of lingerie. -
Page 61: Puntada De Refuerzo
Puntada de refuerzo Brides de renfort (_ Selector de partr6n: (_ s_lecteur de point: (_) Control de la anchura: 2 a 6.5 _) Largeur du point: 2 _ 6_5 (_ Control de la longitud: 0,5 a 1 (_ Longueur du point: 0,5 &... -
Page 62: Button Sewing
Button Sewing WIDTH Stitch selector: Stitch width: 2 to 6.5 LENGTH (_ Stitch length: (_ Needle thread tension: 2 to 6 ® ® ® (_ Presser foot A: Zigzag foot (_) Feed dogs: Dropped Drop the feed dogs_ Match the holes on a button with the horizontal slot on the Presser foot [A} Adjust stitch width matching the distance of the holes on the button Lower the foot to hold the button in place. -
Page 63: Cosido De Botones
Costura de botones Pose des boutons 1_ Selector de patrSn: (_) S_iecteur de point: 2a6.5 1_ Anchura de la puntada: (_) Largeur du point: 2 & 3 (_ Longitud de la puntada: Cualquier n_mero (_ Longueur du point: Toute (_ Tensi6n dei hi!o de ta aguja: Tension du fil superieur: 2 _ 6 1_ Prensatelas A:... -
Page 64: Utility Stitches And Decorative Stitches
SECTION V. UTILITY STITCHES AND DECORATIVE STITCHES WIDTH Blind Hem Stitch (_ Stitch selector: LENGTH (_ Stitch width: 2 to 3 (_) Stitch length: Red zone (_ Needle thread tension: 2 to 6 ® Presser foot G: Blind hem foot ®... -
Page 65: Decorativas
PARTIE V. POINTS UTILITAIRES SECCION V. PUNTADAS UTILES Y PUNTADAS D_CORATIFS DECORATIVAS Dobladillo invisible Ourlet invisible (_ Se]ector de patr6n: (_) S_lecteur de point: (_) Anchura de la puntada: 2 a 3 (_ Largeur du point: 2 & 3 (_) Longitud de ta puntada: Zona roja (_) Longueur du point: Zone rouge... -
Page 66: Lace Work
Lace Work (_ Stitch selector: W1DTH (_ Stitch width: 2 to 3 Stitch length: (_ Needle thread tension: 1 to 4 (_ Presser foot A: Zigzag foot ® Lace adds a fanciful, feminine touch to blouses and lingerie_ Table linens and pillows become more elegant when trimmed with laceo Fold the raw edge of the fabric at least 5/8"(t .5 cm). -
Page 67: Trabajos Con Lazos
Trabajos con lazes Dentelle (_ S_lecteur de point: (_) Selector de patr6n: (_ Anchura de la puntada: 2 a 3 (_ Largeur du point: 2 & 3 (_) Longueur du point: (_ Longftud de la puntada: (_ Tension du fil de raiguitle: 2 &... -
Page 68: Shell Stitch
Shell Stitch G_ Stitch selector: W,OT. @ ® Stitch width: 3 to 65 LENGTH (_) (_) Stitch length: Red zone Q Needle thread tension: 4 to 9 ® Presser foot F: Satin stitch foot Use a lightweight fabric such as tricoL Fold the fabric and stitch on the bias, You may need to increase the needle thread tension slightly. -
Page 69: Puntada En Forma De Concha
Puntada en forma de concha Point coquille (&) S_lecteur de point: (_ Selector de patrSn: (_) Largeur de point: 3&6o5 (_ Anchura dala puntada: 3a&5 (_ Longueur du point: Zone rouge (_) Longitud dala puntada: Zona roja (_ Tension du fil de I'aiguilie: 4&9 (_ Tensi6n del hilo de la aguja: (_) Pied presseur F:... -
Page 70: Fagoting Stitch
Fagoting Stitch (_ Stitch selector (_) Stitch width: 5 to 6,5 (_) Stitch length: 0,,5 to 2 (_ Top thread tension: 3 to 8 ® Presser foot A: Zigzag foot (_) Paper or tear-away backing (_ 1/8"(03cm) Use this stitch to join two pieces of fabric to create an open work appearance and add design interest,. -
Page 71: Puntada Para Deshilachados
Puntada para deshilachados Couture ajourde (_ Selector de patron: (_) S_lecteur de point: (_) Anehura de ta puntada: (_) Largeur du point: 5 & 6°5 5a6,5 (_ Longueur du point: 0,5 & 2 05a2 (_) Longitud de puntada: (_ TensiSn del hilo superior: (_ Tension du fil sup_rieur: 3 &... -
Page 72: Overedge Stitch
Overedge Stitch _W1DTH (_ Stitch Selector: (_) Stitch width: 3 to 6.5 _LENGTH (_) Stitch length: 1 to 3 (_ Top thread tension: 3 to 8 (_) Presser foot A: Zigzag foot This stitch is often used as a seam finish to prevent fraying_ Decorative Stitch of Geometric Patterns t3 to 18 (_) Stitch selector:... -
Page 73: Puntada Para Rebordados
Puntada pararedordados Point de bordure (_ S_tecteurde point: Q Selectorde patr6n: (_) Largeurdu point: 3 & 6,5 _) Anchura de la puntada: 3 a 6°5 (_) Longueur du point: 1 _ 3 (_ Longitudde puntada: 1 a 3 (_ Tensiondu fil supdrieur: 3 &... -
Page 74: Section Vl. Stretch Stitches
SECTION Vl. STRETCH STITCHES Straight Stretch IIIIIIIII WIDTH IIIIIIIII (_ Stitch selector: 6to 8 IIIIIIIII _ _III _Clll Stitch width: LENGTH ® ® Stitch length: Gold stretch stitch position 2 to6 ® Needle thread tension: It rl (_) Presser foo| A: Zigzag foot( Presser foot H: Straight stitch foot( ,_ only) -
Page 75: Extensi6N Recta
SECCION VI. PUNTADAS ELASTICAS PARTIE VI. POINTS EXTENSIBLES Extensi6n recta Point droit extensible (_) Sdtecteurde point: (_ Selector de patr6n: 6&8 (_) Largeurdu point: (_) Anchura de la puntada: (_ Longitud de la puntada: Posici6n oro de (_) Longueur du point: Position ou point extensibte puntada el_stica 2&6... -
Page 76: Overcast Stretch Stitching
Overcast Stretch Stitching (_ Stitch selector: Q Stitch width: 3 to 65 ® w,oT.® LENGTH Stitch length: Gold stretch stitch position (_ Needle thread tension: 2 to 6 (_ Presser foot A: Zigzag foot This stitch is for sewing a seam with an overcast finish. It is used when making swim wear, ski pants and other garments which require stretch •... -
Page 77: Punlada Eldstica De Remate O Sobrehilado
Puntada eldstica de remate o sobrehilado Surjetage extensible (_ Selector de patrSn: (_ S_Jecteur de point: (_ Anchura de la puntada: 3a6.5 (_ Largeur du point: 3&65 (_) Longitud de la puntada: Posici6n ere de puntada (_ Longueur du point: Position point extensible or el_stiea (_) Tension du fil de l'aiguille:... -
Page 78: Serging
Serging WIDTH O Stitch selector: (_ Stitch width: 3 to 6.5 LENGTH ® ® (_ Stitch length: Gold stretch stitch position %o %o (_ Needle thread tension: 3to 6 (_) Presser foot A: Zigzag foot (_ Presser foot C: Overedge foot Set the stitch width 5.0 to 6_5 when the overedge foot C OTE, is used to prevent needle breakage or damaging the foot. -
Page 79: Puntada De Dobladillo
Puntada do dobladillo surjet Point de (_ Selector de patr6n: (_ Sdlecteur de point: (_) Anchura de la puntada: 3a6_5 (_ Largeur du point: 3 _, 6.5 (_ Longitudde la puntada: Posici6n oro de puntada el&stica (_ Longueur du point: Position point extensibie or (_) Tensi6n del hilo de la aguja: (_ Tension du fil de I'aiguille:... -
Page 80: Herring Bone Stretch
Herring Bone Stretch w,oT. ® (_ Stitch selector: 3 to 6..5 ® Stitch width: _LENGTH (_ Stitch length: Gold stretch stitch position 2 to 6 ® Top thread tension: ® (_ Presser foot A: Zigzag foot ® Use as hemming stitch for blankets, table clothes and draperies_ Place the fabric right side up, and sew 3/8"(1 0 cm) from the edge Then trim close to stitching... -
Page 81: Puntada De Espiga El_Stica
Puntada de espiga eldstica Point d'_pine extenstble (_ Selector de patr6n: (_ S_tecteur de point: 3a6.5 (_) Anchura de la puntada: (_ Largeurdu point: 3_6.5 _) Longitud de puntada: (_) Longueurdu point: PosiciSn de puntada el&stica Position point extensible or dorada 2&6 _ Tensiondu fil de I'aiguille:... -
Page 82: Buttonhole And Twin Needle Stitches
SECTION VII. BUTTONHOLE AND TWIN NEEDLE STITCHES Automatic Buttonhole (_) stitch selector: 3 to 65 (_) Stitch width: Blue zone (_) Stitch length: 0 Needle thread tension: 2 to 6 Automatic buttonhole foot (_) Presser foot R: ® • Preparation for Sewing (_ Groove Q Pin... -
Page 83: Ojal Automatico
PARTIE VII. BOUTONNIIERE ET AIGUILLES SECCION VII. OJALES Y PUNTADAS JUMELEES DOBLE AGUJA Boutonniere automatique Ojal automdtico Q Selector de patr6n: S_lecteur de point: 3&6+5 (_) Largeur du point: Anchura de la puntada: 3 a 6+5 Zone bieue (_) Longueur du point: (_) Longitud de la puntada: Zona Azul 2&6... - Page 84 (_ Mark forplacement ofbuttonhole (_ Starting point (_)Slider (_)Thereshoud benogap. 70 Spring holder ® ® Difference Draw both threads to the left under the foot.. insert the garment under the foot, and lower the needle at the starting point Then lower the automatic buttonhole foot. * Make sure there is no gap ®...
- Page 85 (_) Marca para hacer el ojal (_ Repere pour I'emplacement de la boutonniere (_) Punto de comienzo (_ Point de d6part (_ Deslizador (_ Curseur (_) No deber_, haber holgura. (_) II ne devrait pas y avok d'espace (2_)Soporte det resorte (_ Support du ressort (_) Diferencia (_ Diff6rence de longueur...
-
Page 86: How To Adjust Buttonhole Stitch Balance
If thebuttonis extremely t hick,makea testbuttonhole_ If it is difficult t o fit the buttonthrough thetestbuttonhole, lengthen the bL_onhole b y pulling thebuttonholder o nthe footbackto increase thetength. (_)Gap How to Adjust Buttonhole Stitch Balance Use the stitch length control _) to adjust stitch density. Turn the dial in direction (_) for a coarser density (_). -
Page 87: C6Mo Equilibrar Las Puntadas De Tos Ojales
Si el bot6n es extremadamente grueso, haga un ojal de prueba Si le bouton est tr6s 6pals, faites une boutonni6re d'essaL S'il est Si no pudiera meter el bot6n en el ojal de prueba: difficiIe de passer le bouton dans rouverture, augmentez ia longueur Alargue el ojal desplazando hacia arras el alojamiento del bot6n de la boutonniere... -
Page 88: Corded Buttonhole
° Corded Buttonhole Use the same procedure as automatic buttonhole. * Set the stitch width to match the thickness of the cord used With the buttonhole foot raised, hook the filler cord on the spur at the back of the buttonhole foot. Bring the ends toward you under the buttonhole foot, clear- ing the front end. -
Page 89: Costura De Ojales Concord6N
ojales • Costura con cord6n passepoil_es o Boutonnieres Emplee el mismo procedimiento que para la costura de ojales Suivez la m6me proc6dure que pour la boutonniere autom&ticos. automatique. • Ajuste el ancho de la puntada en concordancia con el cord6n * Ajustez la largeur du point en fonction de t'_paisseur du qu e utilice. -
Page 90: Manual Buttonhole
Manual Buttonhole WIDTH 0 Stitch selector: Q Stitch width: 3 to 6,5 (_ Stitch length: Blue zone (_ Needle thread tension: 2 to 6 ® ® (_ Presser foot B: Buttonhole foot r%@[ , Manual Buttonhole * If the diameter of the button is more than 1,,0"(25 cm), a buttonhole must be made manually as follows: [] Turn the handwheel toward you to raise the needle to its highest position. -
Page 91: Ojal Manual
Boutonniere manuelle Ojal manual {_) Selector de patrSn: (_ S_lecteur de point: (_ Anchura de la puntada: 3a6.5 3&6o5 (_) Largeur du point: Zona Azul Zone bleue (_ Longitud de la puntada: (_ Longueur du point: (_ Tensi6n del hi]o de la aguja: 2&6 (_ Tension du fil de raiguitle: (_ Prensatelas... -
Page 92: Automatic Buttonhole (Optional Item)
Automatic Buttonhole (Optional Item) For more varied and accurate buttonholes, use the button- hole attachment and templates, The buttonhole attachment consists of the illustrated parts: O Guide slot (_) Measure marking ® Catch Buttonhole guide plate ® Buttonhole templates (_ Guide block O Two pins Hook (_ Lever... -
Page 93: Ojal Autom6Tico (Artfculo Opcional)
Oja! automdtico (Artfculo opcional) Boutonniere automatique (en option) Para mayor variedad y ojales m_s preclsos, use el accesorio para Utilisez le guide pour les boutonnieres avec les gabarits pour r_aliser ojales, el cual consiste de las partes ilustradas. des boutonnieres vaddes et plus pr_cises. -
Page 94: To Sew
Automatic Buttonhole (Continued) , To Sew Q Stitch selector: ® Stitch width: ® Stitch length: 3 to 4 (_ Needle thread tension: 2 to 6 ® ® ® Presser foot: Buttonhole foot NOTE" Best results are obtained by using #60 or #80 lightweight thread for bobbin thread. -
Page 95: Para Coser
Ojal automdtico (continuaci6n) automatique (suite) Boutonniere • Para coser , Pour coudre Selector de patr6n: C} S61ecteur de point: (_ Anchura de apuntada: Largeur du point: (_ Longitud de la puntada: (_) Longueur du point: 3&4 2&6 (_ Tensi6n de hilo de la aguja: (_ Tension du fit de I'aiguilte: (_ Prensatelas : (_ Pied presseur:... - Page 96 Automatic Buttonhole (Continued) (_ Guide slot (_ Guide block (_ Buttonhole guide plate (_ Buttonhole template (_) Catch ® Setting mark Q Gear (_ Base plate ® After you select a template (_ with the style and size of but- tonhole, slide the template into the guide plate (_.
- Page 97 Ojal automdtico (continuaci6n) automatique (suite) Boutonniere (_ Ranura gu[a _) Fente de guidage (_) Bloque gu[a (_ Doigt de guidage (_ Piaca gu[a para ojales (_ Plaque guide de boutonniere (_ Plantilla de ojales (_ Gabarit (_) Enganche (_ Ctiquet (_) Marca de posicfon (_ Marque de repSre Dentada...
-
Page 98: To Adjust Stitch Density
Automatic Buttonhole (Continued) Marked buttonhole on fabric Center marking on buttonhole foot (_) Measure marking on the guide plate (_ Fabric Mark the buttonhole position carefully on the fabric Place the fabric behind the machine, insert the fabric between the guide plate and the buttonhole foot as illustrated. -
Page 99: Para Ajustar La Densidad De Tas Puntadas
Ojal autormdtico (continuacidn) Boutonnii_re automatique (suite) (_ Trae_ de la boutonniere sur le tissu (_) Ojal marcado en la tela (_) Rep_recentralsur le pied & boutonniere (g) Marca central en el pie pare ojales _-) RepSrede dimensionsur la plaque guide (_ Marca de rnedida en la placa gufa (_ Tissu (_ Tela... -
Page 100: Twin Needle Stitches
Twin Needle Stitches (Optional Item) (_ Stitch selector: '12 to 18 (_) Stitch width: (_ Stitch length: Gold stretch stitch position or green zone (_ Needle thread tension: 3 to 7 ® Presser foot A: Zigzag foot ® (_) Presser foot F: Satin stitch foot (_ Needle: Twin needle (optional item) -
Page 101: Puntadas De Doble Aguja (Articulos De Opcional)
Puntadas de doble aguja (Artfculo opcional) Aiguilles jumeldes (an option) _) Selector de patr6n: 12a18 _') S_lecteur de point: 12&18 _) Anchura de la puntada (_ Largeur du point: (_ Longitud de la puntada Posici6n oro de puntada (_) Longueur du point: Position or point extensibTe el_stica o zona verde OU zone... -
Page 102: Care Of Your Machine
SECTION VIII. CARE OF YOUR MACHINE NOTE: * Unplug the machine * Do not dismantle the machine other than as explained in this section_ * Do not store the machine in a high-humidity area, near a heat radiator or in direct sunlight. * Clean the outside of the machine with a soft cloth and mild soap. -
Page 103: Secclon Mill Mantenimiento Della Maquina Cambiando La Bombilta
SECCION VIII. MANTENIMIENTO DEL LA PARTIE VIII. ENTRETIEN DE VOTRE MACHINE MAQUINA NOTA" REMARQUE: * Desenchufe la m_quina. DSbranchezla machine. * No desmonte la m_,quina de ninguna otra forma que la explicada Ne d_montez rien d'autre que ce qui est d_crit dans ce chapitre, en esta seccion. -
Page 104: Cleaning The Hook Race And Feed Dogs
Cleaning the Shuttle Race and Feed Dogs Unplug the machine and remove the presser foot and needle. Remove the screw on the left side of the needle p!ate with a screwdriver Remove the needle plate (D and take out the bobbin, Q Needle plate Lift up the bobbin holder (_) and remove it. -
Page 105: Limpieza Del Garlic Y Los Dientes Del Transporte
Limpieza del gairfio Y los dientes del transporte Nettoyage de la coursibre et des griffes d'entraTnement Desenchufe la m&quina y quite et pie prensatetas y la aguja D_=branchez la machine et retirez f'aiguille et le pied presseur. Retirez Destornilie el torni!lo que sujeta la place de aguja con un lavis situ_e du e6t_ gauche de la plaque &... -
Page 106: Troubleshooting
Troubleshooting Reference Cause Condition Page 26 The needle thread t. The needle thread is not threaded properly Page 28 breaks° 2. The needle thread tension istoo tight. 3o The needle is bent or blunt, Page 10 Page lO 4, The needle is incorrectly inserted. 5, The needle thread and the bobbin thread are not set properly Page 26 under the presser foot when sewing is starting... - Page 107 Soluciones para problemas de funcionamiento Condicion Causa Probable Referencia 1..El hilo de la aguja no se ha enhebrado correctamenteo P_gina 27 Se rompe el hito de 2. La tensi6n det hito de la aguja es excesivao P&gina 29 la aguja. &...
- Page 108 En cas de problbme Problbme Cause R_f_rence Page27 Le fil de el aigutlle se 1. Le fil de I'aiguille n'est pas enfii_ correctementL Page 29 2, La tension du fii aiguille est trop forte.. C_sse. Page11 3. L'aiguille est tordue ou 6mouss_eo Page11 4.
- Page 110 Bobiaa ordinaria [_ any 1t0/120 volt A,C. wall outlet° 3, Your Kenmore sewing machine has been thoroughly oiled at the factory. Be sure to wipe off the needle cover arch, bed plate and shuttle carefully before sewing a garment. Practice on a scrap of...
- Page 111 i,ii iiii1,,11,1,1111,1 CAREFREE STITCHING LE PLAISIR DE CO UDRE NEEDLE SHUTTLE THREADING depends on the BIG NAVETTE ENFILAGE ddpend des GRANDS AIGUILLE LANZADERA ENHEBRADO depende de las GRANDES AGUJA ,ll H, ,,ll H, lll,iu =,llllllr,r,, NEEDLE #'.,)SHUTTLE AIGUILLE AGUJA K_Clean around the shuttle and feed dogs to remove accumulated dust and Iint which NAVETTE...
- Page 112 AVANCE sluggish, oil your machine Periodically oil at points indicated (MATERLAL NO AVANZA BIEN) in your instruction book, USE ONLY KENMORE SEWING MACHINE OiL Check drop feed .Check handwheel L UBRIFICATION lever,, V&ijiez Ia volant...
-
Page 113: Boutonniere
PRACTICAL STITCH CHART TABLEAU SYNOPTIQUE REFEI_NCIA DE PUNTADA STITCH 1. SELECTOR 2. LENGTH CONTROL 3, WIDTH CONTROL4. TEN_ONCONTROL5. PRESSER FOOT POINT 1o SELECTEUR 2, LONGUEUR 3. LARGEUR 4. TENSION DU FIL 5_PIED DE-BIUHI PUNTADA 2. CONTROL DE LARGO 3.C0NTROLDEAVCI/0 4.CON_0LDET_SION 5. PIEPRENSATEI_ I.SELECTOR STRAIGHT RED ZONE... - Page 114 iiiiil=llUH i lU,Nu,u i UUUlU In U.S.A or Canada for in-home major brand repair service: Call 24 hours a day, 7 days a week 1-800-4-MY-HOM E" (1-800-469-4663) Para pedir servicio de reparaci6n a domicilio - 1-800-676-5811 Au Canada pour tout le service ou les pi_ces - 1-800-469-4663 For the repair or replacement parts you need: Call 6 am - 11 pm CST, 7 days a week...