Table of Contents
Advertisement
Quick Links
Advertisement
Table of Contents

Related Manuals for Nokia Image Viewer SU-5


Summary of Contents for Nokia Image Viewer SU-5
- Page 1 User Guide for Nokia Image Viewer SU-5 9356196 Issue 1...
- Page 2 Nokia reserves the right to revise this document or withdraw it at any time without prior notice. Under no circumstances shall Nokia be responsible for any loss of data or income or any special, incidental, consequential or indirect damages howsoever caused.
-
Page 3: Table Of Contents
Introduction......................5 Technical data .............................. 5 1. Overview......................8 2. Using the Nokia Image Viewer for the first time .........12 Switching the power on and off ......................15 3. Using the Nokia Image Viewer ...............15 Nokia Image Viewer memory and picture formats ................15 Before using the Nokia Image Viewer ....................16... -
Page 4: For Your Safety
IR devices. The remote control is a Class 1 Laser product. CHARGERS AND BATTERIES Check the model number of any charger before use with this device. The Nokia Image Viewer is intended for use with the following chargers: ACP-8, ACP-9 and ACP-12 and with standard AAA batteries. -
Page 5: Introduction
Introduction The Nokia Image Viewer SU-5 enables you to view a single picture or a set of pictures on a TV screen or compatible video projector. Nokia Image Viewer can display pictures that you have stored in a compatible phone or in an optional MMC card. - Page 6 C to 55 • Compatibility with image display devices: The Nokia Image Viewer is compatible with the PAL and NTSC standards. You can also connect the Nokia Image Viewer to a compatible video projector through an AV connector. SECAM TV sets require a special adapter that is not supplied in the sales package.
- Page 7 When the batteries are running out of power, a low battery icon is displayed on the TV screen and the Nokia Image Viewer switches off after 3 minutes. You can wake up the Nokia Image Viewer by pressing any control button on the main unit or the remote control.
-
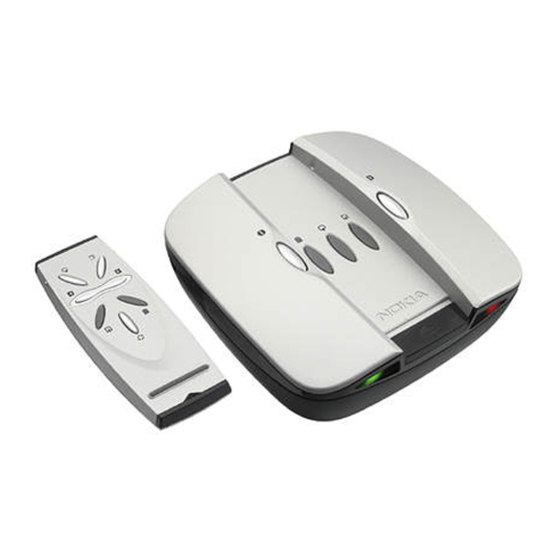
Page 8: Overview
7. Save button 8. Power status indicator light (red) The red light is shown when the Nokia Image Viewer is on. The light blinks when the Nokia Image Viewer transfers images from a connected phone. 9. Charger indicator light (green) The green light is shown when the Nokia Image Viewer uses the charger instead of the batteries as a power source. - Page 9 • Press and hold - press and hold down a button for at least three seconds Indicators on the display Powering on/off The Nokia Image Viewer could not find the default image folder in the phone. The default image folder in the phone is empty.
- Page 10 The phone memory has been selected. The MMC card is full. The MMC card is incompatible. The Nokia Image Viewer has successfully saved an image or images to the MMC card. If slide show not running, appears when slide show key pressed briefly.
- Page 11 Nokia Image Viewer to the charger. Incompatible charger Confirm delete - to delete hold the button for over three seconds The image was successfully deleted from the Nokia Image Viewer or from the MMC card, depending on the selected memory. An error occurred Action successful ©...
-
Page 12: Using The Nokia Image Viewer For The First Time
2. Using the Nokia Image Viewer for the first time 1. Open the main unit by pushing the release bar (1). Note: Always switch the power off and disconnect the device from the charger ot any other enhancement before opening the unit. - Page 13 8. Install the remote control battery as shown in the picture below. The Nokia Image Viewer remote control uses the provided CR2032 button battery as a source of power. If the remote control battery is out of power, you ©...
- Page 14 If you are using a wide screen TV set, the TV screen should be set to a 4/3 ratio. 12.Open the RCA input channel in the TV. The Nokia logo is shown on the TV screen when the correct channel is opened.
-
Page 15: Switching The Power On And Off
Nokia Image Viewer memory and picture formats The Nokia Image Viewer supports JPEG and GIF format images with a maximum size of 1600 * 1200 pixels. The Nokia Image Viewer scales the images so that they fit optimally on the TV screen. -
Page 16: Before Using The Nokia Image Viewer
"DCF" folder of the MMC. When you store images from a phone in the MMC card in the Nokia Image Viewer, the images are stored in the "Images" folder, or, if no such folder is found, in the root directory. Although the Nokia Image Viewer scales images before displaying them, it saves them to the MMC card in their original format. -
Page 17: Selecting The Memory
Nokia Image Viewer: 1. The Nokia Image Viewer is switched on and the Nokia logo is displayed on your TV screen. 2. If you are using the remote control, it must be within a maximum of 7 meters of the main unit and there must be no obstructions, between the IR ports of the main unit and the remote control. -
Page 18: Viewing Images
You cannot change the interval from the main unit. 3. To stop the slide show, press on the remote control or press and hold the main unit. © Copyright 2004 Nokia. All rights reserved. -
Page 19: Rotating Images
Note that the slide show must be on. If the slide show is not on, only the displayed image is saved. Before saving the images, the Nokia Image Viewer checks that the MMC card has room for them. If the entire slide show does not fit in the MMC card, the icon is displayed and none of the images are saved. -
Page 20: Deleting Images
Care and maintenance Treat your Nokia Image Viewer with care. The suggestions below will help you to enjoy the product for many years. • Keep all enhancements out of the reach of small children. • Use the Nokia Image Viewer indoors only.