Table of Contents
Advertisement
Advertisement
Table of Contents

Related Manuals for DieHard 2871222


Summary of Contents for DieHard 2871222
- Page 1 OPERATOR’S MANUAL 12V Battery Charger & Engine Starter Model No. 71222 Read and follow all Safety Rules and Operating Instructions before Every Use of this Product. SAVE THESE INSTRUCTIONS. Sears Brands Management Corporation, Hoffman Estates, IL 60179 U.S.A. 00-99-001009/01...
-
Page 2: Table Of Contents
This warranty gives you specific legal rights, and you may also have other rights which vary from state to state. Sears Brands Management Corporation, Hoffman Estates, IL 60179 FOR CUSTOMER ASSISTANCE OR REPLACEMENT PARTS, CALL TOLL-FREE FROM 7 AM TO 5 PM CT... -
Page 3: Important Safety Instructions
IMPORTANT: READ AND SAVE THIS SAFETY AND INSTRUCTION MANUAL. SAVE THESE INSTRUCTIONS – The 71222 offers a wide range of features to accommodate your needs. This manual will show you how to use your charger safely and effectively. Please read, understand and follow these instructions and precautions carefully, as this manual contains important safety and operating instructions. -
Page 4: Personal Precautions
To reduce the risk of electric shock, unplug the charger from the outlet before attempting any maintenance or cleaning. Simply turning off the controls will not reduce this risk. Do not operate the charger with a damaged cord or plug; have the cord or plug replaced immediately by a qualified service person. -
Page 5: Preparing To Charge
Wear complete eye and body protection, including safety goggles and protective clothing. Avoid touching your eyes while working near the battery. 2.10 If battery acid contacts your skin or clothing, immediately wash the area with soap and water. If acid enters your eye, immediately flood the eye with cold running water for at least 10 minutes and get medical attention right away. -
Page 6: Dc Connection Precautions
DC CONNECTION PRECAUTIONS Connect and disconnect the DC output clips only after setting all of the charger switches to the “off” position (if applicable) and removing the AC plug from the electrical outlet. Never allow the clips to touch each other. Attach the clips to the battery and chassis, as indicated in sections 6 and 7. -
Page 7: Follow These Steps When Battery Is Outside Vehicle
FOLLOW THESE STEPS WHEN BATTERY IS OUTSIDE VEHICLE A SPARK NEAR THE BATTERY MAY CAUSE A BATTERY EXPLOSION. TO REDUCE THE RISK OF A SPARK NEAR THE BATTERY: Check the polarity of the battery posts. The POSITIVE (POS, P, +) battery post usually has a larger diameter than the NEGATIVE (NEG, N, -) post. -
Page 8: Assembly Instructions
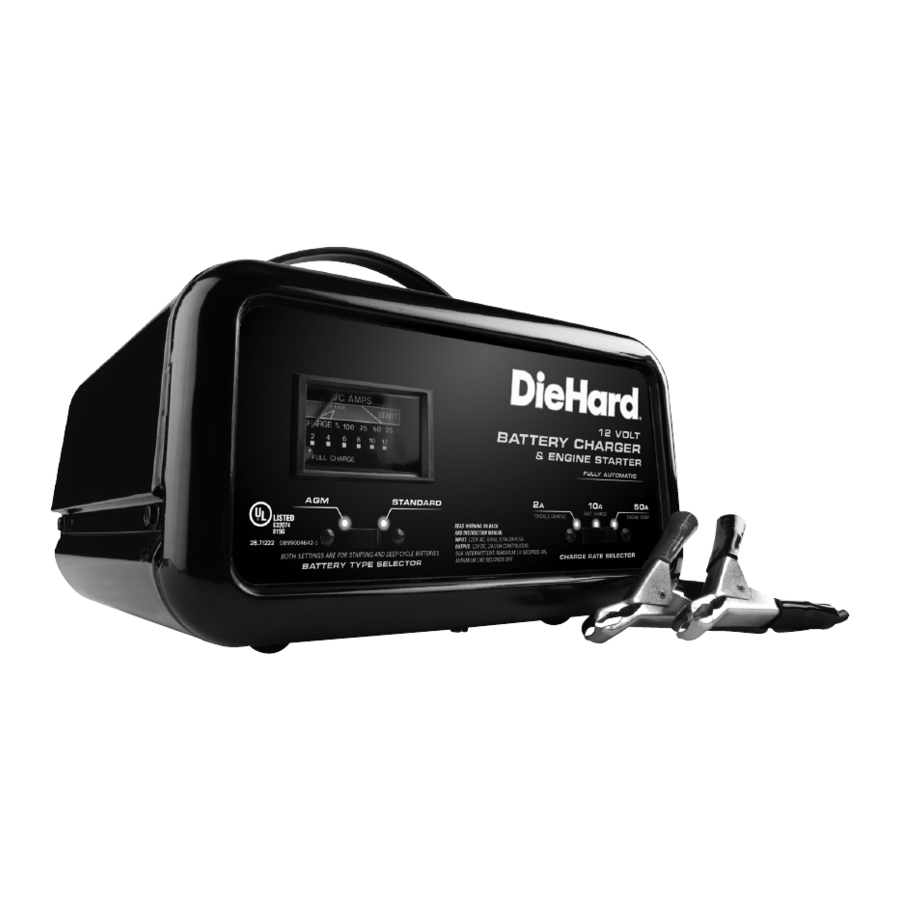
Recommended minimum AWG size for extension cord: • 100 feet long or less - use a 14 gauge extension cord. • Over 100 feet long - use a 10 gauge extension cord. ASSEMBLY INSTRUCTIONS Remove all cord wraps and uncoil the cables prior to using the battery charger. FEATURES /CONTROL PANEL Ammeter Battery Type Selector Switch... -
Page 9: Operating Instructions
Charge Rate Selector Switch: Use the Charge Rate Selector switch to select the charge rate setting you require. OPERATINg INSTRUCTIONS This battery charger must be properly assembled in accordance with the assembly instructions before it is used. The charger does not have an On/Off switch. The On and Off commands are controlled by plugging the 71222 into a 120V AC electrical wall outlet only after the battery connections have been made. -
Page 10: Calculating Charge Time
CALCULATINg CHARgE TIME Use the following table to more accurately determine the time it will take to bring a battery to full charge. First, identify where your battery fits into the chart. CCA = Cold Cranking Amps RC = Reserve Capacity AH = Amp Hour NR means that the charger setting is NOT RECOMMENDED. -
Page 11: Troubleshooting
TROUBLESHOOTINg PROBLEM POSSIBLE CAUSE REASON/SOLUTION The charger will not turn on, Charger is not plugged in. Plug the charger into an AC there is no reading on the outlet. ammeter or the charger is not charging the battery. No power at the receptacle. Check for open fuse or circuit breaker supplying AC outlet. - Page 12 PROBLEM POSSIBLE CAUSE REASON/SOLUTION The charger is making an Circuit breaker is cycling. The settings may be wrong. audible clicking sound. Check the charger settings. Battery is defective. Have the battery checked. Shorted battery cables or Circuit breaker cycles when clips.
-
Page 13: Before Returning For Repairs
BEFORE RETURNINg FOR REPAIRS 16.1 When a charging problem arises, make certain that the battery is capable of accepting a normal charge. Double check all connections, the AC outlet for a full 120 volts, the charger clips for correct polarity and the quality of the connections from the cables to the clips and from the clips to the battery system.
Need help?
Do you have a question about the 2871222 and is the answer not in the manual?
Questions and answers