M-Audio Delta 1010 Manual
Digital recording system
Hide thumbs
Also See for Delta 1010:
- Quick start manual (10 pages) ,
- User manual (45 pages) ,
- User manual (6 pages)
Table of Contents
Advertisement
Delta 1010 Manual
version: Delta1010112000
Table of Contents
Introduction . . . . . . . . . . . . . . . . . . . . . . . . . . . . . . . . . . . . . . . . . . . . . . . . . . . . . . .2
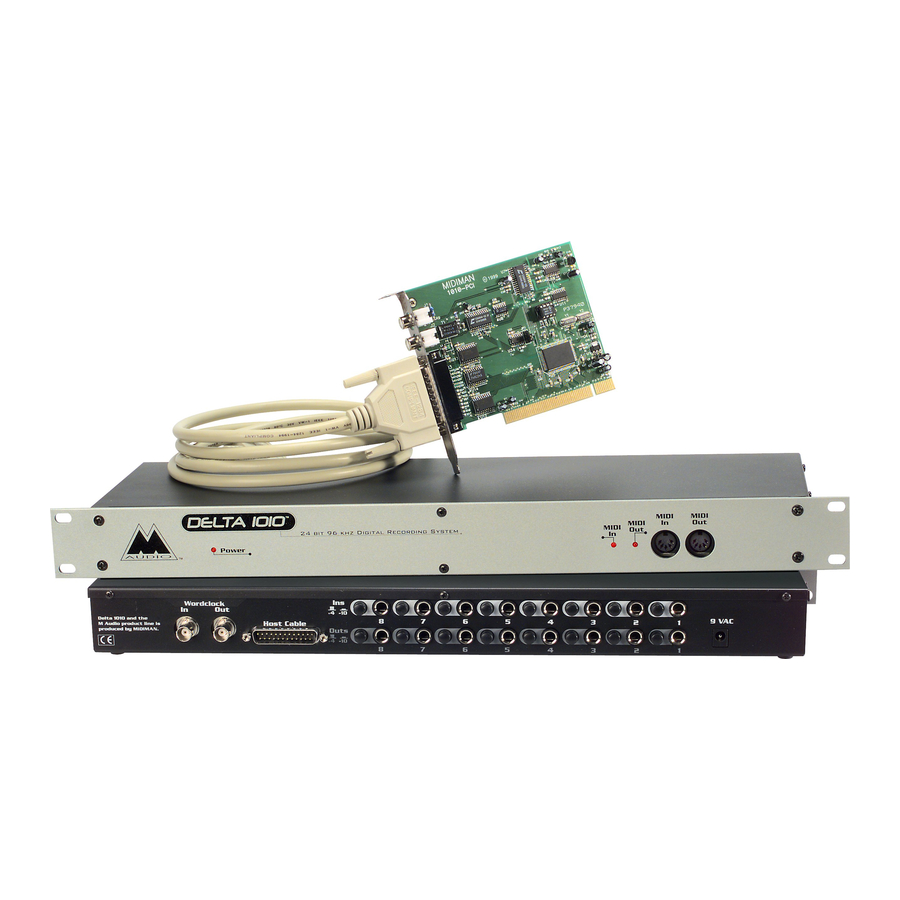
What's in the Box? . . . . . . . . . . . . . . . . . . . . . . . . . . . . . . . . . . . . . . . . . . . . . . . . . .2
About the Delta 1010 Digital Recording System . . . . . . . . . . . . . . . . . . . . . . . . . . . .2
Product Features & Specifications . . . . . . . . . . . . . . . . . . . . . . . . . . . . . . . . . . . . . .3
Minimum System Requirements . . . . . . . . . . . . . . . . . . . . . . . . . . . . . . . . . . . . . . . .3
Rack Unit Front Panel: . . . . . . . . . . . . . . . . . . . . . . . . . . . . . . . . . . . . . . . . . . . . . . .4
Rack Unit Back Panel: . . . . . . . . . . . . . . . . . . . . . . . . . . . . . . . . . . . . . . . . . . . . . . .4
PCI Host Adapter Card: . . . . . . . . . . . . . . . . . . . . . . . . . . . . . . . . . . . . . . . . . . . . . .5
Hardware Installation . . . . . . . . . . . . . . . . . . . . . . . . . . . . . . . . . . . . . . . . . . . . . . . .5
Delta Driver Software Installation . . . . . . . . . . . . . . . . . . . . . . . . . . . . . . . . . . . . . .6
Windows 98 Installation . . . . . . . . . . . . . . . . . . . . . . . . . . . . . . . . . . . . . . . . . .6
Windows 95 Installation . . . . . . . . . . . . . . . . . . . . . . . . . . . . . . . . . . . . . . . . . .7
Windows NT Installation . . . . . . . . . . . . . . . . . . . . . . . . . . . . . . . . . . . . . . . . .8
Macintosh Installation . . . . . . . . . . . . . . . . . . . . . . . . . . . . . . . . . . . . . . . . . . . .8
Verifying Windows Driver Installation . . . . . . . . . . . . . . . . . . . . . . . . . . . . . . . . . .10
Verifying Delta Control Panel Software Installation, PC and Mac . . . . . . . . . . . . . .11
Delta System Basics . . . . . . . . . . . . . . . . . . . . . . . . . . . . . . . . . . . . . . . . . . . . . . . .11
Delta's Analog Inputs/Outputs . . . . . . . . . . . . . . . . . . . . . . . . . . . . . . . . . . . . .11
The Digital Monitor Mixer . . . . . . . . . . . . . . . . . . . . . . . . . . . . . . . . . . . . . . .12
The Patchbay / Router . . . . . . . . . . . . . . . . . . . . . . . . . . . . . . . . . . . . . . . . . . .12
Synchronization . . . . . . . . . . . . . . . . . . . . . . . . . . . . . . . . . . . . . . . . . . . . . . .12
Using the Delta 1010 with your Music Software Application . . . . . . . . . . . . . . . . .14
Delta 1010 Control Panel Software . . . . . . . . . . . . . . . . . . . . . . . . . . . . . . . . . . . . .17
Monitor Mixer Page . . . . . . . . . . . . . . . . . . . . . . . . . . . . . . . . . . . . . . . . . . . .18
Patchbay/Router Page . . . . . . . . . . . . . . . . . . . . . . . . . . . . . . . . . . . . . . . . . . .20
Hardware Settings Page . . . . . . . . . . . . . . . . . . . . . . . . . . . . . . . . . . . . . . . . .22
S/PDIF Page . . . . . . . . . . . . . . . . . . . . . . . . . . . . . . . . . . . . . . . . . . . . . . . . . .26
About Page . . . . . . . . . . . . . . . . . . . . . . . . . . . . . . . . . . . . . . . . . . . . . . . . . . .27
Save, Delete, Load Buttons; H/W Installed . . . . . . . . . . . . . . . . . . . . . . . . . . .27
Delta 1010 Recording Tutorials . . . . . . . . . . . . . . . . . . . . . . . . . . . . . . . . . . . . . . .28
Typical Setup #1 . . . . . . . . . . . . . . . . . . . . . . . . . . . . . . . . . . . . . . . . . . . . . . .28
Typical Setup #2 . . . . . . . . . . . . . . . . . . . . . . . . . . . . . . . . . . . . . . . . . . . . . . .35
Typical Setup #3 . . . . . . . . . . . . . . . . . . . . . . . . . . . . . . . . . . . . . . . . . . . . . . .38
Transferring from DAT to Delta 1010 . . . . . . . . . . . . . . . . . . . . . . . . . . .39
Transferring from 1010 to DAT, monitoring with DAT . . . . . . . . . . . . . .40
Troubleshooting . . . . . . . . . . . . . . . . . . . . . . . . . . . . . . . . . . . . . . . . . . . . . . . . . . .42
Troubleshooting Tips for Frequently Asked Questions . . . . . . . . . . . . . . . . . . . . . .45
Appendix A - Technical Specs . . . . . . . . . . . . . . . . . . . . . . . . . . . . . . . . . . . . . . . .47
Appendix B - If You Use An External Mixer... . . . . . . . . . . . . . . . . . . . . . . . . . . . .48
Limited Lifetime Warranty . . . . . . . . . . . . . . . . . . . . . . . . . . . . . . . . . . . . . . . . . . .50
Advertisement
Table of Contents
Troubleshooting

Related Manuals for M-Audio Delta 1010


Summary of Contents for M-Audio Delta 1010
-
Page 1: Table Of Contents
Delta 1010 Control Panel Software ........ -
Page 2: Introduction
8kHz to 96kHz. Connect a line-level signal from your instrument, mixer, or pre-amp to the Delta 1010’s TRS jacks on the rear of the rack-mount unit. Match the operating line level of your inputs and outputs using the individual +4/-10 switches. -
Page 3: Product Features & Specifications
Within the Delta 1010’s PCI chip is a hardware digital mixer. Controlled by the included Delta Control Panel software, it may handle all of your routing needs, give you extra control of all left, right and stereo levels, in addition to control of pans, solos, and mutes. -
Page 4: Rack Unit Front Panel
7. Word Clock Out: This female BNC connector outputs a word clock signal that is in-sync with the present sample rate clock of the Delta 1010. The output circuitry is designed to drive a word clock signal across 75-ohm coaxial cables and into a device with 75-ohm termination. -
Page 5: Pci Host Adapter Card
5. Remove the metal bracket that covers the access hole on the back of the computer. This bracket is usually fastened to the computer with a single screw. 6. Position the Delta 1010 PCI host card over the target PCI slot and fit the card... -
Page 6: Delta Driver Software Installation
Doing so could damage the PCI card and void the warranty. Now it is time to connect the Delta 1010 rack-mount unit to the PCI host card that you have just installed. With your computer turned off: 1. -
Page 7: Windows 95 Installation
After completion of the driver installation, Windows may require you to restart Windows. If it does request a restart, remove the Drivers CD Disk from the CD drive and respond “Yes”. The system will restart and your Delta 1010 is ready for play. -
Page 8: Windows Nt Installation
After completion of the driver installation, Windows may require you to restart Windows. If it does request a restart, remove the Drivers CD Disk from the CD drive and respond “Yes”. The system will restart and your Delta 1010 is ready for play. - Page 9 6. Go to the Apple menu |Control Panel | Sound. You should see the “built-in” sound icon, plus the Delta icon if your Delta 1010 is properly installed. If your music program does use ASIO, leave the Sound Manager driver set to "built- in"...
-
Page 10: Verifying Windows Driver Installation
Manager device list. The Delta 1010 is properly installed with no conflicts, as is the WINMAN 4x4/S. If you do not see your M Audio Delta 1010 in your Device Manager in this fashion, please jump ahead to the "Troubleshooting" section of... -
Page 11: Verifying Delta Control Panel Software Installation, Pc And Mac
In Windows, open the Windows Control Panel (do so via Start | Settings | Control Panel ). If your Delta 1010 hardware and Delta Control Panel software are properly installed, the Windows Control Panel should display an "M Audio Delta H/W"... -
Page 12: The Digital Monitor Mixer
(such as the Midiman "Audio Buddy™") and then connect the pre-amp output to the input of the Delta 1010. All analog jacks on the Delta 1010 rack-mount chassis are of the 1/4" TRS (Tip- Ring-Sleeve) variety. The TRS jacks allow connection to either balanced (typically professional) or unbalanced (typically consumer) connections. - Page 13 – an S/PDIF data stream coming from an external source is rarely going to be in sync with the Delta 1010 (or other digital audio devices in the system for that matter), even if the sample rates are set the same. If the master clock were set to use the internal crystal, then the incoming S/PDIF audio would have "pops,"...
-
Page 14: Using The Delta 1010 With Your Music Software Application
Using the Delta 1010 with your Music Software Application Once the Delta 1010’s hardware and driver software are properly installed, it is ready for use with your music application software. Some of these applications may require you to highlight or enable the Delta 1010 drivers within the program, and others may have a utility that analyzes or profiles the audio cards in your system and enables the drivers. - Page 15 Instead they are connected to the Delta 1010’s internal patchbay/router and may be sent to one of many destinations. For more on the patchbay/router, see the Patchbay/Router section of the Delta Control Panel software discussion.
- Page 16 Analog 7/8 Delta-1010 S/PDIF L/R Delta-1010 MIDI DRIVERS: The Delta 1010 MIDI drivers, once enabled in your software’s MIDI Setup, will appear as a MIDI source and a MIDI port within that program’s track configuration windows. The MIDI input driver is named "MIDI In Delta-...
-
Page 17: Delta 1010 Control Panel Software
WINDOWS MULTIMEDIA SETTINGS: Windows may be set up to use the Delta 1010 as its default audio device, allowing system sounds to be sent out the Delta 1010. This also enables you to use the Delta 1010 with the sound applets included with Windows. -
Page 18: Monitor Mixer Page
The Monitor Mixer is the first page that appears when the Delta Control Panel is opened, and controls the digital mixer built into the Delta 1010’s PCI controller chip. As described in previous sections, the output of this mixer may be assigned to the OUT1/OUT2 analog outputs and/or the S/PDIF Out digital output (this selection is made in the Patchbay Router page). - Page 19 (you might use the monitoring capability of the Delta 1010 to let your ears be the judge). On all output level meters, 0dB indicates full-scale output.
-
Page 20: Patchbay/Router Page
Further to the right are more channels, labeled "H/W In S/PDIF" and "H/W In 1/2" through "H/W In 7/8." These mixer inputs are audio streams from the physical Delta 1010 hardware inputs, hence the "H/W" at the front of each label. These labels are consistent on both the Mac and PC. - Page 21 3. The third option, "S/PDIF In", connects ports OUT1 and OUT2 directly to the hardware S/PDIF input on the Delta 1010 PCI host card. The left channel of the S/PDIF In is routed to OUT1 and the right channel of the S/PDIF In is routed to OUT2.
-
Page 22: Hardware Settings Page
Windows multimedia applet. In other words, when music software plays audio to the device named "WavOut S/PDIF Delta-1010" it will be routed directly to the hardware S/PDIF output on your Delta 1010 PCI host card. 2. The second option, "Monitor Mixer", connects the S/PDIF Out port to the outputs of the Delta 1010 monitor mixer. - Page 23 This means that any application that attempts to open the Delta 1010 driver at a sample rate other than the one selected here will fail to do so and will post an error message. "Reset Rate When Idle" is selected when you want the sample rate to return to a particular setting when a software application is not actively using the board.
- Page 24 Delta Control Panel before you launch your music software. When using ASIO with the Delta 1010, set the buffer size in the control panel, then exit the control panel. After doing so, launch your music software.
- Page 25 Sound Manager settings in the Delta Control Panel will have no effect. The Sound Manager driver limits you to using only one of the Delta 1010 stereo input pairs for audio input and only one of the stereo output pairs for output.
-
Page 26: S/Pdif Page
"S/PDIF" tab of the Delta Control Panel software. DIGITAL INPUT: This group box displays the current S/PDIF input status. The Delta 1010’s S/PDIF receiver is capable of recognizing a valid input signal versus an invalid, corrupt or non-present one. When a valid signal is detected at S/PDIF In, this group box displays "Valid Input Detected."... -
Page 27: About Page
CONSUMER FORMAT ADVANCED SETTINGS (Emphasis): This status bit is used to indicate if pre-emphasis has been applied to the outgoing digital audio signal. The default is "None" and rarely will any user want to set the value to "50/15uSec" unless the transmitted audio has been encoded with 50/15uSec pre-emphasis. -
Page 28: Delta 1010 Recording Tutorials
Delta device, and of course the sound Manager will support only one stereo pair regardless of how many audio cards are installed in your system. The H/W Installed list will display “Delta 1010 as the active device in the control panel”. - Page 29 1. Plug the guitar into the channel-1 Line input of the pre-amp. Plug the microphone into the channel-2 Mic input. 2. Plug the outputs 1 & 2 of the pre-amp into the Delta 1010’s analog inputs 1 & 2. Both are balanced outputs and inputs (respectively), so use a high quality TRS cable.
- Page 30 5. Open the Delta Control Panel by double clicking the icon in your Windows Control Panel, and then click on the ‘Hardware Settings’ tab. 6. Select ‘Internal Xtal’ as the master clock source. This allows the Delta 1010 to derive its sample rates from its internal clock oscillator. ‘Internal Xtal’ is the default setting for the Delta Control Panel, so selecting it may not be necessary (it may already be selected).
- Page 31 Select the "Monitor Mixer" tab of the Delta Control Panel. The default Master Volume fader settings are 0dB and unmuted, and all other faders are set to full attenuation (-144dB) and muted. We will need to adjust these to our preference. The screen capture on the next page shows the settings that we wish to achieve.
- Page 32 – these levels are merely monitor levels that appear in the mixer outputs (in this case at Delta 1010 analog outs 1 & 2). Click on the left fader handle of H/W In 1/2, and drag it about halfway up. Strum the guitar. If it’s not loud enough, bring it up all of the way.
- Page 33 Now is the time to launch your music software and set it up to record and playback audio tracks. We’re going to speak in general terms here, since setup within software programs will vary somewhat. Minimize your Delta Control Panel so that you can easily access it from your Windows taskbar. Then open your music software program.
- Page 34 Before playing back what you’ve recorded, you will need to assign the newly recorded tracks to output devices on the Delta 1010. In your software, set the output ports of tracks three and four to "WavOut 3/4 Delta-1010." Pan track three all of the way to the left (hard left), and pan track four hard right.
-
Page 35: Typical Setup #2
Delta 1010. A discussion of mixing consoles and their use will follow in Appendix B. For simplicity in this example we’ll use pre-amps to get the signal to the Delta 1010, and a mixer connected to a sound system to handle the multiple outputs. - Page 36 1010. Usually pre-amp outputs are balanced, so if they are, use TRS cables and set the Delta +4/-10 input switches to the +4dB setting. 3. Plug the hardware outputs 1-8 of the Delta 1010 into your mixer’s inputs 1-8 (using 1-8 is recommended for convenience, but not necessary). Some mixers run at –10 line level, and some at +4.
- Page 37 Track one Left PCM In 1/2 Delta-1010 Track two Right PCM In 1/2 Delta-1010 Track three Left PCM In 3/4 Delta-1010 Track four Right PCM In 3/4 Delta-1010 Track five Left PCM In 5/6 Delta-1010 Track six Right PCM In 5/6 Delta-1010 Track seven Left PCM In 7/8 Delta-1010 Track eight...
-
Page 38: Typical Setup #3
-- you may even choose to turn your computer off before making the connections. In this example, we will connect a DAT to the Delta 1010 PCI Host card using coaxial S/PDIF cables (75-ohm impedance RCA-to-RCA). We’ll also connect the 1010’s analog outputs to a sound system for monitoring purposes. -
Page 39: Transferring From Dat To Delta 1010
Sound System Transferring from DAT to Delta 1010 1. Connect the DAT’s coaxial S/PDIF output to the S/PDIF In of the Delta 1010 PCI host card, using a good quality cable. 2. Connect the 1010 analog outputs 1 & 2 to some type of amplified sound system. -
Page 40: Transferring From 1010 To Dat, Monitoring With Dat
The sound system should be equipped with speakers or headphones. 3. Because you will be playing back at the recorded sample rate, you will want to set the Delta 1010’s master clock to use the 1010 internal crystal. Do this by... - Page 41 opening the Hardware Settings page of the Delta Control Panel software and under Master Clock, selecting "Internal Xtal." Also, under the Codec Sample Rate section you may uncheck "Rate Locked" if it is previously checked. This allows for more flexible sample rate playback. 4.
-
Page 42: Troubleshooting
Windows Device Manager. The Device Manager places a yellow exclamation point on top of the icon associated with the problem device. For an example of how the Device Manager should look when a Delta 1010 is successfully installed, see the "Verifying Windows Driver Installation" section of this manual. - Page 43 Look also for IRQs that are shared by more than one device. While the Delta 1010 may share an IRQ with some devices, not all devices are capable of sharing IRQs. An entry that reads "IRQ Holder for PCI Steering"...
- Page 44 You may view the list of assigned I/O addresses by selecting the "Input/output (I/O)" radio button below the "Interrupt Request (IRQ)" radio button at the top of the Device Manager page. I/O addresses are displayed as 16-bit hexadecimal numbers, therefore one might note that an address of 300h (the default address of the Winman 4X4/s, for instance), will read "0300"...
-
Page 45: Troubleshooting Tips For Frequently Asked Questions
Possible Cause 5: Improper connections of the audio accessories. Verify that the Delta 1010 analog audio outputs are properly connected to a digital mix deck or external mixer/amplifier, or the S/PDIF Out is connected to an external digital audio device capable of receiving S/PDIF. - Page 46 Possible Cause 2: If you are recording from the S/PDIF input, but you have the Delta 1010’s master clock set to something other than the S/PDIF input, you are recording an out-of-sync S/PDIF stream. This can result in lost or bogus samples being recorded.
-
Page 47: Appendix A - Technical Specs
Appendix A - Technical Specs Analog Audio Peak Analog Input Signal: +20.2dBu (+4dBu setting), +2.1dBV (-10dBV setting) Peak Analog Output Signal: +20.0dBu (+4dBu setting), +2.0dBV (-10dBV setting) Dynamic Range: Outputs: 108dB (a-weighted), Inputs: 109dB (a-weighted) THD (at 0dBFS): Outputs: less than 0.0015%, Inputs: less than 0.001% Frequency Response:... -
Page 48: Appendix B - If You Use An External Mixer
Appendix B - If You Use An External Mixer... Our main objective is to get the signal we want to record to the Delta 1010, and to monitor the outputs from the Delta 1010. The 1010 has a mixer contained on its chip that allows you to mix hardware inputs and software outputs and send it to an analog stereo output pair and/or the S/PDIF out. - Page 49 system in the form of "sub-mix outs." These are usually arranged in stereo pairs with a set of level control faders for each pair. This configuration can be effectively used for recording, as long as the record channels are taken out of the stereo buss.
-
Page 50: Limited Lifetime Warranty
Limited Lifetime Warranty MIDIMAN warrants that this product is free of defects in materials and workmanship under normal use so long as the product is: owned by the original purchaser; the original purchaser has proof of purchase from an authorized MIDIMAN dealer;... - Page 51 Notes:...
- Page 52 D1010-111700...
Need help?
Do you have a question about the Delta 1010 and is the answer not in the manual?
Questions and answers