
Related Manuals for Zoom Q2HD


Summary of Contents for Zoom Q2HD
- Page 1 User Guide Safety and Operation Precautions must be read before using the unit. © ZOOM CORPORATION Copying or reproduction of this User Guide in part or in whole without permission is prohibited.
-
Page 2: Items Included With This Product
Items included with this product • unit • 2 AA batteries (for testing the unit) Note: Use alkaline batteries or rechargeable NiMH batteries. • SD card • User Guide (this manual) HandyShare software for video editing and sharing Install HandyShare on your computer to use it. Access the included SD card from the computer and double-click the HandyShare installer on it. -
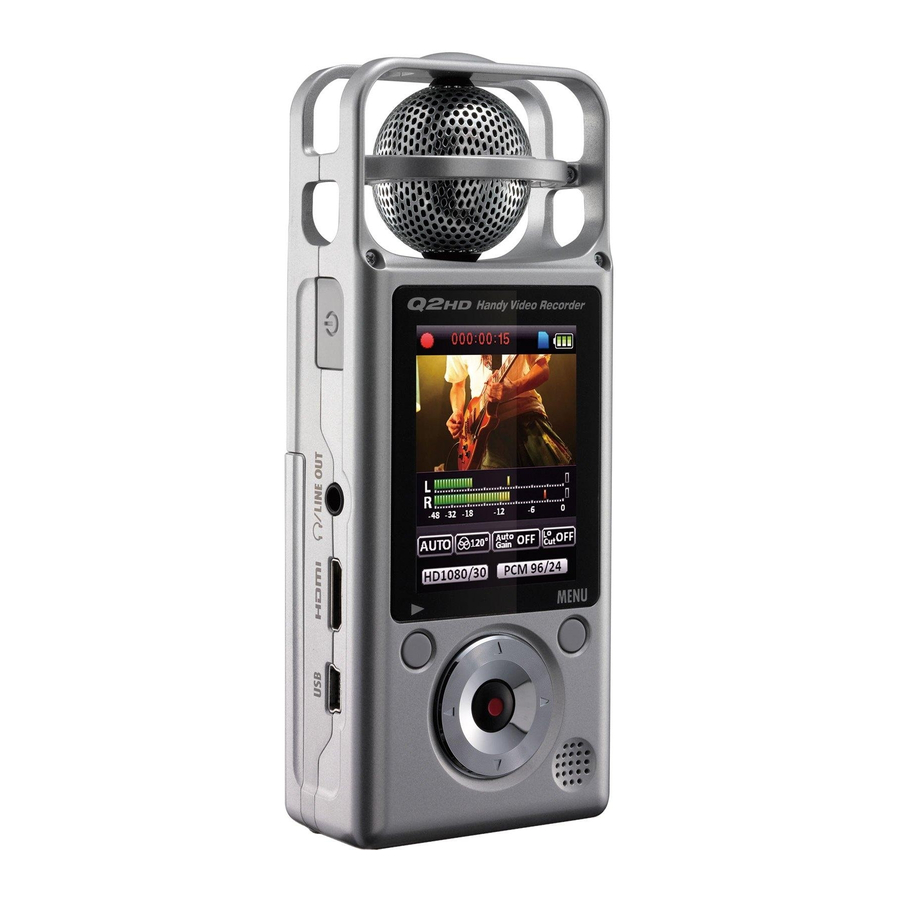
Page 3: Part Functions
Part functions ■ Parts of the unit Recording time or remaining recordable time for video or audio icon appears when an SD card is loaded in the unit (no icon if no SD card is loaded) Current operation status Input volume level Recording level setting Mic angle setting... - Page 4 Part functions (continued) ■ Parts of the unit Sound from the camera side of the unit can be recorded in mono or in stereo with a maximum width of 150º. View video and information about operation. Play and pause recorded video and Open various setting audio.
- Page 5 • Connect to a computer to power the recorder and use it as a card reader, USB mic or web camera. • Connect to an iPad to use as a USB mic. • A ZOOM AD-17 AC adapter (sold separately) can also be connected here.
-
Page 6: Setting The Date And Time
Setting the date & time The date and time are added to recorded video and audio files, so set it accurately before recording. Press to open the Main Menu. to select press SETTING to select Set Date and press to set the current date and time. -
Page 7: Formatting Sd Cards
Formatting SD cards You must format SD cards in the to make them usable with the recorder. Note: Formatting a card will permanently erase all data on it. Press to open the Main Menu. to select press SETTING to select SD Format and press to select “Yes”... -
Page 8: Reducing Noise
Reducing noise Turn the low-cut filter function on to reduce wind sounds and other noise. Press to open the Main Menu. to select press INPUT to select Lo Cut and press to select On or Off and press After completing the setting, press NOTE Use the windscreen included in the APQ- 2HD accessory package to further reduce... -
Page 9: Adjusting The Recording Level
Adjusting the recording level By changing the recording level gain, you can record anything from quiet sounds to loud rock shows at the optimal level. You can set the gain manually or let the recorder set it automatically. • Use the MIC GAIN dial to adjust the mic sensitivity to suit the recording conditions. - Page 10 Video scene setting You can set the camera light sensitivity to suit the video recording conditions. This allows the unit to record video optimally even in dark places and on stages with bright lights. Press to open the Main Menu. to select press SCENE...
-
Page 11: Setting The Image Quality
Setting the image quality You can set the resolution and frame rate used for recording. The amount of available recording time decreases as the image quality is increased. Press to open the Main Menu. to select press VIDEO to select the video quality and frame rate and press After completing the setting, press Setting... -
Page 12: Setting The Sound Quality
Setting the sound quality You can set the sound quality to use for recording video and audio. The amount of available recording time decreases as the sound quality is increased. Press to open the Main Menu. to select press SOUND to set the audio quality and press After completing the setting, press... - Page 13 Setting the mic angle You can set the stereo width recorded by the built-in stereo mic. Press to open the Main Menu. to select press to set the mic angle. MONO Record in mono 30°, 60°, 90°, 120°, 150° Record using the set stereo width After completing the setting, press NOTE You can also use...
- Page 14 “Low Speed Card!” appears on the screen and recording stops. To avoid this, we recommend using cards that are Class 4 or faster. Information about SD cards that can be used with this unit can be found at www.zoom.co.jp.
-
Page 15: Playing Recordings
Playing recordings You can play back recorded audio and video. When the main operation screen is open, press If you want to play a different file, to select it and press Functions of other buttons Adjust the volume Press and hold during playback to search backward/forward. -
Page 16: Deleting Recordings
Deleting recordings You can delete recorded video and audio files to increase the amount of open space on the media card. Press while the file that you want to delete is playing. • If you press this when on the main operation screen, the last recorded or played file will be selected for deletion. - Page 17 ■ Deleting multiple recordings at the same time Press when on the main operation screen or while playing to show the “Delete this file?” message. • Press again to open the file selection screen to select a recording that you want to delete and press Repeat step 2 as many times as necessary to select more files to delete.
-
Page 18: Editing Recordings
Editing recordings Recorded video and audio files can be divided and trimmed. Press to open the Main Menu. to select press FILE Thumbnails of the recorded files are shown. Use to select the file that you want to edit and press The editing menu opens. - Page 19 DIVIDE Change the file dividing point Play/pause Confirm the file dividing point TRIM (partial deletion) Move trim points to set how much of the file beginning/end to delete Switch between beginning and end trim points Play/pause Confirm the trim points INFORMATION (about the file) Return to the editing menu...
-
Page 20: Connecting External Devices
Connecting external devices This unit can be connected to various external devices as needed. ■ Connect to a computer (by USB) to use as a card reader, USB mic or Web camera Use a USB cable to connect to a computer or iPad. See "Connecting by USB"... -
Page 21: Connecting By Usb
Connecting by USB Connect with a computer using a USB cable to use this recorder as a card reader or USB mic. You can also use it as a web camera to stream video and audio. Connected to an iPad, you can use it as a USB mic. - Page 22 Connecting by USB (continued) ■ Using the recorder as a Web camera Connect the recorder to a Windows PC or Macintosh with a USB cable. Press to turn it on. • The USB operation screen will appear. to select the video icon and press After the connects to the...
- Page 23 • A driver stored on the included SD card is necessary to use the unit as a web camera. (This driver can also be down- loaded from www.zoom.co.jp.) • When connected as a web camera, you can use the functions, set the scene type and adjust the mic INPUT angle.
- Page 24 Using as a USB mic with an iPad You can use this recorder as a USB mic by connecting it to an iPad using an Apple Camera Connection Kit. Press to open the Main Menu. to select press to select the mic icon and press Use the Apple Camera Connection Kit to connect the recorder with an iPad by USB...
- Page 25 Display brightness/power saving You can adjust the brightness of the display and set the screen to turn off automatically to save power. Press to open the Main Menu. to select press SETTING to select Backlight and press 2,3,4,5 ■ Adjusting the display brightness to select Brightness and press to set the brightness and...
- Page 26 Setting HDMI video output Set the HDMI video output format to suit the TV. Press to open the Main Menu. to select press SETTING to select HDMI Out and press to select NTSC or PAL and press After completing the setting, press 2,3,4 NOTE NTSC is used in North America.
-
Page 27: Viewing Information
Viewing information You can check the firmware version and remaining recordable memory. Press to open the Main Menu. to select press SETTING to select Information and press Check the information. When you are done checking, press Restoring default settings You can reset the settings, including the scene type and video and audio quality, to their factory defaults. - Page 28 NOTE using the Information item in the Setting menu. • from www.zoom.co.jp. directory on the SD card. Insert the SD card into the unit’s card slot. While pressing and holding , press until the unit starts and the FIRMWARE UPDATE screen opens.
-
Page 29: Safety And Operation Precautions
This must not be done. WARNING ■ Power and batteries Use only a ZOOM AD-17 AC adapter (sold separately). Unplug the AC adapter when the unit will not be used for a long time. When using batteries, insert two commercially-available AA-size alkaline batteries or NiMH rechargeable batteries with the correct orientations. - Page 30 FCC regulation warning (for U.S.A.) This equipment has been tested and found to comply with the limits for a Class B digital device, pursuant to part 15 of the FCC Rules. These limits are designed to provide reasonable protection against harmful interference in a residential installation. This equipment generates, uses and can radiate radio frequency energy and, if not installed and used in accordance with the instructions, may cause harmful interference to radio communications.
- Page 32 ZOOM CORPORATION 4-4-3 Kanda-Surugadai, Chiyoda-ku, Tokyo 101-0062 Japan www.zoom.co.jp Q2HD-5000-1...
Need help?
Do you have a question about the Q2HD and is the answer not in the manual?
Questions and answers