Advertisement
Quick Links
Advertisement

Related Manuals for Ken A Vision TRIG X-1000-1


Summary of Contents for Ken A Vision TRIG X-1000-1
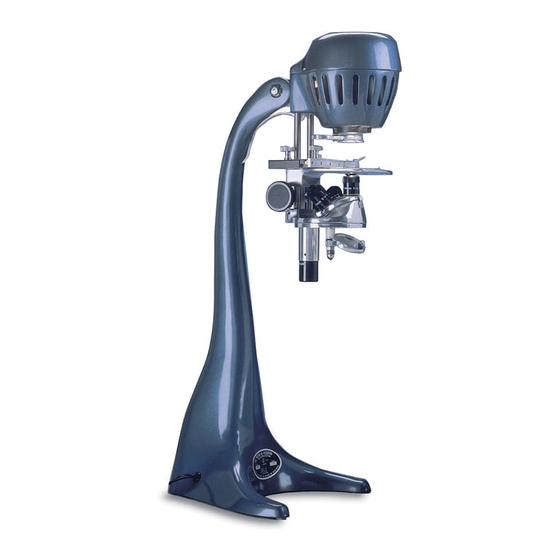
- Page 1 Microprojector Instruction Manual X-1000-1 TRIG...
-
Page 3: Table Of Contents
Table of Contents Using the Microprojector Setting up Microprojector Revolving the Dustproof Disk Table Projection Screen Projection - Direct Projection Horizontal Projection - Using the mirror To Polarize Light - Using the Microprojector as a polarizing microscope... -
Page 4: Using The Microprojector
Using the Microprojector General Notes: Your Microprojector is a very stable technology that has been available for many years but still incorporates many advances in the microprojection field. Uniquely, it will project an image either vertically or horizontally. For small groups or an individual, it is best to project vertically. - Page 5 Figure 1 Figure 2...
-
Page 6: Table Projection
Figure 3. Labeled diagram of Microprojector. 1. Light Source 5. Revolving Dustproof Disc 2. Revolving Polarizer Analyzer 6. Knurled Focusing Knob 3. Stage with Stage Clips 7. Red Line 4. 16mm Objective Lens 8. Mirror Table Projection: 1. Turn the switch to the "ON" position. 2. -
Page 7: Screen Projection- Direct Projection
the desktop. First lower the stage to the lowest position, and then reverse direction until the specimen is brought into focus. 8. To gain an additional 5X magnification, rotate the Revolving Dustproof Disk (5) until the RED "A" is under the red line (7) on the upper disk. Again feel the Revolving Disk "click"... -
Page 8: Horizontal Projection- Using The Mirror
8. To gain an additional 5X magnification, rotate the Revolving Dustproof Disk (5)until the RED "A" is under the red line (7) on the upper disk. Again feel the Revolving Disk "click" into position. 9. In general, the higher the magnification, the darker the room needs to be. -
Page 9: To Polarize Light - Using The Microprojector As A
desktop. First lower the stage to the lowest position, and then reverse direction until the specimen is brought into focus. 8. To gain an additional 5X magnification, rotate the Revolving Dustproof Disk (5) until the RED "A" is under the red line (7) on the upper disk. Again feel the Revolving Disk "click"... - Page 10 1. Turn the switch to the "ON" position. 2. Carefully rotate the entire head of the unit into a horizontal position. Do this by placing one hand on the base, just below the hinge joint to stabilize the base. Then position the head assembly with your other hand by pushing gently on THE BACK of two metal bars which support the stage and lens assembly.
- Page 12 geprufte PRODUCT SERVICE sicherhelt Ken-A-Vision reserves the right to make design improvements and other changes in accordance with the latest technology. There is no obligation to make changes in products already manufactured. Patents Pending Copyright 2010 Ken-A-Vision Corporation. 5615 Raytown Road • Kansas City, MO 64133 U.S.A. Tel.: 816-353-4787 •...
Need help?
Do you have a question about the TRIG X-1000-1 and is the answer not in the manual?
Questions and answers