Advertisement
Available languages
Available languages
Quick Links
Instruction Manual
I CRRFTSMRN°I
3.0 H.P.
ELECTRIC EDGER
Model No.
358,796520
• Safety
• Assembly
• Operation
• Maintenance
• Espahol
®
WARNING:
Read and follow all Safety Rules and Operating
Instructions
before first use of this product.
i_
For answers
to your questions
about this product:
Call 7 am-7
pm, Mon-Sat;
Sun, 10 am-7
pm
•
1-800-235-5878
(Hours listed are Central Time)
Sears, Roebuck
and Co., Hoffman
Estates,
IL 60179 U.S.A.
530088281
4/22/02
Advertisement

Related Manuals for Craftsman 358.796520


Summary of Contents for Craftsman 358.796520
- Page 1 Instruction Manual I CRRFTSMRN°I 3.0 H.P. ELECTRIC EDGER Model No. 358,796520 • Safety • Assembly • Operation • Maintenance • Espahol ® Read and follow all Safety Rules and Operating WARNING: Instructions before first use of this product. For answers to your questions about this product: Call 7 am-7...
- Page 2 FULL TWO YEAR WARRANTY ON CRAFTSMAN ELECTRIC EDGER If this Craftsman Electric Edger fails to perform properly due to a defect in material or workmanship within (2) two years from the date of purchase, Sears will replace it free of charge.
- Page 3 • Avoid unintentional starting oftheunit. • To reduce risk of electrical shock, use Never carry theunit w ith your f inger o n extension cords specifically marked as theswitch. Besure theswitch i snotin suitable for outdoor appliances having theonposition when c onnecting electrical rating not less than the rating extension cord.
- Page 4 • Use only Craftsman replacement • Have all maintenance and service not blades and accessories as recom- explained in this manual performed by mended for this unit.
- Page 5 LATED. The symbolFS] (square within a 4¢LWARNING: All electrical repairs square) may also be marked on the to this unit, including housing, switch, appliance. Failure to have the unit re- motor, etc., must be diagnosed and re- paired by Sears service personnel can paired by qualified servtce personnel.
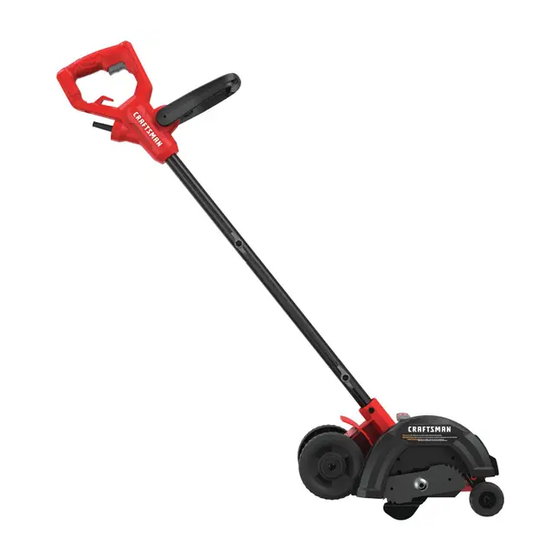
- Page 6 KNOW YOUR EDGER READ THIS INSTRUCTION MANUALAND SAFETY RULES BEFORE OPERATING YOUR UNIT. Compare the illustrations to your unit to familiarize yourself with the location of the various controls and adjustments. Save this manual for future reference. Control Handle Trigger Switch Pivot Locking Lever Blade Guard...
- Page 7 DEPTH ADJUSTMENT • Always r elease theswitch a nd allow motor tostop when not c utting. The front wheel can be adjusted to allow • Tostop themotor, release theswitch; for a deeper or shallower cut. Move the allow blade t ostop turning b efore r e- wheel up for a deeper cut, down for a moving itfrom thecut.
- Page 8 CUSTOMER RESPONSIBILITIES CARE & MAINTENANCE TASK WHEN TO PERFORM Before each use Check for loose fasteners and parts Before each use Check for damaged or worn parts After each use Inspect and clean unit and labels GENERAL RECOMMENDATIONS CHECK FOR DAMAGED OR WORN PARTS The warranty on this unit does not cover Contact your Sears Service Center for...
- Page 9 ACCESSORIES Front wheel ....530095125 Blade Guard ..... 530402859 Safety Glasses ... 71-85707 Edge guide ....530402865 Extension Cord (16 Guage) 71-85708 Rear axle ....530402876 Extension Cord (14 Guage) 71-85709 Front axle ....530402875 CUSTOMER SERVICEABLE PARTS Cup Washer (axle) ..530403500 Blade ....
- Page 10 ELECTR|CA DE LA MARCA CRAFTSMAN Siesta cortadora de bordes el_ctrica Craftsman <"_ dejara de funcionar apropiada- mente dado a defectos en material o mano de obra, durante (2) dos a5os, conta- dos desde la fecha original de compra, Sears la repondr& gratuitamente.
- Page 11 si es necesario. Asegure o remueva • Evite situaciones peligrosas. No use el la ropa suelta y joyas o ropa con ti- aparato en presencia de gases o liqui- ras, borlas, corbatas, etc. Estas pue- dos inflamables para evitar incendios, den enredarse en las piezas en mo- explosiones y/o dafios al aparato.
- Page 12 • Use Qnicamente cuchillas de repues- si6n como seilustrado enSEL, EC- to y los accesorios recomendados ClON DEL CABLE DE EXTENSION de la marca Craftsman para este lasecci6n M ONTAJE. Conecte el aparato. Nunca use alambre, cuer- cable deextensi6n alenchufe e mbu- da, hilo, etc.
- Page 13 • Mantenga lasruedas e ncontacto macenario; asegure el aparato antes con elsuelo. de transportarlo en un vehiculo. • Nolevante e laparato m &s arriba del • Guarde el aparato de mode que la suelo. Lacuchilla p odria acercarse cuchilla no pueda causar heridas ac- peligrosamente a sucuerpo.
- Page 14 CONTENIDO DE LA CAJA SELECCION DEL CABLE DE EXTEN- SION Verifique el contenido de la caja per la lista siguiente. Use 0nicamente suministro de voltaje Modelo 358.796520 de 120 A.C. como se muestra en la • Cortadora de Bordes placa del aparato. •...
- Page 15 CONOZCA SU APARATO LEA ESTE MANUAL DE INSTRUCCIONES O Y LAS REGLAS DE SEGURIDAD ANTES DE COMENZAR A USAR SU APARATO, Compare las ilustraciones a continuaci6n con las piezas de su aparato para familiarizarse con la Iocalizaci6n de los varios controles y ajustes.
- Page 16 AJUSTE DE PROFUNDIDAD La rueda delantera puede ser ajustada mom_ataReameRte despu_s de soltar el para permitir un corte m&s o menos interruptor. Detenga profundo. Mueva la rueda hacia arriba La cuchilla girar_ la cuchilla girante haciendo contacto para un corte m&s profundo, o mueva con el material ya la rueda hacia abajo para un corte con menor profundidad.
- Page 17 RESPONSIBILIDAD DEL CLIENTE TAREA DE CUIDADO Y MANTENIM|ENTO QUANDO HACER Antes de cada uso Verificar que no haya fijadores flojos ni piezas suelta., Antes de cada uso Verificar que no haya piezas dafladas o gastadas Inspeccione y limpiar el aparato y sus placas Despu_s de cada uso RECOM ENDACIONES GENERALES VERIFIQUE...
- Page 18 7. Instale laarandela asegur&ndose ACCESORIOS parte deafuera, conbordes en Anteojos de Seguridad .. 71-85707 muescas, haga contacto conlacu- Cable de Extensi6n chilla. (Calibre 16) .... 71-85708 8. Instale l aarandela enforma de Cable de Extensi6n copa, a segurandose deque el (Calibre 14) ....
- Page 19 TABLA DIAGNOSTICA ADVERTENCIA: Siempre desconecte la unidad antes de hacer cual- quiera de las reparaciones recomendadas que estan listadas siguiente- mente que no requieran que la aparato este en operaci6n. SOLUCION PROBLEMA CAUSA 1. Corte a un ritmomAs lento. La cuchilla se 1.