Advertisement
Quick Links
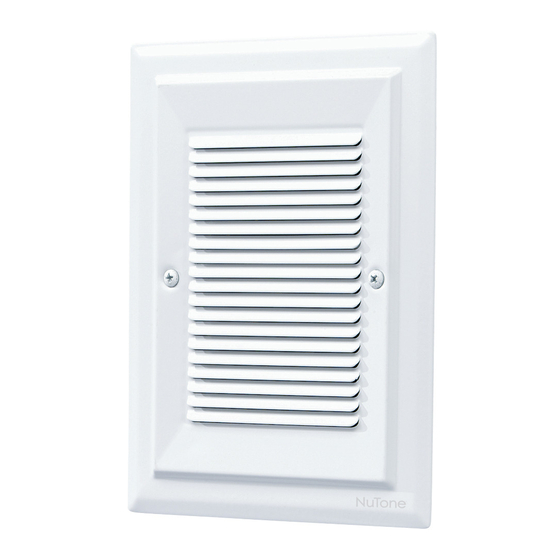
Built-In Electronic Chime
MODEL: LA-174
INSTALLATION HINTS
• This Door Chime is recessed into the wall. The white louvered grille
is flush-mounted to the wall surface and may be painted.
• IMPORTANT: If the door chime is connected to a NuTone Radio-
Intercom System, the chime tones will be heard at all inside and
outside speaker locations (chime will not sound at door speaker).
The Door Chime must be wired in accordance with the Chime-To-
Intercom information that is included in this literature.
• If a NuTone Radio-Intercom System is not used, a door speaker
may be installed at the outside of the front door
so chime tones will be heard at that location.
• Use the NuTone transformer that has been supplied with the door
chime.
LOCATION
• Select a central location so the door chime will be heard throughout
the house.
• Select pushbutton location(s). This door chime can accommodate
up to three (3) door operations.
MOUNTING THE CHIME
Required cutout dimensions: 5
Housing: 2
1
⁄
" deep
4
Refer to Figure 2. Locate wall stud and prepare wall opening at
desired location.
1ST DOOR
2ND DOOR
3RD DOOR
18-22 GA.
INSLUATED
WIRE
TRANSFORMER HOOK-UP
18-22 GA. INSULATED WIRE.
MAX. OF 100 FT. EACH WIRE
FOR 22 GA.
3
⁄
" wide x 7
1
⁄
" high.
8
4
18-22 GA. INSULATED WIRE
WIRE
CONNEC-
TORS
WIRE
CONNECTOR
READ & SAVE THESE INSTRUCTIONS!
WIRING
IMPORTANT: Be certain all wiring complies with local and
state codes.
Disconnect the house power when installing the transformer.
Keep electricity off until all wire connection have been made.
When securing the wiring to wall studs or ceiling joist, avoid
possible shorts that may occur if staples or clips penetrate the
protective wiring insulation.
1. Mount the supplied transformer to any junction or panel box.
Connect the white and black wires from the transformer to the
matching colors of house supply wires. Use approved wire
connectors to make all connections.
2. Refer to Figure 1. Run 18-2 gage wire from the transformer and
pushbutton(s) to the chime location.
3. If applicable, run NuTone IW-2 cable (No.22 twisted pair) from the
intercom master station to the chime location.
4. If applicable, run NuTone IW-2 cable (No. 22 twisted pair) from
remote speaker(s) to door chime location.
5. Pull wires through knockout in housing. Position the housing flange
flush to the finished wall surface and carefully secure the housing
with screws. CAUTION: The printed circuit board is fragile; DO
NOT use nails or hammer.
MAKING CONNECTIONS
1. Refer to Figure 1. Make wire connections to terminals shown as
applicable.
2. Upon completion of installation, check whether chime is functioning
properly by pressing each door pushbutton, if the chime does not
operate, recheck your installation and the pushbutton(s) for poor
contact or loose connections.
NUTONE IW-2
PRINTED CIRCUIT BOARD
GREEN
(COM)
YELLOW
(TRANS)
120/110 VOLT
AC WIRING
16 VOLT, 10 VATT TRANSFORMER
INSTALLATION INSTRUCTIONS
OPTIONAL CONNECTIONS
HOOK-UP TO RADIO-INTERCOM
Radio-Intercom connections to
provide chime functions in
intercom speakers. See Standard
Chime-to-intercom section for
specific connections.
NUTONE IW-2
HOOK-UP TO EXTENSION
SPEAKERS (MAX. 3)
Use NuTone IW-2 (22 GA
Insulated 2-Conductor cable) –
200 Feet Maximum. Connect
Speaker to "EXTENSION
SPKR." No. 1 and No. 2.
FIGURE 1
Advertisement

Related Manuals for NuTone LA-174


Summary of Contents for NuTone LA-174
-
Page 1: Installation Instructions
When securing the wiring to wall studs or ceiling joist, avoid • IMPORTANT: If the door chime is connected to a NuTone Radio- possible shorts that may occur if staples or clips penetrate the Intercom System, the chime tones will be heard at all inside and protective wiring insulation. - Page 2 WARRANTIES OF MERCHANTABILITY OR FITNESS FOR A PARTICULAR PURPOSE. During this one year period, NuTone will, at its option, repair or replace, without charge, any product or part which is found to be defective under normal use and service. THIS WARRANTY DOES NOT EXTEND TO FLUORESCENT LAMP STARTERS OR TUBES, FILTERS, DUCT, ROOF CAPS, WALL CAPS AND OTHER ACCESSORIES FOR DUCTING.
Need help?
Do you have a question about the LA-174 and is the answer not in the manual?
Questions and answers
want to install a ring doorbell. Where is transformer connection sine the model la-174 does not have a trans connector.
The transformer for the NuTone LA-174 model should be mounted to any junction or panel box. The white and black wires from the transformer must be connected to the matching colors of the house supply wires using approved wire connectors. The door chime must be wired according to the Chime-To-Intercom instructions if connected to a NuTone Radio-Intercom System.
This answer is automatically generated
want to install a ring doorbell to my nutone model la-174 doorbell. Where is the trans connection made?
The NuTone LA-174 door chime requires a transformer for operation. To connect a Ring doorbell to the NuTone LA-174, follow these steps:
1. Check Transformer Voltage: Ensure the transformer provides the correct voltage for both the Ring doorbell and the NuTone LA-174. Ring devices typically require 16-24V AC, while the NuTone LA-174 operates on a transformer.
2. Wiring Setup:
- Connect the transformer’s white and black wires to the matching house supply wires.
- Run a wire from the transformer’s output terminals to the Ring doorbell’s power input.
- Connect the Ring doorbell’s wiring to the NuTone LA-174’s chime terminals.
3. Integration Considerations:
- If the NuTone LA-174 is connected to a NuTone Radio-Intercom System, the chime will sound at all speaker locations except the door speaker.
- Use approved wiring methods to avoid shorts or damage.
4. Testing:
- Turn the power back on and test the Ring doorbell.
- Ensure the NuTone chime activates properly when the Ring doorbell button is pressed.
If the Ring doorbell does not ring the NuTone chime correctly, you may need a Ring Chime Connector or a compatible relay to ensure proper function.
This answer is automatically generated
@Mr. Anderson the Ring instructions I have state to connect one wire from the pro power kit to the front door terminal and the second wire to the "trans" terminal. My unit does not have a "trans" terminal. Is it possible then to connect one wire from the power kit to the front door terminal and connect the second wire to the white wire from the transformer?