Cub Cadet SLTX 1054 Operator's Manual
Hydrostatic lawn tractor
Hide thumbs
Also See for SLTX 1054:
- Compatibility manual (3 pages) ,
- Operator's manual (72 pages) ,
- Operator's manual (72 pages)
Table of Contents
Advertisement
Available languages
Available languages
Advertisement
Table of Contents

Related Manuals for Cub Cadet SLTX 1054


Summary of Contents for Cub Cadet SLTX 1054
- Page 1 Safe Operation Practices • Set-Up • Operation • Maintenance • Service • Troubleshooting • Warranty ATOR S ANUAL Hydrostatic Lawn Tractor m SLTX 1054 CUB CADET LLC, P.O. BOX 361131 CLEVELAND, OHiO 44136-0019 PrintedIn USA FormNo.769-043!2A (February 19,2009)
-
Page 2: Table Of Contents
Visit us on the web at www.cubcadetcom Call a Customer Support Representative at (800) 965-4CUB Locate your nearest Cub Cadet Dealer at (877) 282-8684 Write us at Cub Cadet LLC • RO. Box 361131 • Cleveland, OH • 44136-0019... - Page 3 ImportantSafeOperation Practices WARNING! This symbol points out important safety instructions which, if not followed, could endanger the personal safety and/or property of yourself and others. Read and follow all instructions in this manual before attempting to operate this machine. Failure to comply with these instructions may result in personal injury.
- Page 4 12. Amissing ordamaged discharge cover can cause blade Slope Operation contact orthrown o bject injuries. Slopes are a major factor related to loss of control and tip-over 13. Stop t heblade(s) when crossing gravel drives, walks, or accidents which can result in severe injury or death. All slopes roads a nd while notcutting g rass.
- Page 5 Children Service Tragic accidents ca n occur if the operator is not alert to the SafeHandling of Gasoline: presence of children. Children are often attracted to the machine and the mowing activity. They do not understand To avoid personal injury or property damage use extreme the dangers.
- Page 6 Periodically check to make sure the blades come to Donot modify engine complete stop within approximately (5) five seconds after To avoid serious injury or death, do not modify engine in any operating the blade disengagement control. If the blades way.
- Page 7 SafetySymbols This page depicts and describes safety symbols that may appear on this product. Read, understand, and follow all instructions on the machine before attempting to assemble and operate. READ THE OPERATOR'S MANUAL(S) Read, understand, and follow all instructions in the manual(s) before attempting assemble and operate DANGER--...
- Page 8 or a corner of a building... or a fence post ' FOldo,_ " .- 22 diine a 15Oslope "o 15 ° Usethis page as a guide to determine slopeswhere you may not operate safely. WARNING! Do not operate your lawn mower on such slopes. Do not mow on inclines with a slope in excess of 15 degrees (a rise of approximately 2-1/2 feet every 10 feet).
- Page 9 Assembly & Set-Up Contents of Crate One Lawn Tractor One Oil Drain Tube One DeckWash Hose Coupler One Lawn Tractor Operator's Manual One Kohler Engine Operator's Manual Shipping BraceRemoval TractorSet-Up Moving TheTractor Manually off, set the parking brake and remove the ignition Your tractor's transmission is equipped...
- Page 10 Checking Tire Pressure Connecting the Battery Cables CALiFORNiA PROPOSiTiON 65 WARNING: circumstances is 30 psi. Equal tire pressure should Battery posts, terminals, and related accessories WARNING! Maximum tire pressure under any • maintained at all times. contain lead and lead compounds, chemicals known to the State of California...
- Page 11 Adjusting the Seat To adjust the position of the seat, pull up and hold the seat adjustment lever. Slide the seat forward or rearward to the desired position; then release the adjustment lever. Make sure seat is locked into position before operating the tractor.
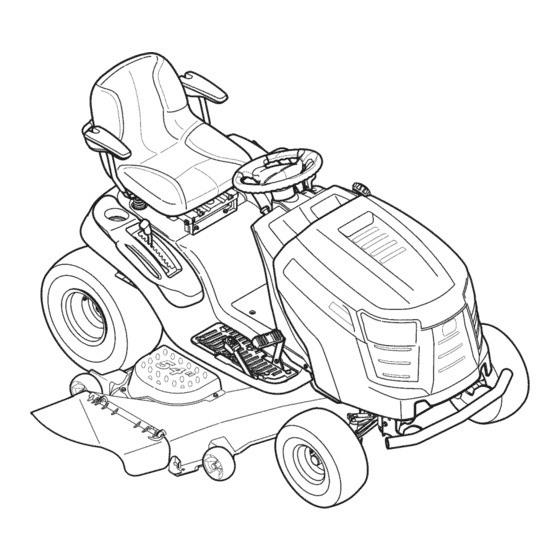
- Page 12 Controls a nd Features Systems indicator Monitor Fuel Tank Ca nition Switch. Module Throttle/Choke Control PTO Knob Fuel Level indicator Drive Peda I Pedal Cargo Net Parking Brake/ Seat Adjustment Lever Storac Cup Holder Figure 4-1 Lawn Tractor controls and features are illustrated in Fig 4-1 and Throttle/Choke Control Lever described on the following pages.
- Page 13 Service section of this manual or have the charging system checked The reverse pedal is located on the right your Cub Cadet dealer. side of the tractor along the running board. (:argoNet Ground speed is also controlled with the reverse pedal.
- Page 14 Fuel LevelIndicator The Fuel Level Indicator is located on the left side of the tractor's dash and indicates the amount of fuel in the gas tank. PTO / BladeEngageKnob Activating the PTO engages power to the cutting deck or other (separately available) attachments.
- Page 15 If the interlock system should ever Stopping the Engine malfunction, do not operate the tractor. Contact your Cub Cadet dealer. engine and disconnect the spark plug wire(s). The safety interlock system prevents the engine from...
- Page 16 Reverse Caution Mode DrivingTheTractor The REVERSE CAUTION MODE position of the key switch module allows the tractor to be operated in reverse with the blades (PTO) and sudden stops. WARNING! Avoid sudden starts, excessive speed engaged. NOTE: Mowing in reverse is not recommended. Lightly press the brake pedal to release the parking brake.
- Page 17 Cruise Control Driving OnSlopes Refer to the SLOPE GAUGE on page 8 to help determine slopes while traveling in reverse. where you may operate the tractor safely. i_ll WARNING! Never engage the cruise control lever To set the cruise control: excess of 15 degrees (a rise of approximately 2-1/2 i_ll...
- Page 18 Pull the PTO/Blade Engage knob outward into the engaged Mulching (If Equipped) (ON) position. See Fig. 5-3. Select models come equipped with a mulch kit which incorporates special blades, already standard on the tractor, in a process of recirculating grass clippings repeatedly beneath the cutting...
- Page 19 Maintenance & Adjustments MaintenanceSchedule Before Every Every Every Every Prior Eachuse 10 Hours 25 Hours 50 Hours 100 Hours to Storing CleanHood/Dash Louvers Check Engine Oil Level Check Air Filterfor Dirty,Looseor Damaged Parts _" CleanandRe-oilAir Filter'sFoamPrecleaner Replace Air Filter Element ChangeEngineOiland Replace Oil Filter CleanBattery Terminals LubeFrontAxlesand Rims...
- Page 20 Pop open the protective cap on the end of the oil drain Hydrostatic Transmission valve to expose the drain port. See Fig 6-1. The hydrostatic transmission is sealed at the factory and is maintenance-free. The fluid level cannot be checked and the fluid cannot be changed.
- Page 21 Lubrication Attach the hose coupler to the water port on your decks surface. See Fig. 6-2. inspecting, always disengage PTO, set parking ARNING! Before lubricating, repairing, brake, stop engine and remove key to prevent unintended starting. FrontWheels Each of the front wheel axles and rims is equipped with a grease fitting.
- Page 22 Determine the approximate distance necessary for proper DeckSpindle adjustment and proceed, if necessary. Grease fittings can be found on each deck spindle. See Fig. 6-4. Loosen (thread outward) the hex lock nut on the end of the Lubricate with 251H EP grease or an equivalent No.
- Page 23 Leveling the Deck(Sideto Side) Steering Adjustment If the cutting deck appears to be mowing unevenly, a side to side If the tractor turns tighter in one direction than the other, or if adjustment can be performed. Adjust if necessary as follows: the ball joints are being replaced due to damage...
-
Page 24: Cutting Deck Removal
Service NOTE: If there is too much tension on the belt for it to be Cutting DeckRemoval easily removed from the electric PTO clutch, carefully insert To remove the cutting deck, proceed as follows: a 3/s"drive ratchet wrench (set to tighten) into the square hole found in the left-hand deck idler bracket and pivot it... - Page 25 5. Pull the deck s upport pinoutward torelease thedeck f rom Cutting fllades the deck liftarm. See Fig. 7-3. WARNING? Shut the engine off and remove ignition key before removing the cutting blade(s) for sharpening or replacement. Protect your hands by using heavy gloves when grasping the blade Deck Lift Arm...
- Page 26 To properly sharpen the cutting blades, remove equal Battery amounts of metal from both ends of the blades along the CALIFORNIA PROPOSiTiON 65 WARNING: cutting edges, parallel to the trailing edge, at a 25 °- to 30 ° angle. Always grind each cutting blade edge equally Battery posts, terminals, and related accessories...
-
Page 27: Fuse
See your Cub Cadet dealer to have the transmission drive belt replaced. Figure 7-7 Loosen, but do not remove the belt keeper rod on the pulley located near the back of the deck. - Page 28 To place the new belt begin by routing the belt around the two outer spindle pulleys, then around the front spindle pulley as shown in Fig. 7-8. Outer Spindle Pulleys Figure 7-8 Then route the belt around the two deck idler pulleys as show in Fig.
-
Page 29: Troubleshooting
Troubleshooting Problem Cause Remedy Engine fails to start 1° PTO/Blade Engage knob engaged. 1. Place knob in disengaged (OFF) position. 2. Parking brake notengaged. 2. Engage parking brake. 3. Spark plug wire(s) disconnected. 3. Connect wire(s) to spark plug(s). 4. Throttle control lever not in correct starting 4. -
Page 30: Replacement Parts
Drive Belt 942-0677B 2-in-1 Deck Blade 918-04126A Deck Spindle 734-04155 Deck Wheel Contact your Cub Cadet dealer to order replacement parts or a complete Parts Manual (have your full model number and serial number ready). Parts Manual downloads are also available... - Page 31 Component Part Number and Description 925-1707D Battery 951-31 ] ] Fuel Tank Cap 946-04556 Throttle/Choke Control Cable 925-2054A Ignition 631-04070A Discharge Chute Assembly Phone (800) 965-4CUB to order replacement parts or a complete Parts Manual (have your full model number and serial number ready).
-
Page 32: Table Of Contents
Attachments & Accessories The following attachments and accessories are compatible for Cub Cadet SLT1054. See your Cub Cadet dealer or the retailer from which you purchased your tractor for information regarding price and availability. attachments (e.g. tiller or moldboard plow). Use of this type of equipment WILL void the tractor's warranty. - Page 34 CALIFORNIA EMISSION CONTROL WARRANTY STATEMENT YOUR WARRANTY RIGHTS AND OBLIGATIONS The CaliforniaAir ResourcesBoardandMTDConsumerGroupInc are pleasedto explainthe evaporativeemissioncontrolsystemwarrantyon your2008 lawn mower.In California,new lawnmowersmust be designed,built and equippedto meetthe State'sstringentanti-smogstandards.MTDConsumerGroupInc must warrantthe EECSon yourlawn mowerfor the periodof time listed below providedthere has beenno abuse, neglector impropermaintenanceof yourlawn mower. Your EECSmay includeparts such asthe carburetor,fuel-injectionsystem,the ignitionsystem,catalyticconverter,fuel tanks,fuel lines,fuel caps, valves, canisters,filters,vapor hoses,clamps,connectors,andother associatedemission-relatedcomponents.
- Page 35 WARRANTED PARTS: The repairor replacementof any warrantedpart otherwiseeligiblefor warrantycoveragemay be excludedfrom such warrantycoverageif MTDConsumerGroup Inc demonstratesthatthe lawn mowerhas been abused,neglected,or improperlymaintained,andthat such abuse,neglect, or impropermaintenancewasthe directcauseof the needfor repairor replacementof the part. That notwithstanding, a ny adjustmentof a componentthat has a factory installed,and properly operating,adjustmentlimitingdevice is still eligiblefor warrantycoverage.
- Page 36 In Canada: The limited warranty set forth below is given by Cub Cadet LLC with respect to new merchandise purchased or leased and used in the United Contact MTD Products Limited, Kitchener, ON N2G4J1, call States and/or its territories and possessions, and by MTD Products 1-800-668-1238 or log on to our website at www.mtdcanada.com.
- Page 37 • Configuraci6n • Funcionamiento • Mantenimiento • Servicio • Soluci6n de problemas • Garantia EL OPE ANUAL Tractor Corta C_specl Hiclrost_tico m SLTX 1054 CUB CADET LLC, P.O. BOX 361131 CLEVELAND, OHiO 44136-0019 FormularioNo.769-04312A Impresoen Estados UnidosdeAmerica (Dkiembre16,2008...
- Page 38 Visite nuestro sitio web en www.cubcadet.com Llame al representante de Atenci6n al Cliente al (800) 965-4CUB Localice a su distribuidor Cub Cadet mSs cercano Ilamando al (877) 282-8684 Escribanos a Cub Cadet LLC • P.O.Box 361131 • Cleveland, OH • 44136-0019...
- Page 39 Medidasimportantesde seguridad ADVERTENCIA" La presencia de este s[mbolo indica que se trata de instrucciones importantes de seguridad que se deben respetar para evitar poner en peligro su seguridad personal y/o material y la de otras personas. Lea y siga todas las instrucciones de este manual antes de poner en funcionamiento esta m_quina.
- Page 40 10. Est_ a tento a lacortadora yaladirecci6n deladescarga 28. Los d atos estadisticos muestran que los operadores de60 delos aditamentos ynoapunte anadie. Nunca opere l a ahos y mayores seven i nvolucrados enunalto porcentaje cortadora dec_sped sin que est_n e nsu lugar apropiado la delesiones relacionadas con tractores corta c _sped.
- Page 41 Servicio No cambie a transmisidn neutral para descender. El exceso de velocidad puede hacer que el operador pierda el control de la m_quina, ocasionando lesiones graves e incluso la muerte. Manej0 segur0 de la gas01ina: No remolque cargas pesadas detr&s de los aditamentos Para evitar lesiones personales o dahos materiales (carrito de basura cargado, podadora...
- Page 42 Antes de limpiar, reparar o inspeccionar la m_iquina, Segun la Comisi6n de Seguridad de Productos para el compruebe que la(s) cuchilla(s) y todas las partes en Consumidor de los Estados Unidos (CPSC) y la Agencia movimiento se hayan detenido. Desconecte el cable de la de Protecci6n Ambiental...
- Page 43 SafetySymbols This page depicts and describes safety symbols that may appear on this product. Read, understand, and follow all instructions on the machine before attempting to assemble and operate. LEA EL MANUAL(S) DEL OPERADOR leido, entienda, y siga todas las instrucciones en el manual(s) antes de procurar montar y funcionar...
- Page 44 15 ° Vseesta p,_ginacomo guia para determinar en qudpendientes no puede operarel tractor de manera segura. ADVERTENCIA: No opere la cortadora de c_sped en dichas pendientes. No corte en inclinaciones mayores de 15 grados (elevaci6n aproximada de 2 1/2 pies por cada 10 pies). El tractor corta c_sped podrfa voltearse y causar lesiones graves.
- Page 45 Montajey Configuraci6n Contenido dei caj6n Un tractor corta c6sped Un acoplador de manguera para Un tubo de drenaje de aceite lavado de plataforma Un Manual del operador del tractor Un Manual del operador del motor Kohler corta c_sped Extracci6n de la traba de seguridad utilizada en el envi0 Configuraci6n dei tractor Mover Manualmente el Tractor tractor...
- Page 46 Instalaci6ndel cablede la baterias Controlde la presi6n de 10sneum_tic0s PROPUESTA 65 DE CALIFORNIA neum_ticos en cualquier circunstancia es de 30 psi. ADVERTENCIA! Los postes de la bateria, IADVERTENClA[ La presi6n m_xima de los Se debe mantener una presi6n uniforme para todos terminales y accesorios relacionados...
- Page 47 Vuelva a insertar el tornillo con reborde (con Gas01ina y aceite cada rueda de calibraci6n) dentro del orificio El tanque de combustible est_ ubicado debajo del guardabarros posicionamiento que deja aproximadamente y posee una capacidad de tres galones y medio. Quite la tapa pulgada entre la parte inferior de la rueda y el...
- Page 48 Controles y Caractefisticas Monitor indicaclor de sistemas M6dulo del Tap6n del tanque de combustible interruptor de encendido Interruptor de Control del regulador/cebador la potencia de arranque (PTO) Indkador Pedaldela Pedal de freno Pedal de la marcha arras Freno de mano Cargo Neto Palanca de elevaci6n de palanca de control...
- Page 49 Pedalde ia marcha atr s secci6n Servicio de este manual o haga que el sistema de carga sea verificado por su distribuidor Cub Cadet. El pedal la marcha atr_s reverso est_ situado en el derecho del tractor a Io largo del tablero CargoNeto corriente.
- Page 50 Indicadorde niveide combustible El indicador de nivel de combustible est_ ubicado a la derecha del panel de instrumentos del tractor e indica la cantidad de combustible en el tanque. Manijade potenda de arranque (PTO)/enganche d e cuchUla AI conectar la potencia de arranque (PTO) se suministra...
- Page 51 Io cual har_ que el motor pierda intensidad. funciona real, no se debe hacer funcionar el tractor. P6ngase en Betenci6n dei motor contacto con su distribuidor Cub Cadet. El sistema de bloqueo de seguridad impide que el motor arranque o se encienda...
- Page 52 Conducci6ndei tractor opere el tractor en MODO DE PRECAUCION EN ADVERTENCIA! Tenga mucho cuidado cuando MARCHA ATRAS. Mire siempre hacia abajo y hacia desarrollar excesiva velocidad y detenerse atr_s antes y mientras opera marcha atr_s. No opere ADVERTENCIA! Evite arrancar subitamente, repente.
- Page 53 IADVERTENClA! Nocorte e lc6sped en Corte de c_sped inclinaciones mayores a15grados (elevaci6n aproximada de2-1/2 p ies c ada 10 pies). El t ractor IADVERTENCIA! Para tratar de evitar el contacto podria v oltearse ycausar lesiones severas. con las cuchillas o una lesi6n por alg0n objeto que sea arrojado, mantenga a los observadores,...
- Page 54 Colocad6n del freno de mano No intente cubrir con pajote m_is que 1/3 la altura total de la hierba o del aproximadamente 1-1/2". El hacer tan har_i NOTA: Si el operador abandona el asiento y deja el motor los recortes agrupar para arriba debajo de la cubierta y no funcionando,...
- Page 55 Tenga cuidado y evite quemarse el aceite caliente. teparaciones cubiettas pot la gatantia deben set Ilevadas cabo pot un distribuidor de Cub Cadet.
- Page 56 Abra el cap6 del tractor y ubique el puerto de drenaje Cuando termine de drenar el aceite, empuje el extremo aceite del lado izquierdo del motor. Vea la Fig. 6-1. la v_lvula de drenaje de aceite hacia adentro, hasta que las lengOetas calcen en su lugar.
- Page 57 Smart Jet Gire la Ilave de encendido a la posici6n STOP (detenci6n) para apagar el motor del tractor. La plataforma de su tractor est_ equipada con un puerto Desconecte el agua y retire el acoplador de la manguera agua sobre su superficie como parte del sistema de lavado de la desde el puerto de agua que se encuentra en la superficie...
- Page 58 Determine la distancia aproximada necesaria para un ajuste Husillode plataforma adecuado y, de set necesario, proceda. Los accesorios de engrase se pueden encontrar en cada husillo Afloje (rosca hacia afuera) la tuerca de seguridad de la plataforma. Vea la Figura 6-4. Lubrique con grasa 251H EP o hexagonal sobre el extremo...
- Page 59 Consulte el interior de la Ilanta izquierda hasta el interior de la con su distribuidor Cub Cadet para realizar un ajuste correcto Ilanta derecha. Anote la distancia. freno. Detr_s del eje, mida la distancia horizontal desde el...
- Page 60 Servkio NOTA:Si hay demasiada tensi6n en la correa para que sea Extracci6n de ia plataformade torte quitada f_icilmente del embrague el_ctrico del PTO, inserte Para extraer la plataforma de corte, proceda de la siguiente cuidadosamente" Ilave de trinquete de impulsi6n un 3/8 manera: (fije para apretar) en la perforaci6n...
- Page 61 CuchUlas de torte Tire hacia afuera el pasador de soporte de la plataforma para separar la misma del brazo de elevaci6n de la plataforma. Vea la Fig. 7-3. Ilave de contacto antes de retirar las cuchillas de ADVERTENCIA! Apague el motor y extraiga corte para afilado o reemplazo.
- Page 62 Para afilar las cuchillas de corte de forma adecuada, Bateria extraiga cantidades iguales de metal de ambos extremos IADVERTENCIA PROPOSICION 65 DE de las cuchillas a Io largo de los bordes cortantes, de forma paralela al borde de caida, a un _ngulo de 25 ° a 30 °. Afile CALIFORNIA! Los bornes de la bateria y los siempre cada borde de las cuchillas...
- Page 63 Solicite a su distribuidor Cub Cadet que realice el reemplazo de la Afloje, pero no quite al protector de la correa en la polea correa de transmisidn. m_s ociosa situada cerca de la parte posterior de la cubierta.
- Page 64 Para colocar [a nueva correa comJence encamJnando la correa alrededor de las dos poleas de huso externas, entonces alrededor de la polea de huso delantera segun las indicaciones de Fig. 7-8. Frente polea Cubierta de la del husillo polea poleas L_/A Exterior del husillo poleas...
- Page 65 Soluci6nde Problemas Problem Cause Remedy El motor funciona La unidad est_ funcionando con el regulador/ 1. Presione el control del regulador/cebador. manera err_tica cebador activado. 2. Los cables de la bujia est_n flojos. Conecte y ajuste los cables de la bujia. 3.
- Page 66 Problem Cause Remedy El motor vacila a altas 1. La separaci6n de la bujia es muy peque_a. 1. Retire la bujia y reajuste la separaci6n. revoluciones Vibraci6n excesiva 1. Cuchilla de corte floja o descentrada. 1. Apriete la cuchilla y el husillo. 2.
- Page 67 Notas...
- Page 68 SECCION NOTAS...
- Page 69 SECCION 9 -- NOTAS...
- Page 70 DECLARACION DE GARANTJA DEL CONTROL DE LAS EMISIONES DE CALIFORNIA DERECHOS Y OBLIGACIONES DE SU GARANTJA El Departamento de los Recursos de Aire de California y MTD Consumer Group Inc, se complacen en explicar la garanfia del sistema de control de emisiones por evaporaci6n de su cortadora de cesped 2008.
- Page 71 PIEZAS GARANTIZADAS: quedeotromodo estar c ubierta perla podr_, setexcluida detalcobertura de reparaci6n o el reemplazo de cualquier pieza garantizada pudiese garanfia garanfia siMTD Consumer Incdemuestra quela cortadora de negligencia o mantenimiento yquetal Group cesped es objeto uso incorrecto, inadecuado, uso incorrecto, mantenimiento inadecuado fuecausa directa delanecesidad de dedicha...
- Page 72 Cub Cadet. El recurso exclusive es reparar o reempJazar eJproducto segJJn Io anteriormente Bastidory eje frontal- Cub Cadet garantiza el bastidor, y eje de pivote de hierro fundido frontal contra defectos en los materiales y mane de obra estaNecido.
- Page 73 Safe Operation Practices • Set-Up • Operation • Maintenance • Service • Troubleshooting • Warranty ATOR S ANUAL Hydrostatic Lawn Tractor m SLTX 1054 CUB CADET LLC, P.O. BOX 361131 CLEVELAND, OHiO 44136-0019 PrintedIn USA FormNo.769-043!2A (February 19,2009)
-
Page 74: Locate Your Nearest Cub Cadet Dealer At (877)
Visit us on the web at www.cubcadetcom Call a Customer Support Representative at (800) 965-4CUB Locate your nearest Cub Cadet Dealer at (877) 282-8684 Write us at Cub Cadet LLC • RO. Box 361131 • Cleveland, OH • 44136-0019... - Page 75 ImportantSafeOperation Practices WARNING! This symbol points out important safety instructions which, if not followed, could endanger the personal safety and/or property of yourself and others. Read and follow all instructions in this manual before attempting to operate this machine. Failure to comply with these instructions may result in personal injury.
- Page 76 12. Amissing ordamaged discharge cover can cause blade Slope Operation contact orthrown o bject injuries. Slopes are a major factor related to loss of control and tip-over 13. Stop t heblade(s) when crossing gravel drives, walks, or accidents which can result in severe injury or death. All slopes roads a nd while notcutting g rass.
- Page 77 Children Service Tragic accidents ca n occur if the operator is not alert to the SafeHandling of Gasoline: presence of children. Children are often attracted to the machine and the mowing activity. They do not understand To avoid personal injury or property damage use extreme the dangers.
- Page 78 Periodically check to make sure the blades come to Donot modify engine complete stop within approximately (5) five seconds after To avoid serious injury or death, do not modify engine in any operating the blade disengagement control. If the blades way.
- Page 79 SafetySymbols This page depicts and describes safety symbols that may appear on this product. Read, understand, and follow all instructions on the machine before attempting to assemble and operate. READ THE OPERATOR'S MANUAL(S) Read, understand, and follow all instructions in the manual(s) before attempting assemble and operate DANGER--...
- Page 80 or a corner of a building... or a fence post ' FOldo,_ " .- 22 diine a 15Oslope "o 15 ° Usethis page as a guide to determine slopeswhere you may not operate safely. WARNING! Do not operate your lawn mower on such slopes. Do not mow on inclines with a slope in excess of 15 degrees (a rise of approximately 2-1/2 feet every 10 feet).
- Page 81 Assembly & Set-Up Contents of Crate One Lawn Tractor One Oil Drain Tube One DeckWash Hose Coupler One Lawn Tractor Operator's Manual One Kohler Engine Operator's Manual Shipping BraceRemoval TractorSet-Up Moving TheTractor Manually off, set the parking brake and remove the ignition Your tractor's transmission is equipped...
- Page 82 Checking Tire Pressure Connecting the Battery Cables CALiFORNiA PROPOSiTiON 65 WARNING: circumstances is 30 psi. Equal tire pressure should Battery posts, terminals, and related accessories WARNING! Maximum tire pressure under any • maintained at all times. contain lead and lead compounds, chemicals known to the State of California...
- Page 83 Adjusting the Seat To adjust the position of the seat, pull up and hold the seat adjustment lever. Slide the seat forward or rearward to the desired position; then release the adjustment lever. Make sure seat is locked into position before operating the tractor.
- Page 84 Controls a nd Features Systems indicator Monitor Fuel Tank Ca nition Switch. Module Throttle/Choke Control PTO Knob Fuel Level indicator Drive Peda I Pedal Cargo Net Parking Brake/ Seat Adjustment Lever Storac Cup Holder Figure 4-1 Lawn Tractor controls and features are illustrated in Fig 4-1 and Throttle/Choke Control Lever described on the following pages.
- Page 85 Service section of this manual or have the charging system checked The reverse pedal is located on the right your Cub Cadet dealer. side of the tractor along the running board. (:argoNet Ground speed is also controlled with the reverse pedal.
- Page 86 Fuel LevelIndicator The Fuel Level Indicator is located on the left side of the tractor's dash and indicates the amount of fuel in the gas tank. PTO / BladeEngageKnob Activating the PTO engages power to the cutting deck or other (separately available) attachments.
- Page 87 If the interlock system should ever Stopping the Engine malfunction, do not operate the tractor. Contact your Cub Cadet dealer. engine and disconnect the spark plug wire(s). The safety interlock system prevents the engine from...
- Page 88 Reverse Caution Mode DrivingTheTractor The REVERSE CAUTION MODE position of the key switch module allows the tractor to be operated in reverse with the blades (PTO) and sudden stops. WARNING! Avoid sudden starts, excessive speed engaged. NOTE: Mowing in reverse is not recommended. Lightly press the brake pedal to release the parking brake.
- Page 89 Cruise Control Driving OnSlopes Refer to the SLOPE GAUGE on page 8 to help determine slopes while traveling in reverse. where you may operate the tractor safely. i_ll WARNING! Never engage the cruise control lever To set the cruise control: excess of 15 degrees (a rise of approximately 2-1/2 i_ll...
- Page 90 Pull the PTO/Blade Engage knob outward into the engaged Mulching (If Equipped) (ON) position. See Fig. 5-3. Select models come equipped with a mulch kit which incorporates special blades, already standard on the tractor, in a process of recirculating grass clippings repeatedly beneath the cutting...
-
Page 91: Maintenance Schedule
Maintenance & Adjustments MaintenanceSchedule Before Every Every Every Every Prior Eachuse 10 Hours 25 Hours 50 Hours 100 Hours to Storing CleanHood/Dash Louvers Check Engine Oil Level Check Air Filterfor Dirty,Looseor Damaged Parts _" CleanandRe-oilAir Filter'sFoamPrecleaner Replace Air Filter Element ChangeEngineOiland Replace Oil Filter CleanBattery Terminals LubeFrontAxlesand Rims... - Page 92 Pop open the protective cap on the end of the oil drain Hydrostatic Transmission valve to expose the drain port. See Fig 6-1. The hydrostatic transmission is sealed at the factory and is maintenance-free. The fluid level cannot be checked and the fluid cannot be changed.
- Page 93 Lubrication Attach the hose coupler to the water port on your decks surface. See Fig. 6-2. inspecting, always disengage PTO, set parking ARNING! Before lubricating, repairing, brake, stop engine and remove key to prevent unintended starting. FrontWheels Each of the front wheel axles and rims is equipped with a grease fitting.
- Page 94 Determine the approximate distance necessary for proper DeckSpindle adjustment and proceed, if necessary. Grease fittings can be found on each deck spindle. See Fig. 6-4. Loosen (thread outward) the hex lock nut on the end of the Lubricate with 251H EP grease or an equivalent No.
- Page 95 Leveling the Deck(Sideto Side) Steering Adjustment If the cutting deck appears to be mowing unevenly, a side to side If the tractor turns tighter in one direction than the other, or if adjustment can be performed. Adjust if necessary as follows: the ball joints are being replaced due to damage...
- Page 96 Service NOTE: If there is too much tension on the belt for it to be Cutting DeckRemoval easily removed from the electric PTO clutch, carefully insert To remove the cutting deck, proceed as follows: a 3/s"drive ratchet wrench (set to tighten) into the square hole found in the left-hand deck idler bracket and pivot it...
- Page 97 5. Pull the deck s upport pinoutward torelease thedeck f rom Cutting fllades the deck liftarm. See Fig. 7-3. WARNING? Shut the engine off and remove ignition key before removing the cutting blade(s) for sharpening or replacement. Protect your hands by using heavy gloves when grasping the blade Deck Lift Arm...
- Page 98 To properly sharpen the cutting blades, remove equal Battery amounts of metal from both ends of the blades along the CALIFORNIA PROPOSiTiON 65 WARNING: cutting edges, parallel to the trailing edge, at a 25 °- to 30 ° angle. Always grind each cutting blade edge equally Battery posts, terminals, and related accessories...
- Page 99 See your Cub Cadet dealer to have the transmission drive belt replaced. Figure 7-7 Loosen, but do not remove the belt keeper rod on the pulley located near the back of the deck.
- Page 100 To place the new belt begin by routing the belt around the two outer spindle pulleys, then around the front spindle pulley as shown in Fig. 7-8. Outer Spindle Pulleys Figure 7-8 Then route the belt around the two deck idler pulleys as show in Fig.
- Page 101 Troubleshooting Problem Cause Remedy Engine fails to start 1° PTO/Blade Engage knob engaged. 1. Place knob in disengaged (OFF) position. 2. Parking brake notengaged. 2. Engage parking brake. 3. Spark plug wire(s) disconnected. 3. Connect wire(s) to spark plug(s). 4. Throttle control lever not in correct starting 4.
- Page 102 Drive Belt 942-0677B 2-in-1 Deck Blade 918-04126A Deck Spindle 734-04155 Deck Wheel Contact your Cub Cadet dealer to order replacement parts or a complete Parts Manual (have your full model number and serial number ready). Parts Manual downloads are also available...
- Page 103 Component Part Number and Description 925-1707D Battery 951-31 ] ] Fuel Tank Cap 946-04556 Throttle/Choke Control Cable 925-2054A Ignition 631-04070A Discharge Chute Assembly Phone (800) 965-4CUB to order replacement parts or a complete Parts Manual (have your full model number and serial number ready).
- Page 104 Attachments & Accessories The following attachments and accessories are compatible for Cub Cadet SLT1054. See your Cub Cadet dealer or the retailer from which you purchased your tractor for information regarding price and availability. attachments (e.g. tiller or moldboard plow). Use of this type of equipment WILL void the tractor's warranty.
- Page 106 CALIFORNIA EMISSION CONTROL WARRANTY STATEMENT YOUR WARRANTY RIGHTS AND OBLIGATIONS The CaliforniaAir ResourcesBoardandMTDConsumerGroupInc are pleasedto explainthe evaporativeemissioncontrolsystemwarrantyon your2008 lawn mower.In California,new lawnmowersmust be designed,built and equippedto meetthe State'sstringentanti-smogstandards.MTDConsumerGroupInc must warrantthe EECSon yourlawn mowerfor the periodof time listed below providedthere has beenno abuse, neglector impropermaintenanceof yourlawn mower. Your EECSmay includeparts such asthe carburetor,fuel-injectionsystem,the ignitionsystem,catalyticconverter,fuel tanks,fuel lines,fuel caps, valves, canisters,filters,vapor hoses,clamps,connectors,andother associatedemission-relatedcomponents.
- Page 107 WARRANTED PARTS: The repairor replacementof any warrantedpart otherwiseeligiblefor warrantycoveragemay be excludedfrom such warrantycoverageif MTDConsumerGroup Inc demonstratesthatthe lawn mowerhas been abused,neglected,or improperlymaintained,andthat such abuse,neglect, or impropermaintenancewasthe directcauseof the needfor repairor replacementof the part. That notwithstanding, a ny adjustmentof a componentthat has a factory installed,and properly operating,adjustmentlimitingdevice is still eligiblefor warrantycoverage.
- Page 108 In Canada: The limited warranty set forth below is given by Cub Cadet LLC with respect to new merchandise purchased or leased and used in the United Contact MTD Products Limited, Kitchener, ON N2G4J1, call States and/or its territories and possessions, and by MTD Products 1-800-668-1238 or log on to our website at www.mtdcanada.com.
- Page 109 • Configuraci6n • Funcionamiento • Mantenimiento • Servicio • Soluci6n de problemas • Garantia EL OPE ANUAL Tractor Corta C_specl Hiclrost_tico m SLTX 1054 CUB CADET LLC, P.O. BOX 361131 CLEVELAND, OHiO 44136-0019 FormularioNo.769-04312A Impresoen Estados UnidosdeAmerica (Dkiembre16,2008...
- Page 110 Visite nuestro sitio web en www.cubcadet.com Llame al representante de Atenci6n al Cliente al (800) 965-4CUB Localice a su distribuidor Cub Cadet mSs cercano Ilamando al (877) 282-8684 Escribanos a Cub Cadet LLC • P.O.Box 361131 • Cleveland, OH • 44136-0019...
- Page 111 Medidasimportantesde seguridad ADVERTENCIA" La presencia de este s[mbolo indica que se trata de instrucciones importantes de seguridad que se deben respetar para evitar poner en peligro su seguridad personal y/o material y la de otras personas. Lea y siga todas las instrucciones de este manual antes de poner en funcionamiento esta m_quina.
- Page 112 10. Est_ a tento a lacortadora yaladirecci6n deladescarga 28. Los d atos estadisticos muestran que los operadores de60 delos aditamentos ynoapunte anadie. Nunca opere l a ahos y mayores seven i nvolucrados enunalto porcentaje cortadora dec_sped sin que est_n e nsu lugar apropiado la delesiones relacionadas con tractores corta c _sped.
- Page 113 Servicio No cambie a transmisidn neutral para descender. El exceso de velocidad puede hacer que el operador pierda el control de la m_quina, ocasionando lesiones graves e incluso la muerte. Manej0 segur0 de la gas01ina: No remolque cargas pesadas detr&s de los aditamentos Para evitar lesiones personales o dahos materiales (carrito de basura cargado, podadora...
- Page 114 Antes de limpiar, reparar o inspeccionar la m_iquina, Segun la Comisi6n de Seguridad de Productos para el compruebe que la(s) cuchilla(s) y todas las partes en Consumidor de los Estados Unidos (CPSC) y la Agencia movimiento se hayan detenido. Desconecte el cable de la de Protecci6n Ambiental...
- Page 115 SafetySymbols This page depicts and describes safety symbols that may appear on this product. Read, understand, and follow all instructions on the machine before attempting to assemble and operate. LEA EL MANUAL(S) DEL OPERADOR leido, entienda, y siga todas las instrucciones en el manual(s) antes de procurar montar y funcionar...
- Page 116 15 ° Vseesta p,_ginacomo guia para determinar en qudpendientes no puede operarel tractor de manera segura. ADVERTENCIA: No opere la cortadora de c_sped en dichas pendientes. No corte en inclinaciones mayores de 15 grados (elevaci6n aproximada de 2 1/2 pies por cada 10 pies). El tractor corta c_sped podrfa voltearse y causar lesiones graves.
- Page 117 Montajey Configuraci6n Contenido dei caj6n Un tractor corta c6sped Un acoplador de manguera para Un tubo de drenaje de aceite lavado de plataforma Un Manual del operador del tractor Un Manual del operador del motor Kohler corta c_sped Extracci6n de la traba de seguridad utilizada en el envi0 Configuraci6n dei tractor Mover Manualmente el Tractor tractor...
- Page 118 Instalaci6ndel cablede la baterias Controlde la presi6n de 10sneum_tic0s PROPUESTA 65 DE CALIFORNIA neum_ticos en cualquier circunstancia es de 30 psi. ADVERTENCIA! Los postes de la bateria, IADVERTENClA[ La presi6n m_xima de los Se debe mantener una presi6n uniforme para todos terminales y accesorios relacionados...
- Page 119 Vuelva a insertar el tornillo con reborde (con Gas01ina y aceite cada rueda de calibraci6n) dentro del orificio El tanque de combustible est_ ubicado debajo del guardabarros posicionamiento que deja aproximadamente y posee una capacidad de tres galones y medio. Quite la tapa pulgada entre la parte inferior de la rueda y el...
- Page 120 Controles y Caractefisticas Monitor indicaclor de sistemas M6dulo del Tap6n del tanque de combustible interruptor de encendido Interruptor de Control del regulador/cebador la potencia de arranque (PTO) Indkador Pedaldela Pedal de freno Pedal de la marcha arras Freno de mano Cargo Neto Palanca de elevaci6n de palanca de control...
- Page 121 Pedalde ia marcha atr s secci6n Servicio de este manual o haga que el sistema de carga sea verificado por su distribuidor Cub Cadet. El pedal la marcha atr_s reverso est_ situado en el derecho del tractor a Io largo del tablero CargoNeto corriente.
- Page 122 Indicadorde niveide combustible El indicador de nivel de combustible est_ ubicado a la derecha del panel de instrumentos del tractor e indica la cantidad de combustible en el tanque. Manijade potenda de arranque (PTO)/enganche d e cuchUla AI conectar la potencia de arranque (PTO) se suministra...
- Page 123 Io cual har_ que el motor pierda intensidad. funciona real, no se debe hacer funcionar el tractor. P6ngase en Betenci6n dei motor contacto con su distribuidor Cub Cadet. El sistema de bloqueo de seguridad impide que el motor arranque o se encienda...
- Page 124 Conducci6ndei tractor opere el tractor en MODO DE PRECAUCION EN ADVERTENCIA! Tenga mucho cuidado cuando MARCHA ATRAS. Mire siempre hacia abajo y hacia desarrollar excesiva velocidad y detenerse atr_s antes y mientras opera marcha atr_s. No opere ADVERTENCIA! Evite arrancar subitamente, repente.
- Page 125 IADVERTENClA! Nocorte e lc6sped en Corte de c_sped inclinaciones mayores a15grados (elevaci6n aproximada de2-1/2 p ies c ada 10 pies). El t ractor IADVERTENCIA! Para tratar de evitar el contacto podria v oltearse ycausar lesiones severas. con las cuchillas o una lesi6n por alg0n objeto que sea arrojado, mantenga a los observadores,...
- Page 126 Colocad6n del freno de mano No intente cubrir con pajote m_is que 1/3 la altura total de la hierba o del aproximadamente 1-1/2". El hacer tan har_i NOTA: Si el operador abandona el asiento y deja el motor los recortes agrupar para arriba debajo de la cubierta y no funcionando,...
- Page 127 Tenga cuidado y evite quemarse el aceite caliente. teparaciones cubiettas pot la gatantia deben set Ilevadas cabo pot un distribuidor de Cub Cadet.
- Page 128 Abra el cap6 del tractor y ubique el puerto de drenaje Cuando termine de drenar el aceite, empuje el extremo aceite del lado izquierdo del motor. Vea la Fig. 6-1. la v_lvula de drenaje de aceite hacia adentro, hasta que las lengOetas calcen en su lugar.
- Page 129 Smart Jet Gire la Ilave de encendido a la posici6n STOP (detenci6n) para apagar el motor del tractor. La plataforma de su tractor est_ equipada con un puerto Desconecte el agua y retire el acoplador de la manguera agua sobre su superficie como parte del sistema de lavado de la desde el puerto de agua que se encuentra en la superficie...
- Page 130 Determine la distancia aproximada necesaria para un ajuste Husillode plataforma adecuado y, de set necesario, proceda. Los accesorios de engrase se pueden encontrar en cada husillo Afloje (rosca hacia afuera) la tuerca de seguridad de la plataforma. Vea la Figura 6-4. Lubrique con grasa 251H EP o hexagonal sobre el extremo...
- Page 131 Consulte el interior de la Ilanta izquierda hasta el interior de la con su distribuidor Cub Cadet para realizar un ajuste correcto Ilanta derecha. Anote la distancia. freno. Detr_s del eje, mida la distancia horizontal desde el...
- Page 132 Servkio NOTA:Si hay demasiada tensi6n en la correa para que sea Extracci6n de ia plataformade torte quitada f_icilmente del embrague el_ctrico del PTO, inserte Para extraer la plataforma de corte, proceda de la siguiente cuidadosamente" Ilave de trinquete de impulsi6n un 3/8 manera: (fije para apretar) en la perforaci6n...
- Page 133 CuchUlas de torte Tire hacia afuera el pasador de soporte de la plataforma para separar la misma del brazo de elevaci6n de la plataforma. Vea la Fig. 7-3. Ilave de contacto antes de retirar las cuchillas de ADVERTENCIA! Apague el motor y extraiga corte para afilado o reemplazo.
- Page 134 Para afilar las cuchillas de corte de forma adecuada, Bateria extraiga cantidades iguales de metal de ambos extremos IADVERTENCIA PROPOSICION 65 DE de las cuchillas a Io largo de los bordes cortantes, de forma paralela al borde de caida, a un _ngulo de 25 ° a 30 °. Afile CALIFORNIA! Los bornes de la bateria y los siempre cada borde de las cuchillas...
- Page 135 Solicite a su distribuidor Cub Cadet que realice el reemplazo de la Afloje, pero no quite al protector de la correa en la polea correa de transmisidn. m_s ociosa situada cerca de la parte posterior de la cubierta.
- Page 136 Para colocar [a nueva correa comJence encamJnando la correa alrededor de las dos poleas de huso externas, entonces alrededor de la polea de huso delantera segun las indicaciones de Fig. 7-8. Frente polea Cubierta de la del husillo polea poleas L_/A Exterior del husillo poleas...
- Page 137 Soluci6nde Problemas Problem Cause Remedy El motor funciona La unidad est_ funcionando con el regulador/ 1. Presione el control del regulador/cebador. manera err_tica cebador activado. 2. Los cables de la bujia est_n flojos. Conecte y ajuste los cables de la bujia. 3.
- Page 138 Problem Cause Remedy El motor vacila a altas 1. La separaci6n de la bujia es muy peque_a. 1. Retire la bujia y reajuste la separaci6n. revoluciones Vibraci6n excesiva 1. Cuchilla de corte floja o descentrada. 1. Apriete la cuchilla y el husillo. 2.
- Page 139 Notas...
- Page 140 SECCION NOTAS...
- Page 141 SECCION 9 -- NOTAS...
- Page 142 DECLARACION DE GARANTJA DEL CONTROL DE LAS EMISIONES DE CALIFORNIA DERECHOS Y OBLIGACIONES DE SU GARANTJA El Departamento de los Recursos de Aire de California y MTD Consumer Group Inc, se complacen en explicar la garanfia del sistema de control de emisiones por evaporaci6n de su cortadora de cesped 2008.
- Page 143 PIEZAS GARANTIZADAS: quedeotromodo estar c ubierta perla podr_, setexcluida detalcobertura de reparaci6n o el reemplazo de cualquier pieza garantizada pudiese garanfia garanfia siMTD Consumer Incdemuestra quela cortadora de negligencia o mantenimiento yquetal Group cesped es objeto uso incorrecto, inadecuado, uso incorrecto, mantenimiento inadecuado fuecausa directa delanecesidad de dedicha...
- Page 144 Cub Cadet. El recurso exclusive es reparar o reempJazar eJproducto segJJn Io anteriormente Bastidory eje frontal- Cub Cadet garantiza el bastidor, y eje de pivote de hierro fundido frontal contra defectos en los materiales y mane de obra estaNecido.