Table of Contents
Advertisement
Available languages
Available languages
Operator's Manual
®
22{)0 PSi MAX
2.2 GPM MAX
Model No. 58{).752040
Before using this product, read this
manuat and foliow ali Safety RuIes
and Operating instructions=
ADVERTE CIA
Antes de utiiizar ei producto, iea este
manuai y siga todas las RegIasde
Seguridad e instrucciones de Uso=
Sears, Roebuck and Ca., Hoffman Estates, [L 68179 U.S.A.
Visit our Craftsman website: www.craftsman.eom
Part No. 203791GS Draft - (04/25/2007)
®Safety
®Assembly
®Operation
,, Maintenance
,, Parts
,, Espa_oi,p. 34
Advertisement
Table of Contents

Related Manuals for Craftsman 580.752040


Summary of Contents for Craftsman 580.752040
- Page 1 Safety RuIes manuai y siga todas las RegIasde and Operating instructions= Seguridad e instrucciones de Uso= ,, Espa_oi,p. 34 Sears, Roebuck and Ca., Hoffman Estates, [L 68179 U.S.A. Visit our Craftsman website: www.craftsman.eom Part No. 203791GS Draft - (04/25/2007)
-
Page 2: Table Of Contents
If this pressure washer faiis due to a defect in materiai or workmanship within one year from the date of purchase, return it to any Searsstore, other Craftsman outlet, or Sears Parts & Repair Center in the United States or Canadafor free repair (or replacementif repair proves impossible). - Page 3 WARNING WARNING The engine exhaust from this productcontains Fueland its vapors are extremely flammable and chemicals known to the State of California to cause explosive. cancer, birth defects, or other reproductive harm. death= Fireor explosion can cause severe burns or WARNING WidENA#UING8U URAiNIN6FUEL Running engine gives off carbon monoxide, an...
- Page 4 WARNING WARNING Starter cord kickback (rapid retraction) can result The high pressure stream of water that this bodily injury, pull Kickback will hand and arm equipment produces can cut through skin and its engine toward faster than you can iet go. underlying tissues, ieading to serious injury and amputation, _ossible...
- Page 5 WARNING High pressure spray may damage fragiie items inciuding Starter and other rotating parts can entangle iass. qands, hair, clothing, or accessories. DONOTpointspraygun at glasswhen usingred(0°) spraytip. NEVER aim spraygun at plants. • NEVERoperate pressure washer without protective housing or covers.
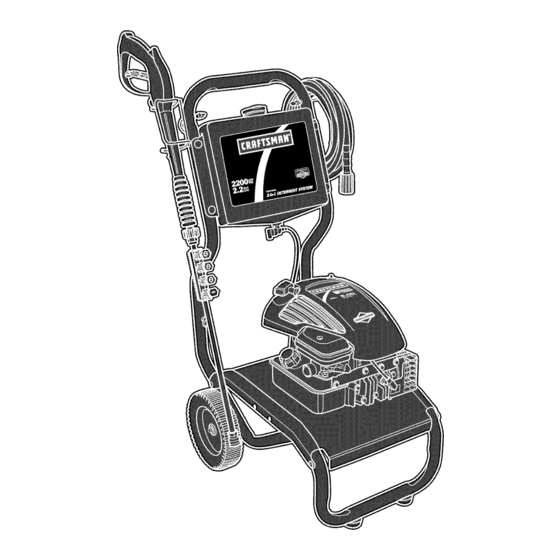
- Page 6 KNOWYOURPRESSURE WASHER ,r' F I-_ Read the Operator's Manual and safety rubs before operating your pressure washer..Compare the illustrations with your pressure washer to familiarize ,'ourself with the locations of various controls and adjustments. Savethis manual for future reference. - Spray Gun -- Controis the appiication of water onto L =Automatic Cool Down System -- Cycles water through cleaning surface with trigger device, includes trigger iock.
- Page 7 A$$EJVJBLJNG CLEANING SYSTEJVJ Insert "L" bolt (A) througil hob just abovecleaning tank Your Craftsman cleaning system will need assembly before on right side of handJe(viewing from front of unit). Hold operation: bolt in piace and attach plastic knob (B) from inside of Fill out and send in registration card.
-
Page 8: Warranty
Add Fuel Insert spray gun holder wireform (A) through hole just above cleaning tank on left side of handle (viewing from Fuel must meet these requirements: front of unit). Hold wireform in place and attach a piastic knob (B) from inside of unit. Tighten by hand. Clean,fresh, unleaded gasoline. - Page 9 CAUTISN! AlcohoI-btended fuels (called gasohoI, ethanol or Cenneet Hese and Water Supply te Pump methanoi) can attract moisture, which ieads to separation and formation of acids during storage. Acidic gas can damagethe fuei system of an engine whiie in storage. water pump supply...
-
Page 10: Safety Rules
3. Before c onnecting garden h ose towater inlet, i nspect Turn ONwater, point gun in a safe direction and squeeze inlet s creen ( A). C lean s creen i fitcontains debris o rhave trigger to purge pump system of air and impurities. it replaced if damaged= DO NOT r un pressurewasher if... - Page 11 HOWTO USEYOUR CLEANING SYSTEM Te Start Yenr Cleaning System To start your engine=poweredcleaning system for the first If you haveany probbms operating your pressure washer, time, foiiow these instructions step=by=step. T his information please call the pressure washer heJpfineat 1-800-222-3136, also applies whenever you start the engine after you have let Pressure Washer Lecation the pressure wa@er sit idle for at bast a day.
- Page 12 10. Move throttle lever to "Fast" position (A), shown as a WARNING rabbit. Starter cord kickback (rapid retraction) call result in bodiiy injury. Kickback wiii puIi hand and arm toward engine faster than you can iet go. Broken bones, fractures, bruises, or sprains could resuIt.
- Page 13 How to Stop Your Cleaning System Select desired spraytip: Reieasespray gun trigger and let engine idte for two Lew Pressure minutes. Move throttie to SLOW position, then STOPposition (A). Black Useto apply chemical ALWAYSpoint spray gun in a safe direction and squeeze spray gun trigger to releaseretained high water pressure, iMPORTANT: Spray gun traps high water pressure, even...
- Page 14 Cleaning and Applying Detergent IMPORTANT:If using detergent siphoning hose, make sure detergent shut=off valve on cleaning tank is in the "Off" CAUTION position. 9B. If using detergent siphoning hose, piace smaii fiiter end Chemicais can cause bodiiy injury, and/or property of detergent siphoning tube into detergent container.
- Page 15 ENGINETECHNICALiNFORMATiON PRODUCTSPECiFiCATiONS This is a single cylinder, L-head, air cooled engine. It is a low PressureWasher Specifications emissions engine. Max Outbt Pressure ....... 2,200 PSi In tile State of California, Modei I00000 engines are certified Max Ftow Rate ......22 GPM by the California Air Resources Board to meet emissions Chemical Mix......
-
Page 16: Assembly
OWNER'SRESPONSiBiLiTIES Follow the hourly or calendar intervals, whichever occurs first. More frequent service is required when operating in adverse conditions noted below. MAINTENANCESCHEDULE OPERATINGiNTERVALS SERVICEDATES FILL IN DATESAS YOU COMPLETE REGULARSERVICE Before 100-300 MAINTENANCETASK Hours or Hours or Hours or Each Use Hours I Every 25... - Page 17 Removespray tip from end of nozzle extension. NOTICE Use a small paper ctip to free any foreign material j Improper treatment of pressure washer can damage it and clogging or restricting spray tip (A). its fife, _horten_ ..L_ DONOT insert any' o bjectsthroughcoolingslots. °...
-
Page 18: Operation
ENGINEMAINTENANCE CheckingOil Level OiI level should be checked prior to each use or at least every WARNING 5 hours of operation. Keep oii ievei maintained. Make sure pressure washer is on a ievei surface= 2= Remove oii dipstick and wipe dipstick with clean cioth= Unintentional sparking can result in fire or Reptaceand tigilten dipstick. -
Page 19: Specifications
3. Clean a rea around o iIfill,remove oilfill cap/dipstick. Service Spark P ug Wipe dipstick c lean. Service the spark piug every 100 hours of operation or 4. Tip yourpressure washer todrain oiifromoiifiiiintoa yearly, whichever occurs first. suitabie container making s ure youtipyourunit a way Cleanarea around spark plug. -
Page 20: Maintenance
Air Cooming System Shut off engine, turn off water suppiy, point gun in a safe direction and squeezetrigger to relieve trapped Overtime debris may accumulate in cylinder cooling fins and pressure, engage trigger lock on spray gun and let cannot be observed without partiai engine disassembly. For engine cool. -
Page 21: Notes
WINTERSTORAGE for 2 minutes to circulate the stabilizer throughout the fuel system. The engine and fuel can then be stored up to 24 months. If gasoiine in the engine has not been treated with a fuei stabiiizer, it must be drained into an approved container. Run the engine untii it stops from iack of fuel. - Page 22 1= Low pressure spray tip installed. Replacewith high pressure spray tip. 2= Water inlet is blocked. Clearinlet. Inadequate water suppty. Provide adequatewater flow. Inlet hose is kinked or leaking. Straighten inlet hose, patch ieak. Pump hasfollowing p roblems: Checkand clean inlet hose strainer. Clogged inlet hose strainer.
- Page 24 CRAFTSMAN2200 PSI Cleaning System 580_752040 Main Unit -- Exploded View © --15...
- Page 25 CRAFTSMAN2200 PSi CteanJng System 580,752040 Main Unit _ Parts List item Part # Description 203009GS ASSY, Base R202522GS HANDLE 203010GS ASSY,6hem Tank w/Decal & Clips 195964GS Clip 1929BOGS Kit, Valve 200200GS ASSY, Pump (see pages 26-27) 194298GS Vaive, Thermal Relief 23139GS 192525GS KiT, Pump Mounting Hardware...
- Page 26 CRAFTSMAN 2200 PSi CJeanin9 System580_752040 Pemp-- Expi0dedView © ® © JJJj...
- Page 27 CRAFTSMAN2200 PSI CteanJngSystem 580.752040 Pemp _ Parts List item Part # Description 200274GS PLUG, Elastic 190578GS 200298GS KIT, CHECKVALVES 200278GS KIT,WATER INLET 200279GS KIT, CHEMICALINJECTION 200280GS KIT, HIGH PRESSURESEALS 200281GS KIT. CHEMINJECTVENTUR! 200282GS KIT, PUMP HEAD,ALUM 200283GS KIT, BY-PASS 189971GS KIT, CHEMICALHOSE items Net HIustrated B2384GS...
- Page 28 ENGINE_Briggs & Stratton_ 10T502 - Exploded View 842 O 524 O 718A 741 / 337J 1095 'vALVE G ASKET SET 15 @ 22__ 455 (_) 592 _ t211 305 @1_ 1210_...
- Page 29 ENGINE, Briggs & Stratton, 10T502 - Exploded View 2ol/_ 633 @ 724 0 190A_ 358 ENGINE GASKETSET 842 0 163 ©...
- Page 30 ENGJHE,Briggs & Stratton, 10T502 - Parts List mtem Part# Description item Part # Description Muffler 394569S 699653 Cylinder Assembly 694051 Housi%-BIowar 399269 Kit-Bushing/Seal (Magneto Side) 692198 Screw(BlowerHousing) 299819S Seal-Oil (Magneto Side) 690400 Shield-Cylinder 698691 Sump-Engine 690345 Screw(Cylinder Shield) 790169 Head-Cylinder 690662 Nut (Flywheel) 698717...
- Page 32 Sears, Roebuck and Co., &S,A, (Sears), the California Air Resources Board ICARB) and the United States Environmental Protection Agency {U,S,EPA) Emissions CentromSystem Warranty Statement ISwneCs Defect Warranty Rights and 8hmigations) The California Air Resources Board (CARB), U.S. EPA and Sears are Carburetor and hrternal parts pleased to explain the Emissions Centre[ System Warranty on your Fuel Pump...
- Page 33 EmJ_ion information Certain engines wiii be certified to meet the United States Environmental Protection Agency (USEPA)Phase 2 emission Enginesthat are certified to meet the California Air Resources standards. For phase 2 certified engines, the Emissions Board (CARB) Tier 2 Emission Standards must display Compiiance Period referred to on the Emissions Compliance information regarding the Emissions Durabiiity Period and Air label indicates the number of operating hours for which the...
- Page 34 Si la limpiadora a presiOn falla debido a defectos de materiales o rnalsode obra en el plazo de un aiio a partir de la fecha de compra, devuGIvalaa cualquier almac@ Sears_punto de venta de Craftsman o centro de reparaci@ y repuestos de Sears de los Estados Unidos o Canad_ para su reparaci@ gratuJta o en caso de que 6sta no sea posibb, para su sustituci6n.
- Page 35 AgVERTENCiA ADVERTENCIA EJescape deJ motor de este producto contJene eJementos La gasolina y sus vapores son extremadamente quJmJ¢os re¢onocJdos en eJ Estado de CaJJfornJa inflamables y exp!osivos. pot producJr ¢_ncer, defectos de nachnJento u otros dafios de tJpo reproductive. severas e inclusive la muerte. E[ fuego o una explosi6n pueden causar quernaduras ADVERTENCJA...
- Page 36 ADVERTENCJA ADVERTENCJA El retroceso (repliegue rApido) del cable del arrancador El chorro de agua a alta presiOn que este equipo puede producir lesiones. El retroceso impedir_ que e! produce puede atravesar la piel y los tejidos tiernpo usuario suelte el cable a y tirarA de su mano y brazo Isacia el motor.
- Page 37 AVI$O ADVERTENCJA El rociado de alta presi0!l puede da#ar elementos frAgiles, El arrancador y otras piezas que rotan pueden enredar incluye!_do e l vidrio. pelo, las manos, el la ropa, o los accesorios. NO dirija la pistola rociadora hacia un cristal cuando utilice la boquilla MAX (punta de alfiler).
- Page 38 CONOZCA S UiVIAQUiNA $ iSTEiVIA DELUVIPiEZA 1 ]Lou o, M u.ou, °0, o,o u ,e o ,us oo s o o ,OuO u.tos oo , e.o o. m u o u oo ,stomu oo , ,m,,o,u..Compare las ilustruciolses con su sistema de I[rnpieza puru familiarizarse con lus ubicaciones de los d[fereetes coetroles y ujustes. Guurde este manual puru referencius futures.
- Page 39 Su sistema de lirnpieza requiere de cierto ensambIe y esta_ lista 6onecte boquilla la extension al pistola rociadora. paa ser usado 0nicamente despuOsde haber depositado el Selecto/conecta r@ido conecta punta de rociado a la extension combustible y el aceite recomendado. de la boqui% Si tbne probbmas conem ensamhb de su m0quina Hmpiadora a Cenecte e! Manuhrie y Limpiar el Tanque...
- Page 40 Agregue Gaseiina Inserte el gancho de alambre de soporte (A) de la pistola a trav_s del orificio situado justo encima det lirnpiar el tanque en el izquierda de la manubrio (visto des@ la parte delantera de la El ¢embustJMedebe reunJrles sJ_uJentesrequisites: unidad).
- Page 41 Cenecte _a Manguera y el $uministre de Agua a Instale la tapa de! tanque de combustible y la espera para algOncombustible rociado para evaporar. la Bemha iPRECAIJCJON! Los combustibles con mezclade alcohol (gasohol, etanol o metanol) poeden atraer la bumedady provocar la 1/0 bagafuncionarla bornba si no tieoeel surninistroconectado yj separaciOny formaciOn de _cidos durante el ah_nacenamiento.
- Page 42 Antes de que conecte la manguera de iardin a la entrada de ABRA el agua, apunte con la pistola hacia una direcci6n segura agua, inspeccionee! colador de la entrada (A). Limpie el colador y apriete el gati% para eliminar el aire y las impurezas del sistema de bombeo.
- Page 43 COMOUSAR$[J $JSTEMA#E LJMPJEZA Para Peaer en Mareha el $istema de Limpieza Para dar[e arranque a su sistema de limpieza movido a motor por Si tiene probIernas con el funcionamiento de su m_qui_a B_npiadora primera vez siga estas instrucciones paso a paso. Esta informaciOn a presi6n, por favor !lamea la B_eade ayuda de la rn_quina acerca de la puesta en rnarcha inicial tambi6n es vAlida para cuando Iimpiadora a presi6n al 1-888-222-3136.
- Page 44 10. Aseg8rese de que la control de la vAlvuIade adrnisi6n se ADVERTENCJA encuentre en la posiciOn "Rdpide" ("Fast") (A), que se distingue de un conejo. El retroceso (repliegue rApido) del cable del arrancador puede producir lesiones. El retroceso impedir5 que el usuario suelte el cable a tiempo y tirar_ de su rnano y brazo hacia el motor.
- Page 45 NOTA: Siempre rnalstenga lacontrol de vdlvuIa deregulaciOn enel C6me usar las puntas de retie "Rdpide" ("Fast") posicione cuAndo operar lalirnpiadora apresi6n. La conexi6n r_pida de la extension para boquillas le permite usar quatro puntas de rocio diferentes. Siempre que est_ activado el C_me Detener $u $iste, ma de Limpieza seguro del gatillo de la pistoIa rociadora se pueden cambiar las SueIte e[ gatillo de la pistoIa rociadora y deje funcionar el...
- Page 46 Seleccione la puntade rociadodeseada: Reviseel uso de la puntas de rocio. Parsun enjuagado suave(bajapresiOn y mayorcaudal), Prepare la soluci6n detergente siguiendo las instrucciones del fabricante. parauna limpieza suavede coches/camiones, barcos, RVs,muebles dejardn, cortac_spedes, etc., seleccione la Aseg(irese de que la Ilave de paso de detergente del depOsito puntsde rociadoUancade40°, de lirnpieza estA en la posici6n "Off".
- Page 47 Enjuage de Ja M_quina Lirnpiadora a Presi6n Ap[iqueun rociadode a[tapresiOn a unapeque_a zonay luego compruebe si seha producidoaIgOn tipo de da_o.Si no apreciadafios,continOe en e!paso7. gespu_s de haber apJicado eJdeter_ente, refrie_ue Jasuperficie y enjua_eJa de Jasi_uiente manera: Comience en la partesuperiorde!Areaqueva a eniuagar, dirigi6ndose haciaabajocon los rnisrnosmovirnientos Coloque el cerrojo de seguridad a la pistola de rociado.
- Page 48 JNFORMACJ6N TECNJCA $OBRE EL IOTOR ESPECJFJCACJONE$ DEL PRODUCTO El motor esde unocilindros,de L-cabeza, refrigerado por aire y de Especificacienes de _a_a_quina Limpiadora a bajaemisiOn. Presi6n Enel Estado de California,los motoresde la serie100000han PresiOn desalidam_xima 2,200PSi obtenidola ce!tificaciOn dei California Air Resources Board(Consejo Caudal r n_x[rno ........
- Page 49 BESPONSABJLJDADES #EL PRSPJETABJO Siga el programa de maRteRimientoseg@ e] ROrnero de I_oraso segOnel calendario, [o que suceda pr[mero. Se requ[ere de servicio COR mayor frecuencia cuaRdoopere la uR[dad on las condiciones adversas descritas a continuaci6n INTERVALODE OPERAOIONPOR NORA CALENDARlO DE MANTENIMIENTO FEOHAS DE SERVIClO ANOTE LAS FECHASCONFORMECUMPLA Antes de...
- Page 50 Remuevala punta de rocio del extremo de la extension de la AVI$O boquilla. El tratamiento inadecuado del lirnpiadora a presi6n puede da[iar!o Useel pequdio sujeta papeIes para liberar cualquier material ' acortar su vidaj_roductiva. extraiio que est_ tapando la punta de rocio (A). I'_1o i nsertecualquierobjetoa trav6sde lasranurasde enfriamiente.
- Page 51 MANTENJMJENTO DEEMOTOR Compm'obaci_n del nivel de aceite Compruebe el nivel de aceite antes de cada usa o cada 5 horas de ,, ADVERTENCJA funcionamiento, coma minima. ReIIenesies necesario. Coloque e! limpiadora a presiOn sabre una superficie nivdada. Retire la variIla de medici6n y limpie la varflla de medici6n. Chispear involuntario puedetener coma resultado el InstaIe e] varflla de mediciOn, apriete firmemente.
- Page 52 Remplacela Buj a Incline su rn_quina limpiadora a presiOn para drenar el aceite a trav_s del orificio de Ilenado en un recipiente adecuado Remplacela bujia anLlalrneeteo cada 100 horas de operaci6n asegurAndosede inclinar la unidad hacia el lade opuesto de la Lirnpie el area ahededor de la bu]iay retirela.
- Page 53 $istema de RefrigeratiOn de AJre Pare e[ motor, cierre la al[mentaci6n de ague, apunte con [a pistoIa rociadora hacia una direcciOn segura y apriete el gat[llo Con el t[empo, se pueden acumu[ar res[duos en las aletas de pare descargar la presi6n, active el seguro de] gati% de la refrigeraciOnde! cilindro y pasar inadvertidos rnientras no se pistola rociadora y deje enfriar el motor.
- Page 54 ALMACENAMJENTO PARAJNVJERNO ALJ ACENAJ JENTOPROLONGADO Si usted no planea usar la rn_quina lirnpiadora a presiOn pot m_s de AVJ$O 30 dias, deber_ preparar el motor para un almacenarniento prolongado. Usted deber_ proteger su unidad de las ternperaturas de _elamiento. Es importante evitar laformaciOn de dep6sitos de goma en las si no Io hace, d a_ar_permanentemente la bombay la unidadno podr_ partes esenciales del sisterna del combustible tales como funcionar.
- Page 55 Camh[e de aceite etras sugeren¢ias pars el almaeenamiente Con el motor todav[a cal[elste,drene el aceite de la caja de! cig8ei_al NO guards combustible de una temporada a otra a menos que Io hays tratado corno se [ndica en la secciOnAditivo pare Vuelva a IIenar!o con el grado de aceite recomendado.
- Page 56 Prebmema SolutiOn Est_ usando [a puntas de rocio de baja Cambie la puntas de rocfo a una de las dos presi6n (negra). puntas de rocio de alta presiOe. La entrada de ague est_ b!oqueada. Limpie la entrada. Suministro de ague inadecuado. Proporcione fIujo de ague adecuado.
- Page 58 California Air Resources Board (CARB) U.S. EPAy Sears le explican a continuaci6n Carburador y partes internas la garantia del sistema de control de emisiones de su pequ@o motor para mdquinas Bomba de combustible de servicio (SORE, Small Offroad Engine). En California, los modelos de peque_os Tube de combustible, acoplamientos del tube de combustible,...
- Page 59 [nfermac[6n sehre emisiones Algunos rnotores cuentan con la certificaciOn de curnplimiento de la fase 2 de las normas sobre emisioees de la United States Los motores con certificacl6n de cumplhnieeto de la normativa Environmental Protection Agency (USEPA Ageecia estadourfideese sobre emisioees de nivel 2 del California Air Resources Board de protecciOndel medioambiente ).
- Page 60 iiiiiiiiiiiiiiiii!! Voor Home ::::::::::: For repair-in your home all major brand appliances, lawn and garden equipment, or heating and cooling systems, no matter who made it, no matter who sold it! ....For the replacement parts, accessories owner's manuals that you need to do-it-yourself....