Yamaha Tyros4 Owner's Manual
Digital workstation
Hide thumbs
Also See for Tyros4:
- Service manual (174 pages) ,
- Reference manual (141 pages) ,
- Manual (102 pages)

Related Manuals for Yamaha Tyros4


Summary of Contents for Yamaha Tyros4
- Page 1 Owner’s Manual Before using the instrument, be sure to read “PRECAUTIONS” on pages 4–5.
-
Page 2: Special Message Section
SPECIFICATIONS SUBJECT TO CHANGE: The information contained in this manual is believed to be cor- rect at the time of printing. However, Yamaha reserves the right to change or modify any of the specifications without Model notice or obligation to update existing units. -
Page 3: Important Safety Instructions
Protect the power cord from being walked on or pinched dropped. particularly at plugs, convenience receptacles, and the point where they exit from the apparatus. WARNING TO REDUCE THE RISK OF FIRE OR ELECTRIC SHOCK, DO NOT EXPOSE THIS APPARATUS TO RAIN OR MOISTURE. (UL60065_03) Tyros4 Owner’s Manual... - Page 4 • The power cord or plug becomes frayed or damaged. and have it inspected by qualified Yamaha service personnel. • It emits unusual smells or smoke. • Some object has been dropped into the instrument.
-
Page 5: Saving Data
Yamaha cannot be held responsible for damage caused by improper use or modifications to the instrument, or data that is lost or destroyed. Always turn the power off when the instrument is not in use. -
Page 6: About This Manual
As a result, this device may not play them back precisely as their producers or composers originally intended. • The photos of the harpsichord, bandneon, hackbrett, music box, dulcimer and cimbalom, shown in the displays of the Tyros4, are courtesy of the Gakki Shiryokan (Collection for organolgy), Kunitachi College of Music. -
Page 7: Included Accessories
Enables MIDI communication and control between the instrument and the computer. • Voice Editor Enables you to edit the Tyros4 Voices on your computer and create your original Voices. For details, see the separate Installation Guide or the online manual included with the software. -
Page 8: About The Manuals
Online Materials (Downloadable from the web) The following instructional materials are available for downloading from the Yamaha Manual Library. Access the Yamaha Manual Library, then enter your model name, Tyros4 in the Model Name area to search the manuals. Yamaha Manual Library http://www.yamaha.co.jp/manual/... -
Page 9: Main Features
Yamaha has a special website (http://music-tyros.com/) featuring Premium Voices, Waves, Songs and Styles, etc. (called Pre- mium Pack data) that can be purchased and loaded to the Tyros4. (In order to use the additional Waves and Voices you pur- chased, you’ll need to install the optional Flash Memory Expansion Module.) ... -
Page 10: Table Of Contents
Using Song Position Markers......................... 61 Turning Song Channels On/Off......................62 Multi Pads – Adding Musical Phrases to Your Performance – Playing the Multi Pads ........................... 64 Using the Multi Pad Synchro Start Function ..................65 Using Chord Match ..........................65 Tyros4 Owner’s Manual... - Page 11 Entering the Internet Direct Connection Function .................. 90 Connecting the Instrument to the Internet....................90 Operations in the Special Website......................92 Connections – Using Tyros4 with Other Devices – Connecting a Microphone ........................94 Connecting Audio Devices........................96 Connecting a Separate TV Monitor/Computer Monitor................98 Connecting Footswitches/Foot Controllers ....................
-
Page 12: Panel Controls And Terminals
!5 MULTI PAD CONTROL buttons ....Page 64 Applies a vibrato effect, etc. Selects and plays a rhythmic or melodic Multi Pad phrase. i ART. 1/ART. 2 buttons........Page 40 !6 TRANSPOSE buttons ........Page 39 Controls Super Articulation Voices. Transposes the pitch in semitone steps. Tyros4 Owner’s Manual... - Page 13 Voices, Styles, Songs and Multi Pads. #1 USB TO DEVICE terminal......Page 100 @2 AUDIO RECORDER/PLAYER buttons..Page 76 For connecting USB storage device. Records your performance in audio format. @3 VOICE EFFECT buttons ........Page 42 Applies some effects to the keyboard performance. Tyros4 Owner’s Manual...
-
Page 14: Rear Panel
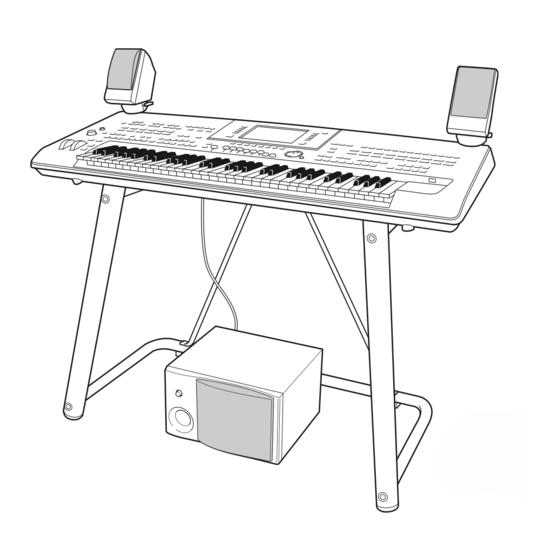
Check carefully that all parts (two music rest brackets and one music rest) are included before following the instructions below. Attach the two music rest brackets to the inside slot on the rear panel. Attach the music rest to the brackets. Use the inside slots (as shown). Tyros4 Owner’s Manual... - Page 15 Connecting Headphones or Optional Speaker Since the Tyros4 has no built-in speakers, you’ll need to monitor the sound of the instrument by using external equip- ment. Connect a set of headphones to the [PHONES] jack or use the speaker system, such as the optional TRS-MS04 speakers.
-
Page 16: Starting Up
Starting Up This section contains information about setting up your Tyros4 and preparing to play. Be sure to read through this section carefully before turning the power on. Power Supply Make sure the power on/off switch on the Tyros4 is WARNING set to off. -
Page 17: Raising The Display Panel
Display the version number To check the version number of this instrument, press the [7 ]/[8 ] (VERSION) buttons in the display in step 2 above. Press the [EXIT] button or [8 ] button to return to the original display. Tyros4 Owner’s Manual... -
Page 18: Playing The Demo
Playing the Demo Overview Demo will play back continuously, calling up the various displays in sequence. Press the [DEMO] button to start the Demo. Press the [EXIT] button to exit from the Demo. Tyros4 Owner’s Manual... -
Page 19: Basic Operations
[A]–[J] buttons can be used to select the corresponding respective files. Example 2 The [A] and [B] buttons are used to move the The [G], [H] and [I] buttons are used to cursor up or down. select the corresponding parameter. Tyros4 Owner’s Manual... - Page 20 If a menu appears in If a parameter appears this section of the dis- in slider (or knob) form, play, use the [1 ]– use the [1 ]– [8 ] buttons. [8 ] button to adjust the value. Tyros4 Owner’s Manual...
- Page 21 (ex., TEMPO [+]), then rotate the [DATA ENTRY] dial and press [ENTER] to close the window. [EXIT] button No matter where you are in the Tyros4 display hierarchy, the [EXIT] button will return you to the next highest level or to the previously indicated display.
-
Page 22: The Messages Shown In The Display
Fingering type for accompaniment playback can be set. Refer to the Data List for a list of the displays that can be called up with the Direct Access function. The Data List is available at the Yamaha website. (See page 8.) Tyros4 Owner’s Manual... -
Page 23: Main Display Configuration
Displays the currently selected Registration Memory Bank name and Registration Mem- ory number. Pressing the [J] button calls up the Registration Memory Bank Selection display (page 73). o Transpose Displays the amount of transposition in semitone units (page 39). Tyros4 Owner’s Manual... -
Page 24: File Selection Display Configuration
VOICE or STYLE category selection buttons, MULTI PAD CONTROL [SELECT] button, etc. SONG selection MULTI PAD CONTROL REGIST BANK AUDIO RECORDER/PLAYER buttons [SELECT] button selection buttons [SELECT] button [VH TYPE SELECT] button STYLE category selection buttons VOICE category selection buttons Tyros4 Owner’s Manual... - Page 25 The PRESET Voice files are categorized and contained in appropriate folders. The next highest level—in this case, folder—is shown. Each folder shown in this display contains appropriately cate- gorized Voices. This display shows the Voice files in a folder. Tyros4 Owner’s Manual...
- Page 26 The File Selection display actually has two different view types. One is Normal View, which we’ve seen up until this point. The other is List View, which lets you open files according to their numbers. Since the Tyros4 has many files spread out over several pages, number input in List View may be quicker and more convenient—providing you know the...
- Page 27 To call up the memorized path for a Song, simply press the appropriate SONG button selected in step 2. To call up the memorized path for a Style, first turn on the [FILE ACCESS] button, then press the appropriate STYLE button selected in step 2. Tyros4 Owner’s Manual...
-
Page 28: File Management
Press the [7 ] (FOLDER) button to call up the naming display for a new folder. Input the name of the new folder (see page 31). NOTE The following marks cannot be entered for a file/folder name. ¥ / : * ? " < > | Tyros4 Owner’s Manual... - Page 29 Call up the display containing the file/folder you want to copy. Press the [3 ] (COPY) button to copy or [2 ] (CUT) to move. The pop-up window for the Cut operation appears at the bottom of the display. NEXT PAGE Tyros4 Owner’s Manual...
-
Page 30: Deleting Files/Folders
To cancel the Delete operation, press the [8 ] (CANCEL) button. Follow the on-display instructions. • YES ......Delete the file/folder • YES ALL .....Delete all selected files/folders • NO ......Leave the file/folder as is without deleting • CANCEL .....Cancel the Delete operation Tyros4 Owner’s Manual... -
Page 31: Entering Characters
ENTRY] dial. The ICON display includes several pages. Press the TAB [][] but- NOTE tons to select different pages. To cancel the operation, press the [8 ] (CANCEL) button. Press the [8 ] (OK) button to apply the selected icon. Tyros4 Owner’s Manual... -
Page 32: Restoring The Factory-Programmed Settings
[][] SYSTEM RESET. For details, refer to the Reference Manual on the website. Data Backup For maximum data security Yamaha recommends that you copy or save your important data to a USB storage device. This provides a convenient backup if the internal memory is damaged. -
Page 33: Voices
Voices – Playing the Keyboard – The Tyros4 features a wide variety of exceptionally realistic instrumen- tal Voices, including piano, guitar, strings, brass, wind instruments and more. Playing Preset Voices Selecting a Voice (RIGHT 1) and playing the keyboard Press the PART SELECT [RIGHT 1] button. -
Page 34: Playing Two Or Three Voices Simultaneously
Play the keyboard. Recalling your favorite Voices easily The Tyros4 has a huge amount of high-quality Voices, covering an exceptionally broad range of instrument sounds—making it perfect for virtually every musical application. However, the sheer number of Voices may seem overwhelming at first. By using the [USER DRIVE] button, you can easily recall your favorite Voice. -
Page 35: Playing Different Voices With The Left And Right Hands
Split Point are set for playing the RIGHT 1–3 parts. NOTE To change the Split Point, press: [FUNCTION] [C] STYLE SETTING/SPLIT POINT/CHORD FINGERING TAB [][] SPLIT POINT. For more information, refer to the Reference Manual on the website. Tyros4 Owner’s Manual... -
Page 36: Voice Types
Any Song, Style or Multi Pads explained. These Voices have special characteristics you should be aware of, and they data you’ve created on the Tyros4 using these Voices will not sound properly require specific performance techniques to bring out all of their expressive qualities. - Page 37 If you move the Modulation wheel when you play the SA2 Voice (using AEM technology), you can also control the depth of the vibrato, while maintaining its realistic quality. Tyros4 Owner’s Manual...
-
Page 38: Purchasing And Installing Premium Pack Data
Imports the license key which has been issued from the website from USB flash memory to the instrument. CLEAR Deletes the license key registered in the instrument. NOTICE If you delete the license key, the data you bought previously will become unusable. Tyros4 Owner’s Manual... -
Page 39: Transposing The Pitch Of The Keyboard
Style setting. The maximum pitch bend range can be changed on the Mixing Console display: [MIX- ING CONSOLE] TAB [][] TUNE [H] PITCH BEND RANGE. Tyros4 Owner’s Manual... -
Page 40: Adding Articulation Effects To Super Articulation Voices
SA guitar Voice can produce fret noise or body-tapping sound. You can effectively intersperse these into the notes as you play. While the articulation effect sounds, the button lights in red. Articulation Sound Blue Tyros4 Owner’s Manual... - Page 41 (Left part) is kept in standby status, the button continues flashing. To cancel the standby status, you need to play the keyboard in the Left part range. (Pressing the flashing button cannot cancel standby status, because this can cancel the standby of the Left part but turns the Right part to standby again.) Tyros4 Owner’s Manual...
-
Page 42: Applying Voice Effects
Applying Voice Effects The Tyros4 features a sophisticated multi-processor effect system which can add extraordinary depth and expression to your sound. This effect system can be turned on or off by using the following buttons. These three effect systems are applied... - Page 43 Many of the Voices have been automatically set to play certain Harmony/Echo types that match the particular Voice. Try out some of Voices. You can also change the Harmony/Echo type: [FUNCTION] [F] HARMONY/ECHO. Tyros4 Owner’s Manual...
-
Page 44: Creating Your Original Organ Flutes Voices
Creating Your Original Organ Flutes Voices The Tyros4 uses advanced digital technology to recreate the legendary sound of vintage organs. Just as on a traditional organ, you can create your own sound by increasing and decreasing the levels of the flute footages. - Page 45 • Loading a single Additional Voice to the Tyros4: [VOICE CREATOR] [A] LIBRARY LOAD • Loading an Expansion Voice Bank (Library) to the Tyros4: [VOICE CREATOR] [F] CUSTOM VOICE EDIT via PC • Editing a Custom Voice on your computer: Tyros4 Owner’s Manual...
-
Page 46: Styles
Styles – Playing Rhythm and Accompaniment – The Tyros4 features a variety of accompaniment and rhythmic backing patterns (called “Styles”) in a variety of different musical genres including pop, jazz, and many others. The Style features Auto Accom- paniment, letting you produce automatic accompaniment playback simply by playing “chords”... - Page 47 The Tyros4 uses the SFF GE file format (page 9). The Tyros4 can play back existing SFF files, but they will be saved in the SFF GE format when the file is saved (or pasted) in the Tyros4. Please keep in mind that the saved file can only be played back on instruments that are compatible with the SFF GE format.
-
Page 48: Operating Style Playback
TAB [][] CHORD FINGERING INTRO [I]–[III] buttons The Tyros4 features three different Intro sections to add an introduction before starting the Style playback. After pressing one of the INTRO [I]–[III] buttons, start playback by using the [START/STOP] button or [SYNC START] button. When the Intro finishes playing, the Style playback automatically shifts to the Main section. -
Page 49: Adjusting The Tempo
[FADE IN/OUT] button when playback is stopped and press the [START/STOP] button to This operation is common for Song start playback with a fade in. To stop the playback with a fade out, press the [FADE IN/ playback (page 58). OUT] button during playback. Tyros4 Owner’s Manual... -
Page 50: Calling Up The Panel Settings To Match The Style (Repertoire)
The settings shown here are Music Finder Records. You can choose addi- tional settings by using the Music Finder feature (page 68). NOTE Depending on the particular selected Style, there may not be any panel set- tings in the Repertoire function. Tyros4 Owner’s Manual... -
Page 51: Appropriate Panel Settings For The Selected Style (One Touch Setting)
Information display. You can also call up the Information display by pressing the [DIRECT ACCESS] button then pressing one of the ONE TOUCH SETTING [1]–[4] but- tons. Press the [F] (CLOSE) button to close the Information display. Tyros4 Owner’s Manual... -
Page 52: Turning Style Parts On/Off And Changing Voices
The Voice Selection display is called up from which you can select the Voice to be used for the channel. See page 34. Press the [EXIT] button to close the CHANNEL ON/OFF display. NOTE When the Main display is shown, the CHANNEL ON/OFF display cannot be closed. Tyros4 Owner’s Manual... -
Page 53: Adjusting The Volume Balance Between The Style And Keyboard
In this display, you can also adjust the volume of Audio Recorder/Player (by adjust the volume for each Style part. [5] slider or buttons) and overall keyboard parts (by [8] slider or buttons). See page 89. BALANCE (1/2) BALANCE (2/2) Tyros4 Owner’s Manual... - Page 54 • Step Recording: TAB [][] ASSEMBLY • Style Assembly: TAB [][] GROOVE • Editing the Rhythmic Feel: TAB [][] CHANNEL • Editing Data for Each Channel: TAB [][] PARAMETER • Making Style File Format Settings: Tyros4 Owner’s Manual...
-
Page 55: Songs
Press the SONG [REC] button and the [STOP] button simultane- ously. A blank Song for recording is automatically set. Press the SONG [REC] button. This enables recording of all Tyros4 parts, according to the default MIDI channel assignments (shown in the chart above). Start recording. NOTE... - Page 56 If you want to record the Right 1 part to channel 1, for example, press the [1 ] button while holding down the [REC] button to set the channel 1 to “REC.” Then use the [C]/[D] buttons to select “RIGHT 1.” After proceeding with steps 3–5, re-select other channels and record other parts as desired. Tyros4 Owner’s Manual...
-
Page 57: Saving Files
Press the [8 ] (OK) button to save the file. NOTE The saved file will be automatically located at the appropriate position among the If you want to cancel the Save operation, press the [8 ] (CANCEL) button. files in alphabetical order. Tyros4 Owner’s Manual... -
Page 58: Playback Of Songs
Song is playing back. The “NEXT” indication appears at the upper right of the corresponding Song name. To cancel this setting, press the [8 ] (NEXT CANCEL) button. Press the SONG [STOP] button to stop playback. Tyros4 Owner’s Manual... - Page 59 • Prot. 1: Indicates Preset Songs saved to the User drive. These cannot be copied/moved/saved to external devices. • Prot. 2 Orig: Indicates Yamaha-protection-formatted Songs. These cannot be copied. These can be moved/ saved only to the User drive and USB storage devices with ID.
-
Page 60: Displaying Music Notation (Score)
Displaying Lyrics (Text) When the selected Song contains lyric data, you can view it on the Tyros4 display during playback. Even if the Song doesn’t contain lyrics data, you can view the lyrics on the display by loading the text file (.txt) created on a computer via USB storage device. -
Page 61: Using Song Position Markers
• Green: Song Position is memorized to the button. • Off: Song Position is not memorized to the button. Starting Playback from a Specific Marker First press the desired SP button (while song playback is stopped), then press the [PLAY/PAUSE] button. Tyros4 Owner’s Manual... -
Page 62: Turning Song Channels On/Off
If you want to play back only one particular channel (solo playback), press and hold down one of the [1 ]–[8 ] buttons corresponding to the desired channel. Only the selected channel is turned to on and others are off. To cancel solo playback, press the same button again. Tyros4 Owner’s Manual... - Page 63 TAB [][] REC MODE • Re-Recording a Specific Section —Punch In/Out: TAB [][] CHANNEL • Editing Channel Events: TAB [][] CHORD, 1–16, SYS/EX. or LYRICS • Editing Chord events, Notes, System Exclusive events and Lyrics: Tyros4 Owner’s Manual...
-
Page 64: Multi Pads
Multi Pads are grouped in Banks of four each. The Tyros4 features a variety of Multi Pad Banks in a variety of different musical genres. -
Page 65: Using The Multi Pad Synchro Start Function
Advanced Features Refer to the Reference Manual on the website, Chapter 4. [DIGITAL RECORDING] [C] MULTI PAD CREATOR Multi Pad creating (Multi Pad Creator): Multi Pad Bank Selection display [8 ] (EDIT) Multi Pad editing: Tyros4 Owner’s Manual... -
Page 66: Music Finder
As a factory default, some sample records (panel settings) are provided in the Music sure to read “Connecting a USB Storage Finder. By downloading many panel settings from Yamaha website and importing them Device” on page 100. to the instrument, you can use the Music Finder function more conveniently and effec- NOTICE tively. - Page 67 Selection display (page 70) For information on registering the • Audio (AUDIO): Audio data which is registered to the Music Finder from the Audio Song/Audio data to the Music Finder, refer to page 70. (Simple) File Selection display (page 70) Tyros4 Owner’s Manual...
-
Page 68: Selecting The Desired Song From Among The Panel Settings
Play the chords in the left-hand section (page 35) of the key- NOTE board. If you want to avoid changing the Tempo during Style playback when selecting another record, turn on the Tempo Lock function by pressing the [I] (STYLE TEMPO) button in the Music Finder dis- play. Tyros4 Owner’s Manual... -
Page 69: Searching The Panel Settings
The Search 1 display appears, showing the results of the search. If you wish to search another criteria, press the [6 ] (SEARCH 2) button in the Music Finder display. The search result is displayed in the SEARCH 2 display. Tyros4 Owner’s Manual... -
Page 70: Registering The Song/Audio Data (Song/Audio)
(Audio file) in the Audio (Simple) File Selection dis- and MP3 files can be registered. play. Press the TAB [][] buttons to select the location of the desired Audio. Press the [A] – [J] buttons corresponding to the desired file. NEXT PAGE Tyros4 Owner’s Manual... - Page 71 [MUSIC FINDER] [8 ] (RECORD EDIT) Editing Records: [MUSIC FINDER] [7 ] (FILES) Saving the Record as a Single File: Viewing Record Information on the Internet [MUSIC FINDER] [J] (MUSIC FINDER +) (MUSIC FINDER Plus): Tyros4 Owner’s Manual...
-
Page 72: Registration Memory
Select the desired item by using the [2 ]–[7 ] buttons, then enter or remove the checkmark by using the [8 ] (MARK ON)/ [8 ] (MARK OFF) but- tons. To cancel the operation, press the [I] (CANCEL) button. NEXT PAGE Tyros4 Owner’s Manual... -
Page 73: Saving The Registration Memory As A Bank File
Bank 04 Bank 03 Bank 02 Bank 01 Press the REGIST BANK [+] and [-] buttons simultaneously to call up the Registration Bank Selection Display. Press the [6 ] (SAVE) button to save the Bank file (page 57). Tyros4 Owner’s Manual... -
Page 74: Recalling A Registered Panel Setup
Refer to the Reference Manual on the website, Chapter 6. [FUNCTION] [E] REGIST SEQUENCE/FREEZE/VOICE SET TAB [][] Disabling recall of specific items (Freeze): FREEZE [FUNCTION] [E] REGIST SEQUENCE/FREEZE/VOICE SET TAB [][] Calling up Registration Memory numbers in order (Registration Sequence): REGISTRATION SEQUENCE Tyros4 Owner’s Manual... -
Page 75: Audio Recorder/Player
.aud (Tyros4 original: 44.1 kHz sample rate, 16 bit resolution, stereo) IMPORTANT • The .aud file saved with the Multi Track recording can be played back only on the Tyros4. • If you want to convert the .aud file to the .wav file (Simple recording file), perform the instructions below. -
Page 76: Recording Your Performance
Recording Your Performance The following sounds can be recorded. NOTE • Internal sound of the Tyros4 (Keyboard parts (Right 1, Right 2, Right 3, Left), Multi Pad, Input from the [AUX IN] jacks cannot be recorded. Song parts, Style parts) •... -
Page 77: Multi Track Recording
[G] (REDO) button. For details on file management, see page 28. Press the [REC] button to enable recording. Start again with Step 4 in “Multi Track Recording”. NEXT PAGE Tyros4 Owner’s Manual... - Page 78 On the TRACK PLAY meter, you can adjust the volume of Main and Sub tracks separately. Use the [2 ]/[3 ] buttons or sliders to adjust the Main/Sub track volume. By using the [1 ]/[4 ] buttons, you can also mute the Main/Sub tracks. NEXT PAGE Tyros4 Owner’s Manual...
- Page 79 NOTE If necessary, convert the Multi Track recording file (.aud) to a The converted .wav file allows playback Simple recording file (.wav). on devices other than the Tyros4, and also playback on the Tyros4 from the USB flash memory. 15-1 Press the [J] (MIXDOWN) button to call up the MIXDOWN display.
-
Page 80: Audio Data Playback
Audio Data Playback Refer to page 75 for the file formats that can be played back on the Tyros4. NOTE • If you want to play back the audio data Press the AUDIO RECORDER/PLAYER [SELECT] button several of a USB flash memory, connect the... -
Page 81: Additional Multi Track Options - Converting An Audio File (.Wav/.Mp3) To A Multi Track Recording File (.Aud)
Setting the Start/End Points of the Audio [SETTING] [C] START/END POINT (Multi Track Recording File): Playlist Mode: AUDIO RECORDER/PLAYER [SELECT] (Select an audio data) [6 ] • Creating a Playlist: (ADD TO PLAYLIST) • Playing a Playlist: AUDIO RECORDER/PLAYER [SELECT] Tyros4 Owner’s Manual... -
Page 82: Vocal Harmony
Included in the feature is a Synth Vocoder effect, also newly enhanced for the Tyros4. Synth Vocoder lets you graft the unique characteristics of your voice onto synthesizer and other sounds, for unusual machine‐like or robotic effects, as well as luscious choir sounds, which you can control with your own singing and playing. -
Page 83: Using Vocal Harmony
Using Vocal Harmony The main use for Vocal Harmony is in live performance. Not only does the Tyros4 give you professional quality instru- mental accompaniment as you play, it also lets you add professional quality vocal harmonies to your singing—as you perform! The three different Vocal Harmony sub-modes (Chordal, Vocoder and Vocoder-Mono) produce harmony in dif- ferent ways. - Page 84 Vocoder effect takes the words you say and applies them to the pitch of the chord you play; for Vocoder-Mono, the instrument sounds. effect is only applied to single notes (last note played). Tyros4 Owner’s Manual...
-
Page 85: Using Synth Vocoder
[VH TYPE SELECT] TAB [][] Synth Vocoder (select a Synth Vocoder Editing the Synth Vocoder Types: type [8 ] (EDIT) TAB [][] Overview • Editing the Overview Tab Parameters: TAB [][] Detail • Editing the Detail Tab Parameters: Tyros4 Owner’s Manual... -
Page 86: Mixing Console
– Editing the Volume and Tonal Balance – There are many components that make up the overall sound of the Tyros4. These include MIDI sequence data from the Styles, Songs, and Multi Pads, and audio input from a microphone, as well as the various parts of your keyboard performance. - Page 87 Use the TAB [][] buttons to select the CHANNEL Page. Use the [A]/[B] buttons to select “SETUP”. Press the [D] (EXECUTE) button. Press the [I] button to call up the Song Selection display for saving your data, then save it (page 57). NEXT PAGE Tyros4 Owner’s Manual...
-
Page 88: Master Compressor
[4 ] THRESHOLD Determines the threshold (minimum level at which compression starts). OFFSET [5 ] RATIO OFFSET Determines the ratio of compression (how much the dynamic range is compressed). [7 ] GAIN OFFSET Determines the output level. Tyros4 Owner’s Manual... - Page 89 Editing TUNE parameters: MIXING CONSOLE display TAB [][] EFFECT [F] TYPE Changing an Effect type: MIXING CONSOLE display TAB [][] EQ Editing EQ parameters: MIXING CONSOLE display TAB [][] LINE OUT LINE OUT Settings: Tyros4 Owner’s Manual...
-
Page 90: Internet Direct Connection
Internet-related terms, refer to the Internet Connection Guide, which can be downloaded from the Yamaha Manual Library website. Entering the Internet Direct Connection Function Press the [INTERNET] button. If the instrument is connected to the Internet, the special website appears on the display. -
Page 91: Connection Examples
Access the Manual Library website on the computer browser. Click “Manual Library” from the menu of included CD-ROM, or enter the follow- ing URL directly. http://www.yamaha.co.jp/manual/ Enter your model name (Tyros4) in the Model Name area, then click “Search.” Click “Internet Connection Guide” from Search Results. Connection Examples ... -
Page 92: Operations In The Special Website
TAB [][] buttons instead of the [1 ] (BACK)/[2 ] (FORWARD) buttons. To return to the top page of the special website, press the [3 ] (HOME) button. Press the [5 ] (REFRESH) button to reload a web page and press the [6 ] (STOP) to cancel loading. Tyros4 Owner’s Manual... - Page 93 Refer to the Reference Manual on the website, Chapter 10. [INTERNET] [5 ] SETTING [D] BROWSER SETTINGS Editing the Browser settings: [INTERNET] [4 ] BOOKMARK [3 ] ADD Registering bookmarks of your favorite pages: Tyros4 Owner’s Manual...
-
Page 94: Connections
Connections – Using Tyros4 with Other Devices – NOTICE Before connecting the instrument to other electronic components, turn off the power of all components. Also, before turning any components on or off, make sure to set all volume levels to minimum (0). Otherwise, elec- trical shock or damage to the components may occur. - Page 95 Disconnecting the microphone Set the [MIC GAIN] to “MIN.” Disconnect the microphone from the Tyros4. Adding Vocal Effects to The Microphone Sound Use the [EFFECT] button to determine the on/off setting of the effect applied to the microphone. For information on set- ting the effect, refer to the Reference manual on the website.
-
Page 96: Connecting Audio Devices
Connecting Audio Devices IMPORTANT Since the Tyros4 has no built-in speakers, you need to monitor its sound output via external audio equipment. Alternatively, you could use a pair of headphones (page 15). Connecting the Optional Yamaha TRS-MS04 Speaker Use the [TO RIGHT SPEAKER], [TO LEFT SPEAKER] and [TO SUB WOOFER L/R] jacks. See page 106. - Page 97 [AUX OUT] jacks of the Tyros4 to the [AUX IN] jacks of the audio system using appropriate audio cables. When these are used as LOOP SEND jacks, you can route the output of the Tyros4 to an external signal processor, and return the processed signal back to the instrument via the [AUX IN/LOOP RETURN] jacks—...
-
Page 98: Connecting A Separate Tv Monitor/Computer Monitor
Connecting a Separate TV Monitor/Computer Monitor You can connect the Tyros4 directly to an external monitor for displaying the lyrics and NOTE chords of your song data on a large screen. There are two kinds of output connectors: RGB If the display is not aligned properly in the computer monitor, change the set- OUT (for a computer monitor) and VIDEO OUT (for a TV or video monitor). -
Page 99: Connecting Footswitches/Foot Controllers
Connecting Footswitches/Foot Controllers One or two optional Yamaha FC4 or FC5 footswitches and an optional Yamaha FC7 Foot CAUTION Controller can be connected to one of these ASSIGNABLE FOOT PEDAL jacks. Make sure to connect or discon- nect the pedal only when the By default, a foot pedal connected to jack 1 controls sustain, a foot pedal connected to jack power is off. -
Page 100: Connecting A Usb Storage Device
The instrument does not necessarily support all commer- simultaneously with musical instruments even when a cially available USB devices. Yamaha cannot guarantee USB hub is used is a maximum of two.) This instrument operation of USB devices that you purchase. Before pur-... -
Page 101: Connecting To The Internet
Connecting to the Internet By using the [LAN] or [USB TO DEVICE] terminal, you can connect the instrument to the Internet. For instructions on connecting, refer to page 91 and Internet Connection Guide downloadable from the Yamaha website. Tyros4 Owner’s Manual... -
Page 102: Connecting To A Computer
By connecting a computer to the [USB TO HOST] terminal, you can transfer data between NOTE the Tyros4 and the computer via MIDI, and use the computer to control, edit and organize You need to install a USB-MIDI driver to connect the computer and the instru- data on the Tyros4. - Page 103 When the USB Storage mode is selected, Wave files and Song files can be transferred NOTE between the internal hard disk drive of the Tyros4 and the computer. In the “normal” mode The USB Storage Mode can be used with Windows XP/Vista/7.
-
Page 104: Connecting External Midi Devices
(A, B) are provided and each can receive MIDI mes- sages of 16 channels. • MIDI OUT ..Transmits MIDI messages generated by the Tyros4 to another MIDI device. Two ports (A, B) are provided and each can transmit MIDI messages of 16 channels. -
Page 105: Utility
– Making Global Settings – The Utility section in the Function menu provides a variety of conve- nient tools and settings for the Tyros4. These include general settings that affect the entire instrument, as well as detailed settings for specific functions. -
Page 106: Appendix
Turn the Tyros4’s power off, and disconnect the AC power cord. Also, make sure to disconnect the keyboard from any other external devices. Insert the two speaker brackets to the rear panel of the Tyros4. NOTE Either bracket can be inserted to either location. - Page 107 Tyros4. Tyros4 Sub-Woofer Connect the power plugs of the Tyros4 and the subwoofer to an appropriate AC outlet. First, set the volume controls (MASTER VOLUME on the Tyros4 and MASTER VOLUME on the subwoofer) to minimum. Finally, turn on the power of the subwoofer, then the Tyros4.
-
Page 108: Installing The Optional Flash Memory Expansion Module
Installing the Optional Flash Memory Expansion Module Installing an optional flash memory expansion module to the Tyros4 allows you to import Wave files on a USB storage device or hard disk drive, letting you create your own original Voices, Normal Voices and Drum Voices. (For information on creating original Voices, refer to the Reference Manual on the website.) This section explains how to install an expan-... - Page 109 Re-install the cover you removed in step 3, in reverse order. Check that the installed module is func- (Rear side) tioning properly. Set the Tyros4 right-side up, and then turn the power on. Call up the Format operation display. [VOICE CREATOR] [E] EXPANSION MODULE...
-
Page 110: Troubleshooting
• Data files with names of more than 50 characters cannot be handled by the instru- ment. Rename the file, reducing the number of characters to 50 or less. The Premium Pack data cannot be purchased. Before purchasing the Premium Pack data, obtain the license key (page 38). Tyros4 Owner’s Manual... - Page 111 The sound is slightly different each time the If you are routing the MIDI OUT on the Tyros4 to a sequencer and back to the MIDI IN, keys are played. you may need to set Local Control setting to “off” in the SYSTEM Page of the MIDI dis- play (page 114).
- Page 112 An old USB-MIDI driver which is incompatible with the instrument has been installed to puter, the computer freezes. the computer. Disconnect the instrument from the computer and uninstall the old driver, then install the latest USB-MIDI driver. The latest driver can be downloaded from Yamaha website (http://music-tyros.com/). Tyros4 Owner’s Manual...
-
Page 113: Panel Button Chart
[SYNC START] — — [START/STOP] — — TEMPO [TAP TEMPO] — — TEMPO [-]/[+] TEMPO (pop-up) — MULTI PAD [SELECT] Multi Pad Selection display CONTROL [1]–[4] — — [STOP] — — TRANSPOSE [-]/[+] TRANSPOSE (pop-up) — Tyros4 Owner’s Manual... - Page 114 38, 105 SYSTEM RESET PACK INSTALLATION — [VOICE CREATOR] LIBRARY LOAD LIBRARY EDIT LIBRARY SAVE INDIVIDUAL LOAD EXPANSION MODULE PRESET EXP. CUSTOM VOICE EDIT via PC CUSTOM VOICE ASSEMBLY Tyros4 Owner’s Manual...
- Page 115 — TION MEMORY [FREEZE] — [MEMORY] REGISTRATION MEMORY CONTENTS display — [1]–[8] — — ONE TOUCH [1]–[4] — SETTING PART SELECT [LEFT]–[RIGHT 3] — — PART ON/OFF [LEFT HOLD] — — [LEFT]–[RIGHT 3] — — Tyros4 Owner’s Manual...
-
Page 116: Specifications
164 banks x 4 Pads Control Pad 1–4, STOP, SYNC START Vocal Harmony Preset Vocal Harmony: 44 Synth Vocoder: 10 User * The number is the total of Vocal Harmony and Synth Vocoder. Vocal Effect MIC SETTING USER MEMORY Tyros4 Owner’s Manual... - Page 117 L-7S * Specifications and descriptions in this owner’s manual are for information purposes only. Yamaha Corp. reserves the right to change or modify products or specifications at any time without prior notice. Since specifications, equipment or options may not be the same in every locale, please check with your Yamaha dealer.
-
Page 118: Index
LIBRARY SAVE ........82 Chordal ........44 Footage ......38 LICENSE KEY ........... 86 ......... 99 Footswitche ......86, 96 LINE OUT ..... 102 Computer (Connections) ........101 FORMAT ........26 List view ......98 Computer Monitor Tyros4 Owner’s Manual... - Page 119 ......63 Song Creator ......55 Quick Recording ....61 Song Position Marker ......63 SONG SETTING ......... 29 NAME ........68 SORT BY ..80 NEXT (Audio Recorder/Player) ......68 SORT ORDER ....58 NEXT (Song playback) Tyros4 Owner’s Manual...
- Page 120 .......... 77 Undo ......25 UP (File/Folder) ......39 UPPER OCTAVE ........... 25 ......... 102 USB cable ......91 USB LAN Adaptor ....100 USB storage device ....103 USB Storage Mode ....... 100 USB TO DEVICE Tyros4 Owner’s Manual...
- Page 121 Tyros4 Owner’s Manual...
- Page 122 Tyros4 Owner’s Manual...
- Page 123 Warranty service will only be provided for defective products within the War- ranted Area. Contact your local authorized YAMAHA dealer who will advise you of the procedures to be followed. If this is not successful, contact YAMAHA at the address, telephone number or website shown below. YAMAHA may request that you send the defective product to a local authorized YAMAHA Servicer or authorize return of the defective product to YAMAHA for repair.
- Page 124 Niederlassung und bei Yamaha Vertragshändlern in den jeweiligen Bestimmungsländern erhältlich. Pour plus de détails sur les produits, veuillez-vous adresser à Yamaha ou au distributeur le plus proche de vous figurant dans la liste suivante. Para detalles sobre productos, contacte su tienda Yamaha más cercana o el distribuidor autorizado que se lista debajo.
- Page 125 Yamaha Corporation of America or its subsidiaries. of other electronic devices. Compliance with FCC regulations does * This applies only to products distributed by YAMAHA CORPORATION OF AMERICA. (class B) IMPORTANT NOTICE FOR THE UNITED KINGDOM...
- Page 126 Yamaha Home Keyboards Home Page http://music.yamaha.com/homekeyboard/ Yamaha Manual Library http://www.yamaha.co.jp/manual/ U.R.G., Digital Musical Instruments Division © 2010 Yamaha Corporation 006PODHX.X-01A0 Printed in Japan WU61880...