Table of Contents
Advertisement
Advertisement
Table of Contents

Related Manuals for M-Audio KEYRIG 25


Summary of Contents for M-Audio KEYRIG 25
-
Page 1: User Guide
KeyRig Easy-to-Use 25-Note USB Keyboard User Guide... -
Page 2: Table Of Contents
KeyRig 25 User Guide Table of Contents 3 Introduction Assigning a Note to a Button Assigning RPN/NRPN to a Fader or Knob 3 What’s in the Box? About SysEx Messages and Device ID Assigning the Device ID 3 KeyRig 25 Keyboard Features... -
Page 3: Introduction
Congratulations on your purchase of the KeyRig 25 USB MIDI controller. This powerful keyboard is designed for easy integration with Windows XP and Mac OS X computers and allows you to control a variety of music creation applications including Ableton Live Lite and M-Audio Key Rig virtual instrument software (both included in this bundle). -
Page 4: Minimum System Requirements
* Home and Professional Edition only. Windows Media Center Edition is not currently supported. ** G3/G4 accelerator cards are not supported. NOTE: M-Audio suggests checking the minimum system requirements for any third-party software you plan to use with your KeyRig 25 keyboard, as they may be greater than the above specifications. -
Page 5: Installing The Keyrig 25 Keyboard
If you have already connected KeyRig 25 to your computer, disconnect it before beginning the installation. We recommend that you download the most recent KeyRig 25 drivers by going to the Support > Drivers page at www.m-audio.com. This ensures that you have the newest drivers available. If you do not have Internet access, insert the KeyRig 25 CD-ROM into your computer to install the drivers that came with KeyRig 25. -
Page 6: Controls And Connectors
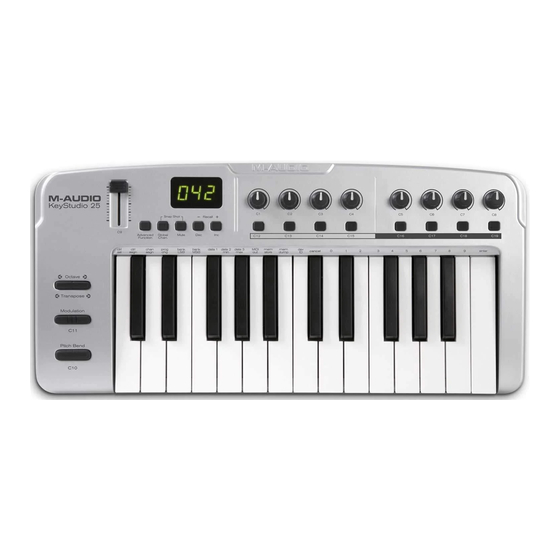
KeyRig 25 User Guide Controls and Connectors Top Panel � � � � � � � � � Keyboard – KeyRig 25 has a two-octave, velocity sensitive keyboard. This controller features special “half-action” keys which allow KeyRig 25 to be thinner and more portable than traditional controller keyboards. -
Page 7: Rear Panel
KeyRig 25 is being used without a computer or if the computer is not able to provide adequate bus power to the controller. The optional power adapter can be ordered from www.m-audio.com IMPORTANT: The KeyRig 25 keyboard is “bus-powered” by your computer through the USB connection. Only use a power... -
Page 8: Using Keyrig 25
In many cases, once KeyRig 25 has been installed, you can simply launch your music program and begin making music right away. Many programs (including Ableton Live Lite, M-Audio Key Rig Virtual Instrument, or Apple GarageBand) are ready “out of the box” and require no further configuration. -
Page 9: Sending Program Changes
However, if you are using KeyRig 25 without a computer to control a MIDI device (such as a sound module), you will need to make sure that both your M-Audio KeyRig 25 keyboard and the MIDI device are set to the same MIDI channel. KeyRig 25 has a “Global” MIDI channel setting that affects the keyboard, program/bank change messages, and any controllers (buttons, knobs, sliders, footswitch) that have been set to respond to the global channel. -
Page 10: Midi Out From Usb Mode
To deactivate MIDI Out from USB mode and return to normal operation, repeat the steps listed above. The LED display will show ‘Int’ indicating that the M-Audio KeyRig 25 keyboard is once again sending mirrored data out of the USB and MIDI Output ports. -
Page 11: Storing Presets
KeyRig 25 User Guide Storing Presets KeyRig 25 uses “non-volatile” memory allowing presets to be stored even after the keyboard has been switched off. All controller and channel assignments are automatically stored under the current preset number as soon as you confirm a change—there is no need to “save”... -
Page 12: Program Mode Overview
KeyRig 25 User Guide Program Mode Overview KeyRig 25 has two modes of operation: Program mode and Performance mode. Most of the time, the controller stays in Performance mode so you can play regularly—Program mode is only used when you need to configure various parameters like knob assignments. Use the ADVANCED FUNCTION button to enter and exit Program mode (a small dot appears on the lower-right hand side of the display whenever you are in Program mode). -
Page 13: Limiting The Range Of The Controls
KeyRig 25 User Guide Limiting the Range of the Controls Normally, the range of a MIDI controller is 0 to 127. In some cases, you may wish to restrict the minimum or maximum limits of this range. A minimum restriction can be placed on knobs, faders, Pitch bend, or Modulation controls by doing the following: Press the ADVANCED FUNCTION button and move or push the controller that you wish to limit. -
Page 14: Setting Toggle Values For The Buttons
KeyRig 25 User Guide Setting Toggle Values for the Buttons The 8 assignable buttons and the pedal can each be assigned to toggle between two values by doing the following: Press the ADVANCED FUNCTION button and push the footswitch or button you wish to modify. -
Page 15: Assigning A Note To A Button
KeyRig 25 User Guide Assigning a Note to a Button The following shows the procedure for setting a button to transmit a MIDI Note On message when pressed, and a MIDI Note Off message when released. Press the ADVANCED FUNCTION button and push the button you wish to modify. -
Page 16: About Sysex Messages And Device Id
LSB values that should be entered for DATA 3 and DATA 2 (See Appendix F). Some sheets may only list the values in hexadecimal format, but the M-Audio KeyRig 25 requires each value to be entered as a decimal. Use Appendix C at the end of this User Guide to convert hexadecimal values into decimal. -
Page 17: Midi Messages In-Depth
KeyRig 25 User Guide MIDI Messages In-Depth Program & Bank Changes When the MIDI standard was first established, it enabled the user to access only 128 different sounds using program change messages (0-127). As MIDI devices grew to be more sophisticated and contain more sounds, bank change messages were included in an updated MIDI specification to allow for more than 128 sounds to be accessed. -
Page 18: Troubleshooting
KeyRig 25 back on and try again. Problem 2: I have connected a sustain pedal to my M-Audio keyboard, but its operation is reversed. The KeyRig 25 keyboard determines the polarity of a sustain pedal when the controller is switched on. The sustain pedal is assumed to be in the OFF position (i.e., not pressed) when the keyboard is turned on. -
Page 19: Appendices
KeyRig 25 User Guide Appendices Appendix A: MIDI Implementation Chart Function Transmitted Received Remarks Basic Default 1-16 Channel Changed 1-16 Mode Default --------- Messages Altered ********* Note 0-127 Number True Voice ********* Note ON Velocity Note OFF After Keys Ch’s... -
Page 20: Appendix B: Assignable Midi Cc's On Keyrig 25
KeyRig 25 User Guide Appendix B: Assignable MIDI CC’s on KeyRig 25 Table B1: Knobs and fader assignments MIDI CC Description Data LSB Data MSB 0-119 Standard MIDI CC’s 120-127 Channel Mode Messages Pitch Bend Sensitivity Channel Fine Tune Channel Coarse Tune... - Page 21 KeyRig 25 User Guide Table B2: Buttons and Sustain Pedal Assignments MIDI CC Description Program Data LSB Data MSB 0-119 Standard MIDI CC’s Toggle value 2 Toggle value 1 120-127 Channel Mode Toggle value 2 Toggle value 1 Messages Pitch Bend Range...
-
Page 22: Appendix C: Hexadecimal Conversion Chart
KeyRig 25 User Guide Appendix C: Hexadecimal Conversion Chart Hexadecimal Value Decimal Value Hexadecimal Value Decimal Value Hexadecimal Value Decimal Value... -
Page 23: Appendix D: General Midi Preset Specification
KeyRig 25 User Guide Appendix D: General MIDI Preset Specification Piano Bass Reed Synth Effects 0 Acoustic Grand Piano 32 Acoustic Bass 64 Soprano Sax 96 SFX Rain 1 Bright Acoustic Piano 33 Fingered Bass 65 Alto Sax 97 SFX Soundtrack... -
Page 24: Appendix E: Standard Midi Controller Numbers (Midi Cc's)
KeyRig 25 User Guide Appendix E: Standard MIDI Controller Numbers (MIDI CC’s) Bank Select Breath Control LSB Legato Pedal Controller 102 Modulation Controller 35 Hold 2 Controller 103 Breath Control Foot Control LSB Sound Variation Controller 104 Controller 3 Porta Time LSB... -
Page 25: Appendix F: Roland Gs And Yamaha Xg Nrpn Support To
KeyRig 25 User Guide Appendix F: Roland GS and Yamaha XG NRPN Support to Roland JV/XP NRPN NRPN Data Data CC99 CC98 CC06 CC38 00-7F n/a (-64 - 0 - +63) Vibrato Rate (relative change) 00-7F n/a (-64 - 0 - +63) Vibrato Depth (relative change) -
Page 26: Technical Info
© 2007 Avid Technology, Inc. All rights reserved. Product features, specifications, system requirements and availability are subject to change without notice. Avid, M-Audio, Enigma, Key Rig and KeyRig 25 are either trademarks or registered trademarks of Avid Technology, Inc. All other... -
Page 27: Technical Support
M-Audio USA M-Audio Germany 5795 Martin Rd., Irwindale, CA 91706 Kuhallmand 34, D-74613 Ohringen, Germany Technical Support Technical Support web: www.m-audio.com/tech e-mail: support@m-audio.de tel (pro products): (626) 633-9055 +49 (0)7941 - 9870030 tel (consumer products): (626) 633-9066 fax: +49 (0)7941 98 70070...
Need help?
Do you have a question about the KEYRIG 25 and is the answer not in the manual?
Questions and answers