GE PP989DNBB - Profile 30" Smoothtop Electric Downdraft Cooktop Use And Care Manual
Radiant downdraft cooktop
Hide thumbs
Also See for PP989DNBB - Profile 30" Smoothtop Electric Downdraft Cooktop:
- Dimensions and installation information (3 pages) ,
- Owner's manual & installation instructions (60 pages)
Table of Contents
Advertisement
Available languages
Available languages
Quick Links
GEAppliances.com
Safety Instructions
. . . . . . . . . . 2-5
Operating Instructions
Bridge Burner . . . . . . . . . . . . . . . . . . . . . . 8
Cooktop Vent System . . . . . . . . . . . . . . 8
Cookware Tips . . . . . . . . . . . . . . . . . . . . . 9
Dual Surface Unit . . . . . . . . . . . . . . . . . . 8
Features of Your Cooktop . . . . . . . . . . 6
Surface Units . . . . . . . . . . . . . . . . . . . . . 7, 8
Temperature Limiter . . . . . . . . . . . . . . . 8
Control Knobs . . . . . . . . . . . . . . . . . . . . . 10
Glass Cooktop . . . . . . . . . . . . . . . . 11, 12
Vent Filter and Chamber . . . . . . . . . . 10
Vent System . . . . . . . . . . . . . . . . . . . . . . 10
Ductwork . . . . . . . . . . . . . . . . . 17-20, 24
Electrical Connections . . . . . . . . 24-26
Exhaust Blower Ratings . . . . . . . . . . . 19
Final Assembly . . . . . . . . . . . . . . . . . . . . 27
Installing the Cooktop . . . . . . . . . 22-24
Installing the Gasket . . . . . . . . . . . . . . 21
Preparation . . . . . . . . . . . . . . . . . . . 15-17
Safety Precautions . . . . . . . . . . . . . . . . 13
Unpacking the Cooktop . . . . . . . 14, 21
. . . . . . . . . 28
Consumer Support
Consumer Support . . . . . . . . . . . . . . . . 32
Warranty . . . . . . . . . . . . . . . . . . . . . . . . . . 31
Write the model and serial
numbers here:
Model # __________________
Serial # ___________________
Find these numbers on a label
under the cooktop, on the side
of the vent chamber .
Owner's Manual &
Installation Instructions
PP989
49-80517-2 10-10 GE
Advertisement
Table of Contents
Troubleshooting

Related Manuals for GE PP989DNBB - Profile 30" Smoothtop Electric Downdraft Cooktop


Summary of Contents for GE PP989DNBB - Profile 30" Smoothtop Electric Downdraft Cooktop
-
Page 1: Table Of Contents
GEAppliances.com Safety Instructions . . . . . . . . . . 2–5 Owner’s Manual & Installation Instructions Operating Instructions Bridge Burner . . . . . . . . . . . . . . . . . . . . . . 8 PP989 Cooktop Vent System . -
Page 2: Important Safety Information
IMPORTANT SAFETY INFORMATION. READ ALL INSTRUCTIONS BEFORE USING. SAFETY PRECAUTIONS WARNING – WARNING – TO REDUCE ThE RISk OF TO REDUCE ThE RISk OF A FIRE, ELECTRIC ShOCk OR INjURY TO PERSONS, COOkTOP GREASE FIRE: OBSERvE ThE FOLLOWING: A. Never leave surface units unattended at high A. - Page 3 IMPORTANT SAFETY INFORMATION. READ ALL INSTRUCTIONS BEFORE USING. GEAppliances.com WARNING! For your safety, the information in this manual must be followed to minimize the risk of fire or explosion, electric shock, or to prevent property damage, personal injury, or loss of life. SAFETY PRECAUTIONS When using electrical appliances, basic safety precautions should be followed, including the following:...
- Page 4 IMPORTANT SAFETY INFORMATION. READ ALL INSTRUCTIONS BEFORE USING. WARNING! SAFETY PRECAUTIONS Do not let cooking grease or other flammable Use little fat for effective shallow or deep-fat ■ ■ materials accumulate on the cooktop . frying . Filling the pan too full of fat can cause spillovers when food is added .
-
Page 5: Radiant Surface Units
IMPORTANT SAFETY INFORMATION. READ ALL INSTRUCTIONS BEFORE USING. GEAppliances.com RADIANT SURFACE UNITS Use care when touching the cooktop. The glass surface of the cooktop will retain heat after the controls have been turned off. Avoid scratching the glass cooktop . The cooktop Clean the cooktop with caution . -
Page 6: Dual Surface Unit
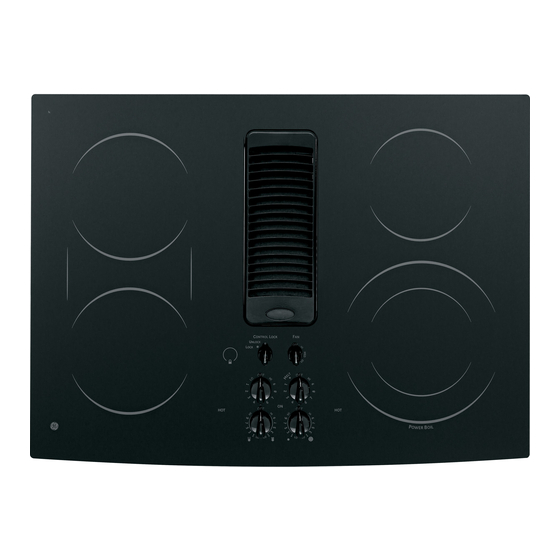
Features of Your Cooktop. Throughout this manual, features and appearance may vary from your model. Feature Index (Features and appearance may vary) Left Rear Surface Unit Bridge Surface Unit Left Front Surface Unit Vent Grille Vent Filter (below the vent grille) Right Rear Surface Unit Dual Surface Unit Model and Serial Number Label... - Page 7 Using the surface units. GEAppliances.com Radiant Surface Units The control for the radiant surface unit can NOTE: The surface unit ON indicator light may be set anywhere between lo and hI for an glow between the surface control settings of LO unlimited number of heat settings .
-
Page 8: Surface Units
Using the surface units. Dual Surface Unit The right front surface unit has 2 cooking sizes To use the small (6-inch) surface unit, turn the to select from so you can match the size of the knob counterclockwise to and select the unit to the size of the cookware you are using . -
Page 9: Selecting Types Of Cookware
Selecting types of cookware. GEAppliances.com The following information will help you choose cookware which will give good performance on glass cooktops. Use a pan that matches the diameter of the surface element you are using. Cooking performance will not be as good if the cookware itself is smaller or larger than the surface unit. -
Page 10: Care And Cleaning
Care and cleaning of the cooktop. Be sure electrical power is off and all surfaces are cool before cleaning any part of the cooktop. how to Remove Protective Shipping Film and Packaging Tape Carefully grasp a corner of the protective To assure no damage is done to the finish shipping film with your fingers and slowly peel of the product, the safest way to remove... - Page 11 Cleaning the glass cooktop. GEAppliances.com Normal Daily Use Cleaning oNly use CERAMA BRYTE Ceramic Cooktop Shake the cleaning cream well . ® Cleaner on the glass cooktop . Other creams Apply a few drops of CERAMA may not be as effective . BRYTE Ceramic Cooktop Cleaner directly ®...
-
Page 12: Glass Cooktop
Cleaning the glass cooktop. Metal Marks and Scratches Be careful not to slide pots and pans If pots with a thin overlay of aluminum across your cooktop . It will leave metal or copper are allowed markings on the cooktop surface . to boil dry, the overlay may leave black discoloration on the cooktop . -
Page 13: Installation Instructions
Installation Radiant Instructions Downdraft Cooktop If you have questions, call 800.Ge.CARes (800.432.2737) or visit our Website at: GeAppliances.com BefoRe you BeGIN ImPoRTANT sAfeTy INsTRuCTIoNs Read these instructions completely and carefully. WARNING – To ReDuCe The RIsk I mPoRTANT – of fIRe, eleCTRIC shoCk oR INJuRy To • Save these instructions PeRsoNs, oBseRVe The folloWING: for local inspector’s use . A Installation work and electrical wiring must be I mPoRTANT – • Observe all governing done by qualified person(s) in accordance with codes and ordinances . - Page 14 Installation Instructions uNPACkING youR CookToP PARTs INCluDeD (PACkeD BeloW The CookToP) • Blower assembly • (9) Sheet metal screws • Vent filter (8-18 x 3/8") • Blower plenum • Cleaning cream • Foam gasket tape (9 ft . roll) • (4) Nuts (10-32 keps – nuts with • Scrub sponge or scraper lock washers attached) •...
-
Page 15: Ductwork
Installation Instructions PRePARATIoN Tools AND mATeRIAls eleCTRICAl RequIRemeNTs you WIll NeeD This appliance must be supplied with the proper voltage and frequency, as listed in these Installation Instructions, • Saw and connected to an individual, properly grounded branch • Flat-blade screwdriver circuit, protected by a 40-amp circuit breaker or time delay •... -
Page 16: Installation Instructions
Installation Instructions CABINeT PRePARATIoN PRePARING foR INsTAllATIoN PRePARING The BAse CABINeT Positioning the cooktop This cooktop is designed to fit easily into a variety of cabinets . However, some cabinets may require The cooktop is designed to look best when centered in a modifications . cabinet at least 30≤ wide . Preparing a cabinet that is against a wall The exhaust vent beneath the cooktop must be located In some cabinets, the sides may need to be scooped or cut... - Page 17 Installation Instructions CABINeT PRePARATIoN CuTouTs PRePARING foR DuCTWoRk PRePARING The CouNTeRToP The countertop must have a deep flat surface NoTe: Ductwork musT be vented to outside. Do NoT vent to accommodate the cooktop and the vent . into a wall, ceiling, crawlspace, attic or any concealed Countertops with a rolled front edge and space. backsplash may not provide the flat surface Cut hole in cabinet wall or floor as appropriate for your area required .
-
Page 18: Installation Instructions
Installation Instructions DuCTWoRk CAlCulATIoNs Equivalent Number Equivalent Duct Pieces Length* x Used = Length Calculate Total equivalent Ductwork length 5” round Equivalent Number Equivalent to 3 ⁄ ” x 10” Duct Pieces Length* x Used = Length transition 90° elbow 37 ft . ft . 5" round 6”... -
Page 19: Exhaust Blower Ratings
Installation Instructions eXhAusT BloWeR RATINGs eXhAusT BloWeR sAfeTy WARNING Sufficient air is needed for proper combustion and exhausting of gases through the flue (chimney) of other fuel burning equipment to prevent back drafting . Follow the heating equipment manufacturer’s guidelines and safety standards such as those published by the National Fire Protection Association (NFPA), the American Society for Heating, Refrigeration and Air Conditioning Engineers (ASHRAE) and local code authorities . -
Page 20: Installation Instructions
Installation Instructions DuCTWoRk INsTAllATIoN (Note: for planning purposes only.) oPTIoNAl INsTAllATIoN: INsTAllING The DuCTWoRk ReAR WAll VeNTING Use galvanized or aluminum duct in 6≤ round or ⁄ ” x 10" size, or a combination of both . 5” round duct may be used on SHORT DUCT runs, but best results will be obtained using 3 ⁄... -
Page 21: Installation Instructions
Installation Instructions uNPACkING The CookToP/INsTAllING The GAskeT INsTAllING The foAm GAskeT foam Gasket Installation Notes: Do not install the cooktop into the countertop • The foam gasket tape should be installed within without installing the foam gasket as shown . 1/8” of the edge of the glass . Do not stretch or It protects the bottom edge of the glass from the twist the foam gasket tape . -
Page 22: Installing The Cooktop
Installation Instructions INsTAllING The CookToP INsTAllING The CookToP CheCkING foR flATNess Inspect the cooktop glass for rocking or uneven C AuTIoN: gap on all four sides at the countertop surface . Do not attempt to force the glass to meet Do NoT lIfT the countertop . fRom VeNT oPeNING. Check for Lift the cooktop by the glass side edges as shown . -
Page 23: Installation Instructions
Installation Instructions INsTAllING The CookToP I NsTAllING The BloWeR PleNum I NsTAllING The BloWeR To The CookToP To The PleNum Slide the plenum, with the blower opening on the Orient the blower discharge opening to match the left, into the opening in the bottom of the cooktop . ductwork in Steps 6 and 7 . Slide the four threaded Push up on the plenum until the stops on the studs on the side of the blower housing into the plenum contact the bottom of the cooktop, and... - Page 24 Installation Instructions INsTAllING The CookToP B loWeR eleCTRICAl A TTAChING A BloWeR TRANsITIoN DuCT CoNNeCTIoNs (cont.) Use a blower transition duct for all downward • Connect the 5-pin plug on the blower assembly to duct installations to connect to 6" round standard the matching 5-pin receptacle on the bottom of the ductwork .
-
Page 25: Electrical Connections
Installation Instructions eleCTRICAl CoNNeCTIoNs BefoRe mAkING eleCTRICAl INsTAll 3/4" fleXIBle CoNDuIT CoNNeCTIoNs Remove the screws holding Note to electrician: The power leads supplied with this the wire compartment cover appliance are UL-recognized for connection to large and remove the cover . gauge household wiring . The insulation of these leads is rated at temperatures much higher than the temperature rating of household wiring . -
Page 26: Electrical Connections
Installation Instructions eleCTRICAl CoNNeCTIoNs m AkING eleCTRICAl CoNNeCTIoNs m AkING eleCTRICAl CoNNeCTIoNs (cont.) Effective January 1, 1996, the National Electrical Code requires that new, but not Three-conductor branch circuit connection existing, construction utilize a four-conductor • When installing in existing construction built connection to an electric range . When installing prior to January 1, 1996, and if permitted by an electric range in new construction, follow the local codes:... - Page 27 Installation Instructions fINAl AssemBly I NsTAll DoWNDRAfT fIlTeR AND VeNT GRIlle Do not operate the vent without the filter in place. • Place the filter diagonally through the vent opening . Vent Filter Vent Chamber • Make sure it rests, at an angle, on the supports in the vent opening . • Carefully place the vent grille onto the downdraft opening .
-
Page 28: Troubleshooting Tips
Before you call for service… Troubleshooting Tips—Save time and money! Review this chart first and you may not need to call for service. Problem Possible Causes What To Do Water won’t boil • Cover pan with a lid . • Turn the downdraft fan OFF until the water begins to boil . Surface units will not Improper cookware •... - Page 29 Notes...
- Page 30 Notes...
- Page 31 To know what your legal rights are, consult your local or state consumer affairs office or your state’s Attorney General. Warrantor: General Electric Company. Louisville, kY 40225...
-
Page 32: Consumer Support
Consumer Support. GE Appliances Website GEAppliances.com Have a question or need assistance with your appliance? Try the GE Appliances Website 24 hours a day, any day of the year! For greater convenience and faster service, you can now download Owner’s Manuals, order parts or even schedule service on-line . -
Page 33: Cuidado Y Limpieza
GEAppliances.com Instrucciones de seguridad . . . . . . . . .2–5 Manual del propietario e Instrucciones Instrucciones de operación de instalación Características.de.su.estufa . . . . . . . . . . . . . . . . 6 Ideas.sobre.las.piezas.de.cocina. -
Page 34: Instrucciones De Seguridad Importantes
INSTRUCCIONES DE SEGURIDAD IMPORTANTES. LEA TODAS LAS INSTRUCCIONES ANTES DE USAR. PRECAUCIONES DE SEGURIDAD ADVERTENCIA – ADVERTENCIA – PARA REDUCIR EL RIESGO PARA REDUCIR EL RIESGO DE INCENDIOS, DESCARGAS ELÉCTRICAS O LESIONES DE UN FUEGO DE GRASA DE ESTUFA: PERSONALES, OBSERVE LO SIGUIENTE: A.. - Page 35 INSTRUCCIONES DE SEGURIDAD IMPORTANTES. LEA TODAS LAS INSTRUCCIONES ANTES DE USAR.. GEAppliances.com ¡ADVERTENCIA! Por su seguridad, la información en este manual debe ser obedecida para minimizar el riesgo de incendio o explosión, descarga eléctrica, o para prevenir daños a la propiedad, lesiones personales, y pérdida de vidas. PRECAUCIONES DE SEGURIDAD Cuando se encuentre usando electrodomésticos eléctricos, precauciones básicas de seguridad deben obedecerse, incluyendo las siguientes:...
- Page 36 INSTRUCCIONES DE SEGURIDAD IMPORTANTES. LEA TODAS LAS INSTRUCCIONES ANTES DE USAR. ¡ADVERTENCIA! PRECAUCIONES DE SEGURIDAD ■.. N o.permita.que.grasa.de.cocinar.u.otros.materiales. ■.. L os.alimentos.que.se.van.a.freír.deberían.secarse. inflamables.se.acumulen.sobre.la.estufa . tanto.como.sea.posible . . El.hielo.y.la.humedad.en. comidas.frescas.pueden.causar.un.derrame.de.aceite . . ■.. N o.toque.las.unidades.de.superficie . . Estas.superficies. podrían.estar.lo.suficientemente.calientes.para. ■.. U se.poco.aceite.para.una.fritura.efectiva.no.muy. quemar.aunque.estén.negras.y.no.parezcan.estar.
- Page 37 INSTRUCCIONES DE SEGURIDAD IMPORTANTES. LEA TODAS LAS INSTRUCCIONES ANTES DE USAR. GEAppliances.com UNIDADES DE SUPERFICIE RADIANTE Sea cuidadoso cuando toque la estufa. La superficie de vidrio de la estufa se mantendrá caliente después de que los controles se hayan apagado. ■..
- Page 38 Características de su estufa. A través de este manual, las características y la apariencia podrían variar de acuerdo con su modelo. Índice de características (las características y la apariencia podrían variar de acuerdo con su modelo) Unidad de superficie posterior izquierda Unidad de superficie de puente Unidad de superficie frontal izquierda Parrilla de ventilación...
- Page 39 Cómo usar las unidades de superficie. GEAppliances.com Unidades de superficie radiantes El.control.de.la.unidad.de.superficie.radiante. Las.temperaturas.de.la.estufa.aumentan.con. puede.colocarse.en.cualquier.lugar.entre.LO.(Bajo). el.número.de.unidades.de.superficie.que.estén. y.HI.(Alto).para.un.número.de.selecciones.de. encendidas . . Con.3.ó.4.unidades.encendidas,.las. calentamiento.ilimitado . . Con.el.interruptor.infinito.el. temperaturas.de.superficie.son.altas,.así.que.tenga. embobinado.hace.ciclo.entre.encendido.y.apagado. cuidado.cuando.toque.la.estufa . . para.mantener.control.de.su.selección . Las.luces.indicadoras.de.HOT SURFACE (Superficie. Para.hervir.líquidos,.use.una.olla.o.sartén.que.tenga. caliente).brillarán.cuando.el.elemento.radiante.esté. tapa . encendido,.y.permanecerán.encendidas.hasta.que. la.superficie.se.enfríe.a.aproximadamente.150º.F . . El.botón.de.control.debe.empujarse.hacia.abajo.y.
- Page 40 Cómo usar las unidades de superficie. Unidad de superficie doble Para.usar.la.unidad.de.superficie.pequeña.(6"),. La unidad de superficie frontal derecha tiene dos tamaños para cocinar entre los que usted gire.el.botón.en.dirección.contraria.a.las.agujas. puede escoger y así podrá combinar el tamaño del.reloj. .y.seleccione.el.ajuste.deseado . . La. correcto de la sartén que se encuentre usando unidad.calentará.solamente.el.área.contenida.
- Page 41 GEAppliances.com Cómo operar el sistema de ventilación El.sistema.de.ventilación.incorporado. MED.(Medio).o.LO.(Bajo),.según.sea.necesario . ayuda.a.remover.los.vapores.de.la. El.uso.continuo.del.sistema.de.ventilación. cocina,.los.olores.y.el.humo.de.las. mientras.cocina.ayuda.a.mantener.la.cocina. comidas.preparadas.en.la.estufa . cómoda.y.menos.húmeda,.reduciendo. los.olores.de.cocina.y.la.humedad.que. Para.operar.el.sistema.de.ventilación.. normalmente.crea.la.necesidad.frecuente.de. de.aire.descendente.(downdraft),.gire.. limpieza . . el.botón.de.control.de.la.velocidad.del. ventilador.de.ventilación.a.HI.(Alto),. Cómo seleccionar los tipos de sartenes. La información siguiente le ayudará a escoger piezas de cocina que le darán un mejor rendimiento sobre su estufa de vidrio.
-
Page 42: Cuidado Y Limpieza De La Estufa
Cuidado y limpieza de la estufa. Cerciórese de que el suministro eléctrico esté suspendido y que todas las superficies están frías antes de limpiar cualquier parte de la estufa. Cómo quitar el envoltorio de protección y la cinta de embalaje Con.cuidado.tome.una.punta.del.envoltorio.de.protección. - Page 43 Cómo limpiar la estufa de vidrio. GEAppliances.com Limpieza de uso normal diario SOLAMENTE.use.limpiador.de.estufas.de..U se.una.toalla.de.papel.o.una.almohadilla. cerámica.CERAMA.BRYTE .en.su.estufa.de. de.limpiar.estufas.de.cerámica.CERAMA. ® vidrio . . Otras.cremas.podrían.no.ser.efectivas . . BRYTE para.limpiar.la.superficie.entera. ®. de.la.estufa . Para.mantener.y.proteger.la.superficie.. de.su.estufa.de.vidrio,.siga.estas.instrucciones: ... U se.un.trapo.seco.o.una.toalla.de.papel. para.remover.los.residuos.de.la..A ntes.de.usar.la.estufa.por.primera.vez,. limpieza .
- Page 44 Cómo limpiar el vidrio de la estufa. Marcas metálicas y rasguñaduras Estas.deberían.removerse.inmediatamente..T enga.cuidado.de.no.deslizar.ollas.o. antes.de.calentar.la.estufa.de.nuevo. sartenes.a.través.de.su.estufa . . Ellas. o.la.decoloración.se.convertirá.en. dejarán.marcas.sobre.la.superficie.de. decoloraciones.permanentes . . su.estufa . . ADVERTENCIA: . E stas.marcas.son.removibles.usando. mucho cuidado inspeccione el fondo de las el.limpiador.de.estufas.de.cerámica. sartenes en búsqueda de protuberancias que CERAMA.BRYTE .con.la.almohadilla.de.
- Page 45 Instrucciones .. Estufa.radiante.de. de instalación . ventilación.descendente. Si tiene alguna pregunta, llame al 800.GE.CARES (800.432.2737) o visite nuestro sitio en la Web: GEAppliances.com INSTRUCCIONES IMPORTANTES DE ANTES DE COMENZAR SEGURIDAD Lea estas instrucciones completa y cuidadosamente. A DVERTENCIA – PARA REDUCIR EL I MPORTANTE –...
- Page 46 Instrucciones de instalación DESEMPACANDO SU ESTUFA PARTES INCLUIDAS (EMPACADAS DEBAjO DE LA ESTUFA) •. Ensambladura.del.soplador •. Tornillos.de.plancha. •. Filtro.del.ventilador . metálica.(9).(8-18.x.3/8") •. Cámara.del.soplador •. Crema.de.limpieza •. . C inta.de.junta.de.espuma.(rollo. •. . T uercas.(4).(10-32.tuercas.–. •. . E sponja.de.restriegue.o. de.9.pies) con.sus.arandelas.de.cierre. raspador.(en.algunos.modelos) pegadas) •.
- Page 47 Instrucciones de instalación PREPARACIÓN HERRAMIENTAS QUE NECESITARÁ REQUISITOS ELÉCTRICOS Este.electrodoméstico.debe.suplirse.con.el.voltaje.y.. •. Sierra la.frecuencia.apropiados,.conforme.se.indica.en.estas. •. Destornillador.plano Instrucciones.de.Instalación,.y.debe.ser.conectado.a.un.ramo. •. Alicates.de.electricista eléctrico.conectado.apropiadamente.a.tierra,.protegido. por.un.interruptor.de.circuito.de.40.amperios.o.fusibles.de. •. Cinta.adhesiva.de.conductos dilatación.de.tiempo . . •. . C inta.métrica.o.escala Todas.las.conexiones.de.alambres.deben.hacerse. •. Escuadra.de.carpintero de.acuerdo.con.los.códigos.locales.y.deben.estar. •. Llave.de.7/16".o.juego.de.cubos apropiadamente.aisladas . . Póngase.en.contacto.con.la. compañía.de.utilidades.local.para.los.códigos.eléctricos. •.
- Page 48 Instrucciones de instalación PREPARACIÓN DEL GABINETE PREPARACIÓN PARA LA INSTALACIÓN PREPARACIÓN DEL GABINETE DE LA BASE Posición de su estufa Esta.estufa.está.diseñada.para.ajustar.fácilmente.en.una. La.estufa.está.diseñada.para.lucir.mejor.cuando.está.centrada. variedad.de.gabinetes . . Sin.embargo,.algunos.gabinetes.podrían. en.un.gabinete.de.por.lo.menos.30".de.ancho . . requerir.modificaciones . . La.ventanilla.de.escape.debajo.de.la.estufa.debe.estar. localizada.entre.los.bajantes.de.la.pared.o.entre.las.vigas.del. Preparando un gabinete que ajuste contra la pared piso.de.forma.que.el.trabajo.de.tubos.pueda.ser.instalado.
- Page 49 Instrucciones de instalación CORTES DE PREPARACIÓN DEL GABINETE PREPARANDO LA ENCIMERA PREPARACIONES PARA LOS CONDUCTOS . . L a.encimera.debe.tener.una.superficie.plana. NOTA: El trabajo de conductos DEBE tener ventilación hacia el profunda.para.acomodar.la.estufa.y.la. exterior. NO VENTILE hacia las paredes, techo, esquinas, áticos o ventilación .
- Page 50 Instrucciones de instalación CÁLCULOS DE LOS CONDUCTOS Longitud. N úmero. Longitud. . Piezas.de.conducto. equivalente*.x. usado.=. equivalente Calcule la longitud de conducto equivalente total Longitud. N úmero. Longitud. Redondo.de. Piezas.de.conducto. equivalente*.x.. usado..=. equivalente 5".a.transición de.3 ⁄ ".x.10". Redondos. Codo.de.90°. 37.Pies. .x. (.
- Page 51 Instrucciones de instalación RANGOS DEL SOPLADOR DE ESCAPE ADVERTENCIA DE SEGURIDAD DEL SOPLADOR DE ESCAPE Suficiente.aire.es.necesario.para.una.combustión.apropiada.y.para.deshacerse.de.los.gases.a.través.de.una. salida.de.humo.(chimenea).de.equipos.que.queman.combustibles.para.prevenir.retroalimentación . . Siga.las. recomendaciones.del.fabricante.del.equipo.de.calentamiento.y.los.estándares.de.seguridad.tales.como.los. publicados.por.la.Asociación.nacional.de.protección.de.incendios.(NFPA),.y.la.Sociedad.americana.de.ingenieros.. de.calefacción,.acondicionadores.de.aire.y.refrigeración.(ASHRAE),.y.los.códigos.de.las.autoridades.locales .
- Page 52 Instrucciones de instalación INSTALACIÓN DE LOS CONDUCTOS (Nota: Solamente con el propósito de planificación.) INSTALACIÓN OPCIONAL: VENTILACIÓN CÓMO INSTALAR LOS CONDUCTOS POR LA PARED POSTERIOR Use.conductos.de.aluminio.o.galvanizados.en.6".. ⁄ ".x.10".en.tamaño,.o.una.combinación.de. Para.corrientes.de.CONDUCTO.CORTO.se.puede. ambos . . utilizar.el.conducto.circular.de.5.pulgadas.pero. los.mejores.resultados.se.obtendrán.con.uno.de. Conductos.de.PVC.se.deben.usar.si.se.están. 3,25.pulgadas.x.10.pulgadas.o.con.un.sistema.de. instalando.bajo.una.capa.de.concreto.vaciado . . conductos.circulares.de.6.pulgadas . NOTA: Los.códigos.de.construcción.locales.se.
- Page 53 Instrucciones de instalación CÓMO DESEMPACAR LA ESTUFA / INSTALAR LA jUNTA CÓMO INSTALAR LA jUNTA DE Notas sobre la instalación de la junta ESPUMA de espuma: No instale la estufa en la encimera sin • L a.cinta.de.junta.de.espuma.debería.ser.instalada. haber instalado la junta de espuma como se dentro.de.1/8".del.extremo.del.vidrio .
- Page 54 Instrucciones de instalación CÓMO INSTALAR LA ESTUFA CÓMO INSTALAR LA ESTUFA CÓMO INSPECCIONAR LO PLANO Inspeccione.el.vidrio.de.la.estufa.en.busca.de. rocas.o.brechas.con.protuberancias.en.todos.los. lados.de.la.superficie.de.la.encimera . . No.intente. PRECAUCIÓN: forzar.el.vidrio.a.moldearse.a.la.encimera . . NO LEVANTE POR LA ABERTURA DE VENTILACIÓN. Levante.la.estufa.por.los.extremos.del.lado.del.vidrio. como.se.muestra . Inspeccione.en. NOTA: No.use.la.abertura.de.ventilación.para. busca.de.brechas levantar.o.mover.la.estufa.de.posición . ..
- Page 55 Instrucciones de instalación CÓMO INSTALAR LA ESTUFA CÓMO INSTALAR LA CÁMARA DEL CÓMO INSTALAR LA CÁMARA DEL SOPLADOR SOPLADOR DE LA ESTUFA Deslice.la.cámara,.con.la.abertura.del.soplador.del.lado. Oriente.la.abertura.de.descarga.del.soplador. hasta.que.iguale.el.conducto.en.los.Pasos.6.y.7 . . izquierdo,.en.la.abertura.en.el.fondo.de.la.estufa . . Empuje. Deslice.las.cuatro.tachuelas.roscadas.en.el.lado.del. la.cámara.hasta.que.se.detenga.cuando.la.cámara.haga. alojamiento.del.soplador.en.los.cuatro.agujeros.en. contacto.con.el.fondo.de.la.estufa,.y.la.cámara.encaje. en.su.lugar . . (Es.posible.que.usted.tenga.que.mover.la. el.lado.de.la.cámara . . cámara.hacia.adelante.y.hacia.atrás.para.encontrar.su.
- Page 56 Instrucciones de instalación CÓMO PEGAR UNA TRANSICIÓN DE SOPLADOR .. C ÓMO PEGAR UNA TRANSICIÓN DE CONEXIONES ELÉCTRICAS SOPLADOR DEL SOPLADOR (cont.) Use.un.conducto.de.transición.de.soplador.para. • . C onecte.el.tapón.de.5.pasadores.en.la. todas.las.instalaciones.de.conductos.de.flujo.de.aire. ensambladura.para.combinar.con.el.receptáculo. descendente.para.conectar.las.piezas.de.conducto. de.5.pasadores.en.el.fondo.del.alojamiento. de.6".redondas . . Este.conducto.rectángulo.de.3 ⁄ ". alambrado . . x.10".a.conducto.de.6".redondo.de.transición.está.
- Page 57 Instrucciones de instalación CONEXIONES ELÉCTRICAS ANTES DE HACER CONEXIONES INSTALE UN CONDUCTO FLEXIBLE ELÉCTRICAS DE 3/4" Nota al electricista:.Los.conductores.proporcionados.con. Remueva.los.tornillos.que.sostienen. este.electrodoméstico.son.reconocidos.por.la.UL.para. la.cubierta.del.compartimiento.del. conexiones.eléctricas.residenciales.de.calibres.altos . . alambre.y.remueva.la.cubierta . El.aislamiento.de.estos.conductores.es.considerado.a. temperaturas.mucho.mayores.que.las.esperadas.en. residencias . . La.capacidad.de.carga.actual.de.un.conductor. es.determinado.por.el.calibre.del.cable.y.también.por.la. temperatura.considerada.del.aislamiento.alrededor.del. Alimente.los.conductores. cable . . ADVERTENCIA: Conducto Conductores..
- Page 58 Instrucciones de instalación CONEXIONES ELÉCTRICAS CÓMO HACER LAS CONEXIONES CÓMO HACER LAS CONEXIONES ELÉCTRICAS ELÉCTRICAS (cont.) Conexión de ramal de circuito de tres Efectivo.el.1.de.enero.de.1996,.el.National.Electrical. conductores Code.requiere.las.construcciones.nuevas,.pero.no.ya. existentes,.utilicen.conexiones.de.cuatro.conductores. •. . C uando.se.encuentre.instalando.en.una. para.estufas.eléctricos . . Cuando.se.encuentre.instalando. construcción.existente.construida.antes.del.1.de. una.estufa.eléctrica.en.una.construcción.nueva,.siga.las. enero.de.1996,.y.si.así.lo.permiten.los.códigos. instrucciones.en.CONSTRUCCIÓN.NUEVA.Y.CONEXIÓN.DE. locales:. RAMAL.DE.CIRCUITO.DE.CUATRO.CONDUCTORES .
- Page 59 Instrucciones de instalación ENSAMBLAjE FINAL CÓMO INSTALAR EL FILTRO DE FLUjO DOWNDRAFT Y LA PARRILLA DE VENTILACIÓN No opere la ventilación sin el filtro en su lugar. • . C oloque.el.filtro.diagonalmente.a.través. de.la.abertura.de.ventilación . Filtro.de. ventilación Cámara.de. ventilación • C erciórese.de.que.el.filtro.descanse,.en.un. ángulo,.en.los.soportes.de.la.abertura.de.
-
Page 60: Antes De Llamar Para Solicitar Servicio
Antes de llamar para solicitar servicio… Ideas sobre la identificación y solución de problemas – ¡Ahorre tiempo y dinero! Revise esta tabla primero y es posible que no necesite llamarnos en busca de servicio. Problema Causas posibles Qué hacer El agua no hierve. •. - Page 61 Problema Causas posibles Qué hacer Picadura (o hendidura) Mezcla de azúcar caliente..•. Llame.a.un.técnico.calificado.para.su.reemplazo . de la cocina derramada o plástico . derretido en la cocina. La cocina emite La cocina está bloqueada..•. Asegúrese.de.que.el.Selector.de.Control.de.Bloqueo.(Control. un sonido que se puede . . .
- Page 62 Notas .
- Page 63 Para saber cuáles son sus derechos legales, consulte a la oficina de asuntos del consumidor local o la oficina del Prucurador (Attorney General) en su localidad. Garante: General Electric Company. Louisville, KY 40225...
-
Page 64: Piezas Y Accesorios
Apoyo al consumidor. Página Web de GE Appliances GEAppliances.com ¿Tiene.alguna.pregunta.sobre.su.electrodoméstico?.¡Pruebe.la.página.Web.de.GE.Appliances.24.horas.al.día,. cualquier.día.del.año!.Para.mayor.conveniencia.y.servicio.más.rápido,.ya.puede.descargar.los.Manuales.de.los. Propietarios,.pedir.piezas.o.incluso.hacer.una.cita.en.línea.para.que.vengan.a.realizar.una.reparación . Solicite una reparación GEAppliances.com El.servicio.de.expertos.GE.está.a.tan.sólo.un.paso.de.su.puerta . . ¡Entre.en.línea.y.solicite.su.reparación.cuando.. le.venga.bien.cualquier.día.del.año!.O.llame.al.800 . G E . C ARES.(800 . 4 32 . 2 737).durante.horas.normales.de.oficina . Real Life Design Studio (Estudio de diseño para la vida real) GEAppliances.com GE.apoya.el.concepto.de.Diseño.Universal—productos,.servicios.y.ambientes.que.pueden.usar.gente.de.todas.