Table of Contents
Advertisement
Advertisement
Table of Contents

Related Manuals for Yamaha CRW4416S - CRW - CD-RW Drive


Summary of Contents for Yamaha CRW4416S - CRW - CD-RW Drive
- Page 1 @YAMAHA...
- Page 2 If these corrective measures do not produce zatisfactoty rerults. please contx~ tbe lucal relailer authoriad 10 distribute this type of product. If you tan not locate the appropnate retailer. please contact Yamaha Systems Technology, Inc. I(H) Century Center Court, San Jmc. CA95 I 12. U.S.A.
- Page 3 Laser Diode Properties Material : GaAIAs Use of controls 01 adjustments or performante of Wavelength : 783-789 nm Emission Durat~on : Contmuous Laser Output Power : Less than 34.6 pW* * This output is value measured at a distance 200mm from the objective lens surface on the optical pick-q block.
- Page 4 WA RNING ? WARNING Z The temperature where CRW4416S is located should be between 5°C and 40°C (41°F - 104”F), when used in a fan-cooled System. not disassemble the CRW4416S cover to reduce the risk of electric shock. Always remove the disc before transporting CRW4416S.
-
Page 5: Important Precautions
CRW44 16s and Computer to impact or shock when in use, as this may impair recording or playback. Yamaha is not responsible for any data or informa- tion losses resulting from the Operation of the CRW44 16s. -
Page 6: Table Of Contents
Computer ................ .3 Software ................3 Tools ................4 Discs ................4 Chapter 2 - Installing the Yamaha CRW4416S Drive ...5 CRW44 16s drive settings ..........5 Installing the CRW4416S drive ........8 Chapter 3 - Operation ............13 Front Panel .............. -
Page 7: Introduction
In troduction Introduction Thank you for purchasing a Yamaha CRW4416S drive. Please read this manual before using the drive in Order to make the best use of the superior CRW44 16s functions. After reading, please retain this manual for future reference. -
Page 8: Orange Book Compatible Recording
In troduction Orange Book Compatible Recording Track at Once In this mode, data tan be recorded to disc one track at a time. Discs recorded in this mode cannot be played in CD players or CD- ROM drives other than a CD-RW or a CD-R drive until the Session is closed. -
Page 9: Chapter 1 - System Configuration
CD-ROM. SCSI card This is required in Order to connect a SCSI device (the Yamaha CRW4416S) to your Computer. We recommend the following: Adaptec SCSI cards: AHA-2940 (PCI), AHA-284~ (VL), AHA-2740 (EISA), AHA- 154~ (ISA). -
Page 10: Tools
CD-RW and CD-R discs tan use that conform to the Recordable Compact Disc Systems Part 2 and 3 (Orange Book). Yamaha recommends the following Yamaha CD-RW and CD-R discs: CD-RW Discs > CRWM74B4X ($120mm, 74 minutes) > CRWM74R4X ($120mm, 74 minutes) CD-R Discs >... -
Page 11: Chapter 2 - Installing Theyamaha Crw4416S Drive
Chap ter 2 - Ins talling the Yamaha CR W44 16s Drive Chapter 2 - Installing theYamaha CRW4416S Drive CRW4416S drive settings Before installing the CRW4416S in your Computer, you will need to set the following jumpers. SCSI ID settings... - Page 12 CharDter 2 - Installincr the Yamaha CßW4416S Drive Note: When you are using Windows 95 or Windows 98, and ifthe SCSI ID set- ring on the rear panel is the same CIS the numbrr assigned to rmothcr Plug SCSI device, the and Play component oj.
- Page 13 Chapter 2 - Installing the Yamaha CßW4416S Drive n Terminator setting The terminator setting indicates whether or not this device is the last connected SCSI device. Terminator ON (with a jumper) - Use this setting if the CRW4416S is the last device in the internal SCSI daisy-chain.
-
Page 14: Installing The Crw4416S Drive
Chapter 2 - Installing the Yamaha CßW4416S Drive Installing the CRW4416S drive The following steps will differ slightly depending on the type of com- Puter you are using. For details on removing the cover from your computer, and installing or removing internal devices, refer to the manual for your Computer. - Page 15 Chapter 2 - Installing the Yamaha CßW4416S Drive 3. Your hands or body may be holding a Charge of static elec- tricity.Touch a metallic Portion of the Chassis or power sup- ply to release any such Charge. 4. Remove the front cover of a vacant half-height drive bay.
- Page 16 Chapter 2 - Installing the Yamaha CßW4416S Drive 7. Connect the SCSI flat cable. Connect the 50-pin SCSI flat cable to the SCSI card and to the SCSI interface located on the rear Panel of the CRW44 16s drive. Position the connector so that the colored line is at pin 1 (your lower right).
- Page 17 Charter 2 - lnstallina the Yamaha CßW4476S Drive AUDI0 cable the CRW4416S 4-pin connector (large) To the Sound Card (Sound Blaster compatible) 4-pin connector (small) 9. Connect the power supply cable. Connect the +12V and +5V 4-pin power cable to the power supply intetface located on the rear Panel of the CR%‘441 6s drive.
- Page 18 Chapter 2 - Installing the Yamaha CßW4416S Drive 10. Tighten the four fastening screws securely. 11. Attach the cover of your Computer. 12. Connect the power cable to an AC outlet, and switch on your Computer. Make sure that the LED located on the Panel of the CRW4416S drive is lit.
-
Page 19: Chapter 3 - Operation
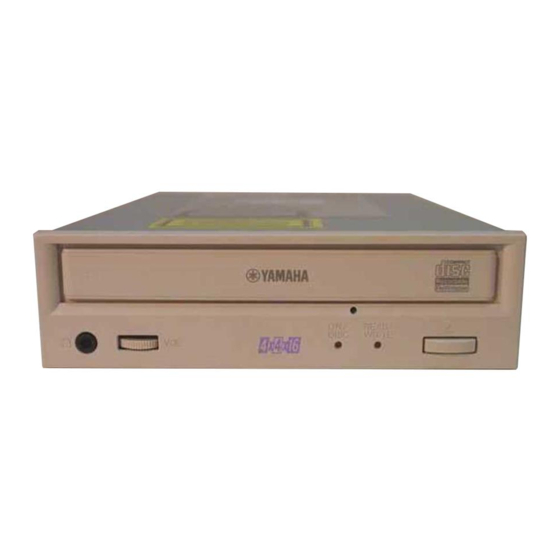
Charoter 3 - Orieration Chapter 3 - Operation Front Panel @ Disc tray The disc is inserted and ejected here. Pressing the eject button will open the tray. @ Headphone jack This stereo mini jack allows you to connect headphones and listen to audio . -
Page 20: Loading A Disc
Chapfer 3 - Operation @ Eject button This button is used to open or close the tray. 0 Manual Eject hole This is used to manually eject a disc that cannot be ejected in the nor- mal way. It is for emergency use only. Loading a Disc 1. -
Page 21: Ejecting The Disc
Chapter 3 - Operation Ejecting the Disc If the CRW4416S is powered on: Press the eject button to eject the disc. Note: You cannot eject the disc if the SCSI command prohibits the eject oper- ation while the CRW4416S is reading data. Caution: Be sure to remove the disc after it is completely ejected. -
Page 22: Manual Eject (Emergency Use)
Chapter 3 - Operation Manual Eject (emergency use) Here we explain how to eject the disc when it cannot be ejected in the normal way; for example, the power is shut off inadvertently or the loading mechanism fails. This technique should be used only as a last resort. -
Page 23: Troubleshooting
Troubleshootina Troubleshooting If CRW44 16s is not performing as expected, look up the symptoms in the following table, and take the appropriate corrective action. Corrective action Symptoms Check the DC power cable connection. The power to the CRW4416S is off Check the SCSI cable connection. -
Page 24: Appendix
Appendix Appendix Specif ications SCSI 2 Interface 650MB (74 minutes disc) Data Capacity 550MB (63 minutes disc) Writing (CD-RW): 2X Speed, 4Xspeed Record/Read Speed Writing (CD-R): Normal Speed, 2X Speed, 4Xspeed Reading: Maximum 16X Speed 150 - 2400KBkec Data Transfer Rate Maximum 13.3 MB/sec Burst Transfer Rate 2MB (666 sectors) -
Page 25: Front Panel Indicator Key
Appendix Front Panel Indicator Key l on: green -1. flashing: green - Off 0 on: orange ;0- flashing: orange Reset Ready (no disc) Inserting disc Ejecting disc Ready (disc inserted) 1 - : * - Seeking 26. . . Preparing to write Writing - 1 0. - Page 26 AUSTRIA, EASTERN EUROPE and French: Pour plus de details xur les produits, RUSSIA veuillez vous adresser &Yamaha ou au distributeur Yamaha Europa GmbH le plus proche figurant dans Ia liste suivante : Multi Media Division...