Table of Contents
Advertisement
Advertisement
Table of Contents

Related Manuals for DigiTech RP150


Summary of Contents for DigiTech RP150
- Page 1 Modeling Guitar Processor User’s Manual...
-
Page 3: Declaration Of Conformity
Vice-President of Engineering-MI 8760 S. Sandy Parkway Sandy, Utah 84070, USA Date: August 15, 2006 European Contact: Your local DigiTech / Johnson Sales and Service Office or Harman Music Group 8760 South Sandy Parkway Sandy, Utah 84070 USA Ph: (801) 568-8800... -
Page 4: Table Of Contents
Master Level Knob ............4 Chorus/FX...............27 X-Edit Editor/Librarian ..........4 Chorus................27 Presets ................5 Flanger ................28 A Guided Tour of the RP150 ........6 Phaser ................28 Front Panel ..............6 Tremolo ................29 Rear Panel ..............10 Panner................29 Getting Started ...............12 Vibrato ................29... - Page 5 Section Four - Other Functions Drum Machine ..............36 Optional Passive Volume/ Continuous Control Pedal ...........37 Factory Reset ..............37 Section Five - Appendix Specifications ..............38 Tone LIbrary ..............40 Effects Library ..............41 Preset List ................42...
- Page 6 1. The warranty registration card must be mailed within ten days after purchase date to validate this warranty. 2. DigiTech warrants this product, when used solely within the U.S., to be free from defects in materials and workmanship under normal use and service.
-
Page 7: Section One - Introduction
International Industries, Inc. Other product names modeled in this product are trademarks of their respec- tive companies that do not endorse and are not associated or affiliated with DigiTech or Harman International Industries, Inc. They are trademarks of other manufacturers and were used merely to identify products whose... -
Page 8: About The Rp150
Tuner Mode The Tuner in the RP150 allows you to quickly tune or check the tuning on your guitar. Enter Tuner mode by pressing and holding both Footswitches simultaneously. The Display briefly shows tu indicating that you are in Tuner mode. To begin tuning, play a note on your guitar (a harmonic at the 12th fret usually works best). - Page 9 Display shows note played Top LEDs indicate note is sharp Green LED indicates note is in tune Bottom LEDs indicate note is flat In Tuner mode, you can change your tuning reference. The default factory setting is A=440 Hz (displayed as 40). Rotating Knob 1 selects alternate and dropped tunings. Alternate tunings are A=453Hz to A=427 Hz (displayed as 53 to 27).
-
Page 10: Tone Library Knob
Master Level Knob This knob controls the overall output volume of all of the RP150’s presets. X-Edit Editor/Librarian You can edit your RP150 with your computer, using the X-Edit Editor/Librarian. -
Page 11: Presets
Presets are recalled with the Footswitches. The active effects in each preset are indicated by lighted LEDs in the Effect Matrix. The RP150 comes with 50 User presets (1-50) and 50 Factory presets (51-00). The User presets are locations where your creations may be stored. The Factory presets do not allow you to store any changes to them. -
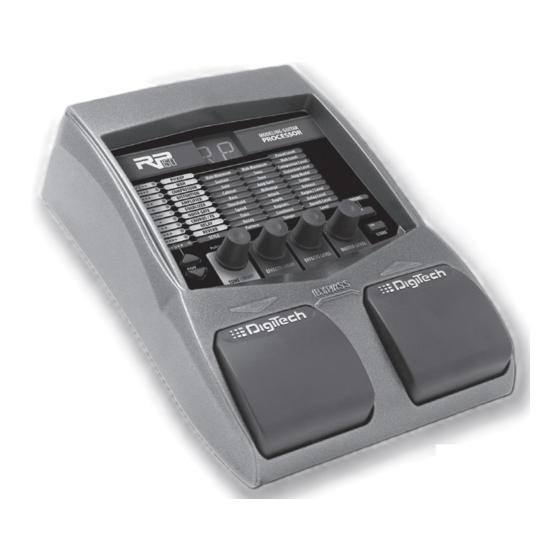
Page 12: A Guided Tour Of The Rp150
A Guided Tour of the RP150 Front Panel... - Page 13 1. Footswitches These two Footswitches are used to select presets, access the Tuner, or bypass the RP150. The Footswitch on the right will select the next preset up, and the Footswitch on the left will select the next preset down. Pressing both Footswitches together will bypass the currently selected preset.
- Page 14 Master Volume Knob (Knob 4) 1. In Performance mode, this knob adjusts the output level of the RP150. 2. When editing a preset, this knob modifies the parameter listed in the column directly above it for the selected Effect row.
- Page 15 Display will show the note played. 6. Drums The Drums button is used to turn on and off the RP150’s built-in drum machine. When the Drums button is turned on, the Drums button LED lights and the selected drum pattern plays continuously.
-
Page 16: Rear Panel
Connect your instrument to this high-impedance TS input. 2. Amp / Mixer This button optimizes the RP150’s outputs for use when plugged into a guitar amp or a mixer/ recording device. When set to Mixer (“In” position), the outputs are optimized for connecting to a mixer, recording device or headphones. - Page 17 When Wah or Whammy is turned on, the pedal controls the RP150’s volume by default. 6. USB Port The USB port is for connecting the RP150 to a computer and serves two purposes: (1) for use with the downloadable X-Edit™ Editor/Librarian software, and (2) for streaming audio to and from the computer.
-
Page 18: Getting Started
There are several different connection options available with the RP150. Before connecting the RP150, make sure that the power to your amplifier and the RP150 is turned off. There is no power switch on the RP150. To turn the RP150 on or off, connect or disconnect the included PS0913B power supply from the Power Input jack. -
Page 19: Stereo Operation
Stereo Operation For stereo operation connect the guitar to the Input of the RP150. Connect one cable to the RP150’s Left (Mono) output, and another cable to the RP150’s Right output. Connect one cable to the input of one amplifier, channel of a mixer, or power amp. Connect the second cable to a second amplifier, second channel of a mixer, or power amp. - Page 20 Stereo Mixer Setup Outputs Instrument Input Mixer Aux 1 Aux 1 Aux 1 Aux 1 Aux 1 Aux 1 Aux 1 Aux 1 Aux 2 Aux 2 Aux 2 Aux 2 Aux 2 Aux 2 Aux 2 Aux 2 0 +1 0 +1 0 +1 0 +1...
-
Page 21: Applying Power
2. Connect the plug of the PS0913B power supply to the power jack on the rear panel of the RP150. 3. Connect the other end of the PS0913B power supply to an AC outlet. Turn the RP150’s Mas- ter Level knob (Knob 4) down to “0”. -
Page 22: Section Two - Editing Functions
Section Two - Editing Functions Editing/Creating Presets The RP150 is designed to make preset editing and creation easy and intuitive. When creating your own sound, you must first start with an existing preset. Note that the preset you begin with doesn’t have to be in the memory location you intend to have it reside, since you can store it to any User preset location during the store procedure. - Page 23 Anytime a stored value within a preset is changed, the Store button LED lights up. This indicates that you need to store the changes. Changing presets, or turning the power off before storing any changes erases any edits made and the RP150 will revert to the stored values for the preset.
-
Page 24: Storing/Copying A Preset
Storing/Copying a Preset Once the preset has been modified to your liking, you may store your settings to any of the 50 User preset locations (presets 1-50). The following steps outline the procedure for storing changes to a preset or copying a preset to a different location: 1. -
Page 25: Section Three - Models And Parameters
With stompboxes, the order in which they are connected affects the overall sound. The RP150 has placed the Amp and Effect models in an order for optimum results. The following diagram shows the order in which they are connected. -
Page 26: Model Definitions
Model Definitions Each Amp and Effect model within the RP150 can be programmed to suit your personal taste and application. Understanding how these components alter the sound, and how each parameter alters the effect, will help you achieve the sound you are looking for. The following overview of the RP150’s effects outlines what each effect and parameter does. -
Page 27: Compressor
Compressor models on and off. Sustain - Knob 2 adjusts the amount of sustain. Ranges from 0 to 99. Tone/Attack - Knob 3 adjusts the tone for the DigiTech Compressor, or attack for the Boss CS-2. Ranges from 0 to 99. -
Page 28: Distortion
DigiTech and DOD are trademarks of Harman International Industries, Inc. Other product names modeled in this product are trademarks of their respective companies that do not endorse and are not associated or affiliated with DigiTech or Harman International Industries, Inc. They are trademarks of other manufacturers and were used merely to identify products whose... - Page 29 Knobs 2, 3, and 4 have the following functions for the various Distortion models: Distortion Knob 2 Knob 3 Knob 4 (X-Edit Model (Gain) (Tone) (Level) (X-Edit (X-Edit only) only) only) Drive Tone Level Gain Level Distortion Filter Level Gain Tone Level Grunge...
-
Page 30: Amplifier
DigiTech is a trademark of Harman International Industries, Inc. Other product names modeled in this product are trademarks of their respective companies that do not endorse and are not associated or affiliated with DigiTech or Harman International Industries, Inc. They are trademarks of other manufacturers and were used merely to identify products whose sounds were... -
Page 31: Cabinet
G12-T70 ® DigiTech and Johnson Amplification are trademarks of Harman International Industries, Inc. Other product names modeled in this product are trademarks of their respective companies that do not endorse and are not associated or affiliated with Digi- Tech or Harman International Industries, Inc. They are trademarks of other manufacturers and were used merely to identify products whose sounds were reviewed in the creation of this product. -
Page 32: Noise Gate
The RP150’s EQ helps further shape your tone with Bass, Midrange, and Treble controls. To help get you started, there are four preset EQ curves: Mid Boost (MB), Scoop (SP), Bright (BR), and Warm (WM) that can be selected using Knob 1. Bass, Midrange, and Treble parameters range from -12dB to +12dB. -
Page 33: Chorus/Fx
A Chorus adds a short delay to your signal. The delayed signal is modulated in and out of tune and then mixed back with the original signal to create a thicker sound. The RP150 includes the fol- lowing Chorus Effect models: CE (based on the classic Boss CE-2 Chorus), DC (DigiTech ’s Dual... -
Page 34: Flanger
A Flanger uses the same principle as a Chorus but uses a shorter delay time and adds regeneration (or repeats) to the modulating delay. This results in an exaggerated up and down sweeping motion to the effect. The RP150 includes the following Flanger Effect models: fL (the DigiTech Flanger), and mx (based on an MXR Flanger). -
Page 35: Tremolo
Tremolo (tR) A Tremolo effect modulates the volume of the signal at an even rate. Speed - Knob 2 adjusts the rate (Speed) at which the volume modulates. Ranges from 0 to Depth - Knob 3 adjusts the intensity (Depth) of the modulating volume. Ranges from 0 to Waveform - Knob 4 selects a waveform: tr, Si, or Sq (Triangle, Sine, or Square). -
Page 36: Rotary Speaker
Rotary Speaker (RO) Rotary Speaker is an emulation of a device that included a spinning horn and woofer. The rotation of these two speakers produced an interesting combination of the sound panning from side to side. This produced a slight pitch change due to the speed of the sound coming towards, and then going away from the listener. -
Page 37: Step Filter
Range - Knob 3 controls the range of the Envelope effect. Ranges from 0 to 99. Step Filter (sf) The Step Filter is like an automatic “random wah” with a square waveform. Speed - Knob 2 adjusts the speed of the Wah effect. Ranges from 0 to 99. Intensity - Knob 3 controls the intensity of the Wah effect. -
Page 38: Intelligent Pitch Shifting
Intelligent Pitch Shifting (HA) Intelligent Pitch Shifting makes a copy of the incoming signal, and then changes the pitch of the copied note to a diatonically correct interval specified by the Amount parameter. An Intelligent Pitch Shifter sharpens or flattens the shifted pitch in order to keep the specified interval within the selected key and scale creating a true harmony. -
Page 39: Digitech Whammy
As the Pedal is moved, the note bends either up or down. When DigiTech Whammy is selected, it is automatically placed before the Amp modeling as shown in the block diagram on page 19. -
Page 40: Delay
Analog Delay), dd (DigiTech Digital Delay), md (DigiTech Modulated Delay), pd ® (DigiTech Pong Delay), and td (DigiTech Tape Delay). Press this knob to turn the Delay mod- els on and off. Knobs 2, 3, and 4 have the following functions for the various Delay models:... -
Page 41: Reverb
Using reverb in recorded program material gives the listener a sense that the material is being per- formed in an actual room or hall. It is this similarity to actual acoustic spaces that makes reverber- ation a useful tool in recorded music. The RP150 features genuine Lexicon reverbs, whose rich, ®... -
Page 42: Drum Machine
Section Four - Other Functions Drum Machine The RP150 includes a built-in drum machine loaded with 65 useful patterns including a metronome setting that are easily accessible at the touch of a button (the Drums button, specifically). Press- ing the Drums button will enable the drum machine and start playback of the selected drum pat- tern (except when in Store or Bypass mode). -
Page 43: Optional Passive Volume/Continuous Control Pedal
Connect a passive volume or continuous control pedal to the RP150’s Control In jack to control the RP150’s Volume, Wah, or Whammy™ in real time with your foot. Turn on a Wah or Whammy model to control it with the optional pedal, or turn on both a Wah model and the Whammy model to control both simultaneously. -
Page 44: Specifications
Section 5 - Appendix Specifications General Specifications A/D/A Converter: 24-bit high performance audio Sampling Frequency: 44.1 kHz DSP Section: AudioDNA2™ DSP Processor Simultaneous Effects: 11 Preset Memory: 50 User Presets (1-50) / 50 Factory Presets (51-00) Drum Machine: 60 Patterns "... - Page 45 Digital Connections: Universal Serial Bus (USB): Type B, supports USB1.1 Full Speed (12 Mbps Bandwidth USB 2.0 compatible) RP150 USB Recording Specifications: Sample Rate: 44.1 kHz Bit depth: supports 16-bit or 24-bit (depends on setup in Recording Software) Power Requirements:...
-
Page 46: Tone Library
Tone Library... -
Page 47: Effects Library
Effects Library... -
Page 48: Preset List
Preset List (User/Factory) - Page 52 RP150 User’s Manual 18-0429-A ©2006 Harman International Industries, Incorporated, all rights reserved. DigiTech and the RP150 are trademarks of the Harman Music Group. Other product names modeled in this product are trademarks of their respective companies that do not endorse and are not associated or affiliated with DigiTech.
Need help?
Do you have a question about the RP150 and is the answer not in the manual?
Questions and answers