HP 914c - iPAQ Business Messenger Smartphone Product Manual
Ipaq 900 series
Hide thumbs
Also See for 914c - iPAQ Business Messenger Smartphone:
- Overview (10 pages) ,
- Navigation manual (128 pages) ,
- Navigation manual (122 pages)
Table of Contents
Advertisement
Quick Links
Advertisement
Table of Contents

Related Manuals for HP 914c - iPAQ Business Messenger Smartphone


Summary of Contents for HP 914c - iPAQ Business Messenger Smartphone
- Page 1 HP iPAQ 900 Series Product Guide...
- Page 2 “as is” without warranty of any kind and is subject to change without notice. The warranties for Hewlett-Packard products are set forth in the express limited warranty statements accompanying such products. Nothing herein should be construed as an additional warranty.
-
Page 3: Table Of Contents
Table of contents 1 Register your HP iPAQ 2 Box contents 3 Components Front panel components ......................... 3 Top panel components ........................4 Left and right side components ....................... 5 Back panel components ........................6 4 Set up your HP iPAQ Step 1: Remove the battery cover and insert the SIM card ............ - Page 4 Protect your HP iPAQ with a password ..................18 Using device lock .......................... 19 Battery saving tips ......................... 19 6 Use your Business Messenger Use the Keyboard ......................... 21 Answer/Send key ......................21 End key ......................... 21 Enter key ........................21 Backspace key ......................
- Page 5 Block calls ....................30 Set up Voice mail or text messaging center number ........30 Change network settings ....................... 31 Change phone network settings ................... 31 View available phone networks ..................31 Set preferred networks ....................31 Manually select a phone network ................. 32 Change the ring tone and ring type ....................
- Page 6 Options for camera and video recorder ..................43 Transfer images ..........................44 Use GPRS ........................44 Use Bluetooth ....................... 44 8 Storage cards Use storage cards ......................... 46 Insert a storage card ........................46 Remove a storage card ......................... 47 View contents of a storage card ....................
- Page 7 Compose and send messages ..................64 Reply or forward a message ..................65 Add an attachment to a message ................. 65 Download messages ....................65 Download messages from a server ................65 Install an online address book ....................... 66 12 Calendar Access calendar ..........................
- Page 8 Access services ......................79 Set a Bluetooth shared folder ..................79 Set up an incoming or outgoing Bluetooth COM port ........... 79 GPRS/EDGE/HSDPA ........................80 HSDPA ......................... 80 GPRS/EDGE ........................ 80 Differences between GSM and GPRS/EDGE/WCDMA/HSDPA technology ....80 Configure GPRS network settings ................81 Edit an Internet connection ...................
- Page 9 HP Help and Support ....................94 HP VoiceReply ......................94 HP iPAQ Setup Assistant ..................... 95 HP iPAQ DataConnect ....................96 HP Photosmart Mobile ....................96 View pictures stored on your HP iPAQ or a storage card ......97 Attach a voice note to a picture ..............97 Print using Storage Card ................
- Page 10 ClearVue PDF ..........................110 Games ............................110 Bubble Breaker ......................110 Solitaire ........................111 Internet Sharing ........................... 111 To connect to a laptop using a USB data connection ..........111 To connect to a laptop using Bluetooth data connection ..........112 Pocket Internet Explorer ......................
- Page 11 Notices ....................... 131 Canadian Regulatory Wireless Notice ................ 132 Brazilian Notice ......................132 Singaporean Wireless Notice ..................132 Japanese Notice ......................... 132 Wireless LAN 802.11b Devices .................. 133 Wireless LAN 802.11g Devices .................. 133 Bluetooth Devices ....................... 133 Taiwan DGT Notice ........................134 Korean Notice ..........................
- Page 12 Cleaning your HP iPAQ ....................... 143 Carrying or storing your HP iPAQ ....................143 Use accessories .......................... 143 23 Quick reference Acronyms ............................ 144 Icons used ........................... 145 Index ................................148...
- Page 13 Register your HP iPAQ Please register your HP iPAQ with Hewlett-Packard to be able to perform the following tasks: ● Access support and services, and get the most out of your HP products. ● Manage your profile. ● Sign up for free support alerts, software updates, and personalized newsletters.
-
Page 14: Box Contents
Box contents This illustration depicts the items that come in the box with your HP iPAQ. NOTE: Box contents might vary by model. HP iPAQ 900 Series Business Messenger Stylus NOTE: The stylus is located on the back panel at the bottom-left corner of your HP iPAQ. 1940 mAh Li-polymer removable/rechargeable battery Getting Started CD with additional software Getting Started Guide... -
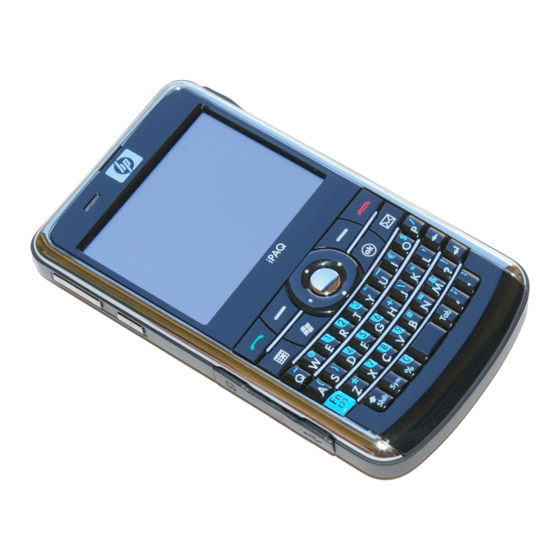
Page 15: Components
Components Know the different components of your HP iPAQ. NOTE: Not all models or features are available in all countries/regions. Front panel components Component Description Function Touch Screen Display Use to view the on-screen contents. Use the stylus to select items, navigate menus, change feature settings, and play games. -
Page 16: Top Panel Components
Component Description Function (11) Calendar Key Press to launch the Calendar application. (12) Answer/Send Key Press to answer a call or to view the Dialer screen. (13) Left SoftKey Press to launch the Pocket Internet Explorer application from the Today screen. (14) LEDs ●... -
Page 17: Left And Right Side Components
Left and right side components Component Description Function Scroll Wheel Use to navigate and scroll through items on the screen and confirm your selection. ok Key Press to confirm your selection. Camera Key Use to launch the camera and capture photos. Mini-USB Connector Use to connect the mini-USB charging/synchronization cable. -
Page 18: Back Panel Components
Back panel components Component Description Function 3 Mega Pixel Camera Turn on the camera, frame the subject in the camera lens, and view it on your HP iPAQ screen before capturing the photo. Wi-Fi Antenna Detects Wi-Fi signals. NOTE: This component will not be visible externally. Speaker Use the speaker to listen to music or as a speakerphone to converse when driving or otherwise occupied. -
Page 19: Set Up Your Hp Ipaq
Set up your HP iPAQ Step 1: Remove the battery cover and insert the SIM card Slide the cover down and away from the HP iPAQ. Align the SIM card over the SIM card slot. Step 1: Remove the battery cover and insert the SIM card... -
Page 20: Step 2: Install The Battery And Replace The Battery Cover
Slide the SIM card into the SIM card slot. NOTE: If the battery is already installed, remove it before inserting the SIM card. The SIM card is provided by a mobile phone service provider. Also, make sure that the metal contacts are facing down and the notched corner is in the correct position. -
Page 21: Step 3: Charge The Battery
Step 3: Charge the battery CAUTION: To avoid damaging your HP iPAQ or the AC adapter, make sure all metal connectors are properly aligned before connecting. The battery provides power for your HP iPAQ to operate. Use the AC adapter that comes with your HP iPAQ to charge the device. -
Page 22: Find The Serial And Model Number
Find the serial and model number Locate the serial and model numbers before contacting HP Customer Support, particularly if you are calling for in-warranty support. View the serial and model number by tapping Start > HP Help and Support > Serial and Model Numbers. - Page 23 Icon Status Icon Status Wi-Fi connected Bluetooth stereo headset detected Roaming General Packet Radio Service (GPRS) available GPRS available in roaming GPRS connecting GPRS in use Enhanced Data Rates for GSM Evolution (EDGE) available EDGE available in roaming EDGE connecting EDGE in use GSM service only Phone connection unavailable or...
-
Page 24: Learn The Basics
Learn the basics Get started with your HP iPAQ by learning the basic functions such as knowing the Today screen, entering text, and synchronizing data. You can use the Getting Started application to learn to perform frequently used tasks. To open the application, tap Start > Programs > Getting Started, and then tap the task that you want to learn. -
Page 25: Customize Your Hp Ipaq
Text-Input Method Definition Letter Recognizer Write individual letters, numbers, and punctuation marks that are converted into typed text. Transcriber Write in cursive, print, or mixed handwriting (consisting of both cursive and print), and convert your writing into typed text. NOTE: This feature might not be available in all countries/ regions. -
Page 26: Change The Regional Settings
To enter owner information: Tap Start > Settings > Personal > Owner Information. On the Identification tab, enter your personal information. TIP: You can edit the owner information directly from the Today screen. To be able to do so, you need to select the Owner Information check box while customizing the Today screen. -
Page 27: Change The Power Management Settings
Change the power management settings To change the power management settings: Tap Start > Settings > System > Power. Tap Advanced and select the length of time the HP iPAQ stays on when using battery power or AC power. Customize screen settings You can customize your HP iPAQ screen settings. -
Page 28: Open And Close Programs
To install programs: Use the WMDC or ActiveSync (WMDC for Windows Vista and ActiveSync for Windows XP) to connect your HP iPAQ to your computer. Follow the instructions in the installation wizard provided with the program you want to install. Check the screen of your HP iPAQ to see if any further steps are necessary to complete the program installation. -
Page 29: Use Shortcut Menus
Tap the day of the week for the alarm. You can select multiple days by tapping each required day. Tap the time display that appears near the alarm name, and then set the time for the alarm. Tap the (Alarm) icon to specify the type of alarm. You can choose single sound or a repeating sound. -
Page 30: Adjust The Speed For Scrolling Through Items In A List
NOTE: To create a new category, tap New and assign a name to the category for a contact, task, or an appointment. The new category is assigned automatically to the item. Adjust the speed for scrolling through items in a list To change the speed at which scrolling occurs: Tap Start >... -
Page 31: Using Device Lock
Using device lock The device lock feature allows you to lock your HP iPAQ to prevent any accidental key press when travelling. This feature allows you to quickly lock and unlock your HP iPAQ, from the Today screen, without a password. NOTE: If this feature is not displayed on the Today screen, tap Start >... - Page 32 WARNING! Removing the battery from your HP iPAQ before turning it off might corrupt data on your HP iPAQ. Chapter 5 Learn the basics...
-
Page 33: Use Your Business Messenger
Use your Business Messenger Use the Keyboard Answer/Send key Press the (Answer/Send) key to access the Dialer screen as well as make and receive calls. End key Press the (End) key to end a call and quit the Dialer screen. You can press this key to wake up your HP iPAQ from the suspend mode. -
Page 34: Scroll Wheel
Pressing a key allows you to enter the respective character. To enter characters in uppercase, press (Shift) key, and then press the required alphabet key. Press the (Shift) key twice to enable caps lock. The on-screen keyboard displays the (Shift lock) icon to indicate that characters will be entered in uppercase. -
Page 35: Answer A Call
Answer a call To answer a call, press the (Answer/Send) key. When you receive a call, you can answer or ignore the call. When the phone stops ringing, the caller might be sent to Voice mail, depending on the settings provided by your mobile phone service provider. -
Page 36: Make Emergency Calls
To make calls from the contacts list: From the Today screen, tap Contacts or press the right softkey. Scroll to the contact name. Scroll to the required number and press the (Answer/Send) key or tap the contact twice to place a call. TIP: If you have a long list of contacts, enter the first few letters of a contact's name. -
Page 37: Voice Mail
To make a speed dial call: Press the (Answer/Send) key. Use the keyboard to press and hold the number you assigned as a speed dial entry. For two-digit speed dial numbers, press the first digit, release it, and then press and hold the second digit of the number. -
Page 38: Put A Call On Hold
Put a call on hold During a call, you can put the call on hold and dial another number or answer an incoming call. If you have more than one call on the line, you can switch between calls. ● To put a call on hold, tap Hold. -
Page 39: Call History
Call history Manage calls using call history Call history provides the time and duration of all incoming, outgoing, and missed calls, a summary of total calls, and provides easy access to notes taken during a call. Press the (Answer/Send) key > Call History to view the history of all dialed and received calls. -
Page 40: Change The Sim Pin
Dial a number using speed dial Speed Dial followed by the digit assigned to the number Compose a message, e-mail, or audio e-mail Compose <SMS/email/audio email> To (Contact) Read messages or e-mails Read <SMS/email> Check Voice mail or call history Call voice mail/Call history View appointments <Today's/Tomorrow's/This Week's appointments>... -
Page 41: Change Service Settings
Tap Menu > Options… > Security. Clear the Require PIN when phone is used check box and tap ok. Change service settings Change phone service settings Once your phone service is set up through your mobile phone service provider, you can change service settings on your HP iPAQ. -
Page 42: Configure Caller Id
Tap Call Waiting > Get Settings… Select the setting you require: ● Select Notify me to enable call waiting. ● Select Do not notify me to disable call waiting. Tap ok. Configure caller ID Configure caller ID to enable the telephone network to display your identity on the recipient's caller ID display. -
Page 43: Change Network Settings
Change network settings Change phone network settings In phone network settings, you can: ● View available wireless phone networks. ● Determine the order in which your phone accesses other phone networks (if the current one is unavailable). ● Specify whether you want to change networks manually or automatically. To change network settings: Tap Start >... -
Page 44: Manually Select A Phone Network
Manually select a phone network Sometimes you might want to control costs by knowing when connectivity for your current, selected network is unavailable. To manually select a network: Press the (Answer/Send) key. Tap Menu > Options… > Network. In the Network selection list, tap Manual. Select the network you want to use, and then tap OK. -
Page 45: Copy All Contacts From Your Hp Ipaq To A Sim
NOTE: Your HP iPAQ might take several minutes, depending on the environment, to connect to the network for the first time when roaming in another country. To avoid problems once you are out of the country, follow these tips before you leave: ●... -
Page 46: Enable Tty Support
To purchase the TTY audio adapter (part number: FA709BAC3), visit http://www.hp.com, and then go to Home and Home office > Handhelds & Calculators > iPAQ accessories. NOTE: As the HP iPAQ does not support internal Cellular Text Telephone Modem (CTM) conversion, the TTY device you use must contain CTM conversion, or you must use an external CTM adapter between the HP iPAQ and the TTY device. -
Page 47: Make A Phone Call Using The Tty Enabled Hp Ipaq
Make a phone call using the TTY enabled HP iPAQ To make a phone call using the TTY enabled HP iPAQ: Press the (Answer/Send) key. Dial the phone number of the person you are trying to reach who also has a Tele-typewriter (TTY) device connected to his phone. -
Page 48: Enable Hac Support
Enable HAC support To enable HAC support: Press the (Answer/Send) key to launch the Dialer screen. Tap Menu > Options… > TTY. TIP: You can also enable HAC by tapping Start > Settings > Personal > Phone > TTY. Select the HAC Mode option. Tap ok. -
Page 49: Delete Voice Notes
NOTE: If you are recording in an open note, the (Voice Note) icon is displayed in the note. If you are creating a stand-alone recording, the (Recorded Voice Note) icon is displayed next to the note in the note list. You can also create a voice note using the HP Photosmart Mobile application and attach the note to a picture. -
Page 50: Notes
To configure the phone broadcast channels: Tap Start > Settings > Personal > Phone > More. Select the Cell Broadcast check box. Tap Setting… Tap Add…, and then enter the channel name and number. Tap ok. Notes You can store information in the form of notes on your HP iPAQ. Write a note To write a note: Tap Start >... -
Page 51: Perform A Hard Reset
Perform a Hard Reset A hard reset stops all running applications, but does not erase any programs or saved data. A hard reset also resets all hardware registers. Be sure to save any unsaved data within a running application before performing a hard reset. NOTE: You can also use these steps to perform a soft reset. - Page 52 The HP iPAQ restarts and powers on. CAUTION: If you perform a factory reset, you will lose all the data stored on your HP iPAQ, except the data in iPAQ File Store. Chapter 6 Use your Business Messenger...
-
Page 53: Camera
Camera With the built-in 3 megapixel camera, you can record video clips, take pictures, view, and save them on your HP iPAQ. NOTE: The camera is not available on all models. Use the camera Use the built-in camera on your HP iPAQ to capture and view photos. Capture photos You can capture photos and store them in your HP iPAQ or storage card. -
Page 54: Basic Settings
Basic settings You can set basic options for the camera. The settings on the Basic tab can be applied while taking photos and also while recording video clips. ● Enable Shutter Sound – Select this option to enable the shutter sound while clicking photos. ●... -
Page 55: Video Settings
To record videos: Tap Start > Programs > Camera. (Video) icon to go into the video mode. Press the Camera key to start recording. Press the Camera key again to stop recording. Video settings To configure settings for recording videos: Tap Start >... -
Page 56: Transfer Images
Icon Description Brightness – Move the slider to adjust the brightness. NOTE: You need to tap the screen while capturing photos to view the Brightness slider. Panorama – This icon is displayed while capturing panorama photos. Stitch – Tap to stitch the photo into a panorama after capturing a set of photos in the Panorama modes. - Page 57 Tap Next. Select the device and tap Tap to send. NOTE: Your Bluetooth connection should be switched on to transfer images. Transfer images...
-
Page 58: Storage Cards
Storage cards Use storage cards Use optional storage cards for: ● Expanding the memory of your HP iPAQ ● Storing pictures, video clips, music, and applications NOTE: Storage cards are not included with your HP iPAQ, and must be purchased separately. For more information about storage cards, visit http://www.hp.com/go/ipaqaccessories. -
Page 59: Remove A Storage Card
Push the card in the slot to lock it in place. Close the cover protecting the storage card slot. If you have trouble inserting a storage card, try the following: ● Make sure you are not inserting the card at an angle. ●... -
Page 60: View Contents Of A Storage Card
Push the card in the slot to unlock the card. Remove the storage card from the storage card slot. Close the cover protecting the storage card slot. View contents of a storage card Use File Explorer to view the files that are located on your optional storage card. To view contents of a storage card: Tap Start >... - Page 61 If the HP iPAQ does not recognize your storage card, try the following: ● Install any drivers that came with the storage card. ● Reset the HP iPAQ by using the stylus to lightly press the Reset button. NOTE: Make sure that you save your data before you reset. View contents of a storage card...
-
Page 62: Synchronization
Synchronization Synchronization software If your computer is running Windows XP or an earlier version, synchronization settings are managed through Microsoft ActiveSync. Microsoft ActiveSync 4.5 is available on the Getting Started CD. You can also visit http://www.microsoft.com/windowsmobile for more information or to download Microsoft ActiveSync. -
Page 63: Migrate Data From Palm Desktop To Microsoft Windows Mobile 6.1
In the ActiveSync window, select Explore. Double-click My Windows Mobile-Based Device and select the files to be copied to or from your computer. Open Windows Explorer on your computer and locate the files to be copied to or from your HP iPAQ. -
Page 64: Wireless Synchronization Cost Saving Tips
Wireless synchronization cost saving tips How you manage the cost of synchronizing without wires from your HP iPAQ depends on your priorities. Do this Reduce network connection or data transfer costs Increase the time between scheduled synchronizations, or synchronize manually. Check the details of your rate plan. Extend battery life Schedule synchronization less frequently or synchronize manually. - Page 65 Following is a list of troubleshooting tips if you experience difficulty while synchronizing your HP iPAQ and computer. Try the following solutions to troubleshoot any synchronization issues: ● Check the OS on your computer before you begin synchronizing information between your HP iPAQ and computer.
-
Page 66: Customized Links In Wmdc
● Unplug your HP iPAQ from your computer, and then re-connect. ● Uninstall ActiveSync from your computer and then reinstall it. To uninstall ActiveSync from your computer, click Start > Control Panel > Add or Remove Programs > Microsoft ActiveSync. Then click Remove > Yes. After trying the above solutions if you still do not have any success in solving your connection problem, perform a hard reset on your HP iPAQ using the HP iPAQ Setup Assistant. -
Page 67: 10 Tasks
10 Tasks The tasks application provides you with an easy way to create a to-do list. You can categorize tasks and mark them as complete, when required. You can also configure tasks to remind you about upcoming appointments. Create a new task To create a new task: Tap Start >... -
Page 68: Mark A Task As Completed
To enable display of tasks on the Today screen: Tap Start > Settings > Personal > Today. Tap Items, and then select the Tasks check box. Tap Tasks to access options, then tap Options… Under Display number of, select the type of tasks to appear on the Today screen. In the Category list, select whether to display only tasks assigned to a specific category only if categories have been assigned or to display all tasks. -
Page 69: 11 Messaging
11 Messaging Understand messages To send and receive e-mail messages for an e-mail account, you need to connect to the Internet or your corporate network, depending on the account. You can send and receive: ● Outlook e-mail ● Internet e-mail through an Internet Service Provider (ISP) ●... -
Page 70: Synchronize E-Mail
● If you use a POP3 account and move your e-mail messages to a folder you created, the link between the messages on the HP iPAQ and their copies on the e-mail server breaks. When you connect, the e-mail server detects that the messages are missing from the Inbox folder on the HP iPAQ and deletes them from the e-mail server. -
Page 71: Internet E-Mail
NOTE: Select This server requires an encrypted (SSL) connection check box to ensure you always send e-mail from this account using an SSL connection. Enter the User name, Password, and Domain. Tap Next. Select the check box for the items you want to synchronize, and tap Finish. Internet e-mail Create a new POP3 or IMAP4 account You must set up an e-mail account that you have with an ISP or an account that you access using... -
Page 72: Change E-Mail Download Options
Setting Description Incoming mail server Enter the name of your e-mail server (POP3 or IMAP4). Outgoing mail server Enter the name of your outgoing e-mail server (SMTP). Require SSL for Incoming e-mail Select this to ensure you always receive e-mail from this account using an SSL connection. -
Page 73: Delete An Account
To change the e-mail download options for Outlook e-mail account: Press the (Messaging) key > Menu > Options. Tap and select Outlook E-mail account. Tap Next. Enter your changes over the next few screens, and then tap Finish. TIP: To send and receive messages automatically, tap Connect, check for messages and enter a time interval. -
Page 74: Mms Composer
When the phone radio is turned on for the first time, the HP iPAQ DataConnect application detects the mobile phone service provider and automatically populates the MMS settings on the HP iPAQ. Alternately, you can access some MMS settings by pressing the (Messaging) key, then tapping Text/MMS Messages >... -
Page 75: Receive Attachments
Receive attachments An attachment sent with an e-mail message or downloaded from the server is displayed below the subject of the message. Tapping the attachment opens the attachment if it has been fully downloaded or marks it for download the next time you send and receive e-mail. You can also download attachments automatically with your messages if you have an Outlook e-mail or IMAP4 e-mail account. -
Page 76: Create Or Change A Signature
After you are set up to receive meeting requests, do the following: Open the meeting request. Tap Accept, or Menu > Tentative, or Menu > Decline. If you want, you can also include a message with the response. The response will be sent the next time that you synchronize or connect to your e-mail server, and your HP iPAQ's calendar will be updated. -
Page 77: Reply Or Forward A Message
Reply or forward a message To reply or forward a message: Tap on the message to open it, and then tap Menu > Reply > Reply, Reply All, or Forward. Enter your response. To quickly add common messages, tap Menu > My Text and tap the required message. -
Page 78: Install An Online Address Book
TIP: To read the entire message, tap Menu > Download Message while in the message window. If you are in the message list, tap and hold the message, and then tap Menu > Download Message. The message will download the next time you send and receive e-mail. This will also download message attachments if you have selected those options while setting up your e-mail account. -
Page 79: 12 Calendar
12 Calendar Access calendar Use Calendar to schedule appointments, including meetings and other events. You can display appointments for the day on the Today screen. ▲ To access Calendar, press the (Calendar) key or tap the (Calendar) icon on the Today screen. -
Page 80: Create An Appointment
Create an appointment To create an appointment on your calendar: To access Calendar, press the (Calendar) key or tap the (Calendar) icon on the Today screen. Tap Menu > New Appointment to create an appointment. Enter the required fields for the task, and then tap ok. Update an appointment To update an appointment on your calendar: To access Calendar, press the... -
Page 81: 13 Contacts
13 Contacts Create a contact To create a contact: On the Today screen, tap Contacts or press the right softkey. Tap New and enter the contact information in Outlook Contact or SIM Contact. When finished, tap ok. NOTE: If your contact list has been filtered by a category when you create a contact, that category is automatically assigned to the new contact. -
Page 82: Find A Contact
Tap Copy Contact. Tap the copy of the contact. Tap Menu > Edit. Change the contact information as needed and tap ok. NOTE: The displayed category is automatically assigned to the new contact. Find a contact To find a contact: On the Today screen, tap Contacts or press the right softkey. -
Page 83: Add And Remove A Picture
Enter your message. To quickly add common messages, tap Menu > My Text and tap the required message. NOTE: To enter symbols, tap Shift using the on-screen keyboard. To check the spelling, tap Menu > Spell Check. Tap Send. If you are sending a text message and want to know if it was received, before sending the message, tap Menu >... - Page 84 NOTE: To display a greater number of contacts on the screen, tap Menu > Options…, select the Show contact names only check box, and clear the Show alphabetical index check box. Chapter 13 Contacts...
-
Page 85: 14 Connections
14 Connections You can use your HP iPAQ to connect and exchange information with other handheld devices, computer, and other networks. You can connect using: ● Wi-Fi ● Bluetooth ● GPRS/EDGE/HSDPA/WCDMA You can connect by tapping Start > Settings > Connections. Use Wireless Manager Using Wireless Manager, you can easily turn on/off the functions of a Wi-Fi connection, a Bluetooth connection, and Phone features. -
Page 86: Wi-Fi Terms
With Wi-Fi, you can: ● Access the Internet. ● Send and receive e-mail. ● Access corporate network information. ● Use VPNs for secure remote access. ● Use hotspots for wireless connectivity. Tap Start > Settings > Connections > Wi-Fi. NOTE: Using dial-up or wireless networks to access a corporate network, e-mail, or other wireless communications, such as Bluetooth devices might require separate hardware along with a Wi-Fi infrastructure and a service contract. -
Page 87: Manually Connect To A Wi-Fi Network
To automatically connect to a Wi-Fi network: Tap Start > Settings > Connections > Wireless Manager > Wi-Fi. Once your HP iPAQ detects a Wi-Fi network, you are asked to choose if you want to connect. Select the network you want to connect to and tap Connect. Manually connect to a Wi-Fi network You can manually configure a wireless network by entering the required settings information. -
Page 88: Bluetooth
In the Configure Wireless Networks box, select the Wi-Fi network you want to delete. Tap Menu > Remove Settings. Bluetooth Bluetooth terms It is recommended that you become familiar with the following terms as you begin to use Bluetooth technology. Term Definition Authentication... -
Page 89: Create, End, And Accept A Bluetooth Partnership
To connect to a computer via Bluetooth using ActiveSync: Follow the instructions in synchronization software help on the computer for configuring Bluetooth on your computer to support ActiveSync. On your HP iPAQ, tap Start > Programs > ActiveSync. Tap Menu > Connect via Bluetooth. Make sure the HP iPAQ and computer are within close range. -
Page 90: Edit A Bluetooth Partnership
To end a Bluetooth partnership: Tap Start > Settings > Connections > Bluetooth. Tap and hold the partnership you want to end. Tap Delete. To accept a Bluetooth partnership: Make sure that your HP iPAQ is discoverable and placed within close range with the pairing device. -
Page 91: Access Services
● Hands-Free Profile (HFP) ● Handset Profile (HSP) ● Human Interface Device (HID) Profile Host ● Generic Object Exchange Profile (GOEP) ● Object Push Profile (OPP) ● Serial Port Profile (SPP) ● Phone Book Access Profile (PBAP) ● File Transfer Profile (FTP) ●... -
Page 92: Gprs/Edge/Hsdpa
Tap COM Ports. Tap New Incoming Port or New Outgoing Port. NOTE: New Outgoing Port is only available if at least one Bluetooth device supports serial (COM) connection. Select a numbered COM port from the list. NOTE: If the port cannot be created, it is in use. Select a different numbered port. To limit communication on this COM port to only devices with which the HP iPAQ has a Bluetooth partnership, select the Secure Connection check box. -
Page 93: Configure Gprs Network Settings
Configure GPRS network settings The first time you use your SIM card, HP iPAQ DataConnect automatically detects the phone network and operator and sets up the GPRS connection information for you. However, if your mobile phone service providers offer different subscription types, then HP iPAQ DataConnect will show a window on your screen that list the different subscriptions available. -
Page 94: Edit Mms Settings
To configure settings using a telephone number: Select the Cellular Line option from the Select a modem list. Tap Next. Enter a telephone number in the text box, and then tap Next. To configure settings using access points: Select the Cellular Line (GPRS, 3G) option from the Select a modem list. Tap Next. -
Page 95: Edit Wap Information Settings
To configure settings using a telephone number: Select the Cellular Line option from the Select a modem list. Tap Next. Enter a telephone number in the text box, and then tap Next. To configure settings using access points: Select the Cellular Line (GPRS, 3G) option from the Select a modem list. Tap Next. -
Page 96: Troubleshoot Automatic Detection
To configure settings using a telephone number: Select the Cellular Line option from the Select a modem list. Tap Next. Enter a telephone number in the text box, and then tap Next. To configure settings using access points: Select the Cellular Line (GPRS, 3G) option from the Select a modem list. Tap Next. -
Page 97: Change An Intranet Url
Change an intranet URL To change an intranet URL: Tap Start > Settings > Connections > Connections > Advanced > Exceptions… Tap the intranet URL exception you want to change, then make the required changes. Tap ok. NOTE: To delete a work URL exception, tap and hold it in the list, then tap Delete. Set up an automatic choice for connections If you have already created more than one connection, you can set up your HP iPAQ to connect to the best available connection automatically. -
Page 98: Configure Advanced Proxy Settings
In the Server box, enter the WAP gateway server name. Under Port, enter the port number. The most common WAP port number is 9201. Enter any logon credentials required by the WAP gateway server. Configure advanced proxy settings To configure advanced proxy settings: Tap Start >... -
Page 99: Change A Connection Group Name
● TCP/IP settings ● Host name or IP address of the VPN server To set up a VPN server connection: Tap Start > Settings > Connections > Connections > Tasks. Under My Work Network, tap Add a new VPN server connection and follow the instructions in the New Connection wizard. -
Page 100: 15 Google
15 Google Google Maps™ for mobile Google Maps is a free mapping application provided by Google that powers many map-based services. It offers street maps, a route planner, and an urban business locator for numerous countries around the world. NOTE: Google offers maps for mobile for free, but mobile service providers might charge data-service rates for downloading and using the application with a limited data plan or no data plan. -
Page 101: Launch Google Search
Launch Google Search To launch Google Search: Tap Start > Google Search. Enter your search criteria in the Search box. Tap Search to start the search. NOTE: Using this application might drain the battery quickly. Google Search... -
Page 102: Configure Global Positioning System (Gps) On Your Hp Ipaq
16 Configure Global Positioning System (GPS) on Your HP iPAQ You can use your HP iPAQ to connect to GPS satellites and determine your exact location on the Earth. You can also download maps from the Internet, to help you navigate from one location to another. -
Page 103: Verify Internet Access
Verify Internet Access To verify Internet access on the HP iPAQ: ● Visit a Web site such as http://www.hp.com. If you do not have an Internet connection and GPRS service, Internet Explorer displays an error message. Please check with your service provider or wireless operator to confirm if the data connection 1, 2, 3 on your device is enabled... -
Page 104: Configure And Manage My Gps Software To Connect To My Hp Ipaq's Gps Receiver Automatically
NOTE: It is recommended that you download all GPS maps to a memory card that is compatible with your HP iPAQ model or to an iPAQ File Store folder (if your model provides one). This prevents you from losing your map data due to a possible power loss or a need to perform a clean reset on the HP iPAQ. -
Page 105: Troubleshoot Common Reasons For Interference When Using Gps Software
Troubleshoot Common Reasons For Interference When Using GPS Software Interference Type How to Avoid Vehicles with thermal glass windows and windshields. Place the HP iPAQ where there is a clear view of the sky or on the dashboard of a vehicle that does not have thermal glass windows. -
Page 106: 17 Applications
17 Applications Enjoy your HP iPAQ by listening to your favorite MP3 music using Windows Media Player. You can also record voice clips to be sent as an attachment to family and friends. Use Office Mobile applications to view presentations, spreadsheets, and documents. HP applications HP Help and Support The HP Help and Support application increases visibility, accessibility, and usability of the HP iPAQ. -
Page 107: Hp Ipaq Setup Assistant
HP VoiceReply can be used with Outlook accounts, POP3 account, or with iMAP4 accounts from your HP iPAQ. To use HP VoiceReply: When composing a new e-mail message or replying or forwarding a message, tap Menu > HP VoiceReply to select either of the following options: ●... -
Page 108: Hp Ipaq Dataconnect
an existing certificate store, such as Personal or Intermediate. Alternatively, you can select a .pfx or .cer certificate file from a file store. ● Exchange Server – Exchange Server is used to access e-mail, calendars, contacts, tasks, and other mailbox contents while on the go. You can set up Outlook on your HP iPAQ to synchronize directly with your organization's Exchange Server. -
Page 109: View Pictures Stored On Your Hp Ipaq Or A Storage Card
View pictures stored on your HP iPAQ or a storage card You can view photos stored on your HP iPAQ or an external storage card using the HP Photosmart Mobile. To view photos: Tap Start > HP Photosmart Mobile. Tap Menu > Open Folder. Browse to the folder where you have saved the photos. -
Page 110: View A Slideshow
View a slideshow To view a slideshow: Tap Start > HP Photosmart Mobile. Tap the (Slideshow) icon at the bottom of the screen. Tap the screen to view the (Forward), (Backward), (Stop), and (Pause) icons. E-mail pictures NOTE: You need to configure your e-mail messaging account to send pictures using e-mail. To send pictures through e-mail: Tap Start >... -
Page 111: Snapfish
Snapfish Snapfish feature enables you to upload images from your HP iPAQ to your Snapfish account via your e-mail account. Tap Start > HP Photosmart Mobile. Tap the thumbnail to be sent via Snapfish and then tap View. Tap Menu > Send… > Snapfish. Select the Reduce sent photo size to check box, and then select the required reduction in resolution. -
Page 112: Switch To Camera Application
Tap the Effects tab, and select the Use transition effects check box to choose a transition effect. Tap the Date/Time tab to select the date and time display option. NOTE: HP Photosmart Mobile automatically displays the slideshow you selected, if your HP iPAQ is inactive while it is connected to the computer with the synchronization software running. -
Page 113: Hp Printsmart Mobile
To play videos: Tap Start > HP Photosmart Mobile. Select the video thumbnail and tap View. HP Printsmart Mobile Use HP PrintSmart Mobile to print information from your HP iPAQ mobile device to a compatible printer. HP PrintSmart Mobile application provides printing support over Bluetooth and Wi-Fi network. -
Page 114: Hp Asset Viewer
Icon Keyboard State Description Function Enter a single superscript character Function lock Enter superscript characters HP Asset Viewer Using the HP Asset Viewer application, you can view information about the system, integrated modules, and attached accessories. To access HP Asset Viewer: Tap Start >... -
Page 115: Hp Ipaq Tips
NOTE: HP CertEnroller picks up certificate types from Active Directory as well as from the HP iPAQ's data store. You must enter a server name for retrieving the certificate, and if required, a valid username and password. To access HP CertEnroller: Tap Start >... -
Page 116: Hp Ipaq Ring Tone Manager
HP iPAQ Ring Tone Manager With HP iPAQ Ring Tone Manager application, you can add and remove ring tones on your HP iPAQ. To add a ring tone: Tap Start > Settings > System > RingTones > Add. On the iPAQ Ring Tones screen, under Select Ring Tones to add to your device, all *.wav, *.mid, *.mp3, *.aac, *.amr, and *.awb files stored on the HP iPAQ are displayed. -
Page 117: Search
To… Do This… View all applications running in the memory Tap the application, then tap Menu > View > Applications. View all processes running in the memory Tap the application, then tap Menu > View > Processes. Change the sorting order Tap Menu >... -
Page 118: Voice Commander
Voice Commander Use the Voice Commander application to look up contacts, dial a contact by name, get calendar information, play and control your music, as well as launch applications on your HP iPAQ. For more information, see Voice commands on page TIP: You can also access the Voice Commander application by tapping Start >... -
Page 119: Windows Media Player
To… Do This… Open an application Tap the application or tap Menu > Operation > Launch. Remove an application Tap Menu > Operation > Delete. Update an application Tap Menu > Operation > Update. Move an application to a folder Tap Menu >... -
Page 120: Use Voice Commander To Play Media Files
Use Voice Commander to play media files You can play your media files by using the Voice Commander application on your HP iPAQ. Press the Voice Commander key on your HP iPAQ. Hold your HP iPAQ 10 cm (3.94 inches) away from your face and say Play Music (Media File Name) to play the media file. -
Page 121: Powerpoint Mobile
To access options for organizing and formatting a worksheet, open a worksheet and tap Menu. In addition to Cut, Copy, and Paste, there are options in Menu that allow you to: ● Paste cells using Paste Special… ● Clear cell contents and formats applied to cells. ●... -
Page 122: Clearvue Pdf
● Format the text inserted in a note. ● Add a numbered or bulleted list in a note. ● Insert pictures using the camera or from the HP iPAQ. ● Insert a voice recording in a note. ClearVue PDF You can view a Portable Document File that has the extension .pdf on your HP iPAQ. To view a file: Tap Start >... -
Page 123: Solitaire
NOTE: To recall the balls you deleted, tap Menu > Undo Move. To play a game: Tap Start > Programs > Games > Bubble Breaker. Tap New Game to start a new game. Tap a ball which is of the same color as the other balls around. Tap the similar colored balls twice to delete the balls from the screen. -
Page 124: To Connect To A Laptop Using Bluetooth Data Connection
Select Specify a Location and browse to the C:\ drive folder that contains the USB driver. NOTE: Click Next to allow your computer to automatically search and download the USB driver file. Click Finish. After installing the driver, Smartphone USB Modem will be added to the device list in the Device Manager. -
Page 125: Pocket Internet Explorer
Pocket Internet Explorer You can launch the Pocket Internet Explorer application by pressing the left softkey from the Today screen. This application displays an HP iPAQ-customized home page with the following options: ● iPAQ Software – Download software and games for your mobile device. Browse the site for the newest updates and best software. - Page 126 ● Invite others for a chat conversation. ● Block certain contacts from seeing your status or sending you messages. Tap Start > Programs > Windows Live to open the Windows Live application. To use Windows Live, you need a Microsoft.NET Passport account unless you already have a Hotmail account.
-
Page 127: Sms Cell Broadcast
If you do not sign out of Windows Live, you remain on a data connection, which might result in additional charges from your service provider. The session will not time out or end unless one of the following occurs: ● User ends the instant messenger session ●... -
Page 128: Sim Toolkit
SIM Toolkit SIM Toolkit (STK) consists of a set of commands that are programmed into the SIM card. The toolkit defines how the card should interact with the outside world and extends the communication protocol between the card and the handset. It supports various value added services typically provided by the operator or third party companies. -
Page 129: 18 Product Specifications
18 Product specifications System specifications NOTE: Not all models described are available in all countries/regions. For more information on specifications for your particular model, on your HP iPAQ, tap Start > Settings > System > HP Asset Viewer. System Feature Description Processor Marvell PXA270, 416 MHz... -
Page 130: Physical Specifications
Physical specifications Metric Length 4.49 inches 113.97 mm Width 2.53 inches 64.18 mm Depth 0.71 inches 18.14 mm ● ● Weight With battery: 5.33 oz With battery: 151 g ● Without battery: 3.63 oz ● Without battery: 103 g Operating environment Metric Temperature Operating... -
Page 131: 19 Regulatory Notices
19 Regulatory notices Federal Communications Commission Notice This equipment has been tested and found to comply with the limits for a Class B digital device, pursuant to Part 15 of the FCC Rules. These limits are designed to provide reasonable protection against harmful interference in a residential installation. -
Page 132: Declaration Of Conformity For Products Marked With The Fcc Logo (United States Only)
This device must accept any interference received, including interference that may cause undesired operation. If you have questions about the product that are not related to this declaration, write to Hewlett-Packard Company P. O. Box 692000, Mail Stop 530113 Houston, TX 77269-2000... - Page 133 *If applicable, a notified body number is used. Refer to the regulatory label provided on this product. Hewlett-Packard GmbH, HQ-TRE, Herrenberger Strasse 140, D-71034 Böblingen, Germany The telecommunications functionality of this product may be used in the following EU and EFTA...
-
Page 134: Products With 2.4-Ghz Wireless Lan Devices
Products with 2.4–GHz Wireless LAN Devices France L'utilisation de cet equipement (2.4GHz Wireless LAN) est soumise a certaines restrictions: Cet equipement peut être utilisé a l'interieur d'un batiment en utilisant toutes les frequences de 2400 a 2483.5MHz (Chaîne 1-13). Pour une utilisation en environement exterieur, les frequences comprises entre 2400-2454 MHz (Chaîne 1-9) peuvent être utilisé. -
Page 135: Disposal Of Waste Equipment By Users In Private Household
1907/2006 of the European Parliament and the Council). A chemical information report for this product can be found at: www.hp.com/go/reach. Disposal of Waste Equipment by Users in Private Household Disposal of Waste Equipment by Users in Private Household in the European Union This symbol on the product or on its packaging indicates that this product must not be disposed of with your other household waste. - Page 136 Seadmete jäätmete kõrvaldamine eramajapidamistes Euroopa Liidus See tootel või selle pakendil olev sümbol näitab, et kõnealust toodet ei tohi koos teiste majapidamisjäätmetega kõrvaldada. Teie kohus on oma seadmete jäätmed kõrvaldada, viies need elektri- ja elektroonikaseadmete jäätmete ringlussevõtmiseks selleks ettenähtud kogumispunkti. Seadmete jäätmete eraldi kogumine ja ringlussevõtmine kõrvaldamise ajal aitab kaitsta loodusvarasid ning tagada, et ringlussevõtmine toimub viisil, mis kaitseb inimeste tervist ning keskkonda.
- Page 137 Disposal of Waste Equipment by Users in Private Household 125...
- Page 138 Šis simbolis ant gaminio arba jo pa atliekoms perdirbti. Atskirai surenkam 126 Chapter 19 Regulatory notices...
- Page 139 Disposal of Waste Equipment by Users in Private Household 127...
- Page 140 Bortskaffande av avfallsprodukter från användare i privathushåll inom Europeiska Unionen Om den här symbolen visas på produkten eller förpackningen betyder det att produkten inte får slängas på samma ställe som hushållssopor. I stället är det ditt ansvar att bortskaffa avfallet genom att överlämna det till ett uppsamlingsställe avsett för återvinning av avfall från elektriska och elektroniska produkter.
-
Page 141: Equipment Warning
Avrupa Birliği'nde Hurda Donanımların Özel Konutlardaki Kullanıcılar Tarafından Elden Çıkarılması Tento Ürünün veya ambalajının üzerinde ki bu simge, bu ürünün diğer ev atıklarıyla birlikte elden çıkarılma ması gerektiğini belirtir. Hurda donanımınızın elektrikli ve elektronik hurda donanımları geri dönüştürmek için belirlenmiş toplama merkezlerine teslim edilmesi, sizin sorumluluğunuzdadır. -
Page 142: Airline Travel Notice
● For your own safety, before using headsets or earphones, always reset the volume. Some headphones are louder than other headphones, even if the volume control setting is the same. ● Changing the default audio or equalizer settings might lead to higher volume and should only be done with caution. -
Page 143: Wireless Notices
* The non-FCC SAR limit for mobile devices used by the public is 2.0 milliwatts/gram (mW/g) averaged over ten grams of body tissue. The guidelines incorporate a substantial margin of safety to give additional protection for the public and to account for any variations in measurements. SAR values may vary depending on national reporting requirements and the network band. -
Page 144: Canadian Regulatory Wireless Notice
Canadian Regulatory Wireless Notice Operation is subject to the following two conditions: (1) this device may not cause interference, and (2) this device must accept any interference, including interference that may cause undesired operation of the device. Brazilian Notice Este equipamento opera em caráter secundário, isto é, não tem direito a proteção contra interferência prejudicial, mesmo de estações do mesmo tipo, e não pode causar interferência a sistemas operando em caráter primário. -
Page 145: Wireless Lan 802.11B Devices
Wireless LAN 802.11b Devices Wireless LAN 802.11g Devices Bluetooth Devices Japanese Notice 133... -
Page 146: Taiwan Dgt Notice
Taiwan DGT Notice 1. SAR 2.0W/Kg 0.785 W/Kg Korean Notice 134 Chapter 19 Regulatory notices... -
Page 147: 20 Frequently Asked Questions
20 Frequently Asked Questions I am having trouble turning on my HP iPAQ. What should I do? Your HP iPAQ seems to have problems with the battery. Please perform the following checks: ● Is the battery charged? If the LED on your HP iPAQ is flashing red, it indicates a low battery charge. -
Page 148: Why Do My Calls Keep Disconnecting
Why do my calls keep disconnecting? This could be a result of poor signal strength. If you have this problem, please check the following: ● Is the reception of the network signal good? You might be located within closed boundaries. If yes, move to an open space or closer to a window. -
Page 149: It Takes A Very Long Time Or I Am Unable To Send An Sms Or Mms. What Do I Do
It takes a very long time or I am unable to send an SMS or MMS. What do I do? If you have problem sending an SMS or MMS, please perform the following checks: ● You should have at least 1.5 to 2 MB of free memory space on your HP iPAQ so that the device operates efficiently. -
Page 150: Why Does The Hp Ipaq Operate Slowly Sometimes
Why does the HP iPAQ operate slowly sometimes? You should have at least 1.5 to 2 MB of free memory space on your HP iPAQ so that the device operates efficiently. To check the free memory space, tap Start > Settings > System > Memory. Remember to delete or transfer old e-mail messages and pictures on your HP iPAQ to free available memory space. -
Page 151: Can I Set Up An Active Connection Between My Hp Ipaq And A Computer Using Bluetooth For The First Time
Can I set up an active connection between my HP iPAQ and a computer using Bluetooth for the first time? No, the initial connection between your HP iPAQ and the computer needs to be created only through a mini-USB synchronization cable using ActiveSync for Windows XP and WMDC for Windows Vista. After this initial connection, you will be able to set up Bluetooth for future connections. -
Page 152: 21 Safety Information
21 Safety information To reduce the risk of bodily injury, electric shock, fire, and damage to the equipment, observe the safety precautions in this document. General Precautions Heed service markings: Except as explained elsewhere in your product documentation, do not service your product yourself. -
Page 153: Safety Precautions For Power Cords And Accessories
Safety Precautions for Power Cords and Accessories WARNING! To reduce the risk of electric shock, fire, or damage to the equipment, do not attempt to power the product with a voltage converter kit sold for appliances. Use the correct external power source: A product should be operated only from the type of power source indicated on the electrical ratings label. -
Page 154: Safety Precautions For Docking Devices
WARNING! There is a danger of explosion if a battery pack is incorrectly replaced. Replace it only with an approved battery pack for this product. WARNING! Keep battery packs away from children. Handle battery packs carefully: Replace a battery pack only with a battery pack approved for this product. -
Page 155: 22 Guidelines For Care And Maintenance
22 Guidelines for care and maintenance It is recommended that you follow certain guidelines to keep your HP iPAQ in a good condition and prevent it from possible damage. Use your HP iPAQ ● Avoid using your HP iPAQ in dusty and extremely high or low temperature environments. ●... -
Page 156: 23 Quick Reference
23 Quick reference Acronyms Acronym Expansion A2DP Advance Audio Distribution Profile Automatic Gain Control AVRCP Audio/Video Remote Control Profile Client Basic Image Push Profile Basic Printing Profile Cisco Compatible Extensions CDRH Center for Devices and Radiological Health Cellular Text Telephone Modem Domain Name Server Digital Rights management EDGE... -
Page 157: Icons Used
Acronym Expansion MicroSD Micro Secure Digital Multimedia Messaging Service Object Push Profile Operating System Personal Area Networking Profile PBAP Phone Book Access Profile Personal Information Manager POP3 Post Office Protocol 3 Radio Frequency Rich Text Format Specific Absorption Rate Subscriber Identification Module Short Messaging Services SMS-CB Short Message Service Cell Broadcast... - Page 158 Icon Description Icon Description Speaker Alarm Wireless Manager Calendar Camera icons Icon Description Icon Description Images / Recording time Images / Recording time balance balance Flash off Flash on Resolution Exit HP PhotoSmart Mobile Video mode Settings Zoom Brightness Panorama Stitch images Previous Next...
- Page 159 Notes icons Icon Description Icon Description Voice note Recorded voice note General icons Icon Description Icon Description Previous Next Play Stop Stop (slideshow view) Record Pause Input selector Shift Shift lock Function Function lock Icons used 147...
-
Page 160: Index
Index Symbols/Numerics backlight 15 dialing international 2.4-GHz wireless LAN Backspace key number 26 devices 122 using HP iPAQ 21 emergency calls 24 battery make a call 22 charging 9 mute a call 25 AC adapter 2 install 8 redial number 23 advanced settings remove 7 speed dials 24... - Page 161 connection group name 87 Federal Communications add picture to Today differences 80 Commission screen 98 edit MMS settings 82 cables 119 attach voice note to a edit WAP settings 83 modifications 119 picture 97 end a connection 87 notice 119 enhance documents 99 GPRS/EDGE 80 France, 2.4-GHz wireless LAN...
- Page 162 protect your HP iPAQ with a maintenance Office Mobile applications password guidelines 143 Excel Mobile 108 settings 18 messaging OneNote Mobile 109 create or change PowerPoint Mobile 109 QWERTY keyboard signature 64 Word Mobile 108 using HP iPAQ 21 creating a new e-mail operating environment account 59 specifications 118...
- Page 163 status icons 10 Use the Keyboard storage cards using HP iPAQ 21 inserting 46 using HP iPAQ 21 removing 47 using video recorder usage 46 recording 42 viewing contents of a storage card 48 voice mail stylus 6 mail 25 synchronizing voice notes copy files 50...