Dell OPTIPLEX 790 Setup And Features Information
Dell personal computer user manual
Hide thumbs
Also See for OPTIPLEX 790:
- Owner's manual (96 pages) ,
- Technical manualbook (48 pages) ,
- Important information (3 pages)
Advertisement
Quick Links
Dell OptiPlex 790
Setup And Features Information
About Warnings
WARNING: A WARNING indicates a potential for property damage, personal injury,
or death.
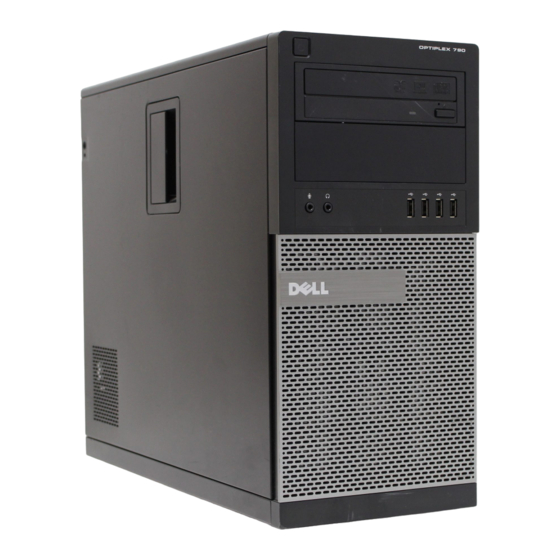
Mini-Tower — Front And Back View
Figure 1. Front And Back View Of Mini-Tower
1. power button, power light
2. optical-drive bay (optional)
3. headphone connector
4. microphone connector
5. diagnostic lights (4)
6. optical drive (optional)
7. optical-drive eject button
8. USB 2.0 connectors (4)
9. drive activity light
10. power supply diagnostic light
11. power supply diagnostic button
12. power connector
13. back panel connectors
14. expansion-card slots (4)
15. security-cable slot
16. padlock ring
Regulatory Model: D09M, D05D, D03S, D01U
Regulatory Type: D09M001, D05D001,
D03S001, D01U002
2011 – 02
Advertisement

Related Manuals for Dell OPTIPLEX 790


Summary of Contents for Dell OPTIPLEX 790
- Page 1 Dell OptiPlex 790 Setup And Features Information About Warnings WARNING: A WARNING indicates a potential for property damage, personal injury, or death. Mini-Tower — Front And Back View Figure 1. Front And Back View Of Mini-Tower 1. power button, power light 2.
-
Page 2: Desktop - Front And Back View
Desktop — Front And Back View Figure 2. Front And Back View Of Desktop 1. optical drive 2. optical-drive eject button 3. power button, power light 4. USB 2.0 connectors (4) 5. microphone connector 6. headphone connector 7. drive activity light 8. - Page 3 Small Form Factor — Front And Back View Figure 3. Front And Back View Of Small Form Factor 1. optical drive 2. optical-drive eject button 3. power button, power light 4. USB 2.0 connectors (4) 5. microphone connector 6. headphone connector 7.
- Page 4 Ultra Small Form Factor — Front And Back View Figure 4. Front And Back View Of Ultra Small Form Factor 1. optical drive 2. optical-drive eject button 3. power button, power light 4. drive activity light 5. diagnostic lights (4) 6.
- Page 5 Mini-Tower And Desktop — Back Panel Figure 5. Back Panel View of Mini-Tower And Desktop 1. mouse connector 2. link integrity light 3. network connector 4. network activity light 5. serial connector 6. line-out connector Small Form Factor — Back Panel Figure 6.
-
Page 6: Quick Setup
WARNING: Before you begin any of the procedures in this section, read the safety information that shipped with your computer. For additional best practices information, see www.dell.com/regulatory_compliance. NOTE: Some devices may not be included if you did not order them. - Page 7 Figure 11. VGA To DisplayPort Adapter 2. Connect the USB keyboard or mouse (optional). Figure 12. USB Connection 3. Connect the network cable (optional). Figure 13. Network Connection 4. Connect the modem (optional). Figure 14. Modem Connection 5. Connect the power cable(s).
-
Page 8: Specifications
Figure 16. Turning On Power Specifications NOTE: The following specifications are only those required by law to ship with your computer. For a complete and current listing of the specifications for your computer, go to support.dell.com. System Information Chipset Processor... - Page 9 Memory Memory module connectors Desktop, Mini-Tower, Small Form Factor Ultra Small Form Factor Memory module capacity Type Minimum memory Maximum memory Desktop, Mini-Tower, Small Form Factor Ultra Small Form Factor Drives Externally accessible: 5.25 inch drive bays Mini-Tower Desktop Small Form Factor Ultra Small Form Factor Internally accessible: 3.5 inch SATA drive bays...
- Page 10 For more information on the diagnostic Service Manual at lights, see the support.dell.com/manuals. 3 V CR2032 lithium coin cell 100 VAC to 240 VAC, 50 Hz to 60 Hz, 5.00 A 100 VAC to 240 VAC, 50 Hz to 60 Hz, 4.40 A 100 VAC to 240 VAC, 50 Hz to 60 Hz, 3.60 A...
- Page 11 Power Small Form Factor Ultra Small Form Factor Maximum heat dissipation Mini-Tower Desktop Small Form Factor Ultra Small Form Factor NOTE: Heat dissipation is calculated by using the power supply wattage rating. NOTE: See the safety information that shipped with your computer for important voltage-setting information.
-
Page 12: Finding More Information And Resources
Storage Airborne contaminant level Finding More Information and Resources See the safety and regulatory documents that shipped with your computer and the regulatory compliance website at www.dell.com/ regulatory_compliance for more information on: • Safety best practices • Regulatory certification • Ergonomics See www.dell.com for additional information on:... - Page 13 Other trademarks and trade names may be used in this publication to refer to either the entities claiming the marks and names or their products, Dell Inc. disclaims any proprietary interest in trademarks and trade names other than its own.
Need help?
Do you have a question about the OPTIPLEX 790 and is the answer not in the manual?
Questions and answers
How do I change the hard drive? I bought a refurbished computer and the drive that came with it was corrupted, so the company sent me another hard drive.
The context does not provide specific instructions on changing the hard drive in a Dell OptiPlex 790. However, in general, to change the hard drive in a Dell OptiPlex 790, follow these steps:
1. Power Off and Unplug – Shut down the computer and disconnect all cables.
2. Open the Case – Remove the side panel by sliding or unscrewing it, depending on the chassis type.
3. Locate the Hard Drive – Identify the hard drive bay inside the case.
4. Disconnect Cables – Unplug the power and data cables from the hard drive.
5. Remove the Hard Drive – Unscrew or release the drive from its mounting bracket.
6. Install the New Hard Drive – Secure the new drive in place and reconnect the power and data cables.
7. Close the Case – Reattach the side panel.
8. Power On and Configure – Turn on the system and ensure the new drive is recognized in the BIOS.
If reinstalling the operating system, boot from a recovery media or installation disk.
This answer is automatically generated