dji GOGGLES N3 Manual
- Quick start manual (55 pages) ,
- User manual (40 pages) ,
- Quick start manual (3 pages)
Advertisement
Using the Manual
Legend

 Hints and Tips
![]() Reference
Reference
Read Before Use
DJI™ provides you with tutorial videos and the following documents:
- Safety Guidelines
- Quick Start Guide
- User Manual
It is recommended to watch all the tutorial videos and read the Safety Guidelines before using for the first time. Make sure to review the Quick Start Guide before using for the first time and refer to this User Manual for more information.
Video Tutorials
Go to the address below or scan the QR code to watch the tutorial videos, which demonstrate how to use the product safely:

https://www.dji.com/goggles-n3/video
Download the DJI Fly App

- To check the Android and iOS operating system versions supported by DJI Fly, visit https://www.dji.com/downloads/djiapp/dji-fly.
- The interface and functions of DJI Fly may vary as the software version is updated. Actual user experience is based on the software version used.
Download DJI Assistant 2
Download DJI ASSISTANT™ 2 (Consumer Drones Series) at: https://www.dji.com/downloads/softwares/dji-assistant-2-consumer-drones-series
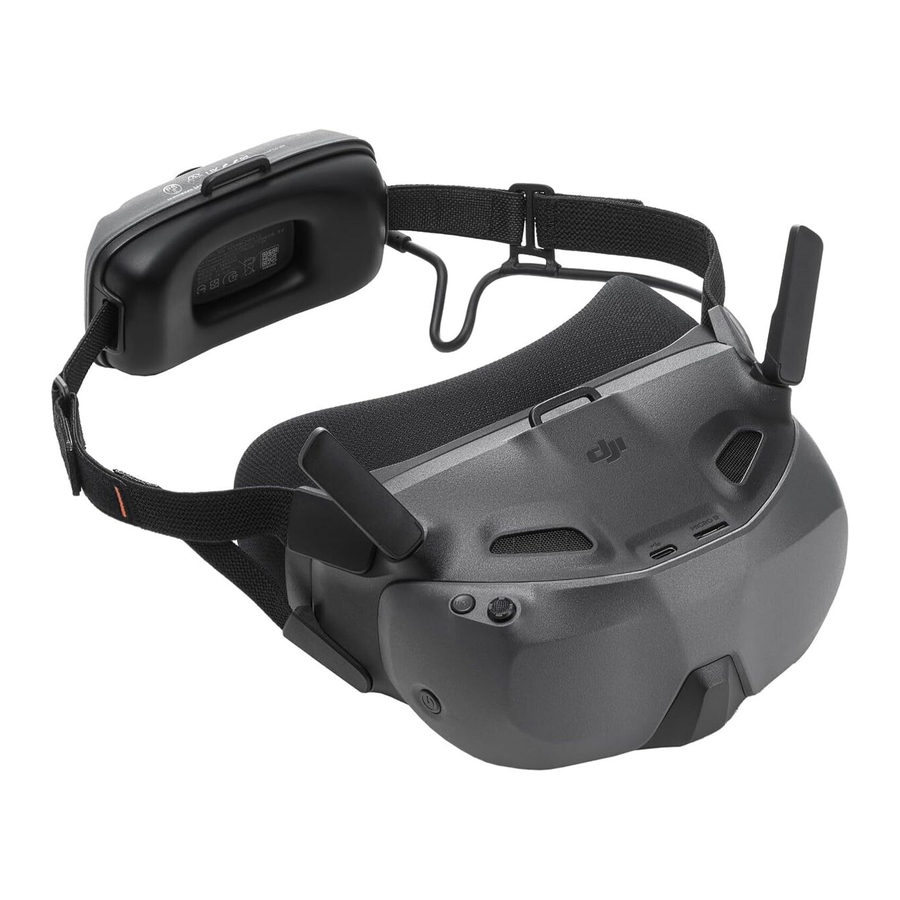
Overview

- Power Button
- Back Button
- 5D Button
- USB-C Port
- microSD Card Slot
- Antennas
- Headband
- Battery Compartment
- Headband Adjustment Knob
- Foam Padding
- Lens
- Power Cable
- When the goggles are connected to a smartphone or a PC, if the devices do not respond after connecting, go to the goggles menu and select Settings > About, and enter the OTG Wired Connection mode. If the devices still do not respond after connecting, use a different data cable and try again.
Preparing the Goggles
Powering on the Goggles

Press the power button once to check the current battery level.
Press once, then press and hold for two seconds to power the goggles on or off.
| Blinking Pattern | Battery Level |
 - Solid Green - Solid Green | 40-100% |
 - Solid Yellow - Solid Yellow | 11-39% |
 - Solid Red - Solid Red | 1-10% |
If the battery level is low, it is recommended to use a USB charger to charge the device.

The table below shows the battery level during charging:
| Blinking Pattern | Battery Level |
| - Pulses Yellow | 1-39% |
| - Pulses Green | 40-99% |
| - Solid Green | 100% |
Wearing the Goggles
- Fold the antennas to avoid damage when the goggles are not in use.
- DO NOT tear or scratch the foam padding, and the soft side of the battery compartment, or other components with sharp objects.
- The power cable is non-detachable. DO NOT pull the power cable with force to avoid damage.
- Unfold the antennas.
![]()
- Put on the goggles after the devices are powered on.

- Rotate the headband adjustment knob on the battery compartment to adjust the length of the headband.


Activation
The goggles must be activated and updated before using for the first time.
Connect the USB-C port of the goggles to the smartphone. Run DJI Fly app and follow the on-screen instructions to activate the device and update the firmware. Make sure the smartphone is connected to the internet during activation.

Linking
Preparation before linking:
- Power on the aircraft, the goggles, and the remote control device before linking. Make sure the devices are within 0.5 m of each other during linking. Make sure the devices are updated to the latest firmware version and have enough battery level.
- Open the goggles menu, selectStatus and make sure that the aircraft model displayed at the top of the menu is correct. Otherwise, select Switch from the upper right corner of the menu and then select the correct aircraft.
Linking via DJI Fly App (recommended)
Keep the goggles connected to the smartphone after activation. Tap Connection Guide on DJI Fly from the smartphone and follow the on-screen instructions for linking.

Linking via Button
- Linking the aircraft and the goggles:
![]()
- Press and hold the power button on the aircraft until it beeps once and the battery level LEDs start to blink in sequence.
- Press and hold the power button on the goggles until the goggles start to beep continuously and the power button starts to blink yellow.
- Once linking is completed, the battery level LEDs of the aircraft turn solid and display the battery level, the goggles stop beeping, and image transmission can be displayed normally.
- Linking the goggles and remote control device:

- Press and hold the power button on the goggles until the goggles start to beep continuously and the power button starts to blink yellow.
- Press and hold the power button on the remote control device until it starts to beep continuously and the battery level LEDs start to blink in sequence.
- Once linking is completed, the goggles and remote control device stop beeping and display the battery level.


- The aircraft can be controlled with only one remote control device during flight. If the aircraft has been linked with multiple remote control devices, turn off the other remote control devices before linking.
Using the Goggles
- Using the goggles does not satisfy the requirement of visual line of sight (VLOS). Some countries or regions require a visual observer to assist during flight. Make sure to comply with local regulations when using the goggles. Fly the aircraft in environments with good lighting and visibility.
- The actual screen interface may differ from the descriptions in this manual, and vary depending on the aircraft used and the firmware version of the goggles.
FPV View

When controlling the aircraft with the motion controller, the circle indicates the direction in which the aircraft is heading.
Goggles Buttons

- Back Button
Press to return to the previous menu or exit the current view. - 5D Button
Press or push to open different menus from the FPV view of the goggles. After the menu is opened, push to navigate through the menu or adjust the parameter value. Press to confirm the selection.
During video playback, press the button to control it.
Opening the Menu
Shortcut Menu
Push the 5D button backward from the FPV view to open the shortcut menu.

Camera Settings
Push the 5D button forward from the FPV view to open the camera settings panel.
In the parameter panel, push to the right to view and set more parameters.

Goggles Menu
Press down the 5D button or push it to the right from the FPV view to open the menu.

- Enter Settings > Safety, Camera View Before Loss helps to find the location of the aircraft by using the captured video of the aircraft within a period before the signal is lost. If the aircraft still has signal and battery power, turn on ESC beeping to locate the aircraft using a beeping sound that is emitted from the aircraft.
- Enter Settings > Control to view the goggles tutorial.
Controlling Video Playback
When playing videos stored on the microSD card of the goggles, the 5D button can be used to control playback such as:
- Press the button to pause or continue to play.
- Push the button left or right to adjust the progress bar.
- Push the button backward to enter playback settings and adjust the screen brightness or volume.
AR Cursor
- AR Cursor is only supported when used with DJI RC Motion 3 (hereinafter referred to as motion controller).
- AR Cursor cannot function properly when being used on moving objects, such as cars and ships.
Before takeoff or when using the lock button to trigger the aircraft to hover, users can use the AR Cursor (the white line with a circle at the end) to interact with the screen of the googles.

Recenter the Cursor
If the cursor is not displayed on the screen of the goggles, hold the motion controller as shown below, and then press and hold the dial on the left side of the motion controller to recenter the cursor.

If the cursor still cannot be found, tilt the motion controller up or down until the cursor appears on the screen.
Operating the Menu
- Using motion controller movements, move the cursor to the arrow on the left side of the screen. Gently press the accelerator to the first stop position, then the cursor will become small and the menu will be opened.

Use the joystick on the motion controller to scroll up or down in the menu.
![]()
To exit or return to the previous menu, push the accelerator forward, or gently press the accelerator when the cursor is on any empty spot on the screen. - Move the cursor to the arrow on the top of the screen, press the accelerator to enter the shortcut menu, and configure settings such as recording.

- Move the cursor to the arrow on the bottom of the screen, press the accelerator to enter camera settings, and configure settings for the parameters of the aircraft camera.
![]()
Use the joystick on the motion controller to scroll left or right in the menu.
![]()


Controlling Video Playback
When playing videos stored on the microSD card of the goggles, the cursor can be used to control playback such as:
- Press the accelerator to pause or continue to play, push the accelerator forward to exit.
- Move the cursor left or right while pressing the accelerator down to adjust the progress bar.
- Move the cursor to the arrow on the top of the screen, press down the accelerator to enter playback settings and adjust the screen brightness or volume.
Goggles Footage Storage and Export

Footage Storage
The goggles support the installation of a microSD card. After a microSD card is inserted, if Record With is set to both the aircraft and the goggles, while the aircraft is recording video, the goggles will simultaneously record the liveview displayed on the screen and store it on the microSD card of the goggles.
Footage Export
The recorded footage can be exported via the following methods.
- Power on the goggles. Connect the USB-C port of the goggles to a PC, and follow the on-screen prompts to export the footage.
- Remove the microSD card from the goggles and insert it into a card reader, and export the footage in the microSD card through the card reader.
The screen recording includes the OSD elements by default. To record the screen without the OSD elements, change the settings as shown below:
- Open the goggles menu.
- Select Settings > Camera > Advanced Camera Settings, and disable Camera View Recording.
Formatting the SD Card
To format the microSD card, follow the steps as shown below:
- Open the goggles menu.
- SelectSettings > Camera > Format.
- Select the storage device to format and follow the on-screen instructions to complete the operation.
- Data cannot be recovered after formatting. Operate with caution.
Liveview Sharing
DJI Goggles N3 can share a flight liveview via the following methods.
- Power on the aircraft, goggles, and remote control device. Make sure all the devices are linked.
- Operate Liveview Sharing prior to taking off, or when the aircraft is braking or hovering, to avoid interfering with the pilot's operation.
- The goggles only support connecting to one smartphone for sharing the liveview at a time. Other smartphones cannot be connected during this period.
- When connected to a smartphone, liveview sharing will be paused when viewing the images or videos in the album. Exit the album to recover sharing.
- When using the broadcasting mode, the audience and the pilot goggles must select the same aircraft model.
Wired Connection with Smartphone
- Connect the USB-C port of the goggles to the smartphone.
- Launch DJI Fly app and tap GO FLY in the lower right corner of the screen to enter the liveview.
Broadcasting to Other Goggles
- Enter the DJI Goggles N3 menu, select Transmission and enter the Pilot sub-menu.
- Turn on Broadcasting mode, and the device number will be displayed.
- On the other goggles, enter the goggles menu, select Transmission and enter the Audience sub-menu.
- If any nearby goggles turns on the Broadcasting mode, the device and its signal strength can be viewed in theAudience sub-menu. Select the device number to access the liveview. Switching to Pilot sub-menu to exit the shared liveview.
Panorama Video Playback
- Import videos to a microSD card, and insert it into the goggles.
- Enter the goggles menu and thenAlbum, then select the video file to play.
- Push the 5D button backward to open the playback menu, and select
![]() for display switch settings.
for display switch settings. - Exit the shortcut menu after confirming the selections, then the video will be played based on the display settings.
- Refer to DJI official website for more information about the supported video formats.https://www.dji.com/goggles-n3/specs
- The goggles have no speaker but can be connected to headphones via the USBC port. Only supports Type-C headphones with built-in DAC (digital-to-analog converter).
Head Tracking
Head tracking is only supported by certain aircraft and can be enabled by selecting ![]() in the shortcut menu of the goggles.
in the shortcut menu of the goggles.
After enabling head tracking, the horizontal orientation of the aircraft and the gimbal tilt can be controlled using head movements during flight. The remote control device will only control the flight path of the aircraft, the gimbal cannot be controlled.
Maintenance
Replacing the Foam Padding
- Hold the position as shown below and remove the foam padding gently.

- Align the positioning columns of the new foam padding with the positioning holes on the goggles. Install it and press along the contour. After hearing a clicking sound, check and make sure that there is no gap between the foam padding and the goggles.
![]()


Cleaning and Maintenance
Clean the surface of the goggles with a soft, dry, clean cloth. Use the lens cleaning cloth to clean the lenses in a circular motion from the center to the outer edges.
- DO NOT clean the integrated goggle lenses with alcohol wipes.
- Clean the lenses gently. DO NOT scratch them as this will affect viewing quality.
- DO NOT use alcohol or other cleanser to wipe the foam padding and the soft side of the battery compartment.
- DO NOT tear or scratch the foam padding, and the soft side of the battery compartment, or other components with sharp objects.
- Store the goggles in a dry place at room temperature to avoid damage to the lenses and other optical components from high temperatures and humid environments.
- Keep the lenses away from direct sunlight to avoid screen damage.
Specifications
Visit the following website for specifications. https://www.dji.com/goggles-n3/specs
Updating Firmware
Use one of the following methods to update the firmware:
Using DJI Fly App
When used with DJI Neo or DJI Avata 2, the aircraft, goggles, and remote control device can be updated together.
Power on the aircraft, goggles, and remote control device. Make sure all the devices are linked. Connect the USB-C port of the goggles to the smartphone. Run DJI Fly, and follow the prompt to update. An internet connection is required.
Using DJI Assistant 2 (Consumer Drones Series)
- Power on the device. Connect the device to a computer with a USB-C cable.
- Launch DJI Assistant 2 and log in with your DJI account.
- Select the device and clickFirmware Update on the left side of the screen.
- Select the firmware version.
- Wait for the firmware to download. The firmware update will start automatically. Wait for the firmware update to complete.
- Make sure to follow all the steps to update the firmware, otherwise the update may fail.
- The firmware update will take several minutes. It is normal for the screen to turn off or the goggles to restart automatically during the update. Wait patiently for the firmware update to complete.
- Make sure the computer is connected to the internet during the update.
- Make sure the device has sufficient power before updating the firmware.
- DO NOT unplug the USB-C cable during the update.
- Note that the update may reset the parameters. Before updating, take note of your preferred settings and reconfigure them after the update.
Visit the following link and refer to the Release Notes for firmware update information: https://www.dji.com/goggles-n3/downloads
Compatibility
Visit the following website to get the information on compatible products. https://www.dji.com/goggles-n3/faq
Risk and Warnings
When the aircraft detects any risk after powering on, there will be a warning prompt on the goggles screen. Pay attention to the prompt during flight and take necessary actions accordingly to avoid product damage or risk of injury.
If the Signal Lost Action of the aircraft is set to RTH, when the control signal or transmission is lost during flight, the aircraft will automatically initiate Failsafe RTH and fly back to the last recorded Home Point.
In emergency situations during flight, such as if a collision occurs, a motor stalls, the aircraft rolls in the air, or the aircraft is out of control and is ascending or descending quickly, the motors can be stopped by pressing the motion controller lock button four times.
- Stopping motors mid-flight will cause the aircraft to crash. Operate with caution.
If the goggles screen goes off unexpectedly during flight, press the motion controller lock button once to brake the aircraft first, and then initiate RTH manually. After the aircraft is back, check the goggles power level and try to restart the goggles. If the problem persists, contact DJI support.
Troubleshooting
Power-on and start-up problems
Check if the battery has power. Contact DJI support if it cannot be started normally.
Power-off and shutdown problems
Contact DJI support.
The device is not functioning after powering on
Contact DJI Support.
SW update issues
Follow the instructions in the user manual to update the firmware. If the firmware update fails, restart all the devices and try again. If the problem persists, contact DJI support.
Procedures to reset to factory default or last known working configuration
Open the goggles menu and select Settings > About > Reset All.
How to restore use after long-term storage?
Fully charge the device first and then it can be used normally.
Direct Remote ID
Method of uploading the UAS Operator Registration Number to the aircraft:
- Connect the goggles to the mobile device.
- Launch DJI Fly on the mobile device.
- Enter DJI Fly, selectSafety > UAS Remote Identification, and then upload UAS Operator Registration Number.
Aftersales Information
Visit https://www.dji.com/support to learn more about aftersales service policies, repair services, and support.

DJI SUPPORT
Documents / Resources
References
![www.dji.com]() DJI Goggles N3 - Tutorials - DJI
DJI Goggles N3 - Tutorials - DJI![www.dji.com]() DJI Fly - Download Center - DJI
DJI Fly - Download Center - DJI![www.dji.com]() DJI Assistant 2 (Consumer Drones Series) - Download Center - DJI
DJI Assistant 2 (Consumer Drones Series) - Download Center - DJI![www.dji.com]() DJI Goggles N3 - Specs - DJI
DJI Goggles N3 - Specs - DJI![www.dji.com]() DJI Goggles N3 - Downloads - DJI
DJI Goggles N3 - Downloads - DJI![www.dji.com]() DJI Goggles N3 - FAQ - DJI
DJI Goggles N3 - FAQ - DJI![www.dji.com]() Support - DJI
Support - DJI
Download manual
Here you can download full pdf version of manual, it may contain additional safety instructions, warranty information, FCC rules, etc.
Advertisement


Need help?
Do you have a question about the GOGGLES N3 and is the answer not in the manual?
Questions and answers