Nespresso VERTUO NEXT - Coffee Maker Manual
- Manual (643 pages) ,
- User manual (56 pages) ,
- Manual (29 pages)
Advertisement
OVERVIEW
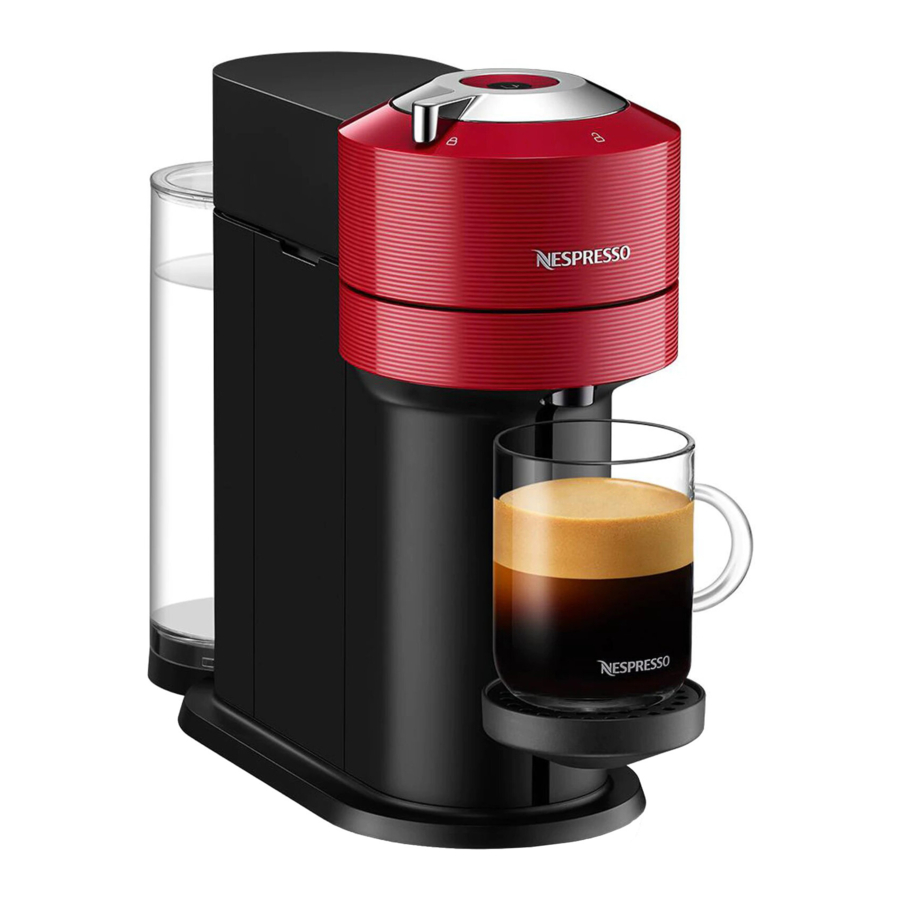
MACHINE OVERVIEW

- ON/OFF and Coffee Button
- Locking/Unlocking Lever
- Drip Grid
- Adjustable Cup Support
- Drip Tray
- Container for used Capsules
- Water Tank and Lid
- Coffee Outlet
PACKAGING CONTENT

- Coffee Machine
- Nespresso Capsules Box
- Nespresso Welcome Material
- Safety Instructions
- Quick Start Guide
- Warranty
 Unboxing: When unpacking the machine, remove the plastic film. Some dust may be present due to recycled materials being used within the packaging. This is not dangerous, simply clean with a soft tissue.
OPEN/CLOSE


For correct machine use, please do not open the machine head while the coffee is brewing, wait until the machine has stopped and the coffee button is steady and white. If you want to stop the brewing earlier, please press the Coffee Button once and wait until the coffee button goes back to steady white.
THE VERTUO SYSTEM
CAPSULE COMPATIBILITY

ON/OFF
ON
Once the machine is plugged in, turn it on by pressing the Coffee Button once or by closing the lever into the lock position (whilst the head is closed).

The light will blink for approximatively 30 seconds while the machine is heating up. Once the light is steady, the machine is ready to be used.
OFF
To save energy, the machine will turn off automatically after 2 minutes of non-use.

The machine can be turned "OFF" manually at any time (when not in use) by pressing and holding the Coffee Button for 3 seconds.
CONNECTIVITY
WHY SHOULD YOU PAIR YOUR VERTUO NEXT MACHINE?

BENEFITS OF CONNECTING YOUR VERTUO NEXT MACHINE
- Smart coffee: Always stay one step ahead and get the latest coffee innovations from Nespresso by keeping your machine up to date
- Expert advice: Get support and simple tutorial videos to accompany your coffee journey via your smartphone
- Machine care: Receive instant notification on how and when to service your machine with an easy-step guide on descaling, rinsing, cleaning, etc.
HOW TO CONNECT YOUR VERTUO NEXT MACHINE?
- Download or update the Nespresso App. Launch the Nespresso App on your smartphone or your tablet. Press the machine icon at the top right of your screen.
![]()


NOTE: for optimal performance and a seamless experience, we recommend connecting your machine to a Wi-Fi router rather than using a smartphone hotspot.
- Plug in the power cord and switch on.
![]()
- Follow the instructions via the Nespresso App.
![]()
![]()
First read the safety precautions to avoid risks of fatal electrical shock and fire. Please ensure ground continuity when plugging the machine into the power outlet.


DISABLING MACHINE BLUETOOTH AND WI-FI
The machine comes with a connectivity module, enabled by default. It gives access to additional features, enhancing your coffee experience. To disable the connectivity module, follow these steps:
- With the machine closed and the lever in unlocked position, unplug the machine for at least 10 seconds.

- Press and hold the button whilst plugging in the machine. The button will blink orange to confirm that the connectivity module has now been disabled.

![information]() Follow the same steps to set the connectivity module back on again. The button will blink white to confirm that the module has been reactivated.
Follow the same steps to set the connectivity module back on again. The button will blink white to confirm that the module has been reactivated.


FIRST STEPS
FIRST RINSING
- Rinse and clean the water tank and lid before filling it with fresh drinking water.

- Put the lid on the water tank and put the water tank in place. Make sure it is properly attached.
![]()
- Plug the power cord in, remove the cup support and place an empty container (of at least 1 L / 34 fl oz) under the coffee outlet.

- Open and close the machine. Ensure the lever is in lock position.

![information]() The light will blink while the machine is heating up. It will take approximately 30 seconds. When the light becomes steady the machine is ready. Make sure that no capsule is inserted.
The light will blink while the machine is heating up. It will take approximately 30 seconds. When the light becomes steady the machine is ready. Make sure that no capsule is inserted. - Press the button 3 times within 2 seconds to start rinsing. Let the rinsing procedure complete automatically. When the light becomes steady white, the cycle is complete.

![information]() It should take less than 2 minutes before the rinsing process begins and water starts to flow. This procedure may take up to 7 minutes.
It should take less than 2 minutes before the rinsing process begins and water starts to flow. This procedure may take up to 7 minutes.


COFFEE PREPARATION
- Open and close the machine.
![]()
![information]() The coffee button light will blink while the machine is heating up. When the light becomes steady, the machine is ready to use.
The coffee button light will blink while the machine is heating up. When the light becomes steady, the machine is ready to use. - Fill the water tank with fresh drinking water and put it back in position.
![]()
- Unlock and open the machine head completely and insert a Vertuo capsule with the dome shape facing down.

- Close the machine head and lock by turning the lever left into the lock position and place a cup on the cup support. The cup support can be adjusted to accomodate your cup size.

- Start brewing by pressing the button once.
![]()
![]()
For correct machine use, please do not open the machine head while the coffee is brewing, wait until the machine has stopped and the coffee button is steady and white. If you want to stop the brewing earlier, please press the Coffee Button once and wait until the coffee button goes back to steady white.
![information]() Due to the barcode reading, coffee pre-wetting and infusion time, it will take a moment before the coffee begins to flow. The machine will automatically recognize the inserted capsule and select the coffee preparation parameters and cup length defined by Nespresso coffee experts to extract the coffee blends at it's best.
Due to the barcode reading, coffee pre-wetting and infusion time, it will take a moment before the coffee begins to flow. The machine will automatically recognize the inserted capsule and select the coffee preparation parameters and cup length defined by Nespresso coffee experts to extract the coffee blends at it's best. - When the coffee stops brewing, open the machine head by turning the lever right towards the unlock position to automatically eject the capsule and enjoy your coffee.

- Don't forget to recycle your Nespresso capsules.*
![]()
* THIS IS NESPRESSO. THIS IS RECYCLABLE. For more information about recycling your Nespresso capsules, visit www.nespresso.com


DISCOVER OUR COFFEE CREATIONS MODE
With this machine, Nespresso offers you a specific function to concentrate your coffee extractions to create your own recipes.
With your machine turned on and a capsule inserted and the head closed and locked, double click the coffee button. It will blink turquoise and your coffee brew will be concentrated, optimizing the coffee taste in recipes with add-ons (milk, cream, over ice...). For Incomparable Coffee Experience.

To fully enjoy the benefits, we recommend brewing our Coffee+ range using only the official cup sizes. For the best in-cup results, we do not recommend brewing our XL (Alto Ambrato, Alto Onice), Cold Brew Style & Carafe Pour Over Style with this mode.

NOTE: An update of your machine via the Nespresso App may be necessary to enable this mode.
Discover how to upgrade your machine with our Aeroccino range on www.nespresso.com
ADAPT YOUR COFFEE VOLUMES
- Open the machine and insert the capsule you want to program.

- Close the machine head, turn the lever left towards the lock position and place a cup on the cup support.

- Press and hold the button, letting go a few seconds before the desired volume is reached. The new water volume is now programmed for the capsule type used during the setting.

![information]() The programming is specific to each capsule type. Cup sizes may be programmed from 20 ml / 0.7 fl oz to 535 ml / 18 fl oz.
The programming is specific to each capsule type. Cup sizes may be programmed from 20 ml / 0.7 fl oz to 535 ml / 18 fl oz.


For correct machine use, please do not open the machine head while the coffee is brewing, wait until the machine has stopped and the coffee button is steady and white. If you want to stop the brewing earlier, please press the Coffee Button once and wait until the coffee button goes back to steady white.
NOTE: Once a customer-specific volume is programmed by the user, every time that capsule type is inserted in the machine, the preparation will stop at the user-programmed cup size. If you wish to come back to the default parameters see the paragraph "Reset to factory settings".
CLEANING
Clean your machine on a monthly basis, when you start having coffee residue inside the machine head or after a long period of non-use.
- Rinse and clean the water tank and the lid before filling it with fresh drinking water.

- Put the water tank back in position on the machine.
![]()
- Unlock and open the machine and eject your used capsule*. Empty and rinse the capsule container and the drip tray and put them back in place.

* THIS IS NESPRESSO. THIS IS RECYCLABLE. For more information about recycling your Nespresso capsules, visit www.nespresso.com - Remove the cup support and place an empty container (of at least 1 L / 34 fl oz) under the coffee outlet.
![]()
- Close the machine head and turn the lever left towards lock position. Make sure no capsules are present in the machine before starting the cleaning procedure.

- Press the button 3 times within 2 seconds to start rinsing. Let the cleaning procedure complete automatically.

![information]() It should take less than 2 minutes before the cleaning process begins and water starts to flow. This operation may take up to 7 minutes and willstop automatically when the cycle is complete. The procedure can be stopped at any time by pressing the button.
It should take less than 2 minutes before the cleaning process begins and water starts to flow. This operation may take up to 7 minutes and willstop automatically when the cycle is complete. The procedure can be stopped at any time by pressing the button. - Wash the capsule container, the cup support and the drip tray with hot water and mild odourless detergent.
![]()
![]()
Do not use any strong or abrasive cleaning agent or solvent cleaner. Do not put the machine in a dishwasher. Never immerse the appliance or part of it in water. - Dry the machine with a clean and fresh towel.
![]()
![]()
Clean the coffee outlet regularly with a clean damp cloth. Always use soft cloths to clean the machine.
NOTE: Water may accumulate inside the machine's head during cleaning. If this happens, please dry visible parts with a clean dry cloth.


DESCALING
Descaling your machine will ensure that it functions properly throughout its lifetime and will make your coffee experience as incomparable as it was the first day. Your machine will indicate when descaling is needed by blinking orange 3 times before steady white.
The descaling procedure takes ~20 minutes and cannot be interrupted.
NOTE: Please carefully read the descaling instructions before starting.
You will need:
- A descaling kit available on www.nespresso.com
- An empty container (of 1 L / 34 fl oz)
- With the button blinking orange 3 times: Unlock and open the machine head to eject any used capsule*. Empty the capsule container and drip tray and put them back into position on the machine.

* THIS IS NESPRESSO. THIS IS RECYCLABLE. For more information about recycling your Nespresso capsules, visit www.nespresso.com - Fill the water tank with 0.5 L / 17 fl oz of water and add 1 unit of Nespresso descaling liquid.

![]()
Please note that the descaling solution can be harmful. Avoid contact with eyes, skin and surfaces. - Remove the cup support and place an empty container (of at least 1 L / fl 34 oz) under the coffee outlet.
![]()
- With the machine on, close the machine head and leave the lever in the unlock position.

- Hold the button for at least 7 seconds or until you see the light turn off. The button will start blinking orange rapidly.
![]()
![]()
You now have 45 seconds to enter the descaling mode, otherwise the machine will return to the brewing mode. - Lock the machine head by turning the lever left until the lock symbol and then unlock the lever by turning right to the unlock position. Press and hold the button again for approximately 7 seconds or until the light turns off. The button will start blinking orange rapidly.

- To enter the descaling mode, lock the machine by turning the lever left towards the lock position. The light should still be blinking orange quickly. This is an indication that you have entered descaling mode.

- Press the coffee button once to begin the descaling process. The light will continously blink orange throughout the process.
![]()
![information]() The machine will stop automatically when the first phase of descaling is completed.
The machine will stop automatically when the first phase of descaling is completed. - At the end of the descaling process, it is time to rinse the machine. Rinse the water tank and drip tray thoroughly. Fill the water tank with fresh drinking water and put it back in place. Empty the container and place it back under the coffee outlet.

- Press the button to rinse the machine. When the button stops blinking rapidly and becomes steady, the descaling procedure is completed.
![]()
![information]() The machine will stop automatically when the procedure is completed.
The machine will stop automatically when the procedure is completed. - Wash the capsule container, the cup support and the drip tray with hot water and mild odourless detergent.
![]()
![]()
Do not use any strong or abrasive cleaning agent or solvent cleaner. Do not put the machine in a dishwasher. Never immerse the appliance or part of it in water. - Dry the machine with a clean and fresh towel. Let the machine dry for 10 minutes before using it.
![]()
NOTE: Water may accumulate inside the machine's head during cleaning. If this happens, please dry visible parts with a clean dry cloth.
NOTE: the machine can only enter descaling mode after 30 or more coffees have been brewed.


EMPTYING THE SYSTEM
Emptying the system is a process that could be done before a period of non-use, for frost protection or prior to sending the machine for a repair.
- Empty the water tank, open the machine head, and let the used capsule be ejected. Empty the capsule container and the drip tray. Don't forget to recycle your Nespresso capsules.*

- Place them back in position on the machine, remove the cup support and place an empty container (0.5 L / 17 fl oz) under the coffee outlet.
![]()
- With the machine plugged in, open and close the machine head and turn the lever towards the lock position.

- Unplug the machine.
![]()
- Press and hold the button while plugging in the machine.

- Release the button. It will blink orange and the emptying process will start.
![information]() It will take approximatively 30 seconds for the machine to complete the emptying process. The machine turns off automatically when it is empty.
It will take approximatively 30 seconds for the machine to complete the emptying process. The machine turns off automatically when it is empty.


RESET TO FACTORY SETTINGS
- With the machine plugged in, open and then close the machine head before leaving the lever in the unlock position.

- Press the button 5 times within 3 seconds. The machine is now programmed with the factory settings.
![]()


TROUBLESHOOTING
| No light on the button. |
|
| No coffee, no water. |
|
| Coffee is not hot enough. |
|
| Leakage or unusual coffee flow. |
|
| Machine turns to "OFF mode". |
|
| Coffee grounds in the cup. |
|
| The machine doesn't start and has light steady on. If blinking, see next points. |
|
| The machine doesn't start and light blinks alternately; 1 blink and 1 pause. |
|
| Light blinks while machine is running. |
|
| Light blinks and machine is not running. |
|
| Light blinks alternately 2 blinks and 1 pause continuously. Machine is not running. |
|
| Light alternately blinking 3 times and then steady on. |
|
SPECIFICATIONS
| Power | ~220–240 V, 50–60 Hz, 1300–1500 W US, CA: 120 V, 60 Hz, 1500 W MX: 127 V~, 60 Hz, 1380 W |
| Frequency | 2.402–2.480 GHz |
| RF output power (EIRP) | Bluetooth 4 dBm Max. e.i.r.p. and Wi-Fi <20 dMm max. e.i.r.p. |
| Standby | 0.39 W/h |
| Power saving mode | Auto-off after 2 min |
| Heat-up time | 30 seconds (head closed and locked) |
| Movable cup support for large recipes | Adjustable |
| Cable length from device dispatch | 75 cm / 30 in |
| Dimensions (W x D x H) | 142 x 429 x 314 mm / 5.5 x 16.9 x 12.4 in |
| Weight | 4 kg / 8.8 lbs |
| Water tank capacity | 1.1 L / 37 fl oz |
| Capsule container capacity | 10 espresso or 6 mug capsules |
Documents / Resources
References
Download manual
Here you can download full pdf version of manual, it may contain additional safety instructions, warranty information, FCC rules, etc.
Advertisement


Need help?
Do you have a question about the VERTUO NEXT and is the answer not in the manual?
Questions and answers