Dell PowerEdge 860 Hardware Owner's Manual
Dell poweredge 860 servers: owners manual
Hide thumbs
Also See for PowerEdge 860:
- Hardware installation manual (142 pages) ,
- Getting started with (127 pages) ,
- Getting started (57 pages)

Related Manuals for Dell PowerEdge 860


Summary of Contents for Dell PowerEdge 860
- Page 1 Dell™ PowerEdge™ 860 Systems Hardware Owner’s Manual w w w . d e l l . c o m | s u p p o r t . d e l l . c o m...
- Page 2 Trademarks used in this text: Dell, the DELL logo, Inspiron, Dell Precision, Dimension, OptiPlex, Latitude, PowerEdge, PowerVault, PowerApp, PowerConnect, and XPS are trademarks of Dell Inc.; Intel, Pentium, and Celeron are registered trademarks of Intel Corporation; Microsoft, MS-DOS, Windows, and Windows Server are registered trademarks of Microsoft Corporation; Red Hat is a registered trademark of Red Hat, Inc.;...
-
Page 3: Table Of Contents
Contents About Your System ......Other Information You May Need ......Accessing System Features During Startup . - Page 4 Disabling a Forgotten Password ......Baseboard Management Controller Configuration ....Entering the BMC Setup Module .
- Page 5 Power Supply ........Removing the Power Supply .
- Page 6 ....Using Dell PowerEdge Diagnostics ..... . .
- Page 7 ......Dell Enterprise Training and Certification ....
- Page 8 Contents...
-
Page 9: About Your System
About Your System This section describes the physical, firmware, and software interface features that provide and ensure the essential functioning of your system. The physical connectors on your system’s front and back panels provide convenient connectivity and system expansion capability. The system firmware, applications, and operating systems monitor the system and component status and alert you when a problem arises. -
Page 10: Accessing System Features During Startup
PXE boot. For more information, see the documentation for your integrated NIC. <Ctrl+D> If you have the optional Dell Remote Access Controller (DRAC), this keystroke allows access to selected DRAC configuration settings. See the DRAC User’s Guide for more information on setup and use of DRAC. -
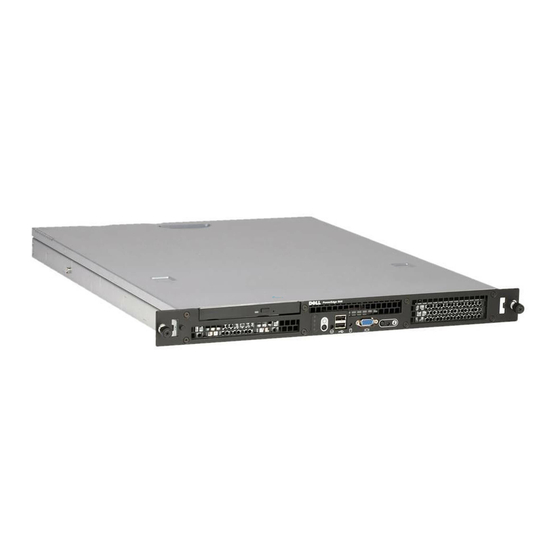
Page 11: Front-Panel Features And Indicators
Front-Panel Features and Indicators Figure 1-1 shows the controls, indicators, connectors, and features on the system front panel behind the optional bezel. (To remove the bezel, press the latch at the left end of the bezel. See "Opening the System" on page 46.) Table 1-2 provides component descriptions. Figure 1-1. - Page 12 Table 1-2. Front-Panel Components Item Component Icon Description Power-on indicator, power The power button turns system power off and on. button NOTICE: If you turn off the system using the power button and the system is running an ACPI-compliant operating system, the system can perform an orderly shutdown before power is turned off.
- Page 13 Table 1-2. Front-Panel Components (continued) Item Component Icon Description System status indicator The blue system status indicator lights up during normal system operation. The amber system status indicator flashes when the system needs attention due to a system problem. System identification button You can use the system identification buttons on the front and back panels to locate a particular system within a rack.
-
Page 14: Back-Panel Features And Indicators
Back-Panel Features and Indicators Figure 1-2 shows the controls, indicators, and connectors located on the system's back panel. Figure 1-2. Back-Panel Features and Indicators power supply connector keyboard connector mouse connector USB connectors (2) Kensington lock serial connector video connector NIC1 connector NIC2 connector 10 expansion slots (2) -
Page 15: Nic Indicator Codes
• Always attach an external device while your system and the device are turned off. Next, turn on any external devices before turning on the system (unless the documentation for the device specifies otherwise). See "Using the System Setup Program" on page 29 for information about enabling, disabling, and configuring I/O ports and connectors. - Page 16 Table 1-4. System Messages Message Causes Corrective Actions The OS Install Mode option in the After the operating system is installed, Amount of available memory System Setup program is set to On. enter the System Setup program and set limited to 256MB This limits the amount of available the OS Install Mode option to Off.
- Page 17 Table 1-4. System Messages (continued) Message Causes Corrective Actions The installed memory modules are See "Memory Module Installation Error: Incorrect memory not matched pairs. Guidelines" on page 68. configuration. Ensure memory in slots DIMM1_A and DIMM1_B, DIMM2_A and DIMM2_B match identically in size, speed and rank.
- Page 18 Table 1-4. System Messages (continued) Message Causes Corrective Actions Faulty or improperly installed memory Ensure that all memory modules are Memory address line modules, or faulty system board. properly installed. See "Troubleshooting failure at address , read System Memory" on page 88. If the value expecting value problem persists, see "Getting Help"...
- Page 19 Table 1-4. System Messages (continued) Message Causes Corrective Actions The operating system is trying to boot Insert a diskette that has a bootable Not a boot diskette from a diskette that does not have a operating system. bootable operating system installed on it.
- Page 20 Table 1-4. System Messages (continued) Message Causes Corrective Actions Faulty drive. INT13 call failure from Ensure that the hard drive cables are Primary drive 0/1 failure the drive. properly connected. See "Troubleshooting a Hard Drive" on page 90. The operating system cannot read Replace the diskette.
- Page 21 Table 1-4. System Messages (continued) Message Causes Corrective Actions Faulty memory module. See "Troubleshooting System Memory" The amount of system on page 88. If the problem persists, see memory has changed. "Getting Help" on page 103. Information only, if you have changed the memory configuration.
-
Page 22: Diagnostics Indicator Codes
Table 1-4. System Messages (continued) Message Causes Corrective Actions Faulty diskette, diskette drive, hard Replace the diskette. Ensure that the Write fault drive. diskette drive and hard-drive cables are Write fault on selected properly connected. See drive "Troubleshooting a USB Device" on page 83, "Troubleshooting a Hard Drive"... - Page 23 Table 1-5. Diagnostic Indicator Codes (continued) Code Causes Corrective Action Diskette drive or hard Ensure that the diskette drive and hard-drive drive failure. are properly connected. See "Installing a Hard Drive" on page 56 for information on the drives A B C D installed in your system.
-
Page 24: System Beep Codes
Table 1-5. Diagnostic Indicator Codes (continued) Code Causes Corrective Action The system is in a normal Information only. operating condition after POST. A B C D = y e l l o w = g r e e n = o f f System Beep Codes If an error that cannot be reported on the screen occurs during POST, the system may emit a series of beeps that identifies the problem. - Page 25 Table 1-6. System Beep Codes (continued) Code Cause Corrective Action 1-2-2 DMA initialization failure See "Troubleshooting System Memory" on page 88. 1-2-3 DMA page register write/read failure 1-3-1 Main-memory refresh verification failure 1-3-2 No memory installed 1-3-3 Chip or data line failure in the first 64 KB of main memory 1-3-4 Odd/even logic failure in the first...
-
Page 26: Warning Messages
Table 1-6. System Beep Codes (continued) Code Cause Corrective Action 4-2-1 No timer tick Faulty system board. See "Getting Help" on page 103. 4-2-2 Shutdown test failure 4-2-3 Gate A20 failure 4-2-4 Unexpected interrupt in protected See "Troubleshooting Expansion Cards" on mode page 91. -
Page 27: Alert Messages
Alert Messages Systems management software generates alert messages for your system. Alert messages include information, status, warning, and failure messages for drive, temperature, fan, and power conditions. For more information, see the systems management software documentation. About Your System... - Page 28 About Your System...
-
Page 29: Using The System Setup Program
Using the System Setup Program After you set up your system, run the System Setup program to familiarize yourself with your system configuration and optional settings. Record the information for future reference. You can use the System Setup program to: •... -
Page 30: System Setup Options
Table 2-1. System Setup Program Navigation Keys Keys Action Up arrow or <Shift><Tab> Moves to the previous field. Down arrow or <Tab> Moves to the next field. – Spacebar, <+>, < >, left and Cycles through the settings in a field. In many fields, right arrows you can also type the appropriate value. - Page 31 Figure 2-1. Main System Setup Program Screen Table 2-2 lists the options and descriptions for the information fields that appear on the main System Setup program screen. NOTE: The System Setup program defaults are listed under their respective options, where applicable. Table 2-2.
- Page 32 Table 2-2. System Setup Program Options (continued) Option Description Video Memory Displays the amount of video memory. This option does not have user- selectable settings. System Memory Testing Determines if memory is being tested during POST. (Enabled default) OS Install Mode Determines the maximum amount of memory available to the operating (Off default) system.
-
Page 33: Cpu Information Screen
Table 2-2. System Setup Program Options (continued) Option Description Report Keyboard Errors Enables or disables reporting of keyboard errors during the POST. Enable (Report default) this option for host systems that have keyboards attached. Select Do Not Report to suppress all error messages relating to the keyboard or keyboard controller during POST. -
Page 34: Integrated Devices Screen
Table 2-3. CPU Information Screen (continued) Option Description ® 64-Bit Technology Specifies if the installed processor supports Intel 64-bit extensions. Integrated Devices Screen Table 2-4 lists the options and descriptions for the information fields that appear on the Integrated Devices screen. -
Page 35: Console Redirection Screen
Table 2-4. Integrated Devices Screen Options (continued) Option Description Serial Port Serial Port options are COM1, COM3, BMC Serial, BMC NIC, (COM1 default) COM1/BMC, and Off. If an optional remote access controller (RAC) is installed in the system, RAC is an additional option. Serial Port shares three usage models. -
Page 36: System Security Screen
System Security Screen Table 2-6 lists the options and descriptions for the information fields that appear on the System Security screen. Table 2-6. System Security Screen Options Option Description System Password Displays the current status of your system's password security feature and allows you to assign and verify a new system password. -
Page 37: Exit Screen
Table 2-6. System Security Screen Options (continued) Option Description NMI Button This field enables/disables the NMI button on the front panel. NOTICE: Use the NMI button only if directed to do so by qualified support personnel or by the operating system's documentation. - Page 38 Assigning a System Password Before you assign a system password, enter the System Setup program and check the System Password option. When a system password is assigned, the setting shown for the System Password option is Enabled. If the setting shown for the Password Status is Unlocked, you can change the system password. If the Password Status option is Locked, you cannot change the system password.
-
Page 39: Using The Setup Password
To disable the password security: 1 Turn on or reboot your system by pressing <Ctrl><Alt><Del>. 2 Type your password and press <Ctrl><Enter>. When the Password Status option is set to Locked whenever you turn on your system or reboot your system by pressing <Ctrl><Alt><Del>, type your password and press <Enter>... -
Page 40: Disabling A Forgotten Password
As you press each character key (or the spacebar for a blank space), a placeholder appears in the field. The password assignment is not case-sensitive. However, certain key combinations are not valid. If you enter one of these combinations, the system beeps. To erase a character when entering your password, press <Backspace>... -
Page 41: Entering The Bmc Setup Module
• Control of system functions including power on and off • Support is independent of the system’s power or operating state • Provides text console redirection for system setup, text-based utilities, and operating system consoles NOTE: To remotely access the BMC through the integrated NIC, you must connect the network connection to integrated NIC1. - Page 42 Using the System Setup Program...
-
Page 43: Installing System Components
Installing System Components This section describes how to install the following system components: • Cooling shroud • System battery • Optical drive • Hard drives • Fan assembly • Optional PCI fan • Power supply • Expansion cards • Riser card •... -
Page 44: Opening And Closing The System
Figure 3-1. Inside the System optical drive (optional) PCI fan riser card PCI expansion card (optional) processor and heat sink memory modules (4) power supply processor fan module hard drive 1 10 hard drive 0 The system board holds the system's control circuitry and other electronic components. The processor and memory are installed directly on the system board. -
Page 45: Removing The Bezel
Removing the Bezel 1 Unlock the bezel. See Figure 3-2. 2 Unlatch the left end of the bezel and rotate it away from the front panel. 3 Unhook the right end of the bezel and pull the bezel away from the system. Figure 3-2. -
Page 46: Opening The System
Opening the System CAUTION: Only trained service technicians are authorized to remove the system cover and access any of the components inside the system. Before performing any procedure, see your Product Information Guide for complete information about safety precautions, working inside the computer and protecting against electrostatic discharge. -
Page 47: Closing The System
Closing the System 1 Ensure that you did not leave tools or parts inside the system. 2 Place the cover over the sides of the chassis, and slide the cover forward. 3 Tighten the thumbscrew at the back of the system to secure the cover. See Figure 3-3. 4 Replace the system in the rack, and reconnect the peripheral cables. -
Page 48: Installing The Cooling Shroud
Figure 3-4. Installing and Removing the Cooling Shroud release latch cooling shroud Installing the Cooling Shroud 1 Insert the tab on the side of the cooling shroud and the release latch into the fan assembly. See Figure 3-4. 2 Push the cooling shroud down until the release latch snaps into place, securing the shroud to the fan assembly. -
Page 49: System Battery
System Battery Replacing the System Battery CAUTION: Only trained service technicians are authorized to remove the system cover and access any of the components inside the system. Before performing any procedure, see your Product Information Guide for complete information about safety precautions, working inside the computer and protecting against electrostatic discharge. -
Page 50: Optical Drive
8 Reinstall the riser card. See "Installing the Riser Card" on page 67. 9 Install the cooling shroud. See "Installing the Cooling Shroud" on page 48. 10 Close the system. See "Closing the System" on page 47. 11 Enter the System Setup program to confirm that the battery operates properly. 12 From the main screen, select System Time to enter the correct time and date. -
Page 51: Installing The Optical Drive
Figure 3-6. Removing and Installing the Optional Optical Drive interposer board captive fasteners (2) interface cable retaining pins (4) mounting holes (4) bracket release lever hard drive 0 Installing the Optical Drive CAUTION: Only trained service technicians are authorized to remove the system cover and access any of the components inside the system. -
Page 52: Configuring The Boot Drive
Configuring the Boot Drive The drive or device from which the system boots is determined by the boot order specified in the System Setup program. See "Using the System Setup Program" on page 29. To boot the system from a hard drive or drive array, the drive(s) must be connected to the appropriate controller: •... - Page 53 Figure 3-7. Removing the HDD0 Hard-Drive Carrier HDD0 hard-drive carrier interface cable power cable plunger notches (4) tabs (4) Installing System Components...
- Page 54 Figure 3-8. Removing the HDD1 Hard-Drive Carrier HDD1 hard-drive carrier plunger interface cable power cable notches (4) tabs (4) 6 Using a #2 Phillips screwdriver, remove the four screws that secure the hard drive to the carrier and remove the drive from the carrier. See Figure 3-10. Installing System Components...
- Page 55 Figure 3-9. Removing the Hard Drive From the HDD0 Drive Carrier HDD0 hard-drive carrier screws (4) mounting holes (4) hard drive Installing System Components...
-
Page 56: Installing A Hard Drive
Figure 3-10. Removing the Hard Drive From the HDD1 Drive Carrier HDD1 hard-drive carrier screws (4) mounting holes (4) hard drive Installing a Hard Drive CAUTION: Only trained service technicians are authorized to remove the system cover and access any of the components inside the system. -
Page 57: Installing A Sas Controller Card
• If a SAS controller card is present, attach the HDD0 cable from the SAS controller to hard drive 0 and attach the HDD1 cable to hard drive 1. See the controller card documentation for further information. 7 Install the CD drive. Install the CD drive if you are removing hard drive 0. -
Page 58: Installing The Fan Assembly
Figure 3-11. Installing and Removing the Fan Assembly release levers (2) power cable securing posts (2) hard drive 1 data cable cable tray Installing the Fan Assembly 1 Align the holes in the fan assembly with the two fan assembly securing posts. See Figure 3-11. 2 Lower the fan assembly until the release levers snap onto the securing posts. -
Page 59: Optional Pci Fan Assembly
Optional PCI Fan Assembly The optional PCI fan module provides cooling for the expansion cards. NOTICE: Your system requires the PCI fan assembly if your system has a SAS controller that can be connected to an external storage system. Removing the fan assembly or disabling the fan could result in your system overheating and shutting down unexpectedly. -
Page 60: Installing The Pci Fan Assembly
Figure 3-12. Installing and Removing the PCI Fan Assembly PCI fan assembly screws (2) panel cutout chassis intrusion switch Installing the PCI Fan Assembly 1 Align the fan assembly with the screw holes on the chassis and use a #2 Phillips screwdriver to install the two mounting screws. -
Page 61: Power Supply
6 Connect the control panel interface cable to the FP_CONN1 connector on the system board. See Figure 6-2 for the location of the connector. 7 Connect the optical drive interface cable to the IDE connector on the system board. See Figure 6-2 for the location of the connector. -
Page 62: Installing The Power Supply
Figure 3-13. Installing and Removing the Power Supply screw P1 connector P2 connector power supply pins (4) securing brackets (4) P3 connector Installing the Power Supply 1 Lower the power supply into the chassis and slide it backward until the four pins on the power supply are engaged into the securing brackets. -
Page 63: Expansion Cards
3 Connect the following power supply cables: P3 to the hard drive cable harness P2 to the system board connector 12V P1 to the system board connector PWR_CONN 4 Close the system. See "Closing the System" on page 47. Expansion Cards The system is available with an optional PCIe riser card or PCI-X/PCIe riser card. - Page 64 Figure 3-14. Installing and Removing Expansion Cards expansion-card retainer slot 1 slot 2 expansion-card connector (on expansion card riser card) Installing System Components...
-
Page 65: Removing An Expansion Card
Figure 3-15. Opening and Closing the Expansion-Card Sliding Retainer expansion-card sliding release tab expansion card retainer Removing an Expansion Card CAUTION: Only trained service technicians are authorized to remove the system cover and access any of the components inside the system. Before performing any procedure, see your Product Information Guide for complete information about safety precautions, working inside the computer and protecting against electrostatic discharge. -
Page 66: Riser Card
6 If you are permanently removing the card, replace the metal filler bracket over the empty card-slot opening. NOTE: Filler brackets must be installed over empty expansion-card slots to maintain FCC certification of the system. The brackets also keep dust and dirt out of the system and aid in proper cooling and airflow inside the system. -
Page 67: Installing The Riser Card
Figure 3-16. Installing and Removing the Riser Card screws (2) riser card Installing the Riser Card CAUTION: Only trained service technicians are authorized to remove the system cover and access any of the components inside the system. Before performing any procedure, see your Product Information Guide for complete information about safety precautions, working inside the computer and protecting against electrostatic discharge. -
Page 68: Memory Module Installation Guidelines
You can upgrade the system memory by installing combinations of 512-MB, 1-GB, and 2-GB unbuffered memory modules. If you receive an error message stating that maximum memory has been exceeded, see "System Messages" on page 15 for more information. You can purchase memory upgrade kits from Dell. NOTE: The memory modules must be PC-3200 compliant. -
Page 69: Installing Memory Modules
Installing Memory Modules CAUTION: Only trained service technicians are authorized to remove the system cover and access any of the components inside the system. Before performing any procedure, see your Product Information Guide for complete information about safety precautions, working inside the computer and protecting against electrostatic discharge. -
Page 70: Removing Memory Modules
Figure 3-17. Installing and Removing a Memory Module memory module memory module socket socket ejectors (2) alignment keys (2) Removing Memory Modules CAUTION: Only trained service technicians are authorized to remove the system cover and access any of the components inside the system. Before performing any procedure, see your Product Information Guide for complete information about safety precautions, working inside the computer and protecting against electrostatic discharge. -
Page 71: Replacing The Processor
Replacing the Processor CAUTION: Only trained service technicians are authorized to remove the system cover and access any of the components inside the system. Before performing any procedure, see your Product Information Guide for complete information about safety precautions, working inside the computer and protecting against electrostatic discharge. - Page 72 5 If the heat sink has not separated from the processor, carefully rotate the heat sink in a clockwise, then counterclockwise, direction until it releases from the processor. Do not pry the heat sink off of the processor. 6 Lift the heat sink off of the processor and set the heat sink aside. 7 Press down on the processor socket release lever, then pull the release lever upward to the fully open position.
-
Page 73: Control Panel Assembly (Service-Only Procedure)
13 Set the processor lightly in the socket and ensure that the processor is level in the socket. When the processor is positioned correctly, press it gently to seat it in the socket. 14 Close the processor cover. 15 Rotate the release lever back down until it snaps into place, securing the processor cover. 16 Install the heat sink. -
Page 74: Installing The Control Panel Assembly
Figure 3-20. Installing and Removing the Control Panel Assembly control panel assembly screws (2) cables mounting holes (2) Installing the Control Panel Assembly CAUTION: Only trained service technicians are authorized to remove the system cover and access any of the components inside the system. -
Page 75: System Board (Service-Only Procedure)
System Board (Service-Only Procedure) The system board and system board tray are removed and replaced as a single assembly. Removing the System Board Assembly CAUTION: Only trained service technicians are authorized to remove the system cover and access any of the components inside the system. -
Page 76: Installing The System Board Assembly
Figure 3-21. Installing and Removing the System Board plunger system board system board tray Installing the System Board Assembly CAUTION: Only trained service technicians are authorized to remove the system cover and access any of the components inside the system. Before performing any procedure, see your Product Information Guide for complete information about safety precautions, working inside the computer and protecting against electrostatic discharge. - Page 77 5 Connect the two power cables to the 12V and PWR_CONN connectors on the system board. See Figure 6-2. 6 Connect the chassis intrusion cable to the INTRUSION_SWITCH connector on the system board. 7 Install the riser card. See "Installing the Riser Card" on page 67. 8 Using a #2 Phillips screwdriver, tighten the two screws that secure the riser card to the system board.
- Page 78 Installing System Components...
-
Page 79: Troubleshooting Your System
Troubleshooting Your System Safety First—For You and Your System To perform certain procedures in this document, you must remove the system cover and work inside the system. While working inside the system, do not attempt to service the system except as explained in this guide and elsewhere in your system documentation. -
Page 80: Checking The Equipment
Checking the Equipment This section provides troubleshooting procedures for external devices attached to the system, such as the monitor, keyboard, or mouse. Before you perform any of the procedures, see "Troubleshooting External Connections" on page 81. Troubleshooting IRQ Assignment Conflicts Most PCI devices can share an IRQ with another device, but they cannot use an IRQ simultaneously. -
Page 81: Troubleshooting External Connections
3 Check the system and power connections to the monitor. 4 Run the appropriate online diagnostic test. See "Using Dell PowerEdge Diagnostics" on page 93. If the tests run successfully, the problem is not related to video hardware. -
Page 82: Troubleshooting The Mouse
Mouse is not functioning properly. Action 1 Run the appropriate online diagnostic test. See "Using Dell PowerEdge Diagnostics" on page 93. If the test fails, continue to the next step. 2 Examine the mouse and its cable for signs of damage. -
Page 83: Troubleshooting A Usb Device
Action 1 Turn off the system and any peripheral devices connected to the serial port. 2 Swap the serial interface cable with a working cable, and turn on the system and the serial device. If the problem is resolved, replace the interface cable. See "Getting Help" on page 103. 3 Turn off the system and the serial device, and swap the device with a comparable device. -
Page 84: Responding To A Systems Management Software Alert Message
Action 1 Run the appropriate online diagnostic test. See "Using Dell PowerEdge Diagnostics" on page 93. 2 Check the appropriate indicator on the NIC connector. See "NIC Indicator Codes" on page 15. • If the link indicator does not light, check all cable connections. -
Page 85: Troubleshooting A Damaged System
7 If the system starts properly, shut down the system and reinstall all of the expansion cards that you removed. See "Installing an Expansion Card" on page 63. 8 Run the appropriate online diagnostic test. See "Using Dell PowerEdge Diagnostics" on page 93. If the tests fail, see "Getting Help" on page 103. -
Page 86: Troubleshooting The System Battery
1 Run the appropriate online diagnostics test. See "Using Dell PowerEdge Diagnostics" on page 93. 2 Turn off the system and attached peripherals, and disconnect the system from the electrical outlet. -
Page 87: Troubleshooting System Cooling Problems
1 Run the appropriate diagnostic test. See "Using Dell PowerEdge Diagnostics" on page 93. 2 Open the system. See "Opening the System" on page 46. 3 Ensure that the faulty fan's power cable is firmly attached to the fan power connector. See "Fan Assembly"... -
Page 88: Troubleshooting System Memory
1 If the system is operational, run the appropriate online diagnostic test. See "Using Dell PowerEdge Diagnostics" on page 93. If diagnostics indicates a fault, follow the corrective action(s) provided by the diagnostic program. If the problem is not resolved or if the system is not operational, proceed to step 2. -
Page 89: Troubleshooting An Optical Drive
2 Enter the System Setup program and ensure that the drive’s IDE controller is enabled. See "Using the System Setup Program" on page 29. 3 Run the appropriate online diagnostic test. See "Using Dell PowerEdge Diagnostics" on page 93. 4 Turn off the system and attached peripherals, and disconnect the system from the electrical outlet. -
Page 90: Troubleshooting A Hard Drive
This troubleshooting procedure can destroy data stored on the hard drive. Before you proceed, back up all files on the hard drive. 1 Run the appropriate online diagnostics test. See "Using Dell PowerEdge Diagnostics" on page 93. Depending on the results of the diagnostics test, proceed as needed through the following steps. -
Page 91: Troubleshooting Expansion Cards
1 Run the appropriate online diagnostic test. See "Using Dell PowerEdge Diagnostics" on page 93. 2 Turn off the system and attached peripherals, and disconnect the system from the electrical outlet. -
Page 92: Troubleshooting The Microprocessor
1 Run the appropriate online diagnostics test. See "Using Dell PowerEdge Diagnostics" on page 93. 2 Turn off the system and attached peripherals, and disconnect the system from the electrical outlet. -
Page 93: Running The System Diagnostics
The files required to run PowerEdge Diagnostics for systems running supported Microsoft Windows and Linux operating systems are available at support.dell.com and on the CDs that came with your system. For information about using diagnostics, see the Dell PowerEdge Diagnostics User's Guide. -
Page 94: When To Use The System Diagnostics
The system diagnostics can be run either from the utility partition on your hard drive or from removable bootable media. You can create this media using the CDs that came with your system or from the diagnostic utility that you can download from support.dell.com. NOTICE: Use the system diagnostics to test only your system. -
Page 95: System Diagnostics Testing Options
System Diagnostics Testing Options Click the testing option in the Main Menu window. Table 5-1 provides a brief explanation of testing options. Table 5-1. System Diagnostics Testing Options Testing Option Function Express Test Performs a quick check of the system. This option runs device tests that do not require user interaction. -
Page 96: Viewing Information And Results
Viewing Information and Results The tabs in the Customize window provide information about the test and the test results. The following tabs are available: • Results — Displays the test that ran and the result. • Errors — Displays any errors that occurred during the test. •... -
Page 97: Jumpers And Connectors
Jumpers and Connectors This section provides specific information about the system jumpers and describes the connectors on the various boards in the system. System Board Jumpers Figure 6-1 shows the location of the configuration jumpers on the system board. Table 6-1 lists the jumper settings. -
Page 98: System Board Connectors
Table 6-1. System Board Jumper Settings Jumper Setting Description NVRAM_CLR (default) The configuration settings in NVRAM are retained at system boot. The configuration settings in NVRAM are cleared at next system boot. PWRD_EN (default) The password feature is enabled. The password feature is disabled. System Board Connectors See Figure 6-2 and Table 6-2 for the location and description of the system board connectors. -
Page 99: Riser Card Connectors
Table 6-2. System Board Connectors Item Connector Description PROC Processor socket power supply connector PWR_CONN power supply connector DIMM 1 Memory module DIMM 3 Memory module DIMM 2 Memory module DIMM 4 Memory module Power connector for the fans BATTERY Connector for the 3.0 V coin battery SATA_0 Connector for the SATA 0 hard drive... - Page 100 Figure 6-3. PCIe Riser Card Connectors slot 1, PCIe x4-lane (x8-lane slot 2, PCIe x8-lane connector) Figure 6-4. PCI-X/PCIe Riser Card Connectors slot 1, PCI-X 64-bit 133 MHz slot 2, PCIe x8-lane system management (3.3 V) Jumpers and Connectors...
-
Page 101: Disabling A Forgotten Password
Disabling a Forgotten Password The system's software security features include a system password and a setup password, which are discussed in detail in "Using the System Setup Program" on page 29. The password jumper enables these password features or disables them and clears any password(s) currently in use. CAUTION: Only trained service technicians are authorized to remove the system cover and access any of the components inside the system. - Page 102 Jumpers and Connectors...
-
Page 103: Getting Help
When prompted by Dell's automated telephone system, enter your Express Service Code to route the call directly to the proper support personnel. If you do not have an Express Service Code, open the Dell Accessories folder, double-click the Express Service Code icon, and follow the directions. -
Page 104: Autotech Service
See the contact information for your region. Automated Order-Status Service To check on the status of any Dell™ products that you have ordered, you can go to support.dell.com, or you can call the automated order-status service. A recording prompts you for the information needed to locate and report on your order. -
Page 105: Dell Enterprise Training And Certification
If you need information about additional products available from Dell, or if you would like to place an order, visit the Dell website at www.dell.com. For the telephone number to call to speak to a sales specialist, see the contact information for your region. - Page 106 Remember to fill out the Diagnostics Checklist (see "Diagnostics Checklist" on page 107). If possible, turn on your system before you call Dell for technical assistance and call from a telephone at or near the computer. You may be asked to type some commands at the keyboard, relay detailed information during operations, or try other troubleshooting steps possible only at the computer system itself.
- Page 107 Programs and versions: See your operating system documentation to determine the contents of the system’s start-up files. If possible, print each file. Otherwise, record the contents of each file before calling Dell. Error message, beep code, or diagnostic code: Description of problem and troubleshooting procedures you performed:...
-
Page 108: Contacting Dell
If you do not see a telephone number listed that is specific for XPS computers, you may contact Dell through the support number listed and your call will be routed appropriately. When you need to contact Dell, use the electronic addresses, telephone numbers, and codes provided in the following table. - Page 109 Home/Small Business Customer Care 0820 240 530 14 Preferred Accounts/Corporate Customer Care 0820 240 530 16 Support for XPS 0820 240 530 81 Home/Small Business Support for all other Dell 0820 240 530 17 computers Preferred Accounts/Corporate Support 0820 240 530 17 Switchboard...
- Page 110 Website: support.euro.dell.com International Access Code: 00 Tech Support for XPS 02 481 92 96 Country Code: 32 Tech Support for all other Dell computers 02 481 92 88 City Code: 2 Tech Support Fax 02 481 92 95 Customer Care...
- Page 111 Website and E-Mail Address Local Numbers, and Country Code Toll-Free Numbers City Code Canada (North York, Ontario) Online Order Status: www.dell.ca/ostatus International Access Code: 011 AutoTech (automated Hardware and Warranty toll-free: 1-800-247-9362 Support) Customer Service (Home Sales/Small Business) toll-free: 1-800-847-4096 Customer Service (med./large business,...
- Page 112 Customer Care E-mail: customer_cn@dell.com Technical Support Fax 592 818 1350 Technical Support (Dimension and Inspiron) toll-free: 800 858 2969 Technical Support (OptiPlex, Latitude, and Dell toll-free: 800 858 0950 Precision) Technical Support (servers and storage) toll-free: 800 858 0960 Technical Support (projectors, PDAs, switches,...
- Page 113 22537 2711 Denmark (Copenhagen) Website: support.euro.dell.com International Access Code: 00 Technical Support for XPS 7010 0074 Country Code: 45 Technical Support for all other Dell computers 7023 0182 Customer Care (Relational) 7023 0184 Home/Small Business Customer Care 3287 5505 Switchboard (Relational)
- Page 114 International Access Code: 00 Home and Small Business Country Code: 33 Technical Support for XPS 0825 387 129 City Codes: (1) (4) Technical Support for all other Dell computers 0825 387 270 Customer Care 0825 823 833 Switchboard 0825 004 700...
- Page 115 International Access Code: 00 E-mail: tech_support_central_europe@dell.com Country Code: 49 Technical Support for XPS 069 9792 7222 City Code: 69 Technical Support for all other Dell computers 069 9792-7200 Home/Small Business Customer Care 0180-5-224400 Global Segment Customer Care 069 9792-7320 Preferred Accounts Customer Care...
- Page 116 Website: support.ap.dell.com International Access Code: 001 Technical Support E-mail: HK_support@Dell.com Country Code: 852 Technical Support (Dimension and Inspiron) 00852-2969 3188 Technical Support (OptiPlex, Latitude, and Dell 00852-2969 3191 Precision) Technical Support (servers and storage) 00852-2969 3196 Technical Support (projectors, PDAs, switches,...
- Page 117 01 204 4014 Corporate Customer Care 1850 200 982 Technical Support Technical Support for XPS computers only 1850 200 722 Technical Support for all other Dell computers 1850 543 543 General Fax/Sales Fax 01 204 0103 Switchboard 01 204 4444 U.K.
- Page 118 Technical Support outside of Japan (Dimension and 81-44-520-1435 Inspiron) Technical Support (Dell Precision, OptiPlex, and toll-free:0120-198-433 Latitude) Technical Support outside of Japan (Dell Precision, 81-44-556-3894 OptiPlex, and Latitude) Technical Support (PDAs, projectors, printers, toll-free: 0120-981-690 routers) Technical Support outside of Japan (PDAs,...
- Page 119 Area Codes, International Access Code Website and E-Mail Address Local Numbers, and Country Code Toll-Free Numbers City Code Korea (Seoul) E-mail: krsupport@dell.com International Access Code: 001 Support toll-free: 080-200-3800 Country Code: 82 Support (Dimension, PDA, Electronics and toll-free: 080-200-3801 Accessories)
- Page 120 Country Code Toll-Free Numbers City Code Malaysia (Penang) Website: support.ap.dell.com International Access Code: 00 Technical Support (Dell Precision, OptiPlex, and toll-free: 1 800 880 193 Latitude) Country Code: 60 Technical Support (Dimension, Inspiron, and toll-free: 1 800 881 306 City Code: 4...
- Page 121 Website: support.euro.dell.com International Access Code: 00 Technical Support for XPS 020 674 45 94 Country Code: 31 Technical Support for all other Dell computers 020 674 45 00 City Code: 20 Technical Support Fax 020 674 47 66 Home/Small Business Customer Care...
- Page 122 Technical Support toll-free: 1-866-390-4695 St. Kitts and Nevis Website: www.dell.com/kn E-mail: la-techsupport@dell.com Technical Support toll-free: 1-866-540-3355 St. Lucia Website: www.dell.com/lc E-mail: la-techsupport@dell.com Technical Support toll-free: 1-866-464-4352 St. Vincent and the Grenadines Website: www.dell.com/vc E-mail: la-techsupport@dell.com Technical Support toll-free: 1-866-464-4353 Getting Help...
- Page 123 Website: support.ap.dell.com Country Code: 65 toll-free: 1 800 394 7430 Technical Support (Dimension, Inspiron, and Electronics and Accessories) Technical Support (OptiPlex, Latitude, and Dell toll-free: 1 800 394 7488 Precision) Technical Support (PowerApp, PowerEdge, toll-free: 1 800 394 7478 PowerConnect, and PowerVault)
- Page 124 Website: support.euro.dell.com International Access Code: 00 Technical Support for XPS 0771 340 340 Country Code: 46 Technical Support for all other Dell products 08 590 05 199 City Code: 8 Relational Customer Care 08 590 05 642 Home/Small Business Customer Care...
- Page 125 0080 165 1228 Corporate Sales toll-free: 0080 165 1227 Thailand Website: support.ap.dell.com International Access Code: 001 Technical Support (OptiPlex, Latitude, and Dell toll-free: 1800 0060 07 Precision) Country Code: 66 Technical Support (PowerApp, PowerEdge, toll-free: 1800 0600 09 PowerConnect, and PowerVault)
- Page 126 City Code: 1344 Sales Home and Small Business Sales 0870 907 4000 Corporate/Public Sector Sales 01344 860 456 Customer Care Home and Small Business Customer Care 0870 906 0010 Corporate Customer Care 01344 373 185 Preferred Accounts (500–5000 employees)
- Page 127 Dell Outlet Store (Dell refurbished computers) toll-free: 1-888-798-7561 Software and Peripherals Sales toll-free: 1-800-671-3355 Spare Parts Sales toll-free: 1-800-357-3355 Extended Service and Warranty Sales toll-free: 1-800-247-4618 toll-free: 1-800-727-8320 Dell Services for the Deaf, Hard-of-Hearing, or toll-free: 1-877-DELLTTY Speech-Impaired (1-877-335-5889) Getting Help...
- Page 128 Department Name or Service Area, Area Codes, International Access Code Website and E-Mail Address Local Numbers, and Country Code Toll-Free Numbers City Code U.S. Virgin Islands E-mail: la-techsupport@dell.com Technical Support toll-free: 1-877-702-4360 Venezuela Website: www.dell.com/ve E-mail: la-techsupport@dell.com Technical Support toll-free: 0800-100-2513 Getting Help...
-
Page 129: Glossary
Glossary This section defines or identifies technical terms, BIOS — Basic input/output system. Your system’s BIOS abbreviations, and acronyms used in your system contains programs stored on a flash memory chip. The documents. BIOS controls the following: • Communications between the processor and peripheral devices •... - Page 130 DNS — Domain Name System. A method of translating conventional memory — The first 640 KB of RAM. Internet domain names, such as www.dell.com, into IP Conventional memory is found in all systems. Unless they addresses, such as 143.166.83.200.
- Page 131 expansion-card connector — A connector on the system headless system — A system or device that functions board or riser board for plugging in an expansion card. without having a keyboard, mouse, or monitor attached. Normally, headless systems are managed over a network F —...
- Page 132 KB — Kilobyte(s); 1024 bytes. MAC address — Media Access Control address. Your system’s unique hardware number on a network. Kbps — Kilobit(s) per second. mAh — Milliampere-hour(s). KBps — Kilobyte(s) per second. Mb — Megabit(s); 1,048,576 bits. key combination — A command requiring you to press multiple keys at the same time (for example, MB —...
- Page 133 NTFS — The NT File System option in the protected mode — An operating mode that allows Windows 2000 operating system. operating systems to implement: • A memory address space of 16 MB to 4 GB NVRAM — Nonvolatile random-access memory. Memory that does not lose its contents when you turn off your •...
- Page 134 — See bootable diskette. service tag — A bar code label on the system used to identify it when you call Dell for technical support. system memory — See RAM. simple disk volume — The volume of free space on a System Setup program —...
- Page 135 UNIX — Universal Internet Exchange. UNIX, the video resolution — Video resolution (800 x 600, for precursor to Linux, is an operating system written in the example) is expressed as the number of pixels across by C programming language. the number of pixels up and down. To display a program at a specific graphics resolution, you must install the uplink port —...
- Page 136 Glossary...
-
Page 137: Index
(PCI) troubleshooting, 85 installing, 60 Dell CD drive removing, 59 contacting, 108 installing, 51 troubleshooting, 87 Dell PowerEdge Diagnostics removing, 50 fan assembly (processor) using, 93 troubleshooting, 89 installing, 58 diagnostics checking equipment, 80 removing, 57 advanced testing options, 95... - Page 138 NICs indicators, 15 hard drives jumpers troubleshooting, 83 configuring the boot drive, 52 system board, 97 NMI button, 13 installing, 56 removing, 52 troubleshooting, 90 keyboard optical drive troubleshooting, 81 installing, 51 removing, 50 indicators back-panel, 14 front-panel, 11 memory NIC, 15 installation guidelines, 68 installing...
- Page 139 13 startup cooling shroud, 47 accessing system features, 10 expansion cards, 65 hard drives, 52 support memory modules, 70 contacting Dell, 108 troubleshooting optical drive, 50 system battery basic I/O, 82 PCI fan assembly, 59 replacing, 49 battery, 86...
- Page 140 USB device troubleshooting, 83 video troubleshooting, 81 warning messages, 26 warranty, 9 wet system troubleshooting, 84 Index...
Need help?
Do you have a question about the PowerEdge 860 and is the answer not in the manual?
Questions and answers